Molding &
Casting
Exploring the principles of mold design, material selection, and casting techniques for creating precise replicas and functional parts. Understanding the workflow from CAD design to machined molds to finished castings.
Due to a 12-day trip to India, I was unable to complete the full molding and casting assignment. Upon returning, I prioritized catching up on "Make Something Big" (Computer-Controlled Machining) to stay on track with the course schedule. This page documents the general learnings and principles I've gathered from the class materials and peer documentation, rather than a completed project.
01 · Molding & Casting Fundamentals
Molding and casting is a manufacturing process that allows for the replication of complex geometries and the production of parts in materials that may be difficult to machine directly. The process typically involves creating a negative mold (the cavity) and then filling it with a casting material to produce a positive replica of the original design.
Based on the MIT Academy class materials, molding and casting encompasses a wide range of techniques from simple single-use molds to complex multi-part tooling systems. The fundamental workflow typically follows a three-step process: create a positive master (often machined from wax), cast a flexible negative (silicone mold), and then cast the final positive (in plaster, metal, or other materials).
Types of Molds
Understanding the different types of molds is crucial for selecting the right approach for a given project:
- Injection Molds: Used for high-volume production with features like sprue, runner, gate, vent, and parting lines
- Vacuum Molds: Use vacuum pressure to assist in material flow and bubble removal
- Blow Molds: For hollow parts, using air pressure to shape the material
- Rotational Molds: Rotate the mold to distribute material evenly
- Slip Casting: For ceramics, using porous molds that absorb water
- Investment Casting: Uses a sacrificial pattern that is burned out before casting
- Flexible Molds: Silicone or rubber molds that can handle undercuts and complex geometries
Mold Materials
The choice of mold material depends on the casting material, production volume, and required surface finish:
- Wax: Low-temperature molds, machinable, good for prototyping
- Silicone: Flexible molds (Mold Star series), excellent for complex geometries and undercuts
- Rigid Foam: Lightweight, disposable molds
- Wood: Traditional material, requires careful sealing
- Metal: For high-temperature casting and production runs
- 3D Printed: Fast iteration, but may require post-processing to hide layer lines
02 · Casting Materials
Casting materials range from low-temperature waxes and plasters to high-temperature metals. Each material has specific properties, mixing ratios, and curing requirements:
Gypsum-Based Materials
- Hydro-Stone: High compressive strength, durable, requires 32 parts water to 100 parts plaster (by weight)
- Drystone: Low-shrink, self-leveling, captures fine detail. Mix ratio: 20 mL water per 100 g powder
- Plaster of Paris: Common casting material, sets quickly
Metal Alloys
- Low-Melt Alloys (RotoMetals 281): Melts at 281°F, lead-free (58% Bi, 42% Sn), reusable
- Aluminum: Requires higher temperatures and specialized equipment
- Cerrotru: Low-melting point metal for casting
Polymers & Resins
- Epoxy Resins: Clear or tintable, durable, longer cure times
- Urethane Rubbers: Flexible castings with various hardness options
- Clear Rubber Epoxy: For transparent parts
03 · Mold Design Principles
Successful mold design requires careful consideration of several factors:
Draft Angles
Draft angles are essential for part removal. Without sufficient draft, parts can become locked in the mold. Typically, 2-5 degrees of draft is recommended, though flexible silicone molds can handle undercuts.
Registration Features
For multi-part molds, registration features (pins, bosses, or keys) ensure proper alignment between mold halves. These features must be carefully sized to prevent interference while maintaining accuracy.
Venting & Gating
Proper venting allows air to escape during casting, preventing bubbles and incomplete fills. Pour gates (sprue) should be sized appropriately for the material viscosity and part volume. Larger gates help with viscous materials like Drystone.
Wall Thickness
Minimum wall thickness depends on the casting material. For example, Rotomelt 281 requires at least 0.04 inches (1mm) thickness. Thinner sections may fail during casting or demolding.
04 · Manufacturing Processes
CNC Machining Molds
Machining wax or other machinable materials produces excellent surface finishes directly from the tool. Based on detailed CAM workflows, the process involves:
- Fixturing: Secure wax stock (typically 1.5"×3"×7" blocks) using three-point hot-glue fixture
- 3D Adaptive Clearing: Roughing pass at 12,000 RPM, 120 IPM cutting, 0.4" max stepdown, fine stepdown 0.04"
- Flat Finishing: ¼" flat end mill for planar surfaces, limit to wall faces, feed optimization enabled
- Rest Machining: ⅛" flat end mill, threshold 0.008", targets areas missed by larger tool
- Parallel Finishing: Perpendicular passes with 0.01" stepover for curved surfaces
- Pencil Passes: Two stepovers for tight radii and sharp edges
Tool selection is critical: larger tools (¼" flat end mills, 2.5" OAL, 1.25" flute) for roughing and flat surfaces, smaller tools (⅛" flat end mills, 1.5" OAL, 1.25" flute) for detail work. Proper feeds, speeds, and stepover values determine surface quality. Expected runtime for a complex mold is approximately 4.5 minutes after tool changes and probing.
3D Printing Molds
While faster to produce, 3D-printed molds often require post-processing to hide layer lines. This may involve epoxy or wax skim coats, sanding, or other surface treatments. The trade-off is speed vs. surface quality—CNC machining produces superior finishes directly from the tool, while 3D printing requires additional finishing steps.
Comparing Mold-Making Processes
| Method | Strengths | Trade-offs |
|---|---|---|
| 3D-Printed Molds | Fastest to fabricate; easy to iterate geometry; can print complex draft-less shapes | Requires laborious post-processing—epoxy or wax skim coats to hide layer lines; surface quality depends on print settings |
| CNC-Machined Molds | Excellent surface finish directly off the tool; precise registration; minimal hand cleanup | Longer setup time and CAM effort; limited by cutter reach and allowable overhangs |
| Hand-Sculpted Wax | Quick for simple geometries; easy to tweak by hand | Only suitable for low-temperature casting media (wax deforms with heat); surface quality depends on sculpting skill |
05 · Casting Workflow
A typical casting workflow follows these steps, as demonstrated in detailed peer documentation:
Wax Master Preparation
- Fixturing: Secure wax stock (1.5"×3"×7" standard size) using three-point hot-glue fixture
- Surface Preparation: Apply thin beeswax coating, then reflow to create uniform release barrier
- CNC Machining: Execute adaptive clearing, flat finishing, rest machining, and pencil passes
- Post-Machining: Clean chips with compressed air and soft brush, protect surface finish
Silicone Mold Creation
- Mold Box Preparation: Create watertight containment, verify volume with water test
- Mixing: Measure Mold Star components (1A:1B by volume), mix viscous part first, scrape walls, mix until streak-free
- Pouring: Pour in steady thin stream from lowest corner, tap for ~60 seconds to release bubbles
- Curing: Allow full cure time (4-6 hours depending on material), monitor exotherm if needed
- Demolding: Use putty knife to score seam, progressive release with guarded tools to protect silicone
Final Casting
- Mold Preparation: Apply release agent (talc for metal, beeswax for gypsum), clamp mold halves securely
- Pre-wetting: For fine details, brush slurry into thin regions to prevent trapped air
- Material Mixing: For Drystone: 20 mL water per 100 g powder, mix to "organic peanut butter" consistency
- Pouring: Pour through sprue, chase vents until cavity floods, clear surface bubbles
- Curing: Monitor companion "witness button" to check set without damaging part
- Demolding: Controlled release sequence, preserve mold for reuse
- Finishing: Trim flash with flush cutters, file edges, sand surfaces, apply CA glue to seal microfractures
06 · Safety Considerations
Always review Safety Data Sheets (SDS) before working with any material. Proper ventilation, personal protective equipment (PPE), and safe handling practices are essential.
Material-Specific Safety
- Silicone (Mold Star): Part B contains amines that can cause skin sensitization. Wear nitrile gloves, provide ventilation, avoid eye/skin contact
- Gypsum Materials: Fine dust is a respiratory irritant. Use N95 masks during weighing and cleanup. Wet material generates heat—do not place hands in curing batches
- Metal Casting: Molten metal requires face shields, long sleeves, leather gloves, and closed-toe shoes. Keep water away from melt pots to prevent steam explosions
- Epoxy Resins: Can cause skin irritation. Use gloves and work in well-ventilated areas
Workspace Safety
- Ensure proper ventilation for all casting operations
- Have appropriate fire extinguishers available for hot-metal work
- Dispose of materials properly—gypsum should not go down drains
- Store materials in sealed containers in dry areas
07 · Planned Project: Nefertiti Casting
While I was unable to complete the assignment due to time constraints, I had planned to create a mold and cast of the Egyptian queen Nefertiti. This project would have involved:
- Obtaining or creating an STL file of Nefertiti's bust
- Scaling and preparing the model for mold making (ensuring it fits within the standard 1.5"×3"×7" wax block constraints)
- Designing a multi-part mold with proper registration features (pins/bosses for alignment)
- Machining the wax positive master using CNC with adaptive clearing, flat finishing, and pencil passes
- Casting silicone molds (Mold Star 15 or 30) from the wax master
- Casting the final piece in Drystone for fine detail capture or Hydro-Stone for durability
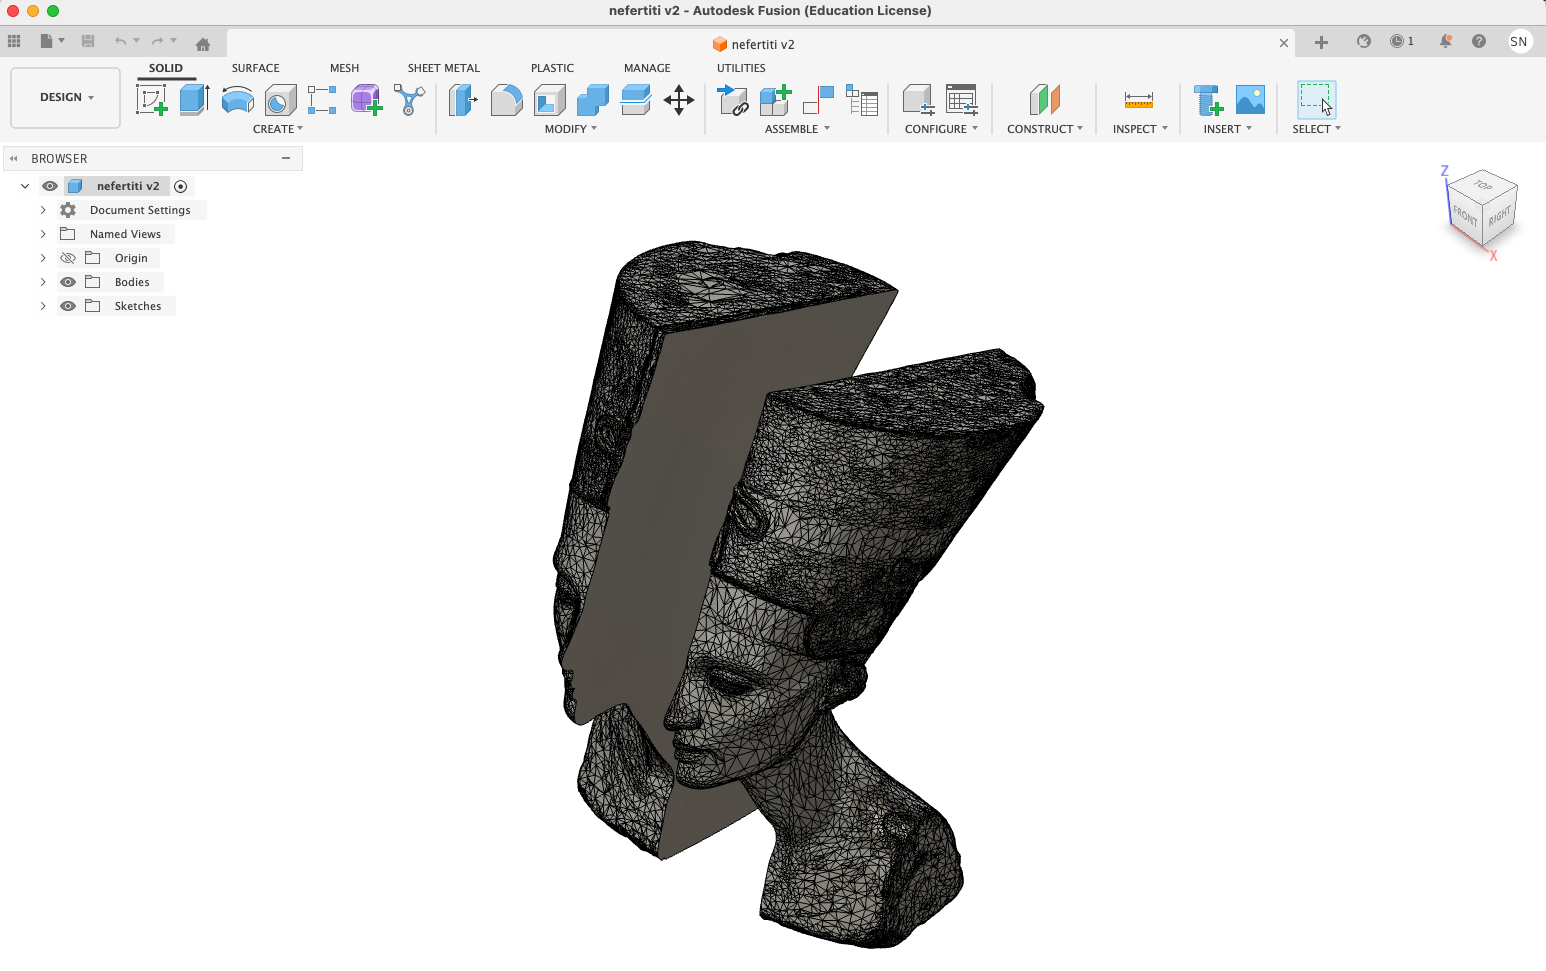
Preparation work for the planned Nefertiti casting project. The project would have demonstrated multi-part mold design, registration features, and casting techniques for complex geometries.
The Nefertiti bust presents interesting challenges: the elongated neck, detailed facial features, and the iconic headdress would require careful mold design to capture all details while ensuring successful demolding. A flexible silicone mold would be ideal for handling the undercuts and complex geometry. Based on learnings from peer documentation, the workflow would follow the proven pattern: machine wax positive → cast silicone negative → cast final positive in gypsum or metal.
Design Considerations
Key design considerations for the Nefertiti project would include:
- Parting Line: Determining the optimal split plane to minimize undercuts while preserving detail
- Registration: Designing alignment features (6-7mm bosses) to ensure mold halves align perfectly
- Venting: Strategically placed vents to allow air escape during casting, especially around fine facial features
- Wall Thickness: Ensuring minimum thickness (≥5mm) for structural integrity, particularly in the neck region
- Draft Angles: While silicone molds can handle undercuts, some draft would aid in demolding
- Surface Finish: CAM toolpath strategy to achieve smooth surfaces that hide machining artifacts
The project would have been an excellent opportunity to practice the full workflow from CAD design through CAM programming, CNC machining, silicone molding, and final casting—demonstrating mastery of the molding and casting process.
08 · Key Learnings & Takeaways
From studying the class materials and peer documentation, several key principles emerge:
Material Selection
The choice of mold and casting materials is interdependent. Consider:
- Temperature Compatibility: Mold material must withstand casting temperature (silicone rated to 450°F for metal casting)
- Material Viscosity: Flow characteristics determine gate sizing and vent placement
- Surface Finish: Required detail capture (Drystone for fine detail, Hydro-Stone for strength)
- Production Volume: Single-use vs. reusable molds (silicone molds can produce multiple casts)
- Cost and Availability: Material costs and shop inventory constraints
Process Control
Successful casting requires attention to detail at every step:
- Precise Mixing: Measure by weight for accuracy (Drystone: 20 mL water per 100 g powder)
- Bubble Management: Tap for ~60 seconds, pre-wet fine details with slurry, pour in thin stream
- Temperature Control: Monitor exotherm with IR thermometer, use heat lamps only if material allows
- Timing: Respect work life (pot life), demold time, and cure schedules
- Consistency: Target "organic peanut butter" texture for Drystone, streak-free mixing for two-part materials
Design Principles
Key design considerations that determine success:
- Registration Features: 6-7mm bosses/pins ensure mold halves align without interference
- Wall Thickness: Minimum 5mm (0.2") for structural integrity, 0.04" minimum for Rotomelt 281
- Venting Strategy: Proper vent placement prevents trapped air and incomplete fills
- Draft Angles: While silicone handles undercuts, some draft aids demolding
- Parting Line: Optimal split plane minimizes undercuts while preserving detail
Iterative Design
Mold making often requires iteration. Test casts with witness buttons or small batches help validate the process before committing to final parts. Documentation of what works (and what doesn't) is valuable for future projects. Common iterations include adjusting wall thickness, vent sizing, and registration feature dimensions based on test results.
Workflow Discipline
Following a disciplined workflow prevents common failures:
- Always proof mold boxes with water before pouring to confirm watertight seal
- Pre-mix components in their bottles before combining to homogenize fillers
- Use companion "stock buttons" to test cure without damaging final parts
- Progressive demolding with guarded tools protects both mold and casting
- Proper disposal: gypsum should never go down drains (clogs pipes)
09 · Resources & References
The following resources were instrumental in understanding molding and casting principles:
- MIT Academy: Molding & Casting Class Page — Comprehensive overview of mold types, materials, processes, and safety
- Peer Documentation: Saleem Al Dajani's Week 9 — Detailed workflow documentation including CAD/CAM, silicone molding, and casting processes
- Material Suppliers: Smooth-On, Reynolds Advanced Materials, USG, RotoMetals — provide technical bulletins and SDS documents
10 · Conclusion
While I was unable to complete a full molding and casting project this week, the study of materials, processes, and safety considerations has provided a solid foundation for future work. The principles of mold design, material selection, and process control apply broadly across manufacturing disciplines. Understanding these fundamentals will be valuable for future projects requiring replication or production of complex geometries.
The planned Nefertiti project would have been an excellent demonstration of these principles, combining historical artifact replication with modern digital fabrication techniques. I hope to return to this project in the future when time permits.