Overview
Computer-Controlled Machining is about scale. After weeks of working with desktop mills and small PCBs, this week challenges us to think big — to design and fabricate furniture-scale objects using large-format CNC routers. The assignment pushes us to understand toolpaths, material constraints, joinery, and the unique considerations that emerge when moving from millimeters to meters. It's an exercise in both precision and ambition: how do you take a digital design and turn it into something you can sit on, lean against, or walk through?
This week's assignment explores large-format CNC routing, toolpath generation, material selection, and design for subtractive manufacturing at architectural scale.
For this assignment, I decided to create something deeply personal — a set of decorative architectural panels that connect my family's heritage in woodworking with the precision of modern CNC fabrication. The project combines traditional Indian architectural aesthetics with contemporary digital manufacturing, resulting in functional art that bridges generations and technologies.
A Heritage in Wood
Those travels influenced his aesthetic sensibilities profoundly. He began designing and crafting wonderful Art Deco-style rosewood furniture that blended European modernism with Indian craftsmanship. While we kids didn't pay much attention to it at the time, the combination of good design and well-crafted wood furniture seeped into my consciousness. Decades later, I find myself returning to those roots, but with digital tools my grandfather could never have imagined.
The Mysore Room Project
I had designed a room in my mother's house in Mysore — the city where I grew up. The vision was to create a space that honored ancient Indian aesthetics while functioning as a modern living space. I wanted both the bedroom, the sitting area (sitout), and the interior to evoke traditional Indian architecture with hand-carved wooden pillars and antique doors. The design called for placing carved pillars and creating a rectangular portico structure supported by these pillars and decorated with traditional arches.
The challenge was clear: I needed to design the decorative arch panels that would sit atop these pillars, creating the traditional architectural language of Indian temple and palace architecture — but I needed to do it at scale, with precision, and within a reasonable timeframe. This is where CNC machining became not just useful, but essential.
The Architectural Context
Antique Carved Pillars
The foundation of the design began with sourcing authentic elements. I found this beautifully carved pillar in Mysore, salvaged from an old house that had been demolished. Made of teak wood — one of the most durable and prestigious hardwoods in Indian architecture — the pillar features intricate traditional carvings that have survived decades, perhaps over a century.
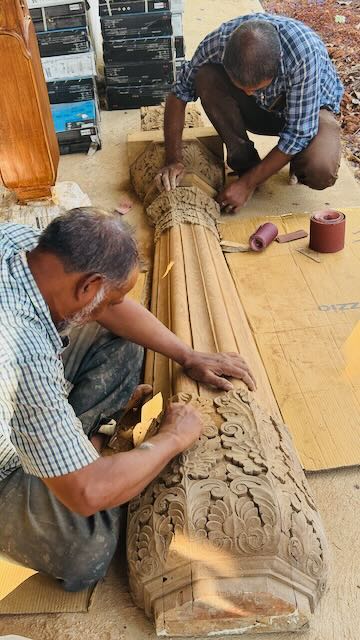
Antique carved teak pillar salvaged from a demolished house in Mysore, India — the inspiration and structural element for the room design
These pillars carry both aesthetic and cultural weight. In traditional Indian architecture, carved wooden pillars serve as structural supports while also defining sacred or important spaces. The carvings aren't merely decorative — they tell stories, represent deities, and mark boundaries between secular and spiritual spaces.
The 150-Year-Old Door
The sitting area (sitout) outside the bedroom features an intricately carved door that's approximately 150 years old. This door serves as the threshold between the outer sitting area and the inner bedroom, maintaining the traditional Indian architectural concept of layered privacy and spatial hierarchy.
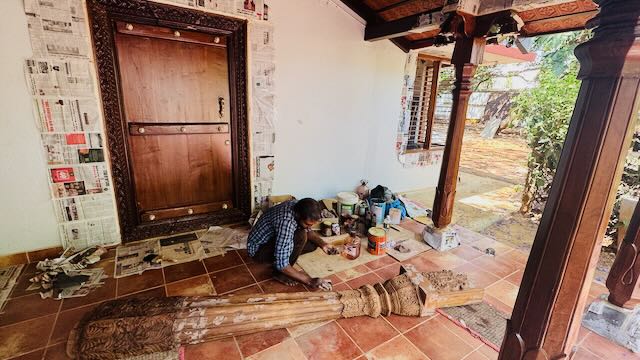
The sitout (sitting area) featuring a 150-year-old intricately carved door — establishing the traditional aesthetic context
The weathered patina, the hand-carved details, and the proportions of this door set the design language for the entire space. Any new elements I created would need to respect and complement this existing heritage while being unmistakably contemporary in their execution.
Design Challenge and Concept
The Architectural Vision
The design called for creating a pillared enclosure approximately 4 feet deep and 19 feet wide spanning across the room. The carved teak pillars would serve as the vertical structural elements, while the arch panels I needed to design would create the decorative upper portion — essentially a colonnade or portico that divides the space while maintaining visual and physical connection.
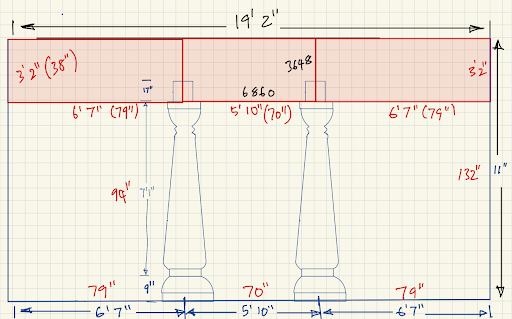
Front elevation sketch showing the placement of antique carved pillars (brown semi-circles) and the new arch panels (red rectangles) to be CNC-machined
The front elevation shows the overall composition: the existing carved pillars define the rhythm and vertical scale, while the red rectangles indicate the new decorative panels that would bridge these pillars. This is where traditional craftsmanship meets digital fabrication — I couldn't hand-carve panels at this scale with the required precision and repeatability, but CNC machining could create complex geometric patterns that would complement the organic hand-carved pillars.
Design Constraints
Several constraints shaped the design approach:
- Scale: The panels needed to span significant distances (multiple feet) while remaining structurally sound
- Material thickness: Standard sheet goods (plywood or pine) come in specific thicknesses that determine joinery options
- CNC capabilities: The router bit diameter, cutting depth, and machine bed size define what's geometrically possible
- Aesthetic harmony: The new panels needed to feel connected to the antique carved pillars without mimicking them directly
- Weight and installation: The panels would need to be lifted and mounted overhead, limiting their practical weight
Digital Design Process
Arch Pattern Development in Fusion 360
I designed the decorative arch panels using Autodesk Fusion 360, leveraging parametric modeling to create repeating patterns that could be adjusted for different panel sizes. The design draws inspiration from traditional Indian jali (latticed screen) work and torana (ornamental gateway) motifs, but interprets them through geometric patterns suited to CNC fabrication.
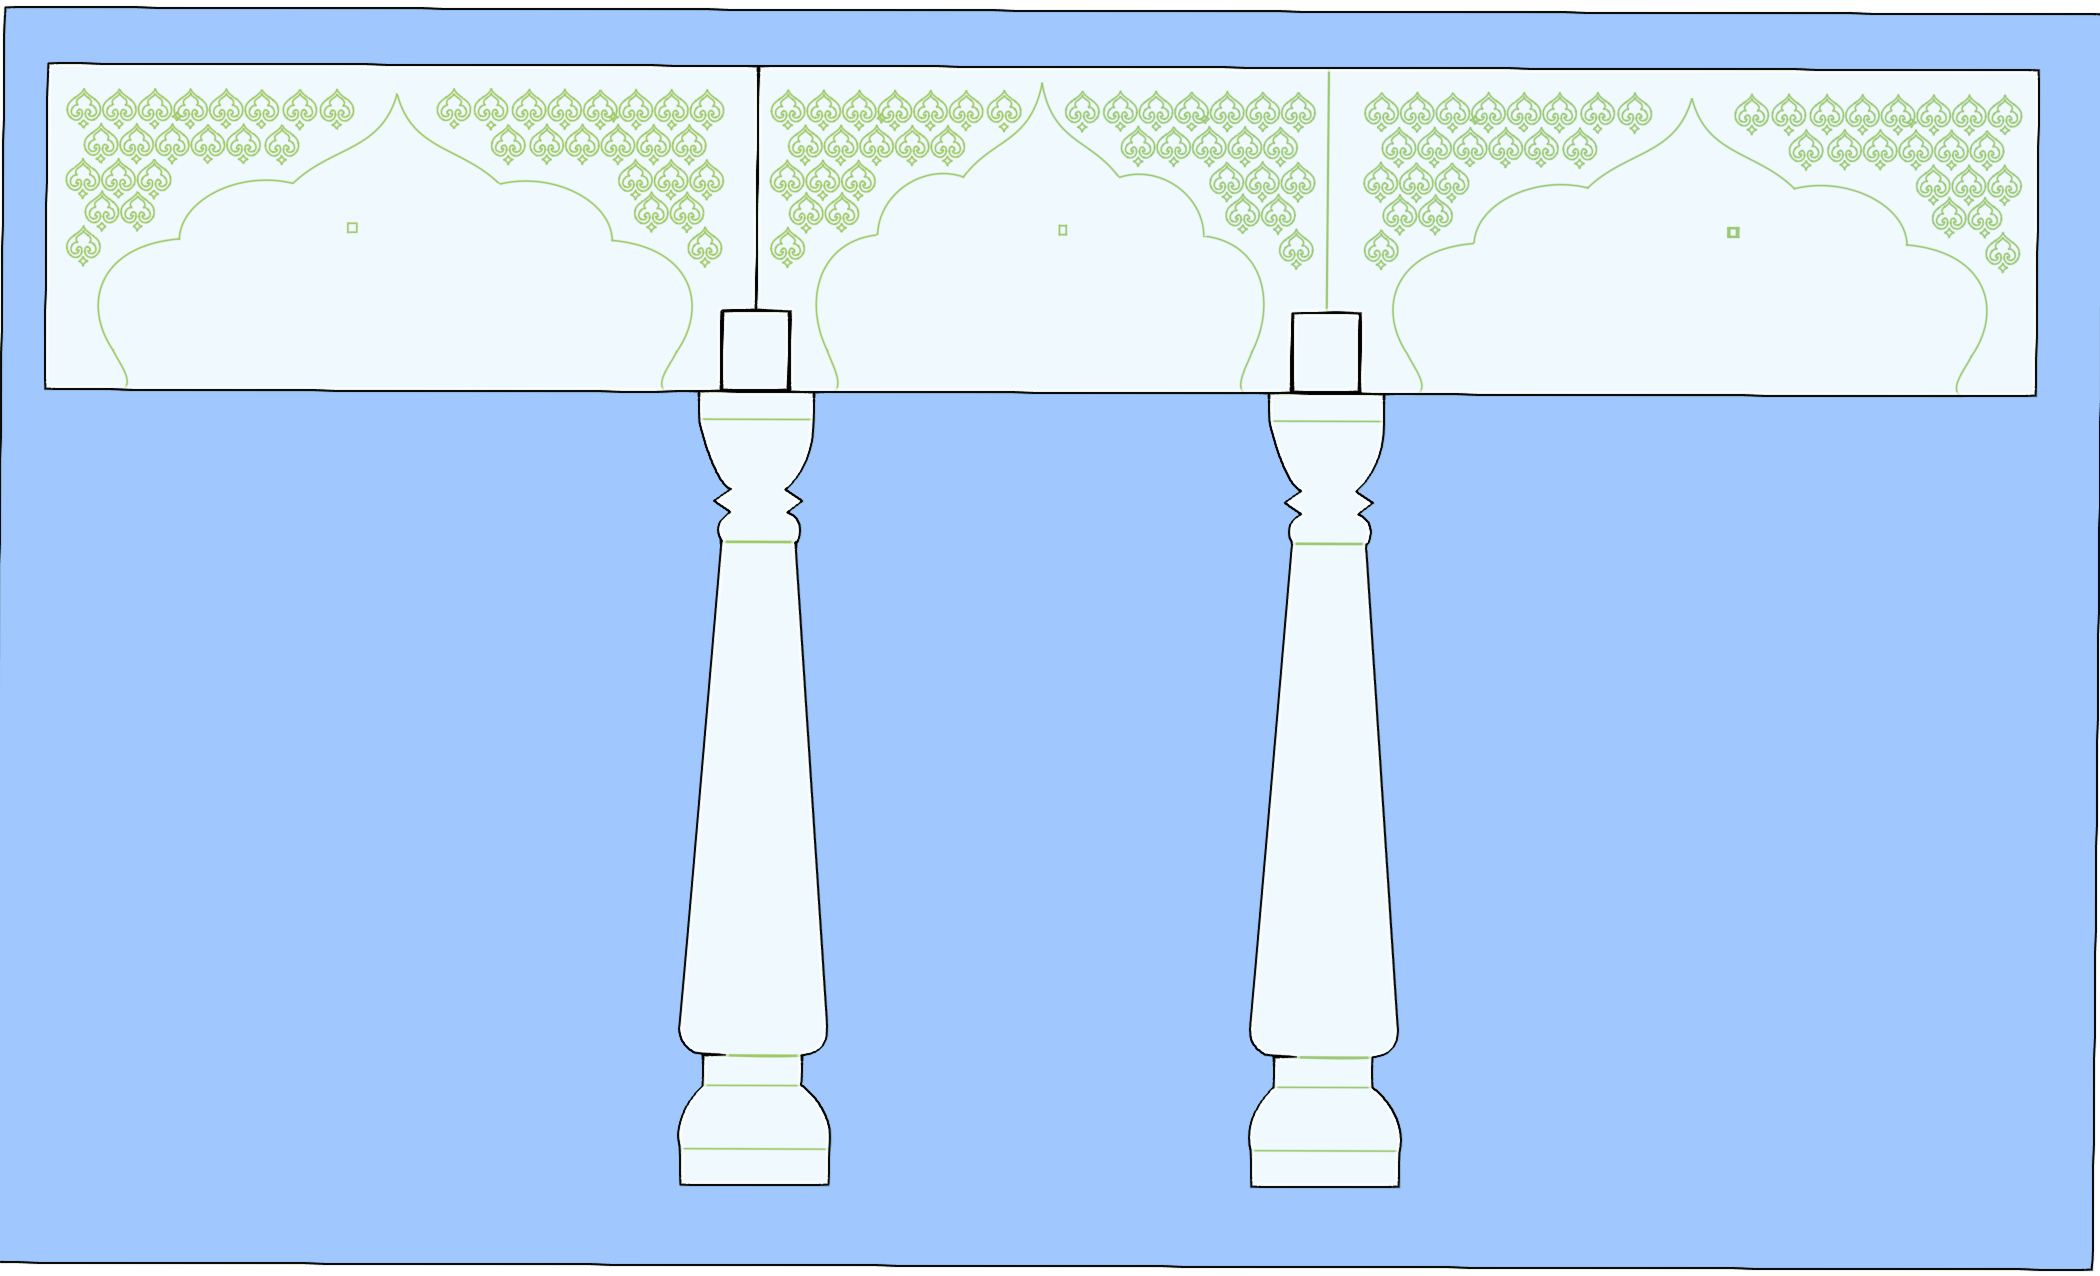
Fusion 360 design showing the repeating arch pattern with geometric elements inspired by traditional Indian architecture
The pattern features:
- Repeating arched motifs: Creating rhythm and visual continuity across the panel width
- Negative space: Strategic cutouts that reduce weight while maintaining structural integrity
- Geometric precision: Clean lines and consistent proportions that contrast with the organic hand-carved pillars
- Edge joinery: Integrated connection points designed into the panel geometry for assembly
Parametric Modeling Benefits
Using Fusion 360's parametric features allowed me to:
- Define the arch spacing as a parameter, making it easy to adjust the pattern density
- Link all geometric relationships so changes propagate consistently
- Generate multiple panel variations from a single master design
- Export clean toolpaths with proper lead-in/lead-out moves
CNC Machining Process
Material Selection
Initially, I had planned to use plywood to match the heritage of my grandfather's plywood business. However, Kris Brewer (our fantastic CNC technician) suggested using pine wood for this project. Pine offered several advantages:
- Easier to machine: Pine's softer grain cuts cleanly without excessive tool wear
- Better surface finish: Produces less tearout and fuzzing compared to plywood's laminated layers
- More forgiving: Pine's homogeneous grain structure is more forgiving of feed rate variations
- Aesthetically appropriate: The warm tone and visible grain complement the antique teak pillars
- Availability: Standard dimensional pine boards were readily available in the required sizes
The decision to use solid wood rather than sheet goods also meant the panels would have more structural integrity and could support their own weight when cantilevered between pillars.
At the Architecture Lab
The fabrication took place at MIT's Architecture Lab, which houses large-format CNC routers capable of handling full sheets of material. These machines can cut materials up to several inches thick and have working areas measured in feet rather than inches — perfect for architectural-scale components.
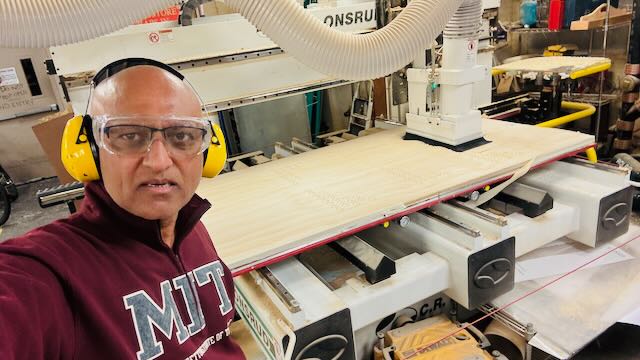
At the MIT Architecture Lab, setting up and monitoring the CNC routing process for the decorative arch panels
Toolpath Strategy
The CNC toolpath required careful planning:
- Roughing passes: Initial passes removed bulk material quickly using a larger bit and aggressive feed rates
- Finishing passes: Final passes used a smaller bit and slower feed rates for clean edges and accurate dimensions
- Climb vs. conventional milling: Choosing the right cutting direction to minimize tearout on the visible edges
- Tab placement: Small tabs held the panel in place during cutting, preventing it from shifting or becoming a projectile as the final cut completed
- Dust management: Pine produces significant sawdust — proper dust collection was essential for visibility and safety
Results and Details
The Finished Panel
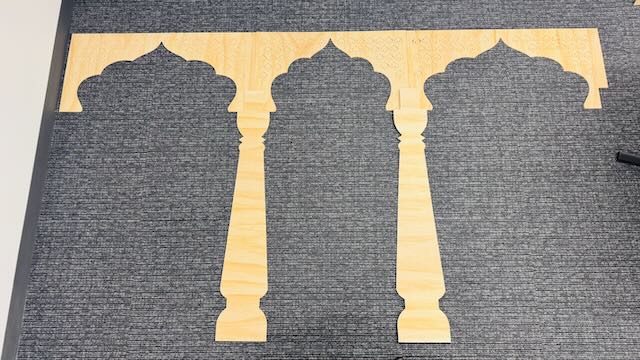
After approximately 45 minutes of cutting time, the CNC router produced a beautifully detailed decorative arch panel. The precision of the machine is evident in the clean edges, consistent spacing, and perfect repeatability of the pattern elements.
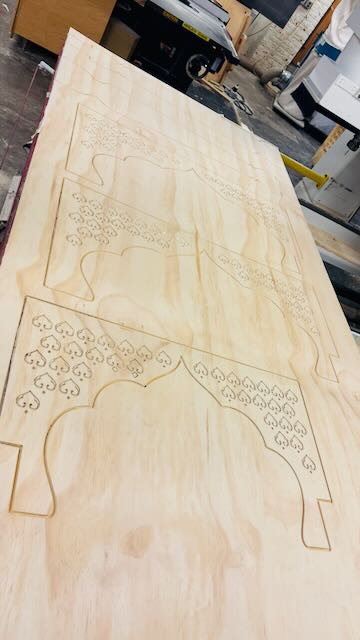
The finished CNC-cut pine panel — approximately 4 feet long with intricate arch patterns and geometric cutouts
The panel demonstrates several successful aspects of the design:
- The repeating arches create visual rhythm without monotony
- The cutout patterns provide interesting negative space and reduce weight
- The edge profiles complement the organic curves of the hand-carved pillars
- The geometric precision contrasts intentionally with the antique elements, marking this as a contemporary intervention
Close-Up: Arch Detail
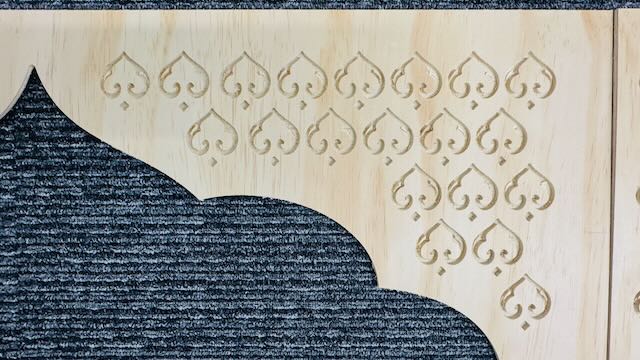
Detail view of the arch pattern — note the clean edges, consistent radii, and smooth surface finish achieved through proper toolpath programming
The detail shot reveals the quality achievable with CNC machining when properly executed. The curves are smooth and consistent, the surface finish requires minimal sanding, and the dimensional accuracy ensures that multiple panels would fit together precisely if needed for a larger installation.
Joinery Detail
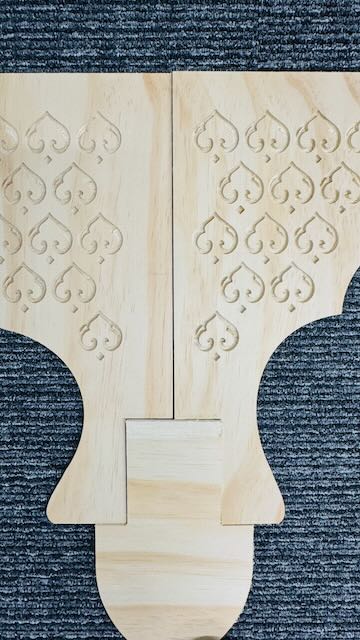
Joint detail showing the integrated connection geometry designed into the panel for assembly with the pillars
The joinery detail shows how the panel connects to the structural elements. Rather than relying on external hardware, the design incorporates connection geometry directly into the CNC-cut pattern. This approach maintains the clean aesthetic while ensuring structural integrity.
Installation and Final Assembly
Integration with Antique Pillars
The ultimate test of the design was how well the CNC-fabricated panels integrated with the century-old hand-carved teak pillars. The goal was not to make them look identical — that would be disingenuous — but to create a harmonious dialogue between old and new, hand and machine, tradition and innovation.
The final installation: CNC-machined pine arch panels mounted atop the antique carved teak pillars, creating a contemporary interpretation of traditional Indian architectural elements
The completed installation successfully achieves the design intent:
- Visual continuity: The arch forms echo traditional Indian architectural vocabulary
- Respectful contrast: The geometric precision of the CNC work clearly distinguishes new from old while maintaining aesthetic coherence
- Functional success: The panels define the space architecturally while allowing light and sightlines to pass through
- Personal narrative: The combination tells a story about my family's woodworking heritage evolving through generations and technologies
Scale and Proportion
Seeing the panels installed at full scale validates design decisions that were difficult to evaluate on a computer screen. The negative space provides visual lightness while the overall mass grounds the composition. The 4-foot width of each panel creates a generous, ceremonial scale appropriate for the room's traditional function while the open patterns prevent the structure from feeling heavy or oppressive.
Reflections and Lessons Learned
Design for CNC Manufacturing
This project reinforced several key principles for designing parts intended for CNC fabrication:
- Tool radius matters: Every internal corner must accommodate the router bit radius — embrace this constraint rather than fighting it
- Material thickness drives joinery: Design with your actual material dimensions, not nominal sizes
- Minimize tool changes: Keeping the entire cut to a single bit size reduced setup time and potential errors
- Consider grain direction: Wood grain affects both structural strength and surface finish — orient the pattern accordingly
- Fixturing strategy: Plan how the workpiece will be held during cutting to avoid vibration and ensure safety
Bridging Tradition and Technology
Perhaps the most meaningful lesson was discovering how digital fabrication can honor craft traditions rather than replace them. My grandfather's hand-carved furniture and the antique pillars represent thousands of hours of skilled manual labor — irreplaceable and precious. The CNC-fabricated panels don't attempt to replicate that hand-carved quality; instead, they offer a complementary aesthetic vocabulary that speaks to contemporary capabilities while respecting historical context.
This project became about more than making something big — it became about making something meaningful that connects generations, technologies, and cultural traditions.
Technical Challenges
Several technical challenges emerged during the project:
- Material warping: Solid wood can warp during and after cutting due to internal stresses being released — proper material conditioning and prompt installation helped minimize this
- Dust management: Pine produces copious sawdust that can obscure the cutting area and affect cut quality — constant dust collection was essential
- Feed rate optimization: Balancing cutting speed with surface finish quality required several test cuts to dial in optimal parameters
- Assembly precision: Even small dimensional errors are magnified at architectural scale — careful measurement and test fitting were crucial
Conclusion
The Computer-Controlled Machining assignment challenged me to work at a scale I'd never attempted before, but more importantly, it provided an opportunity to create something deeply personal that connects my family history with contemporary digital fabrication. The decorative arch panels for my mother's house in Mysore represent more than just a successful CNC project — they embody a continuing tradition of woodworking that spans from my grandfather's 1950s plywood factories to today's parametric CAD and robotic routers.
The project demonstrates that "making something big" isn't just about physical dimensions — it's about ambitious ideas, meaningful context, and the courage to bridge past and present through thoughtful design and precise execution.
Files and Resources
- Fusion 360 design files: [arch-panel.f3d]
- Toolpath files: [arch-panel-toolpath.nc]
- MAS.863 Computer-Controlled Machining Class Page
- SmartPi Final Project (other coursework)