Week 13 - Wildcard
-
Artificial Muscles
This week I explored a method that might be applicable to my final project (prosthetic hand) - artificial muscles.
Experience of this week was valuable as an illustration of a possible actuation method, and it highlighted its benefits and drawbacks.
It was also just fun to work with such an unusual material and to see how it behaves. -
Training
During the training session with Jack, I got a better understanding of what artificial muscles are, and what are their specific properties.
Artificial muscle is a thread or multiple threads, that contracts when applied heat of 60C and stretches back to its initial form when it cools down.
I also got to learn that there are also threads for different temperature (e.g. 40C), however, they have slower reaction time.
Some ways to embed artificial muscles into a structure are weaving, vinylcutting thin plastic, connect any two parts of a shape that should be held together.
Additionally, another trick is to braid artificial muscle threads together with a conductive thread, so that one can run current through its sides and heat up the system (and contract as a result).
-
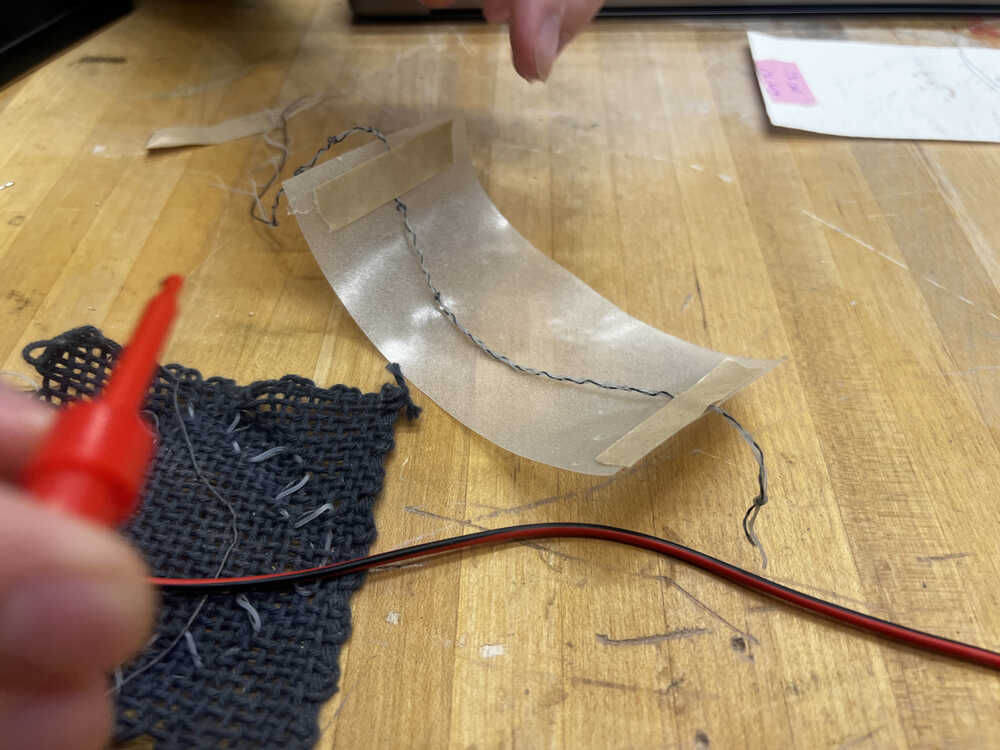
First Tests - Always Preheat Threads!
This project was in a way a group project, so for first tests, we were trying out the bending technique with the matierial that Gauri manufactured.
The material did shrink when heated, however, it didn't fully stretch back, which was the first lesson of this week - preheat the thread before using. This is because in process of manufacturing the thread is stretched more than it normally would, and when cooling it only reverts to that "normal" state. -
"The first prototype should look as if you made it under a gunpoint" - Jack
I took this advice very literally. So here you are - a first minimalistic tape and foam prototype, under a heat gun.
As you can see, things started to fail even then - not a very thorough connection of the end of the thread made it pull out during shrinking. That means that all the threads have to be carefully braided to avoid it.
On the other side, in some situations it seems like the thread is struggling to pull the system, which is purely material limitation, however, could potentially be solved by layering several threads together.
Overall, this protopype confirmed an overall idea of the artificial muscle finger joints, as well as pointed out some important things to keep in mind.

-

Well, what about prosthetics?
Conveniently timed, first version of the prosthetic hand got printed around that time. Please refer to the final project page for more details about printing and designing.
With regards to the artificial muscles, the hand was printed on Prusa using TPU, with 10% infill, which might affect how easily it would bend, and whether the printing material would melt from the heat. -
First joints and contractions!
The first ever test on a printed model was a success! The joints were made out of a single thread, and the contraction was achieved by heating up the thread with a heat gun.
Well, it was a success, but also a failure. The antiflexor wasn't connected, so the system just fell instead of bending, but that is fine for the first run.
It also showed yet another limitation of the material - it is slow. And I mean it is fast enough if you are willing to wait. It might be not that fast for the purpose of finget joints controls in a prosthetic hand.
-


TEST TEST TEST
Further tests were a lot of trial and error, and trying to feel the material. I was trying to move fingers to see, if I can control the muscles with current, which approximately worked, maybe on a lower force than I thought, but in the rigth direction.
Reproducing steps and detailed procedure:- 1. Imitate the system. The easier way was to take a piece of foam/paper, and make joints pretty nominal. The harder way is to find a CAD model of a prosthetic hand, print it out of TPU with 10% infill, clean up the resulting model, identify connections. A good resource for a Free Online CAD model.
- 2. Preheat and cool back the material. As mentioned above, it is in somewhat stretched state when on the spool, so preheating is nessessary, to know which size will it actually stretch back to.
- 3. Braid a ligament. It is a simple braid with 2 parts being deformable thread and 1 part being conductive thred. Leave enough of conductive thread at the ends and make sure to braid the whole size carefully.
- 4. Connect the ligament to the system. It is important to make sure that the ligament is not too tight, so that it doesn't pull out the thread from the system. It is also important to make sure that the ligament is not too loose, so that it doesn't fall out of the system.
- 5. Connect the ligament to the power source from two sides. See how it is connected to both sides of the thread on the videos. Power source characteristics: 0.5A, ~15V.
- 6. Watch it burn... I meant smoke, literally. First time the thread heats up it will smoke, mainly because of some material in the conductive thread. It will not happen later (probably), but don't be scared if it does.
- 7. Try actuating different connectors, experiment flexing and unflecing. Importantly, don't short the circuit, make sure to isolate all connector points from one another.
Importantly, some of the videos are too slow to notice the motion, so I sped them up in post-processing.
-
Future Work and Improvements
Overall, I am pretty happy about the result of this week. The proof of concept for artificial muscles for prosthetic hand is completed.
As some of the future points of improvements and work, I see:
1. Trying to layer several threads together to increase the force of contraction.
2. Trying to use a different material for printing the hand, potentially resin printing (to be sure about non-melting properties).
3. Milling a PCB to control the circuit.
4. Redesigning the hand to flex better.
5. Move the artificial muscle shrinkable material to the forearm instead of the fingers - might be stronger, easier to control, and more neat.
6. Try out embroidery/weaving machine for more neat and even elements.
Thanks to Jack, Gauri, Andy, Github Copilot and all the people who helped me with this project!