final project proposal
I want to make a CNC machine that cuts and stitches shirts.
This week I reserached how CNC machines work and how stitching machines work. My biggest discovery was that because of the way the sewing machine is built, I will need two sets of moving x and y axes. For now, my designs don't include a moving a-axis, since the thickness of fabric doesn't vary too much.
stitching:
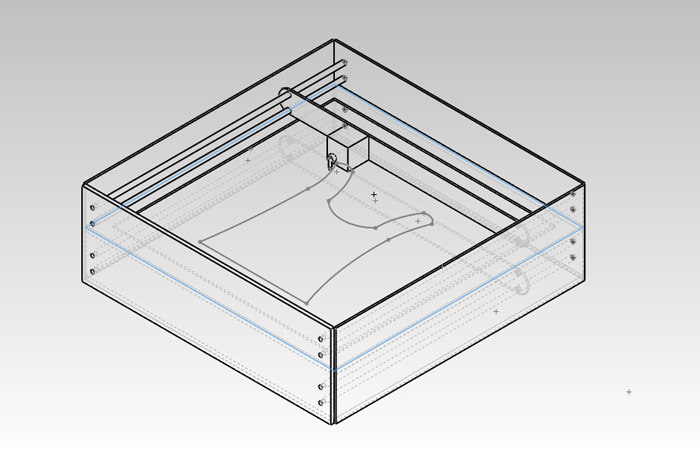
The sewing machine has three major components. The needle, which feeds the thread through the top, the rotary hook, which catches the string from the needle and ties it to the other thread, and the feeders, which move the fabric along. In my machine, the sewing mechanism will be moving while the fabric remains stationary, so there is no need for the feeders. The reason I need two sets of synchronized moving x and y axes is because two separate threads need to be fed from two opposite directions. I thought about ways to simply attach the bottom spool to the top one, so that only one set of axes and one set of commands would be neecssary. But at one of the extremes, this would require the connecting pieces to extend 3 feet beyond the casing of the machine, or a round bed and a an extra degree of motion.
The two sets of axes would always move in perfect syncrhonization. They would receive the same set of commands, so that they move in the same way and are always at the same x-y coordinate. Each axis is responsible for one degree or freedom, or on vector of motion. Each axis also contains four main components: the motor, the transmission, the guide, and the payload. For the motors, I will use simple rotary stepper motors, which move in small precise increments. The transmision is what converts the rotational motion of the motors into linear motion. The guides are sets of parallel aluminum rods that constrain the motion to linear motion. Moving both the x and y axis at the same time, however, will allow you to make curves. All axes will have the same transmission, motor, and guides. The payload is what is actually being moved. In a laser cutter, the payload is a laser, and in a ShopBot, the payload is a drill bit. The payload on the top set of axes will control the needle, which feeds one thread and actually pierces the fabric. The payload in the bottom set of axes controls the rotary hook, which catches the thread from the needle and ties it to the other thread, creating a stitch.
One problem that I have not yet solved is how to hold the fabric in place. As of now, I am making it taught and clamping it down with a two inch frame that is the same size as the bed. The problem is that once I start cutting the fabric will no longer be taught, it will sag. In laser cutters or water jets, for example, pieces being but out fall to be bed when they are cut and you can see that are fully detached from the rest of the pieces. But these materials are all stiff. So even if the not held down in place, they can still be cut. Fabric is so soft that it needs to be held down taught in order to cut. Another idea is to use a vacuum to hold the faric down, but that would require having an air-tight container for the machine. Please let me know if you have any suggestions!
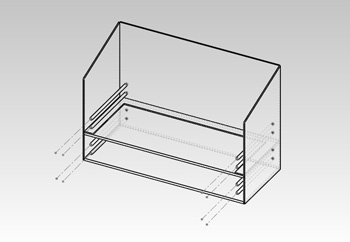
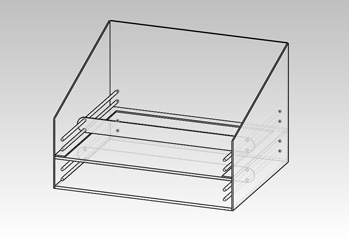
These two pictures show two different positions of the axis, and that they always move together. In Solidworks, I mated the the front face of each of the pieces connecting the axis. This way, whenever I moved one set of axis, the other would move accordinly.
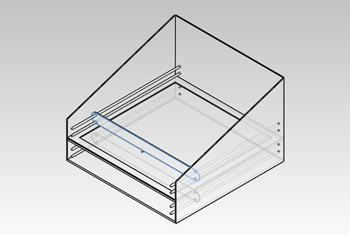
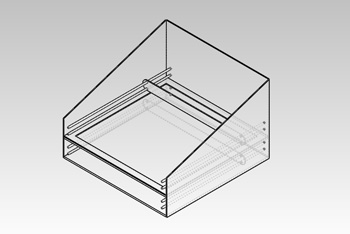
The first picture shows a cross-section of the rods, and how they are set up. There are 4 sets of parallel rods. These are the guides. The second picture shows a cross section of how the rods support the piece that supports the payload.
cutting:
In order not to incorporate yet another axis, I will include a cutting mechanism in the needle payload. This will just be a sharp knife that moves up and down very quickly. The cut obviously needs to always be on the outside of the stitch. So I will put the knife on a ring centered around the needle, and always keep the knife normal to the stitching curve. This will require an extra degree of freedom and some more programming, but I think it is the best solution.
overall design mechanical design:
The design will have 5 degrees of freedom- 2 in the x-direction, 2 in the y-direction, and one of rotational motion. The fours sets of guides and the ring around the needle will constraind the range of motion to only these 5 degrees. For the sewing part, I will used parts from an already existing sewing machine and adapt them to my machine. For the cutting, I will use a small sharp knife, on the order of a surgical blade or a cutting knife. For the casing, I want to use clear ABS, becuase I would like to be ablt to see what is going on. I will laser cut the pieces of ABS, and they will fit together by press-fit construction. As of now, I'm planning on using a 3 feet by 3 feet bed, so a laser cutter will not be large enough. In this case, I will use the larger beam laser or the water jet to cut the pieces.
The control system:
This week I have been inspired by and and refered many times to Ilan Moyer's thesis. Ilan is a PhD student in Mechanical Engineering, and he wrote a fantastic thesis on Rapid prototyping rapid prototyping machines. He used a control system designed by the Center for Bits and Atoms at MIT that threats the machine as a distributed network of addressable internet nodes. A virtual machine running on a computer send commands to these separate nodes. This is how I will be able to perfectly synchronize both sets of x and y axes.
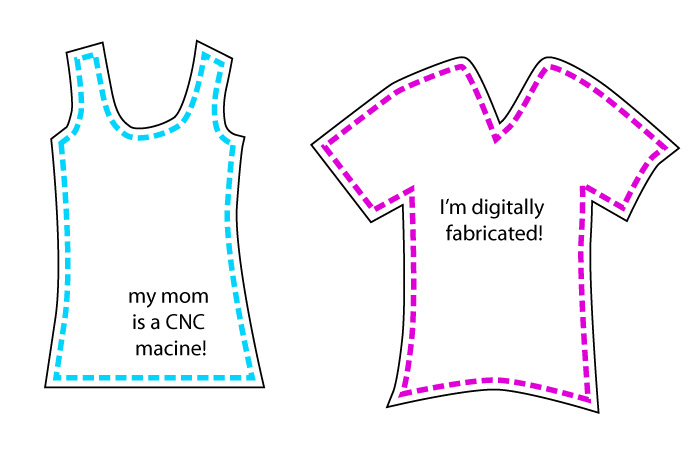
limitations in garment design:
The driving force behind this project is the idea of personalization. The clothes we wear are very intimate objects, yet all the clothes we own (with maybe a few exceptions), are manufactured with a "one size fits all" philosophy. They are manufactured in different sizes, and you chose whichever one happens to fit your body. Often this is a good fit, and every once in a while it's a great fit. But it's very rarely, if ever, a perfect fit.
With this machine, I hope to change that. In the early prototypes, however, the clothes will fit loosely and somewhat awkwardly. This is because my machine is limited to seams on only on plane. If you look at a standard T-Shirt, there are seams going off into different planes. This machine will be constrained to 2-dimensional drawings, so the seams can only be made on one plane. I want them to have a playful nature, celebrating digital fabrication shamelessly. I don't need my cut to be as close to the stitch as possible. I might leave some extra fabric on the edges for style and personality. Another hope is that this machine, or this idea more generally, will inspire new types of clothes or new ways of wearing clothes.