FINAL PROJECT: OMNI
OMNI tries to answer the following question:
What if we could bring the vision of the
ultimate interactive apartment to the conventional homes of today?
The answer is “yes”, if we could design a
device that was so cheap and simple that it could, not only bring that
experience, but also make it scalable to thousands, millions of homes.


This is how it all started: http://fab.cba.mit.edu/classes/863.13/people/Hasier/Week1.html
And this is how it evolved, subsystem by
susbsystem:
Inspiration
I was inspired by slot car technology, that
is both simple and cheap. I bought an analog scalextric start track ($150) to
understand better how the system works. I decided to keep the standard track
for my project (with the 15V power supply) and focus on the carriage system.
Even the car chassis had to be redesigned because slot cars can only go in one
direction, and of course, they are not thought to accommodate a pan/tilt moving
head either. At least, I salvaged the drive wheels, gears and motors to use in
my system.

Even though I was keeping the track, I
decided to cut it in half, in order to make it more aesthetically pleasing. I
used the vertical saw for that.
Carriage
= 3D design + 3D printing
First iterations were based on using the
caliper and making sense of the key dimensions. I used the Makerbot for quick
iterations (orange and blue in the photos) and the Dimension for the last
version (white). I used solidworks for the 3D design.
Some technical problems with the makerbot
(at least I got to learn the innards of the machine):

I mounted in the chassis the parts I
salvaged from the original car:
- Wheels
- Drivetrain
- Guidance
connector. I used two (the two that come with the two slot cars in the set), so
that the car could go in both directions
As it can be seen in the picture, I´m using
standard Neodymium magnets to fake gravity.
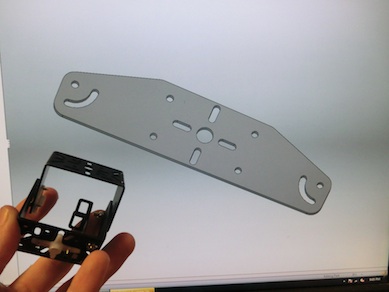
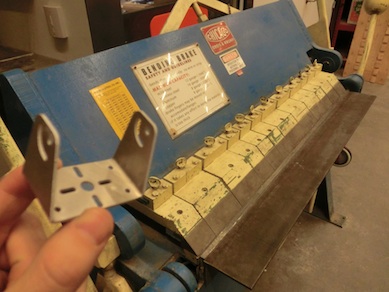
Pan/Tilt
Bracket = 2D design + Waterjet +
Bending
For the pan/tilt bracket I was inspired by
an old pan/tilt bracket I found in my lab space.
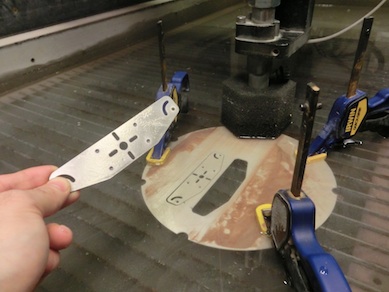
Process:
- 2D design in
solidworks
- Cutting in the
waterjet
- Bending
Hasiduino
= Electronics Design + Fabrication
The electronics has been an ongoing project
during the whole semester. Check:
http://fab.cba.mit.edu/classes/863.13/people/Hasier/Week11.html
http://fab.cba.mit.edu/classes/863.13/people/Hasier/Week12.html
The summary:
The design is based on Neil´s fabduino, but
I added the h bridge, dc motor connector, servo connectors, regulator and
headers for the pins. I´m getting decent with eagle and I managed to create a
pretty small board.
My debugging skills are also improving:
check the h bridge bottom pad touching one of the pins and shorting one of the
control pins to ground.
DC
motor + Servos = Output Devices
The DC motor came with the original car and
the servos are from Spakfun: https://www.sparkfun.com/products/9065
The Hasiduino controls both the DC motor and
the two servos (I´m attaching the code to see how they are controlled at the
end). I mounted them to the chassis. Time constraints led me to use Velcro tape
(probably too much), which I call “magic tape”. You can use it for “almost
“anything.
I had to make some adjustments to the
connectors of the hasiduino, so that the pan/tilt bracket would not hit it.
Quick hack using ftdi pins.
Mounting motors. I used a lego block as a
hack to adjust to the chassis width.
Input
devices = RFID reader / Reed Switch
https://www.sparkfun.com/products/11827
I bought an rfid for specifying the location of the car.
Unfortunately, even though I had the rfid reader working, the car was too fast
to recognize the tags when moving.
So, due to time constraints I decided to use
some Reed switches temporarily to stop the car in specific locations:
https://www.sparkfun.com/products/8642
They seem faster than the rfid. I had to
adjust the code though (attached at the end), as sometimes the car was still
too fast to see it and go to the subroutine that stops the motor.
This is something I would like to rethink
for the next version, as it is extremely important to have a good location
system for the application.
Communications
= Bluetooth Terminal
I found a Sparkfun Bluetooth terminal that
was extremely easy to interface using the arduino serial.
https://www.sparkfun.com/products/10269
More details in week 12:
http://fab.cba.mit.edu/classes/863.13/people/Hasier/Week12.html
Integration
Adding all subsystems

Trying to minimize consequences of possible
accidents under the table (car falling from track):
Accidents
Fatal accidents (the worst so far):
Testing new system after fatal crash:

Final tests before open house:
http://www.youtube.com/watch?v=P7liMzWv3YE
I had a very few accidents so far, but when
there is one it is a tragedy, as this “toy” falls from 3 meters high.
Code
Using Arduin:o
#include <Servo.h>
int servo = 5;
int servo2=6;
//#define rxPin 1
//#define txPin 0
// Pins for H-bridge
int h1 = 9;
int h2 = 10;
Servo ser;
Servo ser2;
int magnet1=8;
int magnet2=7;
int led=13;
int magnet1enable;
int magnet2enable;
void setup() {
Serial.begin(115200); //
Start bluetooth serial at 9600
ser.attach(servo);
ser2.attach(servo2);
// initialize the digital pin as an output.
pinMode(magnet1, INPUT);
digitalWrite(magnet1, HIGH);
pinMode(magnet2, INPUT);
digitalWrite(magnet2, HIGH);
pinMode(led,OUTPUT);
digitalWrite(led, LOW);
magnet1enable=0;
magnet2enable=0;
pinMode(h1, OUTPUT);
pinMode(h2, OUTPUT);
Serial.println("Enter -1 to move the car backwards, 1 to move the
car forwards, 0 to stop it");
}
// the loop routine runs over and over again
forever:
void loop() {
if (Serial.available() > 0) {
int input =
Serial.parseInt();
if (input == 0) { // stop
stop();
} else if (input == 1) { //
forwards
setDir(true);
delay(1000);
while(digitalRead(magnet1)==HIGH){
}
stop();
digitalWrite(led, HIGH);
delay(500);
digitalWrite(led, LOW);
ser.write(160);
delay(500);
ser2.write(110);
}
else if (input == 2){
ser.write(130);
}
else if (input == 3){
ser.write(160);
}
else if (input == 4){
ser2.write(170);
}
else if (input == 5){
ser2.write(100);
}
else if (input == 6){
ser2.write(50);
}
else if (input == 7){
setDir(true);
delay (1000);
stop();
}
else if (input == 8){
setDir(false);
delay (1000);
stop();
}
else{
setDir(false);
delay(1000);
while(digitalRead(magnet2)==HIGH){
}
stop();
digitalWrite(led, HIGH);
delay(500);
digitalWrite(led, LOW);
ser.write(120);
delay(500);
ser2.write(170);
}
}
}
// Sets the motor direction to be forward if
forward is true,
// backwards otherwise
void setDir(boolean forward) {
digitalWrite(h1, !forward);
digitalWrite(h2, forward);
}
void stop(){
digitalWrite(h1, true);
digitalWrite(h2, true);
}