It's not everyday you see a software programmer play around with embedded firmwares. This week we needed to create a board or use the one we made two weeks ago, use many programming languages possible and write some program to this board, hopefully moving something or making it flash.
My goal was to try at least two environments, native C and Arduino. Unfortunately I only got to play with the Arduino IDE and had very little time to mess around with C.
I learned this week how to manipulate a bootloader in Arduino, change fuse bits, set up an external clock, baud and work a little bit with avrdude. Oh, and most importantly, I learned how to read a small parts of a datasheet (there are many things I don't understand there yet that require more time).
How to write a working bootloader in Arduino for ATmega328p
Edit the Makefile located in /Applications/Arduino.app/Contents/Resources/Java/hardware/arduino/bootloaders/atmega/Makefile (in other OS, it should be something similar - look inside the Arduino application folder).
Copy the part that starts with: "atmega328_pro8" and ends with "atmega328_pro8_isp: isp", and paste it right below that part. Change the prefix: "atmega328_pro8" to something like "atmega328_pro20" and "8MHz" to "20MHz" (these are just names, nothing special).
Change the AVR_FREQ to "20000000L" (which is 20MHz)
In the terminal, go to the folder /Applications/Arduino.app/Contents/Resources/Java/hardware/arduino/bootloaders/atmega/ and write: "make atmega328_pro20" (assuming you used "atmega328_pro20" in step 1).
You should now see a file called "ATmegaBOOT_168_atmega328_pro_20MHz.hex" inside that directory. If not, then something failed - try doing it again.
Open the sketchbook folder of Arduino (if you don't know where it is, open Arduino - Preferenecs - Sketchbook location). Create a new folder if not exists called "hardware". Create another folder called "ATmega328" (or any other name). Copy this file to that folder.
If you look inside that file, you'll see there are two types of boards, one that uses the internal 8MHz clock and another that uses an external 20MHz ceramic full-swing crystal oscillator, slowly rising power with CKOUT set to "ON" for debugging purposes. If you look carefully, you'll see that the upload.speed is set to 57600 which correlates with the same speed we set inside the Makefile (see page 203, table 19-12 in the datasheet for error rates at that speed). One last thing to note is the "arduino:" prefix in some places, this will use the arduino install location as prefix path when it looks for files and folders. If you're overriding the built-in boards.txt file then you can remove these.
If Arduino is open, close it (important, otherwise it won't work).
Open the /Users/amirlazarovich/Library/Arduino/preferences.txt file and set upload.verbose=true.
This will ensure you see what's going on behind the scene. Always nice to know more...
Connect both the programmer (i'm using the one we created in week 3) and your board to the computer and also connect the programmer to your board.
- Open Arduino, select tools - board - Tmega328P, 5V, 20MHz external ceramic resonator
- Select tools - serial port - /dev/tty.usbserial-FTGxxx..
- Select tools - programmer - [what ever you're using - i'm using USBtinyISP]
- Select tools - Burn Bootloader
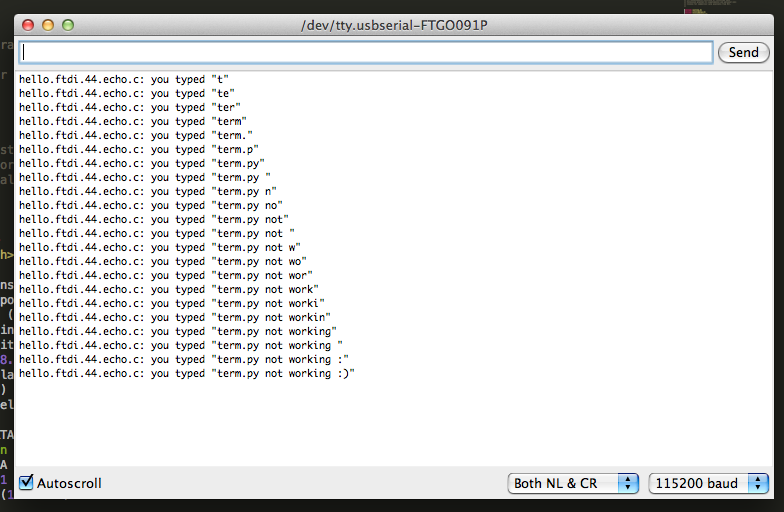
Remove the connection between the programmer and your board. Try to upload a sample program and test if it works.
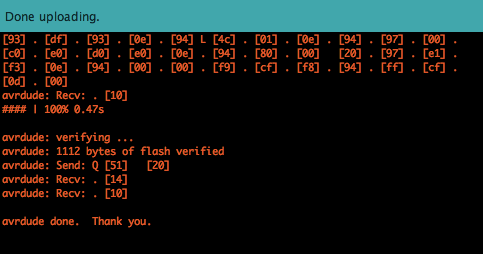
If it doesn't work then try clicking on the "reset" button right when you see this line: "avrdude: Send: 0 [30] [20] " in the Arduino console
The first involved my old FabISP, it didn't work for some reason so I had to create another one.
My bootloader didn't work for some really unknown and annoying reason, I tried everything and nothing seem to work. Then I realized, with the help of Yadid Ayzenberg ("hagever") that i'm setting the CKDIV8 bit - so stupid... anyways, after I changed that Arduino seem to recognize my board again but failed in the verification step. That took another hour to solve. How did I solve that? you don't want to know.. clean copy and paste and it was working. I tried going over my code and didn't see any differences - only god knows what happen but hey, it's working and thanks to Yadid I learned a lot more about avrdude and the entire process :)

Arduino boards description
Arduino atmega Makefile
Arduino ATmega328P 20MHz .hex file
Arduino code


