This is a video that goes through the step of assembling the press-fit stool. Takes about 38 seconds!
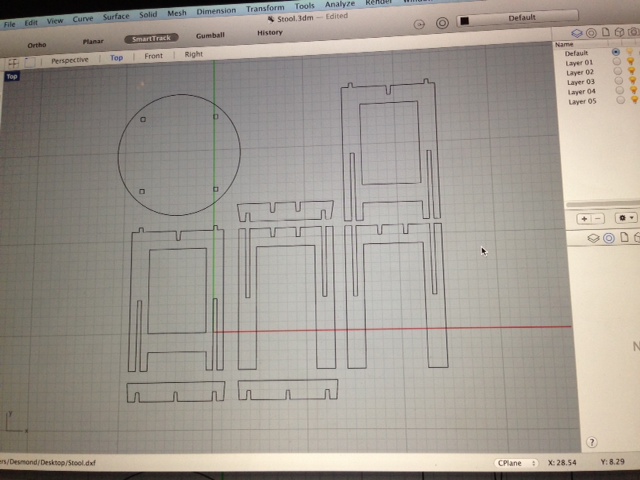
This was my second time using Rhino to make a design, and I felt more comfortable using it this time! I set out to do a press-fit stool, and started off by first using pen and paper to draw out what I had in mind. I found that to be the most helpful as I could make a lot of quick changes on pen and paper easily. I also measured exactly the dimensions of every single edge of the stool, as it was very important to have the right dimensions in order to fit each of the press-fit joint. In order to make the press-fit joint worked, I zoomed very deep into each joint of my design to ensure that they would fit. I knew that the thickness of the board was approximately 0.43 inches, so I made sure that most joints started off with around 0.44 - 0.45 inches, and narrow to around 0.42 - 0.43 inches. I wanted to have a slight angle so that the joints of the stool would be tight fitting. My final result was actually successful, so it proves that my strategy to cut the press-fit stool joints at an angle actually worked pretty well! On rhino, I started off with the top view and designed everything in 2D format. I did not needed to use the extrude feature as I was not cutting a 3D object in this case.
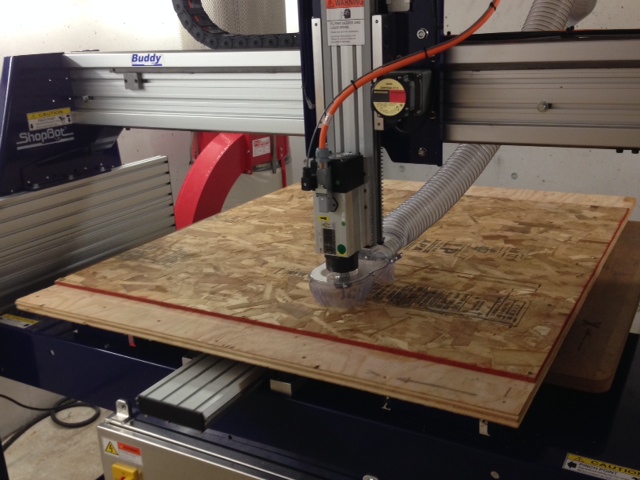
This is the brand-new shopbot which we will use to cut the wood! It cost around US$20,000, and the Harvard workshop just bought it. We were all very excited to use it, but we knew that safety was the most important thing, and all of us definitely took care to take precautions and followed through all the steps. There is also an emergency button (in bright red) which you can use to stop the machine in any case of emergency.
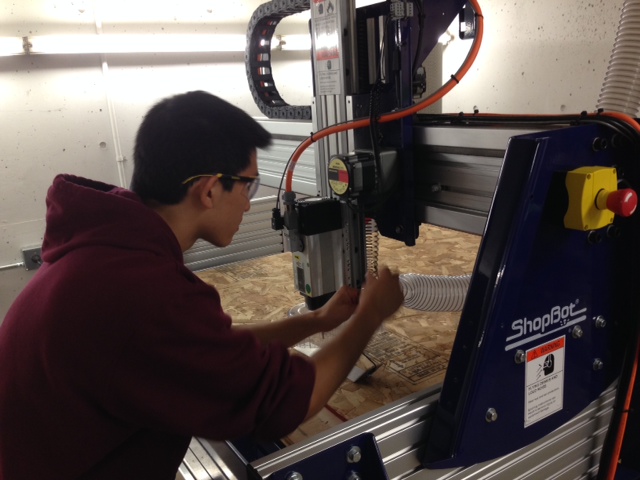
In this week, we needed to buddy up with someone. I worked with Vincent from my section. It was great working with him, and I really appreciated having a buddy to watch my back and learn together. In this picture is Vincent trying to zero and measure the Z-index of the shopbot. Before using the shopbot, we needed to zero the x, y, and z axis of the shopbot, which can be done by moving the drill to the desired spot, and then pressing "zero x and y axis" on the computer, followed by the step which Vincent is now doing, which is clipping the alligator clip and plate on the drill for the shopbot to recognize the thickness.
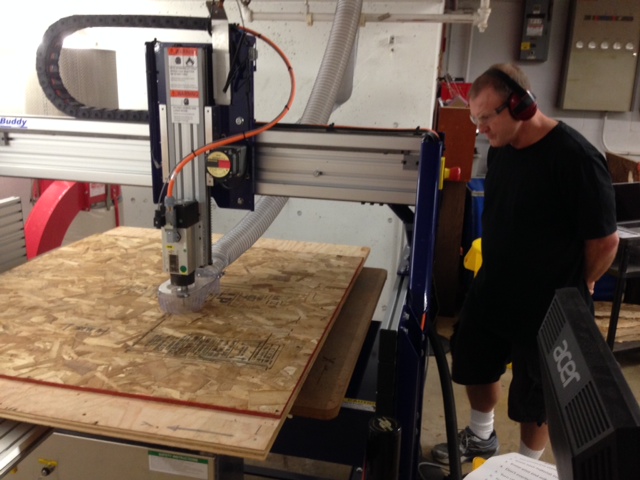
Here we go! In this picture, you can see Daniel assiduously supervising our work. Daniel was a great resource to have, and definitely guided us a lot. It was important for us to put on ear plugs and protective eyewear too. Here you can see the shopbot in action. One thing we learned is that cutting the "inside" holes first before moving on to the "outside", and also adding "tabs" on the board will make the cutting process smoother. The reason is that if you start from outside in, the portion of the board that has been cut will not be secured properly and hence the cutting will not work well.
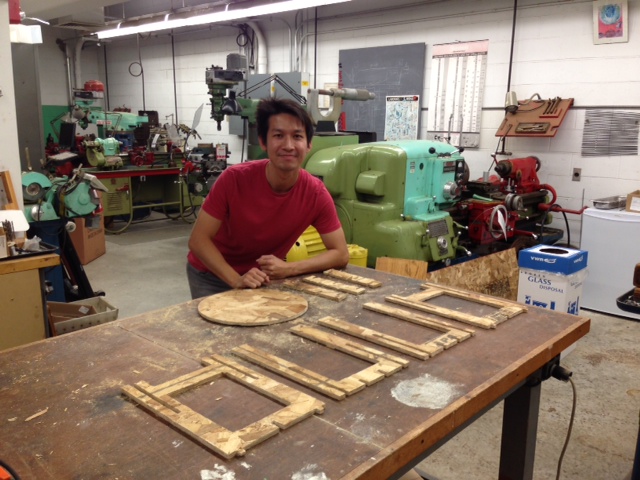
Here I am with my completed parts of the stool. It looks pretty easy, but it took Vincent and me nearly 2 hours to get all these out. I also spent nearly 3 hours on designing and planning. We next had to file and make the edges of the joints smooth. There were some parts of the joints which were not as smooth, but nothing like a bit of filing and cutting away loose parts of the press-fit stool.
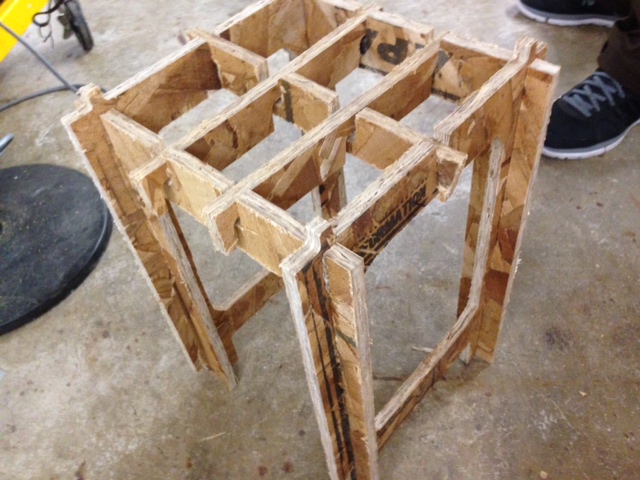
My press-fit stool! This is the base of my press-fit stool. I took a lot of inspiration from David's (last cohort) press-fit standing desk, and wanted to design a stool that was resilient and strong. Hence, you can see there are several cross-junctions of the stool. The stool is actually very resilient and the joints are all very tightly fitted together. There are nearly no loose parts and I think spending more time on designing and making sure that the joints were all slanted at an angle from 0.42 inches to 0.45 inches really helped the joints come together nicely.
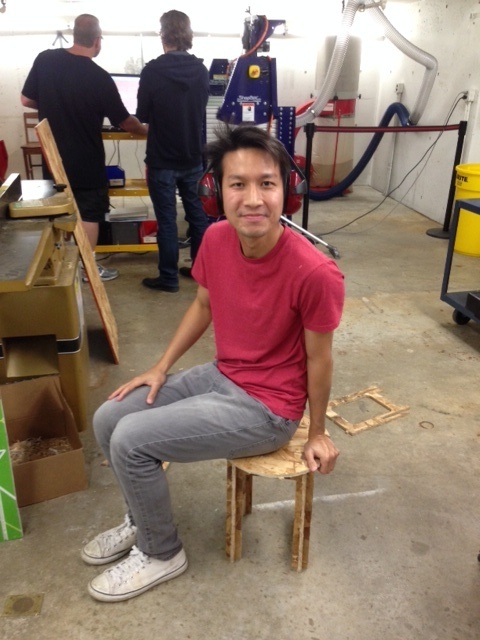
That's me sitting on the press-fit stool to test the strength of the stool. It turned out to be very sturdy! I could even stand on the stool and maybe even jump on it! I am very happy with the process and felt accomplished in working in the lab on this for nearly 3-4 hours.
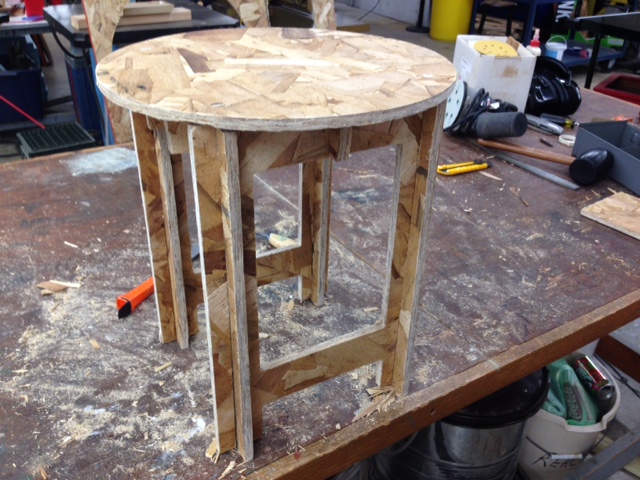
There you have it - the press-fit stool!
This was my second time using Rhino to make a design, and I felt more comfortable using it this time! I set out to do a press-fit stool, and started off by first using pen and paper to draw out what I had in mind. I found that to be the most helpful as I could make a lot of quick changes on pen and paper easily. I also measured exactly the dimensions of every single edge of the stool, as it was very important to have the right dimensions in order to fit each of the press-fit joint. In order to make the press-fit joint worked, I zoomed very deep into each joint of my design to ensure that they would fit. I knew that the thickness of the board was approximately 0.43 inches, so I made sure that most joints started off with around 0.44 - 0.45 inches, and narrow to around 0.42 - 0.43 inches. I wanted to have a slight angle so that the joints of the stool would be tight fitting. My final result was actually successful, so it proves that my strategy to cut the press-fit stool joints at an angle actually worked pretty well! On rhino, I started off with the top view and designed everything in 2D format. I did not needed to use the extrude feature as I was not cutting a 3D object in this case.
This is the brand-new shopbot which we will use to cut the wood! It cost around US$20,000, and the Harvard workshop just bought it. We were all very excited to use it, but we knew that safety was the most important thing, and all of us definitely took care to take precautions and followed through all the steps. There is also an emergency button (in bright red) which you can use to stop the machine in any case of emergency.
In this week, we needed to buddy up with someone. I worked with Vincent from my section. It was great working with him, and I really appreciated having a buddy to watch my back and learn together. In this picture is Vincent trying to zero and measure the Z-index of the shopbot. Before using the shopbot, we needed to zero the x, y, and z axis of the shopbot, which can be done by moving the drill to the desired spot, and then pressing "zero x and y axis" on the computer, followed by the step which Vincent is now doing, which is clipping the alligator clip and plate on the drill for the shopbot to recognize the thickness.
Here we go! In this picture, you can see Daniel assiduously supervising our work. Daniel was a great resource to have, and definitely guided us a lot. It was important for us to put on ear plugs and protective eyewear too. Here you can see the shopbot in action. One thing we learned is that cutting the "inside" holes first before moving on to the "outside", and also adding "tabs" on the board will make the cutting process smoother. The reason is that if you start from outside in, the portion of the board that has been cut will not be secured properly and hence the cutting will not work well.
Here I am with my completed parts of the stool. It looks pretty easy, but it took Vincent and me nearly 2 hours to get all these out. I also spent nearly 3 hours on designing and planning. We next had to file and make the edges of the joints smooth. There were some parts of the joints which were not as smooth, but nothing like a bit of filing and cutting away loose parts of the press-fit stool.
My press-fit stool! This is the base of my press-fit stool. I took a lot of inspiration from David's (last cohort) press-fit standing desk, and wanted to design a stool that was resilient and strong. Hence, you can see there are several cross-junctions of the stool. The stool is actually very resilient and the joints are all very tightly fitted together. There are nearly no loose parts and I think spending more time on designing and making sure that the joints were all slanted at an angle from 0.42 inches to 0.45 inches really helped the joints come together nicely.
That's me sitting on the press-fit stool to test the strength of the stool. It turned out to be very sturdy! I could even stand on the stool and maybe even jump on it! I am very happy with the process and felt accomplished in working in the lab on this for nearly 3-4 hours.
There you have it - the press-fit stool!