This is a video of my final project - please take a look!
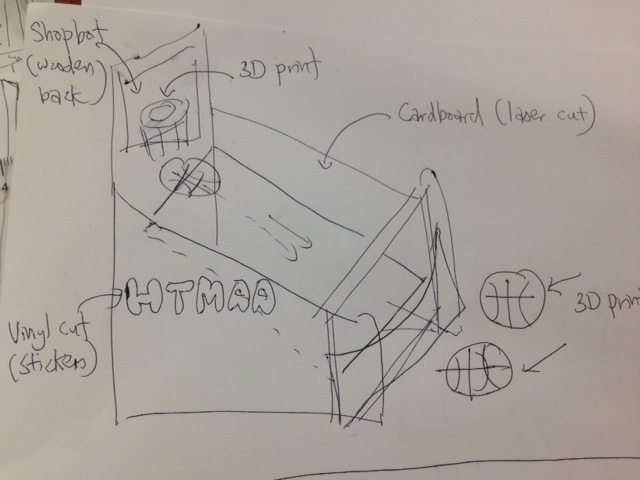
The design is my initial idea for the final project; as you can see, I am trying to create arcade basketball hoop!
The main objectives of the final project is to integrate as much learnings as you can from each of the preceding classes we have worked on. For my final project, I was able to integrate many of the learnings and am fairly pleased with what I have worked on. The things I have worked on are
(1) Computer-aided design + Vinyl cutting: Used this to cut the stickers for my structure
(2) 3D design and printing: Designed my basketball hoop and used to makerbot to 3D print it
(3) Computer-controlled machining: Designed and used the Shopbot to cut a couple of foam mini-basketballs
(4) Laser-cutting: Used the laser cutter to cut the cardboard and create a fit-bit structure for the magic hoop
(5) Electronics production + programming: Designed my electronic boards and milled them
(6) Output devices + Networking: Used a DC motor to power the board so that it will move from left to right
(7) Others: I learned a lot of weaving, making, creating, and just tinkering around to make this work
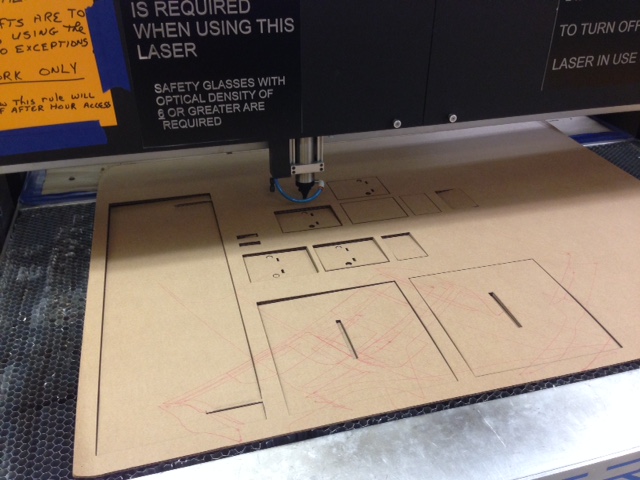
Laser cutting: Over here, I was pretty efficient in creating the necessary designs using Rhino. A few tips, for the cardboard, I used a width of 0.18-0.20 inches for each fit-bit end, and it worked really well. I tried to design and visualize everything on paper first, spending nearly 4-5 hours coming up with
a comprehensive design of what I wanted to do, before I used 2 hours on Rhino to come up with the necessary designs. At the laser cutting shop, I worked with Rob to get the necessary cardboards out in less than one hour, which was fairly efficient.
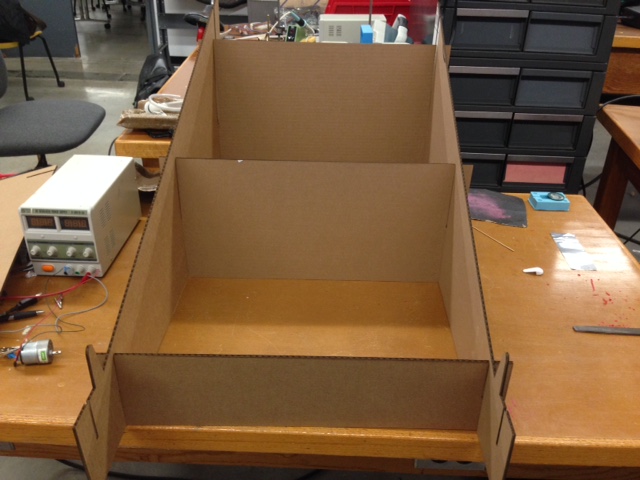
Fit-piece assembly: Once I have finished laser cutting, I immediately tried to assemble all my pieces of cardboard together, and to my pleasant surprise, every piece fitted perfectly well and it was great. I did not have to re-do any parts and everything went smoothly. Early and comprehensive design and planning is very important from my point of view.
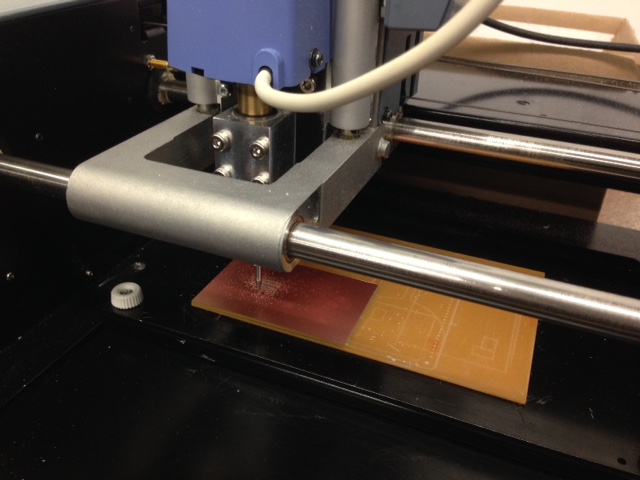
Electronics production: Using the software Eagle, I designed the necessary design for the DC motor, and milled the board out. I had to re-do it as I did not zero the mill properly in the first place. It is very important to zero on at least 7-8 spots all over the mill before you proceed. There are clear instructions on how to use the mill, but basically I needed to download the fab module on the desktop, run Javascript, and then choose Roland RMX-20, and fine traces. I also needed to change the drill (small drill for traces; wider drill for outline) before I milled it.
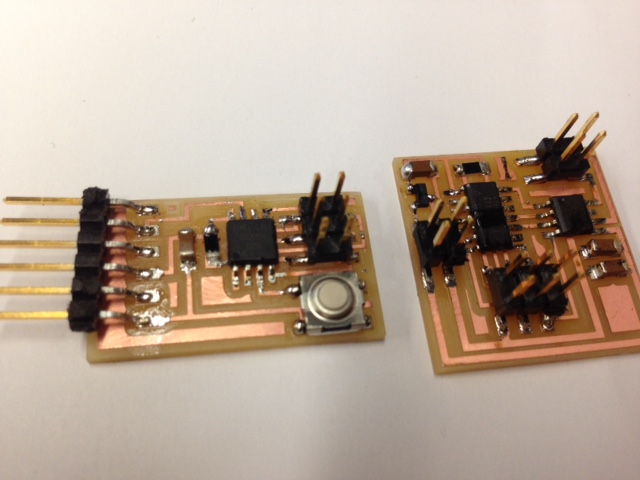
Electronics production: I created both the DC motor board and the switch board as I was planning to use a switch to connect to the DC motor and use networking and communication to link up both of them. In the end, I was advised by Nadya Peek to just use the DC motor which I did.
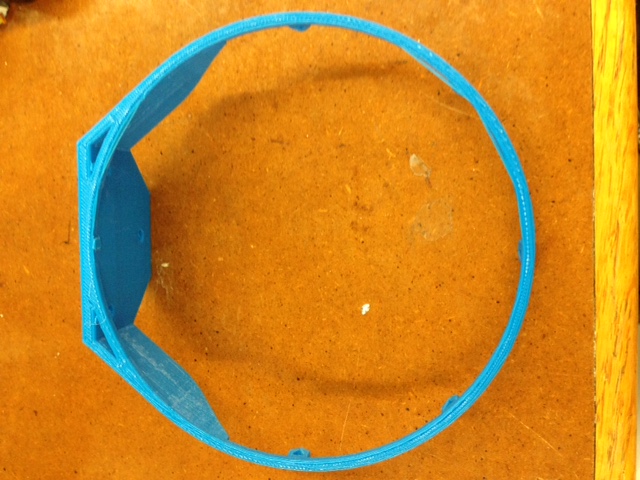
3D-printing: Over here, I designed the basketball hoop and 3D printed it. It was a bit troublesome to 3D print as the makerbot was facing some problems. In the end, I learned a lot on how to make the 3D printer work. A few steps (1) Load / Unload filament using the utilities button, and then change the filament. (2) Clean the makerbot, unload filament and then use a brush to clean the inside of where the filament is plugged into. Remember to turn off the 3D printer before doing so. (3) Once done, reload filament and test it! After a while, my basketball hoop finally printed!
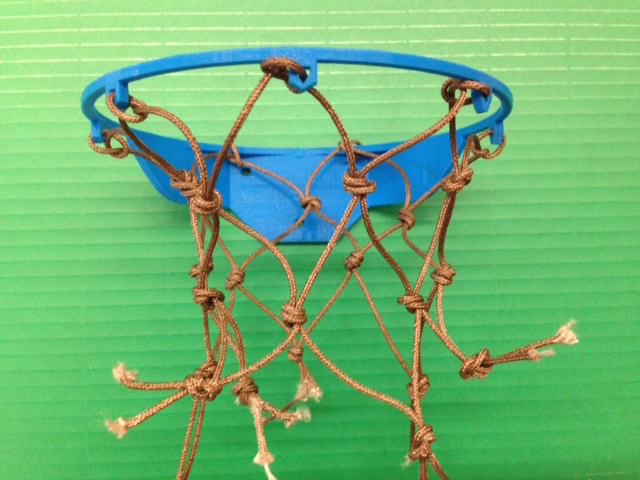
Weaving: I learned to weave a net which was pretty cool. I watched an online video, and was able to weave the basketball net using around 8 pieces of identical-length strings and then tying them together!
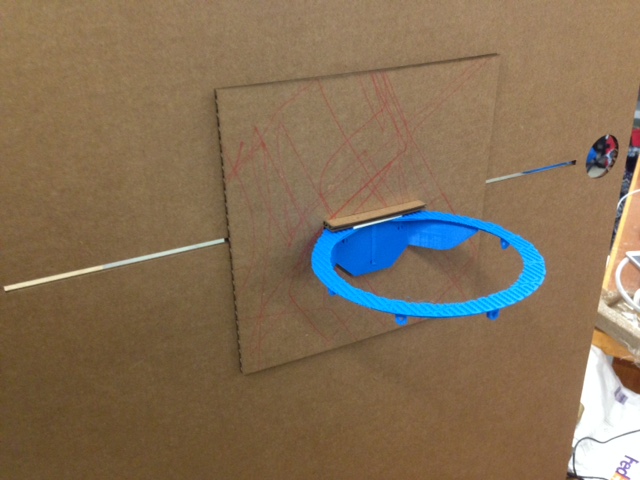
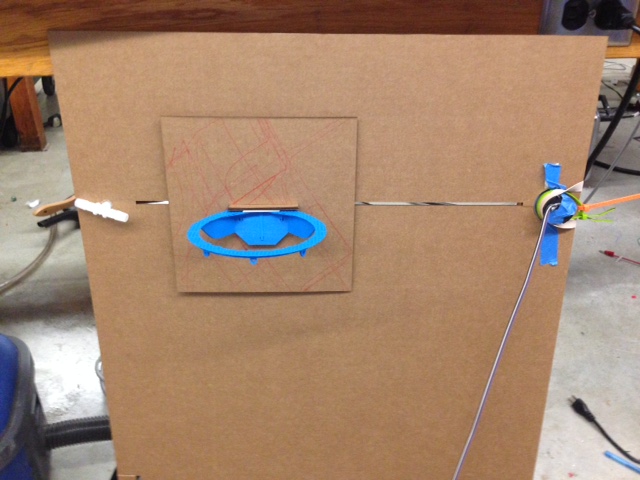
Assembly: In this picture, I assembled the hoop and the cardboard structure to create the magic hoop!
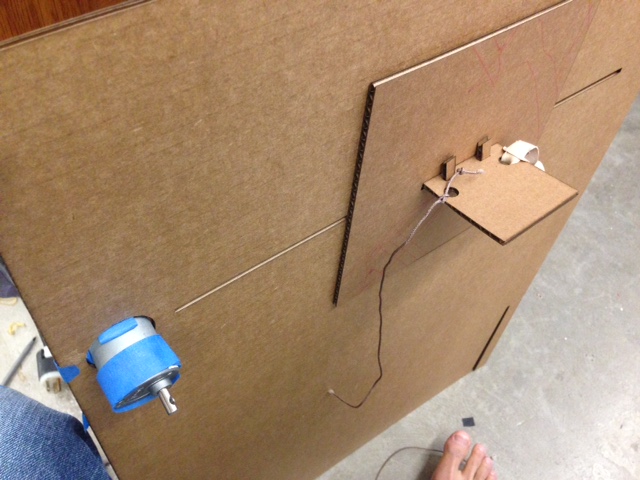
Assembly: This is the back view of how the magic hoop works. On one end, I have a rubber band to pull the hoop back, and on the other end, I have the DC motor which I am planning to program it.
Electronics Programming: To make the magic hoop move left and right, I actually had to program the DC motor to make it turn anti-clockwise and clockwise at fixed intervals of timings. To program it, I followed the steps below:
(1) Download the necessary files
(2) Use terminal to cd ~/Desktop/DC_Motor to move into the right folder
(3) "Make" the C file, by typing make + name of file (make -f hello.H-bridge.44.DC.make)
(4) Use the AVRISP2 plus a power source (if there is FTDI wire can use that if not any power source is fine) to physically attach both to the board
(5) Program using the AVRISP2 by typing make -f hello.H-bridge.44.DC.make program-avrisp2
The board is now programmed. To change the clockwise and anti-clockwise to the correct interval timings that I wanted to do, I used a very good skill, trial and error, which I learned have been working very well for me thus far! I looked for lines of code that looks like "time" or "intervals" and I altered them and re-programmed the board many times to get the right direction, power, and intervals that I wanted.
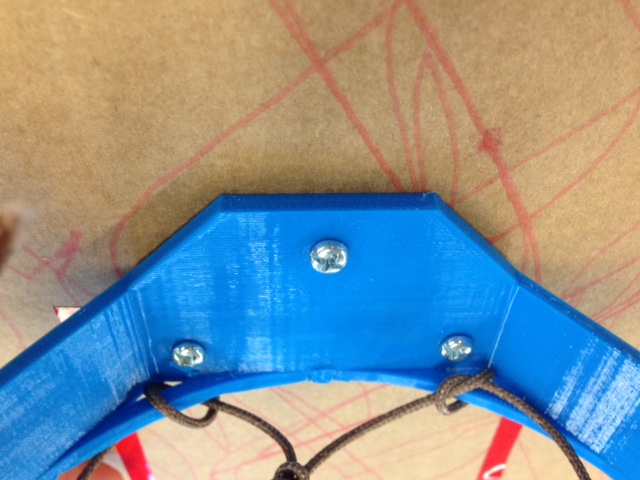
Securing and nails: I was able to find three nails and nailed the rim onto the cardboard to make the whole structure more secured. One thing I learned is that if you take your time to look around the lab, you will definitely be able to find the things that you need. There is no need to always ask people. It also helps you to know where the things are by actually trying to use the time to look for things and finding them.
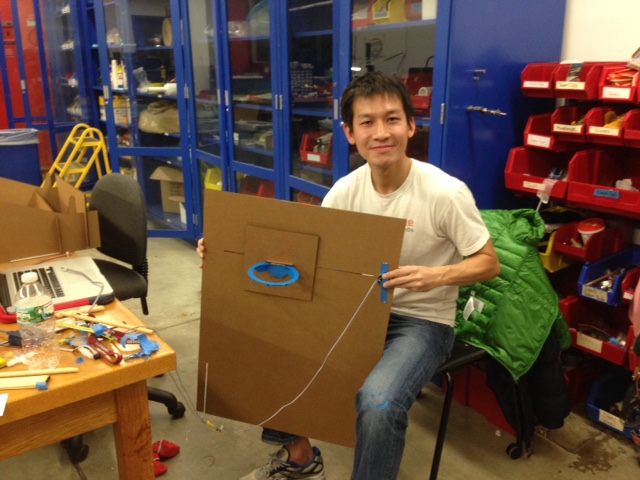
Assembly: That's me holding up the working prototype of the magic hoop!
Assembly: The magic hoop!
Electronics Programming: From the side view, you will be able to see the mechanism of how I am getting the basketball rim to work. I attached one end to a rubber band and the other end to the DC motor, which works very well!
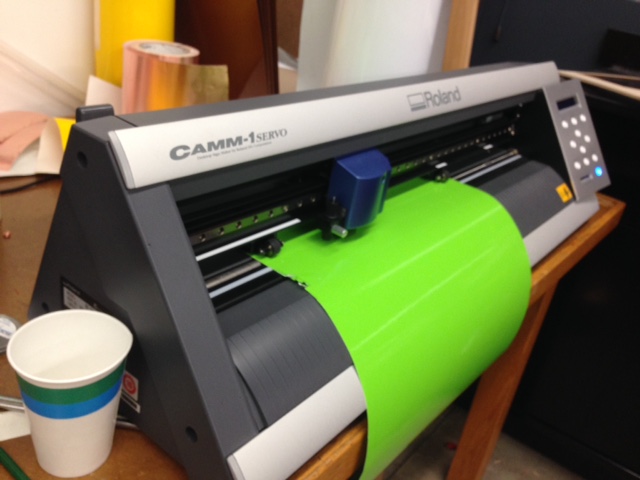
Vinyl cutting: I also learned to use the vinyl cutting which was very exciting as that means I can now cut stickers that I like and I can use them. The steps to do it was (1) Open up Adobe Illustrator (AI), create the design you want. You may need to open up the plugged in software and create "outline" so that it will show up. (2) Import that file into the other software (3) Turn on the vinyl cutter, fit it with the right paper you like (4) Remember the two tabs must be within the white spaces. (5) Press "cutting", and see it work its magic. (6) You can adjust how deep you want the cut to be. (+2 is the deepest which is still not that deep for me)
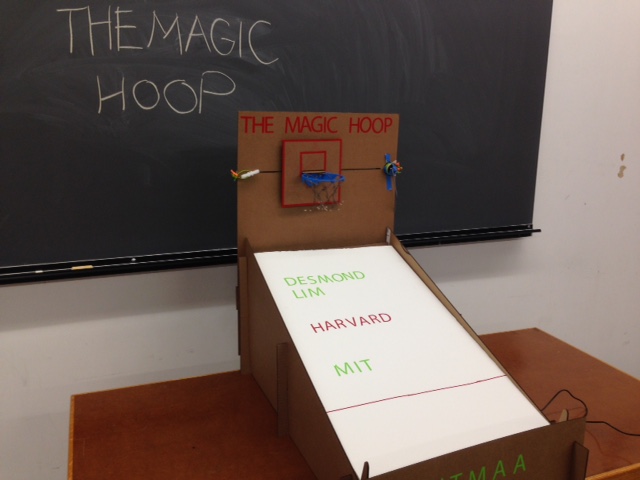
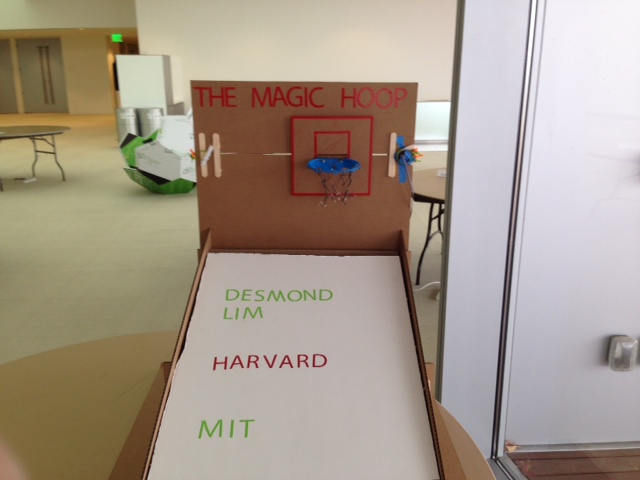
Complete: The completed Magic Hoop!
Sweet picture of the Magic Hoop at MIT Media Lab Open House for the class, How to make almost anything!
The design is my initial idea for the final project; as you can see, I am trying to create arcade basketball hoop! The main objectives of the final project is to integrate as much learnings as you can from each of the preceding classes we have worked on. For my final project, I was able to integrate many of the learnings and am fairly pleased with what I have worked on. The things I have worked on are
Laser cutting: Over here, I was pretty efficient in creating the necessary designs using Rhino. A few tips, for the cardboard, I used a width of 0.18-0.20 inches for each fit-bit end, and it worked really well. I tried to design and visualize everything on paper first, spending nearly 4-5 hours coming up with
a comprehensive design of what I wanted to do, before I used 2 hours on Rhino to come up with the necessary designs. At the laser cutting shop, I worked with Rob to get the necessary cardboards out in less than one hour, which was fairly efficient.
Fit-piece assembly: Once I have finished laser cutting, I immediately tried to assemble all my pieces of cardboard together, and to my pleasant surprise, every piece fitted perfectly well and it was great. I did not have to re-do any parts and everything went smoothly. Early and comprehensive design and planning is very important from my point of view.
Electronics production: Using the software Eagle, I designed the necessary design for the DC motor, and milled the board out. I had to re-do it as I did not zero the mill properly in the first place. It is very important to zero on at least 7-8 spots all over the mill before you proceed. There are clear instructions on how to use the mill, but basically I needed to download the fab module on the desktop, run Javascript, and then choose Roland RMX-20, and fine traces. I also needed to change the drill (small drill for traces; wider drill for outline) before I milled it.
Electronics production: I created both the DC motor board and the switch board as I was planning to use a switch to connect to the DC motor and use networking and communication to link up both of them. In the end, I was advised by Nadya Peek to just use the DC motor which I did.
3D-printing: Over here, I designed the basketball hoop and 3D printed it. It was a bit troublesome to 3D print as the makerbot was facing some problems. In the end, I learned a lot on how to make the 3D printer work. A few steps (1) Load / Unload filament using the utilities button, and then change the filament. (2) Clean the makerbot, unload filament and then use a brush to clean the inside of where the filament is plugged into. Remember to turn off the 3D printer before doing so. (3) Once done, reload filament and test it! After a while, my basketball hoop finally printed!
Weaving: I learned to weave a net which was pretty cool. I watched an online video, and was able to weave the basketball net using around 8 pieces of identical-length strings and then tying them together!
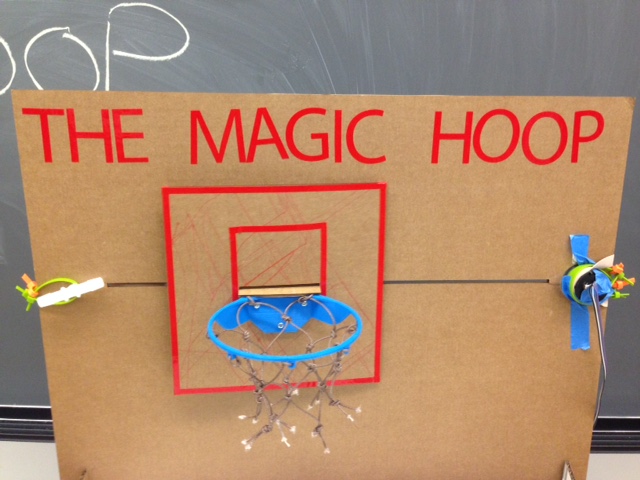
Assembly: In this picture, I assembled the hoop and the cardboard structure to create the magic hoop!
Assembly: This is the back view of how the magic hoop works. On one end, I have a rubber band to pull the hoop back, and on the other end, I have the DC motor which I am planning to program it.
Electronics Programming: To make the magic hoop move left and right, I actually had to program the DC motor to make it turn anti-clockwise and clockwise at fixed intervals of timings. To program it, I followed the steps below:
(1) Download the necessary files
(2) Use terminal to cd ~/Desktop/DC_Motor to move into the right folder
(3) "Make" the C file, by typing make + name of file (make -f hello.H-bridge.44.DC.make)
(4) Use the AVRISP2 plus a power source (if there is FTDI wire can use that if not any power source is fine) to physically attach both to the board
(5) Program using the AVRISP2 by typing make -f hello.H-bridge.44.DC.make program-avrisp2
The board is now programmed. To change the clockwise and anti-clockwise to the correct interval timings that I wanted to do, I used a very good skill, trial and error, which I learned have been working very well for me thus far! I looked for lines of code that looks like "time" or "intervals" and I altered them and re-programmed the board many times to get the right direction, power, and intervals that I wanted.
Securing and nails: I was able to find three nails and nailed the rim onto the cardboard to make the whole structure more secured. One thing I learned is that if you take your time to look around the lab, you will definitely be able to find the things that you need. There is no need to always ask people. It also helps you to know where the things are by actually trying to use the time to look for things and finding them.
Assembly: That's me holding up the working prototype of the magic hoop!
Assembly: The magic hoop!
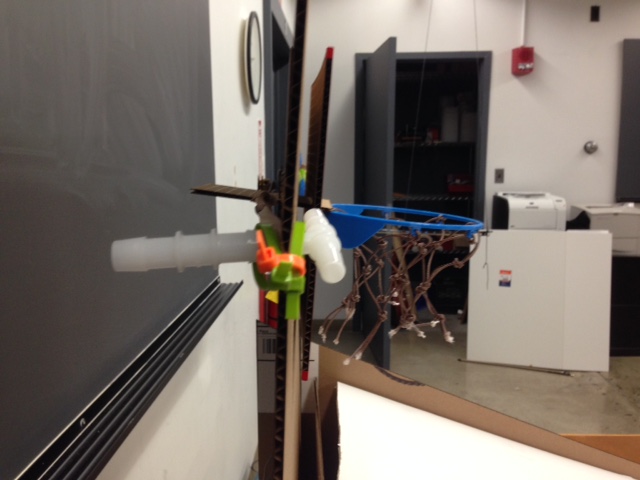
Electronics Programming: From the side view, you will be able to see the mechanism of how I am getting the basketball rim to work. I attached one end to a rubber band and the other end to the DC motor, which works very well!
Vinyl cutting: I also learned to use the vinyl cutting which was very exciting as that means I can now cut stickers that I like and I can use them. The steps to do it was (1) Open up Adobe Illustrator (AI), create the design you want. You may need to open up the plugged in software and create "outline" so that it will show up. (2) Import that file into the other software (3) Turn on the vinyl cutter, fit it with the right paper you like (4) Remember the two tabs must be within the white spaces. (5) Press "cutting", and see it work its magic. (6) You can adjust how deep you want the cut to be. (+2 is the deepest which is still not that deep for me)
Complete: The completed Magic Hoop!
Sweet picture of the Magic Hoop at MIT Media Lab Open House for the class, How to make almost anything!
Fit-piece assembly: Once I have finished laser cutting, I immediately tried to assemble all my pieces of cardboard together, and to my pleasant surprise, every piece fitted perfectly well and it was great. I did not have to re-do any parts and everything went smoothly. Early and comprehensive design and planning is very important from my point of view.
Electronics production: Using the software Eagle, I designed the necessary design for the DC motor, and milled the board out. I had to re-do it as I did not zero the mill properly in the first place. It is very important to zero on at least 7-8 spots all over the mill before you proceed. There are clear instructions on how to use the mill, but basically I needed to download the fab module on the desktop, run Javascript, and then choose Roland RMX-20, and fine traces. I also needed to change the drill (small drill for traces; wider drill for outline) before I milled it.
Electronics production: I created both the DC motor board and the switch board as I was planning to use a switch to connect to the DC motor and use networking and communication to link up both of them. In the end, I was advised by Nadya Peek to just use the DC motor which I did.
3D-printing: Over here, I designed the basketball hoop and 3D printed it. It was a bit troublesome to 3D print as the makerbot was facing some problems. In the end, I learned a lot on how to make the 3D printer work. A few steps (1) Load / Unload filament using the utilities button, and then change the filament. (2) Clean the makerbot, unload filament and then use a brush to clean the inside of where the filament is plugged into. Remember to turn off the 3D printer before doing so. (3) Once done, reload filament and test it! After a while, my basketball hoop finally printed!
Weaving: I learned to weave a net which was pretty cool. I watched an online video, and was able to weave the basketball net using around 8 pieces of identical-length strings and then tying them together!
Assembly: In this picture, I assembled the hoop and the cardboard structure to create the magic hoop!
Assembly: This is the back view of how the magic hoop works. On one end, I have a rubber band to pull the hoop back, and on the other end, I have the DC motor which I am planning to program it.
Electronics Programming: To make the magic hoop move left and right, I actually had to program the DC motor to make it turn anti-clockwise and clockwise at fixed intervals of timings. To program it, I followed the steps below:
(1) Download the necessary files
(2) Use terminal to cd ~/Desktop/DC_Motor to move into the right folder
(3) "Make" the C file, by typing make + name of file (make -f hello.H-bridge.44.DC.make)
(4) Use the AVRISP2 plus a power source (if there is FTDI wire can use that if not any power source is fine) to physically attach both to the board
(5) Program using the AVRISP2 by typing make -f hello.H-bridge.44.DC.make program-avrisp2
The board is now programmed. To change the clockwise and anti-clockwise to the correct interval timings that I wanted to do, I used a very good skill, trial and error, which I learned have been working very well for me thus far! I looked for lines of code that looks like "time" or "intervals" and I altered them and re-programmed the board many times to get the right direction, power, and intervals that I wanted.
Securing and nails: I was able to find three nails and nailed the rim onto the cardboard to make the whole structure more secured. One thing I learned is that if you take your time to look around the lab, you will definitely be able to find the things that you need. There is no need to always ask people. It also helps you to know where the things are by actually trying to use the time to look for things and finding them.
Assembly: That's me holding up the working prototype of the magic hoop!
Assembly: The magic hoop!
Electronics Programming: From the side view, you will be able to see the mechanism of how I am getting the basketball rim to work. I attached one end to a rubber band and the other end to the DC motor, which works very well!
Vinyl cutting: I also learned to use the vinyl cutting which was very exciting as that means I can now cut stickers that I like and I can use them. The steps to do it was (1) Open up Adobe Illustrator (AI), create the design you want. You may need to open up the plugged in software and create "outline" so that it will show up. (2) Import that file into the other software (3) Turn on the vinyl cutter, fit it with the right paper you like (4) Remember the two tabs must be within the white spaces. (5) Press "cutting", and see it work its magic. (6) You can adjust how deep you want the cut to be. (+2 is the deepest which is still not that deep for me)
Complete: The completed Magic Hoop!
Sweet picture of the Magic Hoop at MIT Media Lab Open House for the class, How to make almost anything!
Assembly: In this picture, I assembled the hoop and the cardboard structure to create the magic hoop!
Assembly: This is the back view of how the magic hoop works. On one end, I have a rubber band to pull the hoop back, and on the other end, I have the DC motor which I am planning to program it.
Electronics Programming: To make the magic hoop move left and right, I actually had to program the DC motor to make it turn anti-clockwise and clockwise at fixed intervals of timings. To program it, I followed the steps below:
Securing and nails: I was able to find three nails and nailed the rim onto the cardboard to make the whole structure more secured. One thing I learned is that if you take your time to look around the lab, you will definitely be able to find the things that you need. There is no need to always ask people. It also helps you to know where the things are by actually trying to use the time to look for things and finding them.
Assembly: That's me holding up the working prototype of the magic hoop!
Assembly: The magic hoop!
Electronics Programming: From the side view, you will be able to see the mechanism of how I am getting the basketball rim to work. I attached one end to a rubber band and the other end to the DC motor, which works very well!
Vinyl cutting: I also learned to use the vinyl cutting which was very exciting as that means I can now cut stickers that I like and I can use them. The steps to do it was (1) Open up Adobe Illustrator (AI), create the design you want. You may need to open up the plugged in software and create "outline" so that it will show up. (2) Import that file into the other software (3) Turn on the vinyl cutter, fit it with the right paper you like (4) Remember the two tabs must be within the white spaces. (5) Press "cutting", and see it work its magic. (6) You can adjust how deep you want the cut to be. (+2 is the deepest which is still not that deep for me)
Complete: The completed Magic Hoop!