Week 7 - Molding and Casting
The assignment this week was to design a 3D mold, machine it, and use it to cast parts. This week was Harvard Law School's Bicenntennial, so I knew I would be short on time and decided to do something small. I also knew I had to make a 3D model and I had trouble exporting from Fusion360 during the CNC week and had to redraw the entire model in VCarve. I didn't want to risk that again. Finally, I wanted to make something that I could use for my final project, so I decided to make toast. One of my final project ideas is to make get simple household items that you can click on to learn about patents. Crustless toast is one of the household items that many people do not realize are patented.
Toast
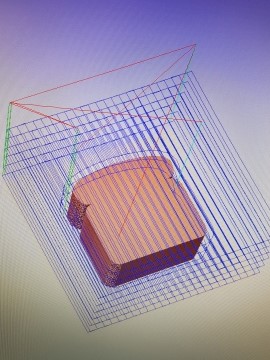
First, I designed the toast in Fusion360. I can feel myself getting more and more comfortable with this software as the weeks go by! The design was simple enough to make, but the problem was in defining the toolpath. I didn't have too much trouble importing my STL file into VCarve, yet once I tried to define the toolpath, my model would turn into a plane. Initially I thought the toast was too thin or the entire model was too small. I tried exporting the file many times and adjusting dimensions both in Fusion360 and in VCarve before I finally realized that I had to press the "convert from mm to inches" button on VCarve. I couldn't just manually change the dimensions. Somehow, since I designed the model in mm and VCarve default is in inches, the program was having trouble with my file. Once I pressed this convert button though, I encountered no problems defining the tool path.

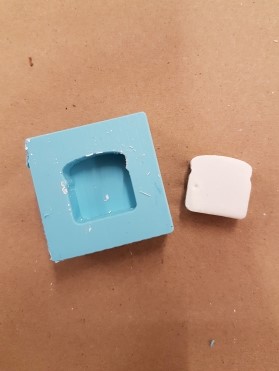
Setting up the Shopbot wasn't too difficult either since it resembled the Shopbot used for CNC. I decided to mill on an used piece of wax wanting to be conservative of wax pieces and figuring that I had more than enough space. The cut fit on the used piece of wax, but it ended up being a lot tighter of a cut than expected and almost broke the wall of the wax. After cutting the wax, I mixed the Oomoo together, which reminded me a bit of arts and crafts time back in the day. I mixed the Oomoo via sheering to not introduce any bubbles, but since this was my first time, a few bubbles were introduced, though luckily not near the borders of the mold. Pouring with a thin lead also helped get rid of bubbles. Mixing the Hydrostone powder to water and adding it to finallly cast a part was straightforward too. Neil taught us that we should be using exothermetic reaction to determine whether the cast had cured (ie. cast should turn hot then cold) instead of time, so I will be sure to do that next time.

Yoda
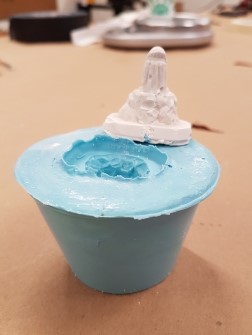
A trick from Rob to creating a simple mold was to stick a figurine into Oomoo. Since I had extra mixed Ooomoo left after making my toast mold, I decided to make another mold using a Yoda figurine. Problem was that the leftover Oomoo was not enough to keep the figurine upright, so I decided to mix more Oomoo and added the new Oomoo mixture to the old mixture. Since the Yoda figurine was already resting in the old Oomoo mixture, adding in more Oomoo made the figurine move a bit. I figured though that this was all within the first 10 minutes of curing and that the mold hadn't fully taken shape yet. I was hopeful that a Yoda mold would still form. After curing, I took the figurine out, then added plaster to cast. The end result looked nothing like Yoda though and I attribute it to my combining two Oommoo mixtures and moving the figurine around during the curing process.

As always, thank you Rob Hart for your help!