Notice: Documentation Forthcoming

Please be advised that this page is a work in progress. More complete documentation will be available prior to the Harvard HTMAA Open House in January 2018.

That said, see below for preliminary notes and process photos.

Initial Concept

Roughly speaking, in my day job I teach teens and coach educators in product design education at a high school entrepreneurship program. While I've brought a small handful of products to market myself, I hadn't ventured into the realm of electronics aside from a couple Arduino-based projects in undergrad. So much of entrepreneurial product design these days involves the design and integration of electronics, and there's a massive, global industrial complex set up to support this type of work. For my final project, I wanted to try my hand at designing and prototyping what could be a consumer-facing product, diving head-first into the world of electronics. Eventually I'd like to make something more purpose-driven, a product to empower, enable, and encourage young people and others to use this technology and to regard the built world with an eye that says, “oh, I could make that.” But to start, I figured a watch would be an ambitious but achievable undertaking for this class, and would help me to better understand (and ultimately teach) the electronics side of consumer-facing product design.

When I think about what a watch does, I think how it anchors us in time. Time can feel so relative, sometimes moving so quickly or slowly; the watch shows us where we are in reference to the time around us, in reference to one another and to the rotation of the earth. But just as we can lose track of time, we get lost in space as well, or even just lost in our own heads. What if a watch could help ground us in both space and time, allowing us to check our connection to places and people close to our hearts in the same, casual, persistent way we check the time?

For my final project, I'll attempt to create a watch which orients spatially as well as temporally, using GPS to display the relative locations of places (and eventually people) of interest, similar to pointing hands on a clock. I'm envisioning a minimal, simple ring with RGB LEDs, using color to help differentiate between AM and PM, between hour and minute, and between places and people of interest.

Feature and Construction Brainstorm

Orientation

Icons by Heipi and Alone Forever

Important points of interest are indicated by color, relative to user's current location.

Proximity

Relative proximity to points of interest is communicated by the width of the color indicator. When a destination is reached, the entire ring will glow.

Housing

The watch housing would be milled from a block of wood. The LED diffuser would either be laser-cut vellum with a wood veneer in the center, or (time permitting) a translucent resin cast directly into the block of wood, to create a seamless surface.

Inspiration: What's Been Done Before

There are many great examples of home-grown electronic watches out there. Some are Arduino-based, some simply tell the time, and others are fully-featured smart watches. My initial inspiration came from Harnek Gulati's Word Watch, itself a HTM(A)A final project from a couple years back. He continued to develop the project further into a Kickstarter campaign and sold over 500 units. He received some glowing reviews from those who were able to snag one before they sold out.

Below are some links to other projects I referenced for further inspiration.

Image source: https://knowtechie.com/gulati-designs-watch/

Project Components and Considerations

the nitty-gritties

Component List

GPS Module (not used in non-GPS version)
as seen in this breakout board
Accelerometer/Magnetometer (not used in non-GPS version)
as seen in this breakout board
3.3 Voltage Regulator
LiPo Battery Charger
as seen in this micro-USB charger
LiPo Battery
APA102-2020 RGB LEDs
Navigation Switch
ATmega328PB (not used in non-GPS version)
ATtiny84 (not used in GPS version)

Schematic

GPS Watch Schematic (incomplete WIP)
Non-GPS Watch Schematic v1

Power

Figuring out how to power my watch was trickier than I expected. Originally I figured I'd use a CR2032 coin cell battery. They're cheap, have a low profile, and they're sold just about everywhere. They don't store a ton of charge (only about 225 or 250mAh) but with smart power draw using a relatively slow clock speed it should be possible to get a decent amount of life out of that battery. I know the final version of Harnek's Word Watch was able to operate for the better part of a year before needing a replacement battery.

The DotStar/APA102 RGB LEDs I'd like to use are rated for 5v, the GPS module I got is rated for between 3v and 4.3v, and the accelerometer/magnetometers I've been looking at are rated for between 2.2 and 3.6v. David Johnson-Davies on Technoblogy found that he was able to run APA102s on a coin cell without too much trouble, though the colors weren't as even as they would be at 5v (namely the blue LED looks rather dim). Unfortunately, while the CR2032 is rated for 3v, it really starts out at 3v and then slowly dips down toward 2.5v or so, which is a no-go for the GPS module.

In this case the solution seemed to be a reachable Lithium Polymer (LiPo) battery. They come in a slew of different sizes so I'm sure I could find one to fit into a watch enclosure, though they don't hold as much per charge as the CR2032 (~100mAh for a similarly sized battery).

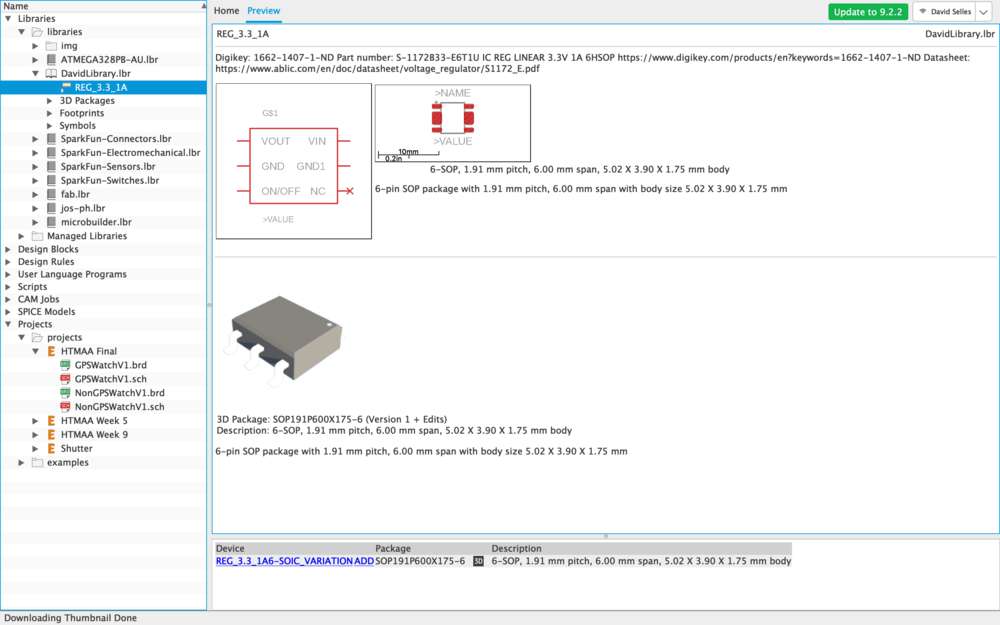
Unfortunately, this leaves us with the opposite problem when it comes to the accelerometer/magnetometer; while most LiPo batteries are rated for 3.6v, they actually start out around 4.2v and dip down to 3.6v for the majority of their discharge, ultimately landing around 3v. I voltage regulator would solve this problem, though upon further inspection the 3.3v regulators we have in stock have a dropout voltage of over 1v, which means they'd be cutting an additional 1v+ off the top of the battery's already low voltage. After some poking around online I was able to find a voltage regulator with a much smaller dropout rating, which would allow me to run all of my components (perhaps with the exception of the LEDs) at around 3.3v.

Process Photos