SOFTWARE: About
This page documents our software, and is meant to explain to even those with little coding experience to how our software works. It reviews some basics of 3D graphics and webapp design.
Deploying locally: Our program can be found at '../apple/toolpath.html'. You can deploy the program locally by navigating to that folder in terminal and using npm start or python -m SimpleHTTPServer.
Overview
Our app consists of the following components:- Rendering: An apple object
- Displaying: A scene object with a camera that allows us to look at the apple
- Canvas: A canvas that allows us to draw a design on the apple
- Communications: "Apple Jack" - a JS library that connects to a Cuttlefish-connected websocket server
- User Controls: A dat.gui control box to adjusting parameters
Rendering the Apple
Our first task with the program is to create a 3D rendering of an apple.
BasicsAxes: In our program, you will see the apple is displayed horizontally. So we use X to refer to movement up and down and the height of the apple and Y to refer to movement along the side or radius of the apple.
Max-Min: Our apple is not a simple circle, but generated using a sinusoidal curve. We use a variable maxmin to determine the difference between the peak and valley along the side curve of the apple.
The apple is generated as a sinusoidal curve rotated around a central axis (the core of the apple).
- Because the apple is initially generated as a sinusoidal curve, it makes it easy for us to create a design by adjusting sine/cosine options.
- We create a curve, then calculate N points along that curve by taking a set number of x-points at set distances and plugging them into the sinusoidal equation defined by user controls . N (numPoints) is the height of the curve divided by the size of the x-step (both of which are user-controlled parameters).
- THREE.LatheGeometry allows us to easily turn a sinusoidal line into a 3D mesh by rotating a 2D line around the space (more on this later). It also allows us to constantly rotate the apple around the space in the final rendering.
- We also use THREE.js to easily create 3D mesh and overlay a texture on the apple using an image we loaded in ('/assets/apple_texture.jpg') THREE.MeshBasicMaterial.
Displaying the Apple
We use Three.js to dispaly our apple object, which involves:
- Setting up a THREE.Scene object with
'scene = new THREE.Scene();: This object is allows us to place an object, decide how it will be lit and how it will be seen (where cameras are placed). - Setting up a camera so we can display the scene on the screen
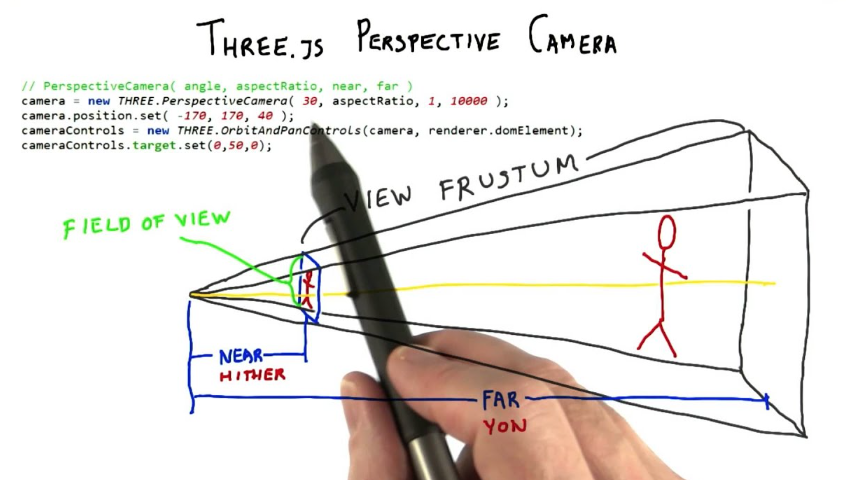
'THREE.PerspectiveCamera( fov, aspect, near, far);'.
Here are some useful terms related to 3D computer graphics:
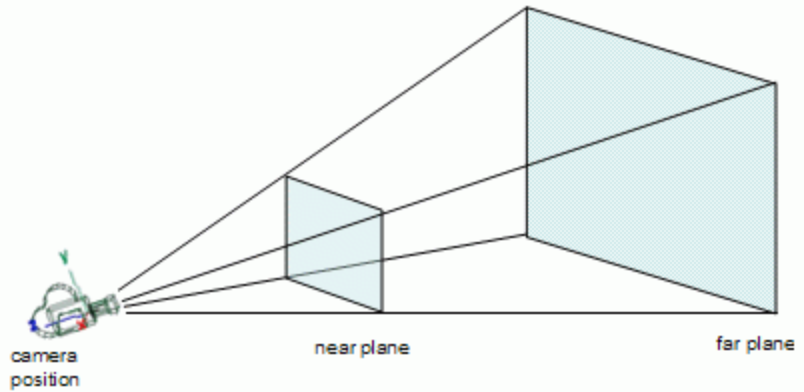
- view frustum: the region of space in the modeled world that may appear on the screen aka field of view of the camera, in THREE this is referred to a fov (field of view) and is given in degrees from the bottom to the top of the angle that defines the view
- aspect: camera aspect ratio, determines the shape of the rectangle the camera records (like in a real camera)
- near plane / far plane: we see the apple via the near plane
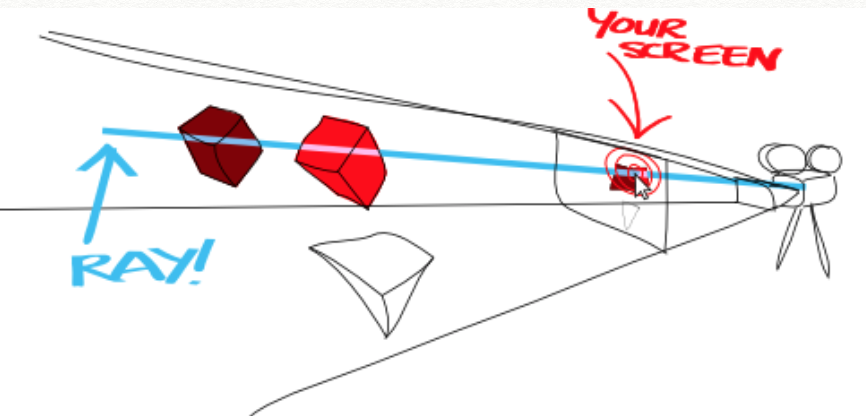
- raycasting: we use a THREE.js option called Raycaster which relates a location of the mouse on the 2D screen to a corresponding point in the 3D space the apple exists in (a process called Raycasting).


Design
Sinusoidal
As discussed earlier, we can create a carving design simply by adjusting the sine/cosine equations we used to generate the apple.
Hand Drawing
When the "handdraw" button is selected in the user control box, we lay an HTML canvas over the screen. The user can draw a black line. When the user lifts their mouse, the app converts the hand-drawn line into a smoothed line equation. The apple is then regenerated using this equation the same way we did before.
HTML Canvases: Our canvas records user interactions. Whenever the user clicks down the mouse, we set the canvas to record the points where the mouse is in space.

Smoothing
We created several smoothing algorithm options for applying to the hand-drawn line before applying to the apple. See this explainer on basic smoothing algorithms we implemented such as exponential and moving average.
Communicating to Cuttlefish
Cuttlefish already used WebSockets for its serial communication, but didn't have a built in facility for arbitrary data to and from a websocket server. There was a built-in websocketclient.js hunk that sounded promising, but it could only do a single stream of i/o and didn't contain logic for auto-spinning up the websocket server like the serialport connector does.
Working based off of the serialport.js hunk, we created:
- hunks/comm/applejack.js - cuttlefish client hunk that connects to the apple-jack-server websocket and translates websocket packets to the corresponding inputs and outputs in cuttlefish-land
- processes/apple-jack-server.js - websocket server process that facilitates addressed two-way communication between connected "ui" and "cuttlefish" clients
- apple/ui-applejack.js - the UI's applejack (websocket) client
- apple/socket-test.html - test page for applejack socket API
One interesting thing cuttlefish does that we followed was having the serialport-websocket clients spin up and shut-down their own corresponding websocket servers. The nice thing about this is that you don't need to worry about the IP / port of the websocket server -- it sends that along as part of an HTTP response.
This took a bit of fiddling to get right, as the main cuttlefish serialport-websocket could rely on always spinning up and always shutting down a server whenever it was created/destroyed — for our use case, we wanted it to be possible to open EITHER the cuttlefish hunk OR the standalone UI and still properly spin up the websocket server and connect to it.
Our apple-jack-server keeps a registry of currently connected clients and their type (UI or cuttlefish):
    let clientSocketsByType = {
      ui: [],
      cuttlefish: []
    };

    // ...

    if (data.type === 'identification') {
        clientSocketsByType[data.clientType].push(ws);
    }

    // ...

    ws.onclose = (evt) => {
        Object.keys(clientSocketsByType).forEach((type) => {
          clientSocketsByType[type] = clientSocketsByType[type].filter((item) => item !== ws);
        });
    };
We then devised what data packet formats we'd want to go between the UI and cuttlefish.
To start, we wrapped all messages as JSON objects with relatively descriptive parameter names. If performance was found to to be insufficient for a use case, we would move to a more compact performance-focused data format (e.g. protobufs or a format of our own devising)
apple-jack Socket Protocol
Top-level Packet Types
Client Identification:
{
  type: 'message',
  clientType: 'cuttlefish' or 'ui',
}
Messages:
{
  type: 'message',
  to: 'cuttlefish' or 'ui',
  message: [MESSAGE - see below]
}
[MESSAGE] contents:
UI to Cuttlefish
step message:
{
  messageType: 'step',
  x: 3.212,
  y: 5.2212,
  rotation: 12.5
}
distance sensor control message:
{
  messageType: 'distanceEnabled',
  enabled: true/false
}
stop message:
{
  messageType: 'stop',
}
Cuttlefish to UI
distance sensor control message:
{
  messageType: 'currentDistance',
  distance: 0.234234 (or default int?)
  x/y/z
}
steps completed
{
  messageType: 'stepsCompleted',
  steps: 123
}