Gabriella Perry
Final Project
My final project for How to Make [Almost] Anything is the "3-Stitch-Knit Machine". It is a small-scale knitting machine based on existing flat bed knitting machines. The intent was to create a scarf knitting machine, but that idea seemed less and less feasible as the semester went on.
Ideas and Inspiration
The original proposed concept was a "Crochet Machine" since there is a lack of crochet machines in industry because of the complex movements used in the process. The sister process to crochet, knitting has long since been mechanized and mass-produced in industry using highly advanced fabrication technologies.

I decided to pivot from the crochet machine to a knitting machine since it would be easier to build, and because I have never built a machine before...
There are many existing kinds of knitting machines some of which are small for personal use and large for industrial use.
One particular kind of knitting machine is called a "flat bed" knitting machine.
A crucial component of the flatbed knitting machine is the latch hook which allows the knitted loops to pull back and then over the hook to create loops. I have 3D printed hinges in objects before, so I decided to design, model, and 3D print the pieces for the latch hook and the base for the latch hook to slide through. For preliminary designs, I printed two hooks and a base with two slots.
Preliminary Prototyping
I printed about five versions of the latch hooks. Originally I hoped to print the entire hook and have the latch piece be offset and freely moving once printed. However, I was unsuccesful and every fully printed hook had an immobile latch. I ended up printing the pieces separately and then connecting them using a wire that feeds through the latch and hook separately.


The original latch hook designs did not work as intended as the yarn ended up inside the hook instead of pulling over the hook. I redesigned the latch hook so the latch when closed is supported by the end of the hook and modified the hook so that the part the yarn slides on is flatter and prevents the yarn from getting stuck.


I also redesigned the knitting machine to include a piece to push the knitted yarn back on the hook to open the latch and feed the next loops of yarn. I also increased the nuber of hook units on the machine from 2 to 6 to see how this affected the force neeed to pull the yarn over the latch hook. In this new model I could also remove every other hook to privide extra spacing between hooks. This is important for helping yarn feed through the hooks when the machiine is pulling against the yarn.


Below is a video of me testing the printed machine parts by hand before attempting to motorize the machine.
And here are some hand actuated knitted pieces

Electronics
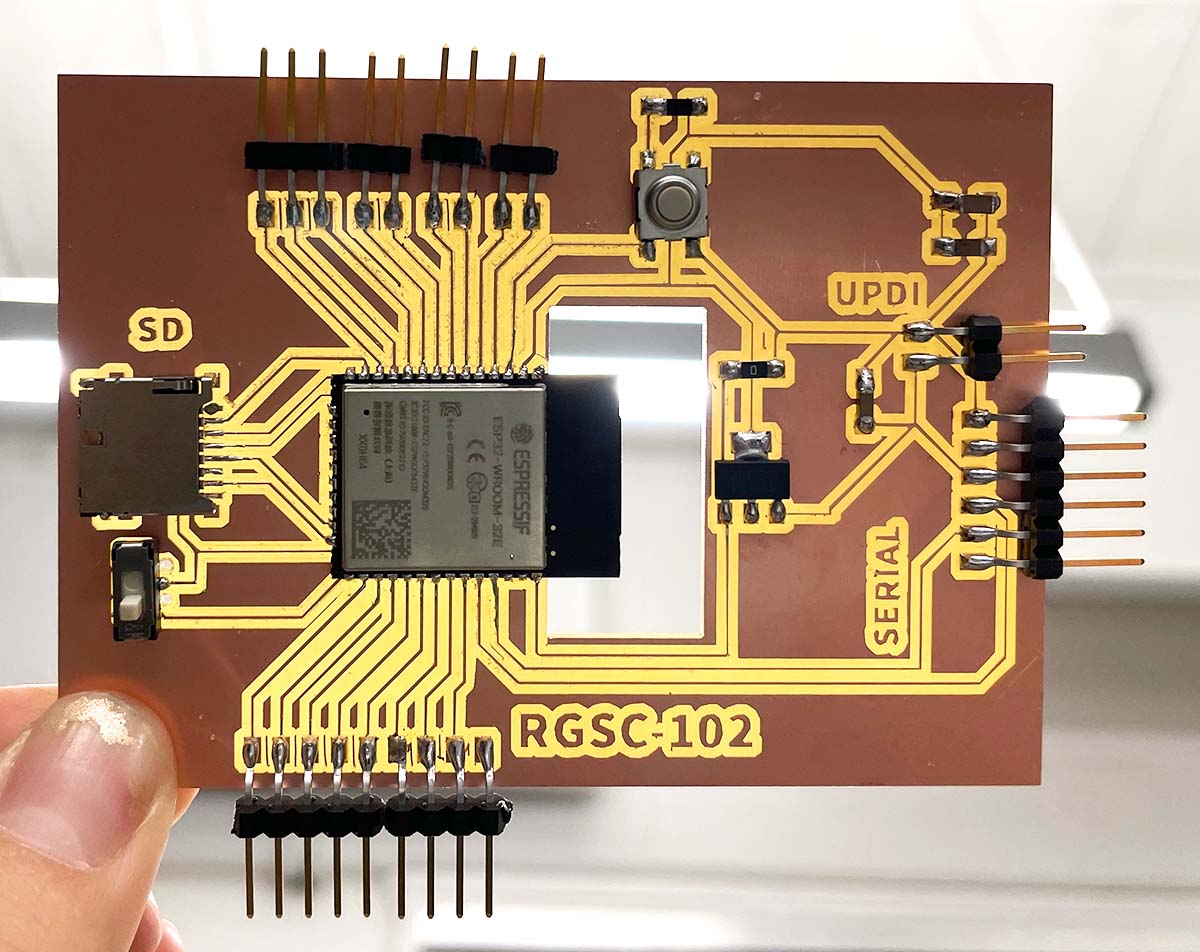
During the semester, I made a bunch of ATTiny boards and an ESP board that I used for testing the knitting machine. The ATTiny board was designed and made during the input devices week and the ESP during the networking week. Check out the links for more board information!

Motors, Drivers and Buttons!
I started with a servo motor to move the machine because I was afraid of using larger motors. They require more power, and I was deathly afraid of frying my nicely made boards. I attached a servo to a printed component that fits on top of the butt of the Latch hooks. I wrote a very simple program that turns the servo to 90 degrees and then back to 0, pulling the slider back and forth. The servo motor did work, but my intuition told me this was not going to cut it when pulling tight loops over large hooks.
I swapped out the servo motor for an extruder motor and a gear rack for the next version of the machine. The extruder motor is attached to the latch hooks, and the gear rack is positioned so that the motor can move backward and forward.


Stepper motors need drivers. I decided to use an existing driver, the A4988. I spent many hours googling how to set up the driver, and I kept getting confused about how to power the motor and the board. At one point, I accidentally flipped the capacitor and burnt out my ATTiny 1614 microcontroller. After many hours and a help session with Nathan, I programmed the motor to move back and forth on the gear rack.
Once the motor was working, I milled a new board with buttons to control the motor motion. That way, I could control the hook position while I added the yarn.

Knitting Weights
When knitting, it is essential to keep an appropriate amount of tension on the yarn so that the loops are held down but can still move back and forth on the hooks. Tension is maintained by adding weight to the start of the knitted piece. I found that knitting with six loops/hooks with any weight was difficult for the single stepper motor because the yarn would always get pulled too tight. Three or four loops was much more doable. I fashioned a makeshift weight for the early testing made out of cardboard, wire, duct tape, and wood. Later I designed a new 3D printed version that had the same weight as the cardboard version.

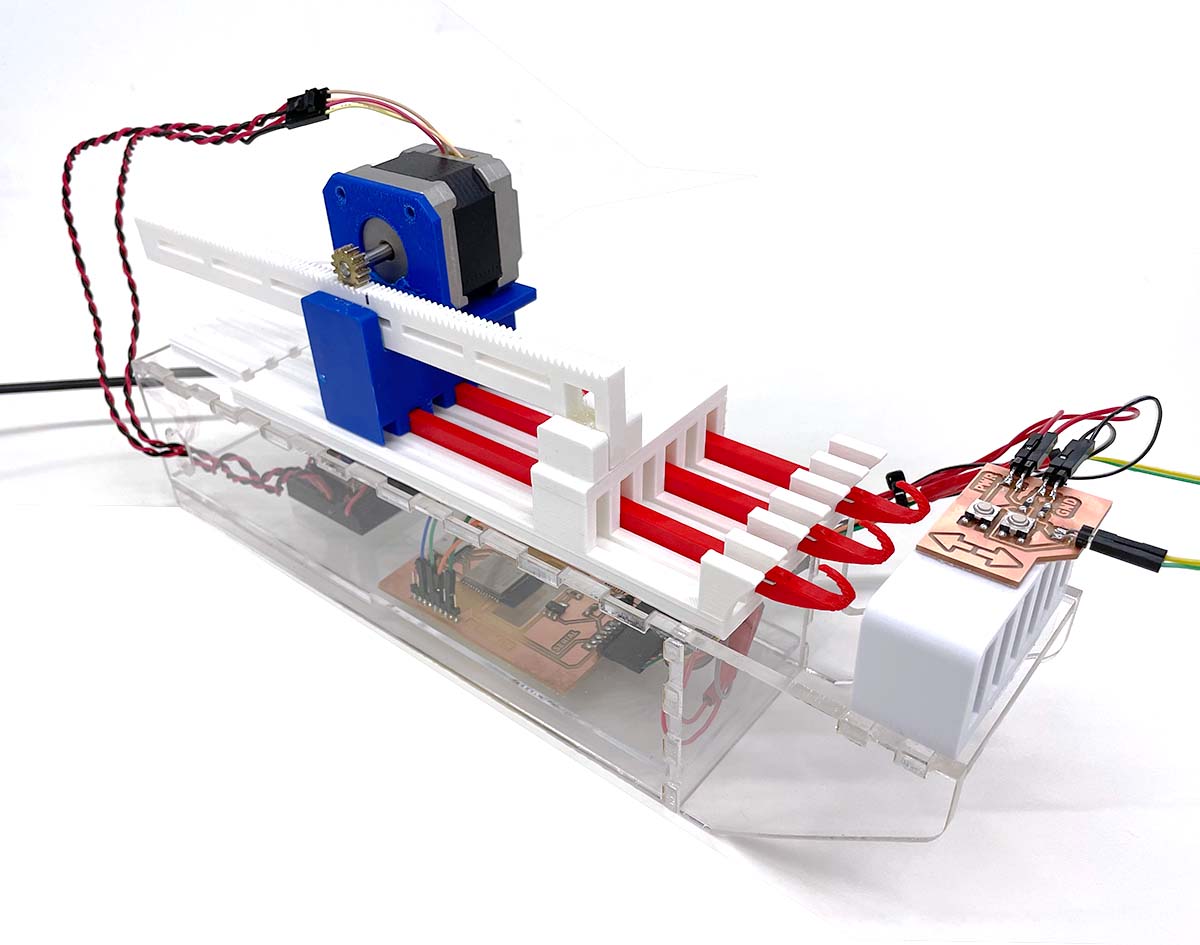
Packaging
Now to put it all together!!! I decided to house the electronics underneath the main machine to keep everything compact. I designed the box to be laser cut out of acrylic and glued together. The top plane of the box holds the machine but can be removed to access the controller underneath. The box has cutouts for the logic and motor power and the wires that connect to the button board, which is mounted on the printed piece separated from the main machine. The machine has to be positioned on a table so that the knitting hangs off the edge.


During final testing, I turned up the potentiometer on the motor driver to apply more amperage and therefore increase the force so the motor could pull tenser yarn. The machine can successfully knit one and two strands of yarn, with occasional problems like yarn getting stuck somewhere it shouldn't be.

Neil's Questions:
What does it do? It is a machine that can knit three stitches over and over again. It can successfully knit one or two strands of yarn.
Who's done what beforehand? Knitting machines are commonly found in the textile industry, and smaller versions exist in households. However, you do not commonly find small flatbed-style knitting machines like mine in the typical household. (I don't think there are any with just three stitches)
What did you design? I designed all of the printed pieces, the laser cut pieces, the ESP32 control board, the button board, and the knitting weight.
What materials and components were used? PLA plastic in various colors, a sheet of 4.6mm acrylic, one stepper motor, and one stepper driver. I used many wires and electronic components, including the ESP32, pin headers, capacitors, regulators, a switch, multiple buttons, and resistors.
Where did they come from? Everything I used came from the Harvard lab. I used a variety of PLA colors so I didn't hog any one color and found scrap acrylic that I could fit all of my pieces on. The only thing I bought was my own personal FTDI cord because the ones in the lab kept disappearing.
How much did they cost? $20 for PLA, $15 for acrylic, $8 for a motor driver, $10 for a stepper motor, $8 for PCB material, $10 for miscellaneous electronics, $10 for FTDI cord, and $10 for a nine-volt power supply. Total = $91.
What parts and systems were made? The entire system was based on a flatbed knitting machine, but all aspects of this system were designed and made by me except the motor driver, which was premade, and all of the electronic components that I could not make myself.
What processes were used? 3D Printing, Laser cutting, and milling.
What questions were answered? Can I made a knitting machine? Yes but only one that is three stitches.
What worked? What didn't? Knitting 3 stitches worked, knitting more was more difficult without having a stronger motor or more motors in general.
How was it evaluated? I evaluated it by how successful it could be at knitting something. It can successfully knit long skinny knitted things that could be used as headbands, bowties, accessories etc.
What are the implications? There probably isn't any real-world implications for this machine, but the significance for me is that now I know how to design and build functional machines, which was my main goal in this class!!!!
This has been my all-time favorite class. Thank you to my Harvard section mates for making this an enjoyable experience. Thank you to Rob and Nathan for hanging out and answering my many questions, I know I ask way too many. Thank you Neil for your wealth of knowledge. It was always a pleasure to hear you lecture about things I did not understand until I spent a couple of hours reviewing the HTMAA website. Thank you all, and happy making!!!