project proposal
press fit construction kit
pcb fabrication
3D scanning and printing
electronics design
molding and casting
embedded programming
cnc machining
| [06] ~ MOLDING AND CASTING |
|
This week I made some snap-fit tiles using molding and casting.  DESIGN I had a lot of different ideas for what I would make this week but eventually settled on the snap-fit tile after finding inspiration from my precision machine design class with Alex Slocum. One of the fun "toys" he passed around in class was a snap-fit rubber mat for industrial workplaces. I liked the idea and decided to try to make my own version. Making the 3D model in Solidworks wasn't too hard but figuring out how to design the two-part mold was way more challenging than I thought it was going to be. The amount of undercuts and weird symmetries was just so confusing. I ended up finding a workflow that is a nice way to check whether you made the molds right. I first made two bodies within the same part for each mold. Then, I used boolean subtracts to create the negative from the positives (this produced what the silicone molds would look like). I then did another boolean subtract which should result in the finished model. All went well I the final result turned out to be exactly what I wanted. The other design challenge was accounting for tool-diameters. Initially some of my features would not have been mill-able. So I tweaked the design a bit. I'd hope to only need to use one tool (and so not need to do a tool-change) but I ended up needing to use a 1/16" end-mill to access some of the smaller features. 
 
SHOPBOT MILLING I milled my molds on the Shopbot Desktop. I love Shopbots. They're so nice to use. I imported my STL's in Partworks 3D and stepped through the toolpath generation process. Here are the settings I used: Job 1: Rough Cut Tool: 1/8" end-mill Pass-depth: 0.05" (it's less than 0.125" because my object is pretty slim and I didn't want the finish cut to have to remove a bunch of material) Feed Rate: 140 inch/min Plunge Rate: 100 inch/min Stepover: 40% Spindle speed: "F60.4" * 60 = 3600 RPM (for some reason you need to multiply the number on the spindle controller by 60 to figure out the true RPM). Time: 4 mins (estimated), 6 mins (actual) Job 2: Finish Cut Tool: 1/16" end-mill Feed Rate: 140 inch/min Plunge Rate: 100 inch/min Stepover: 10% Spindle speed: "F60.4" * 60 = 3600 RPM Time: 15 mins (estimated), 22 mins (actual)I've started a google doc to keep track of all the settings I use on machines like the shopbot and lasercutter because I figure I'll be accumulating a lot of knoweldge in this area and it'd be good to keep track of it.  
There were a few things I made sure to do when setting up my jobs on the Shopbot. The first was to leave a little border on the shorter sides of the wax to ensure I could re-zero the Z-axis when I changed tools. Otherwise you'd have to go through the risky process of calibrating at a certain level on the rough-cut and accounting for the depth of cut (which you can do but making a mistake is easy). I also used a starting depth of 0.05" to ensure that the top surface got nicely-milled. 
Shopbot quick tip: Sometimes a tool can be stuck in the collet and it takes a lot of force to get it out. When I don't know which direction to turn the collet I'm always worried that I tighten it rather than loosen it. My secret is to hold the tool that attaches to the bottom (the funky looking silver wrench) in my left hand and the tool that attaches to the spindle in my right hand. This makes the tightening and loosening of the collet intuitive: open your hands (pull part) to open the collet and close your hands (push together) to tighten. 
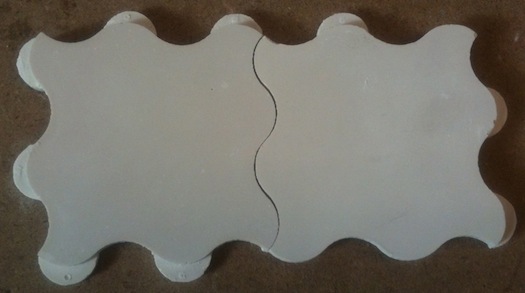
MOLDING AND CASTING Moving on to molding and casting... I used Oomoo 25 to make the negative mold from my wax positive. I realized halfway through pouring the Oomoo in the second side that I totally forgot to design-in pour holes and vents for my mold. To fix the problem, I stuck a small cylindrical stand-off into the mold while the Oomoo was curing. It ended up working pretty well and left a nice clean hole. I also stuck a coffee stirrer in next to it to act as an air vent.  Both sides came out well with only minor air bubble defects.  Now that I had the two sides of the mold, I could now start casting. I started with drystone. I initially tried making a funnel out of paper with the idea that it'd be easier to get the drystone in the mold but it just clogged and made things way worse. I found the best technique was just pouring slowly and with a very thin stream. I inclined the mold at various angles while I was pouring to ensure the drystone got everywhere. The first cast actually turned out really well. The tiny features came out way better than I was expecting.  In fact, the small features came out so well that it made the tiles basically impossible to fit together since the material is quite hard and brittle. So I ended up filing-off the little nubs. I made three more. Two in drystone and one in hydrostone. Some ended up with some major defects on the bottom side where air bubbles got trapped. In the future I think I'll try designing the mold a little more intelligently to account for fluid and air flow in the mold.  But here are the finished tiles...   Molding&Casting Tips&Tricks
SOURCE Solidworks Master Part snap_tile_part1.stl snap_tile_part2.stl
|