
The individual assignments this week is to write an application that interfaces a user with an input and/or output device that I made. Specifically, I planned to make an application that interfaces with a servo motor (output device).
Since my final project is to make a motor that is timer-controlled, I decided I wanted to make an app with Google AppSheet. AppSheet reads data from a Google Sheets file which is great, because the ESP32 microcontroller is capable of reading / communicating with a Google Sheets File! For example, this person in the video link below connected an ESP32 to communicate with Google Sheets:
https://www.youtube.com/watch?v=0LoeaewIAdY
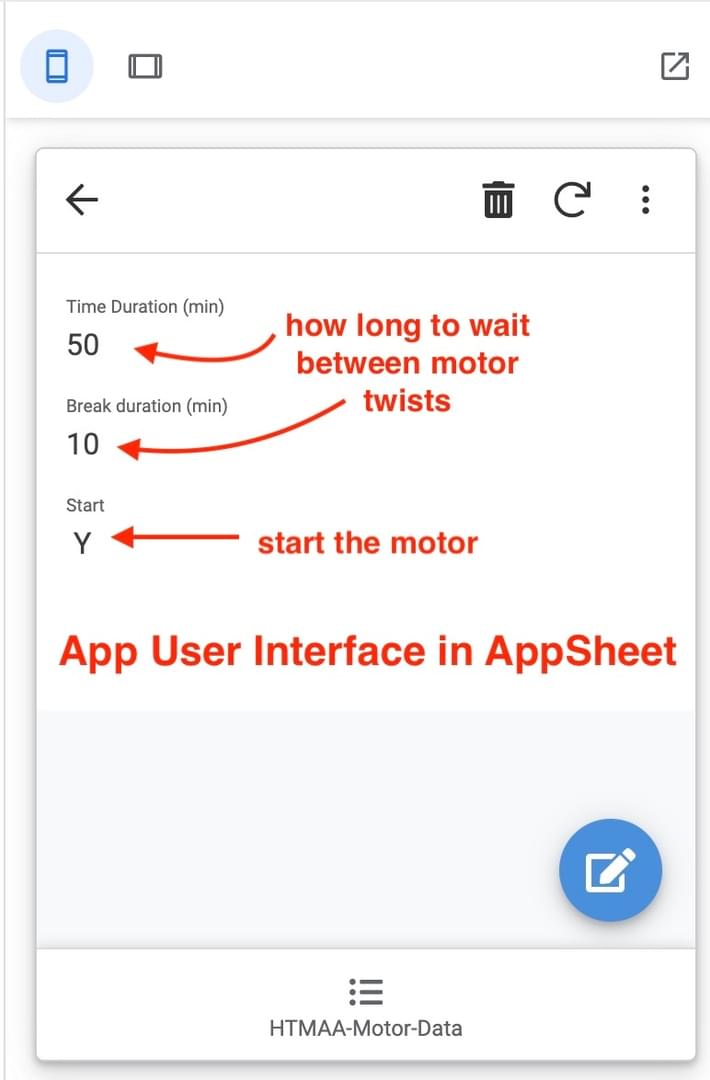
So, the first step I took was to create a Google Sheets file and populate it with some key data that I would want to then drive the behavior of the motor:

Next, I went to script.google.com > New Project.
Next, I used the following tutorial for ESP32 communication with Google Sheets:
https://docs.leafony.com/en/docs/examples/advanced/2_p/esp32/esp32_googlesheets_1/
First, I copied the part of the url in google sheets after the https://docs.google.com/spreadsheets/d/
12uV6i5-bm_KL8Ydc3ERwt6YUTzVqRkSRn95GLOafwXM/edit#gid=0
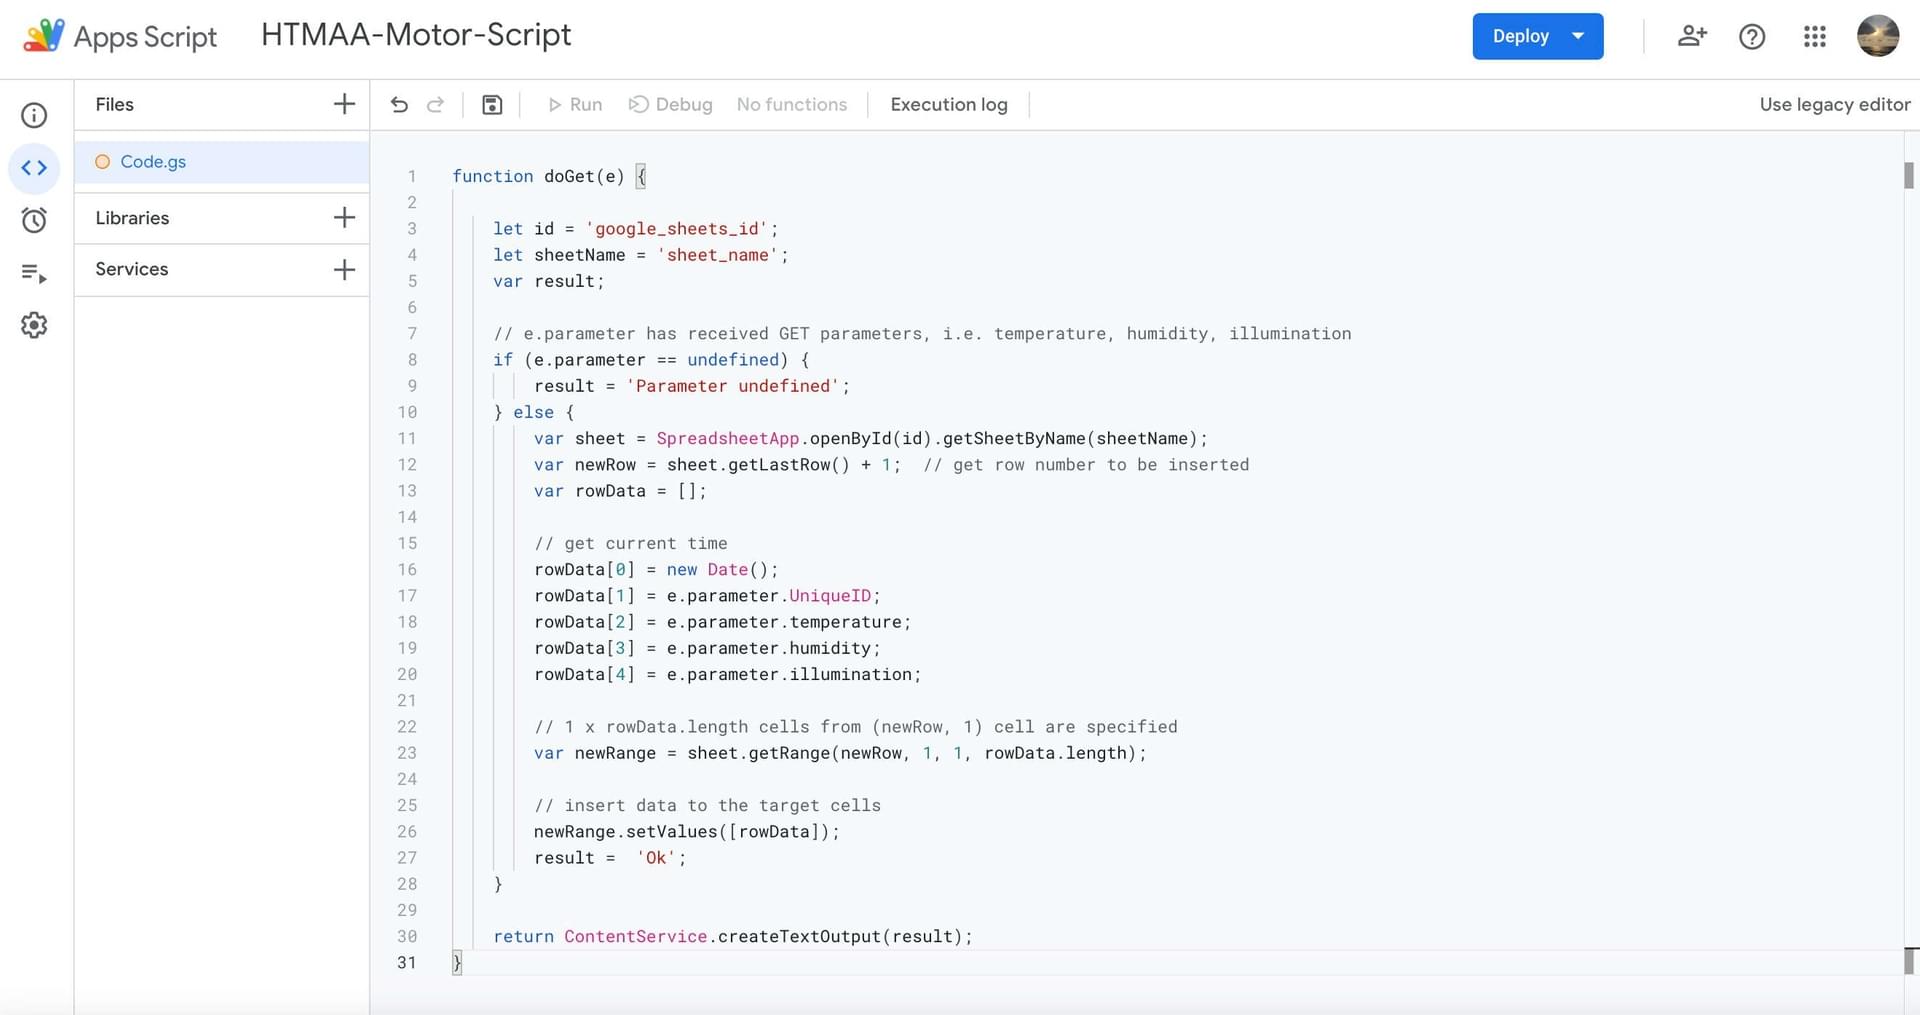
Next, I copy-pasted the Leafony example code into my new project within script.google.com as follows:
Then, I edited line 3 and line 4 per the tutorial instructions. For line 3 I replaced 'google_sheets_id' with the copied url from my google sheets as explained above, and on line 4 I replaced 'sheet_name' with the name of my google sheets file (HTMAA-Motor-Data). 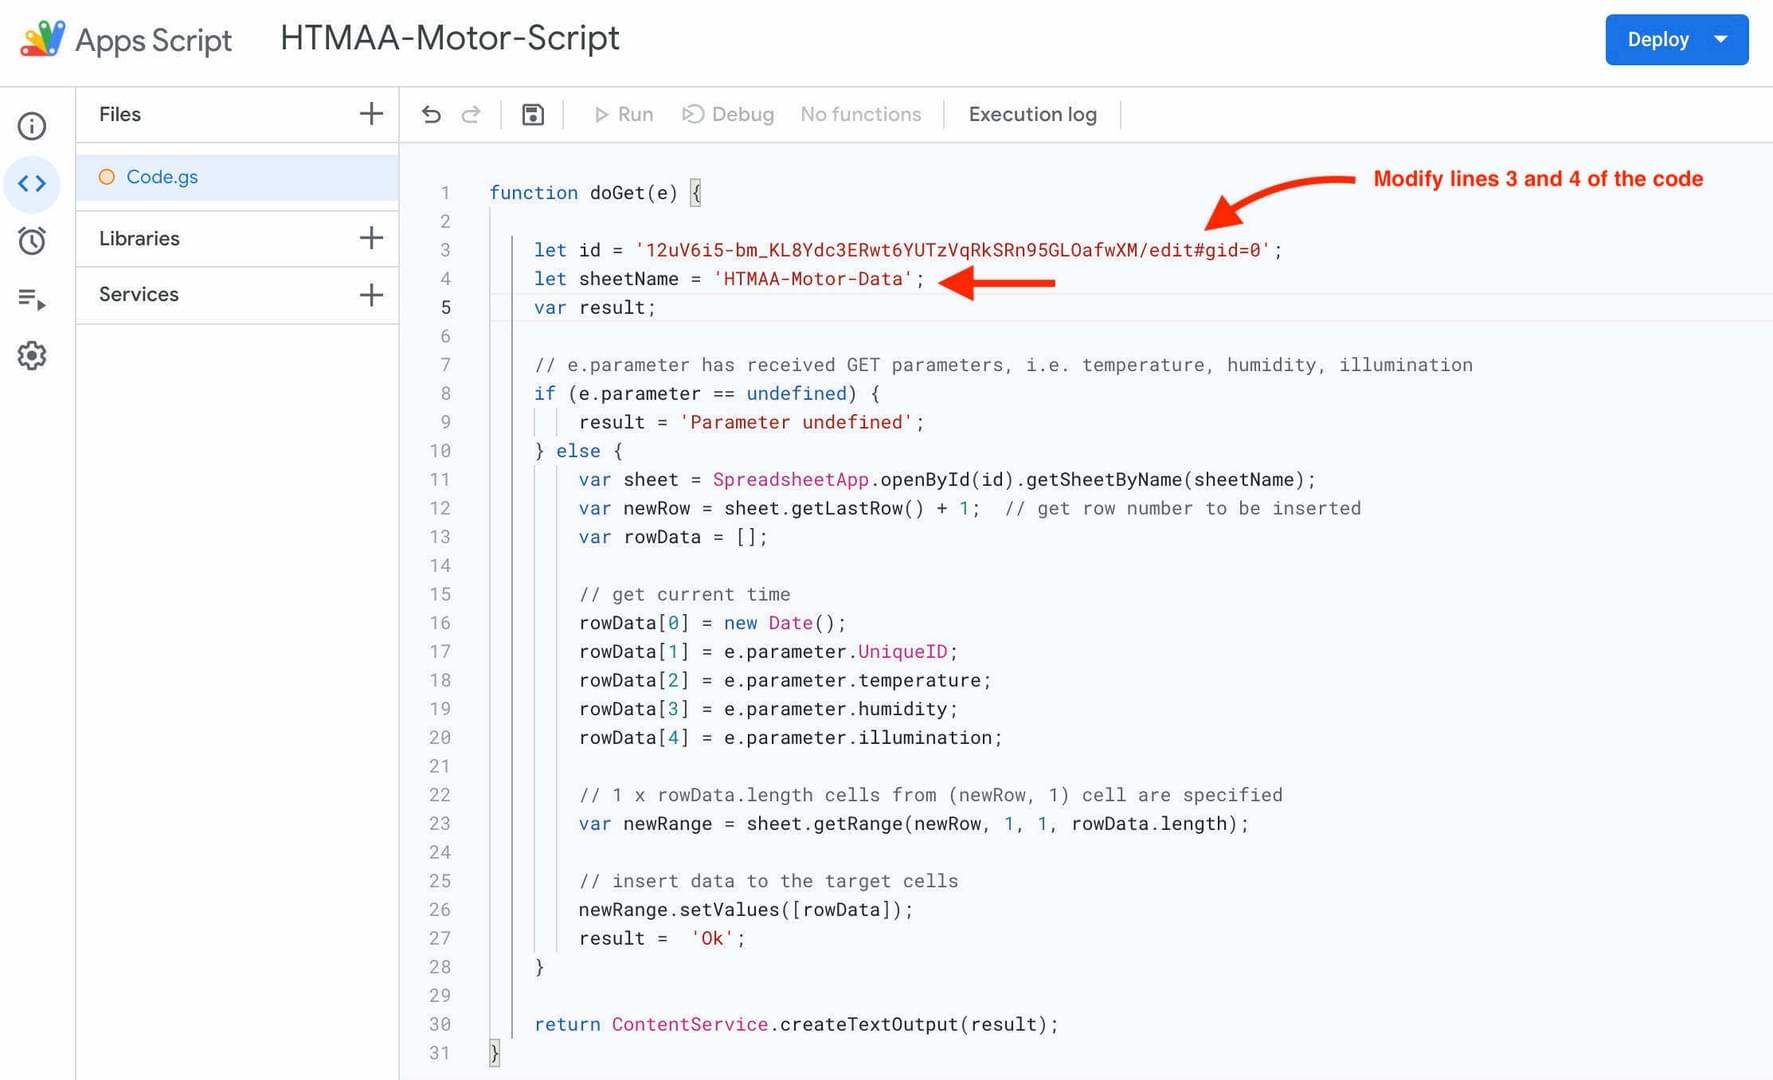
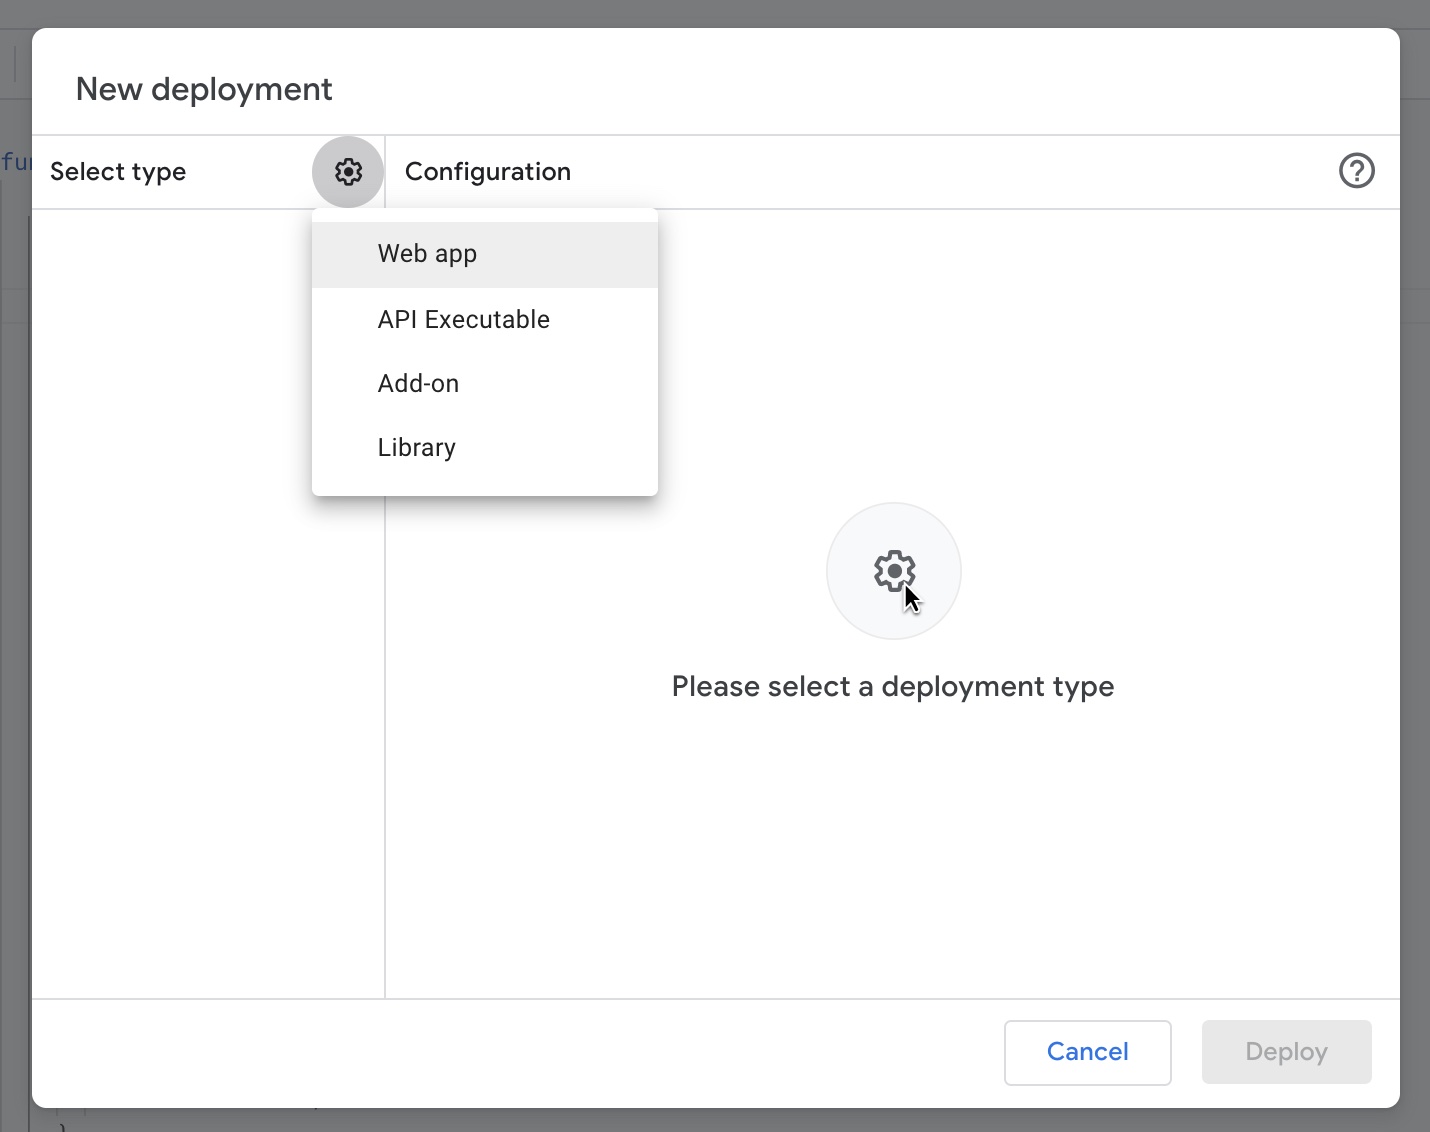
Next, click on Publish > Deploy (in the newer version of the software, just click on Deploy > New Deployment.
After clicking on New Deployment, click the gear icon and select Web App.
Change access permissions to Anyone (not just people with a google account and not just yourself). Then click the Deploy button.

Next, copy the web app URL. In my case, this is:

Unfortunately, I kept getting an error when trying to paste the url into my browser:
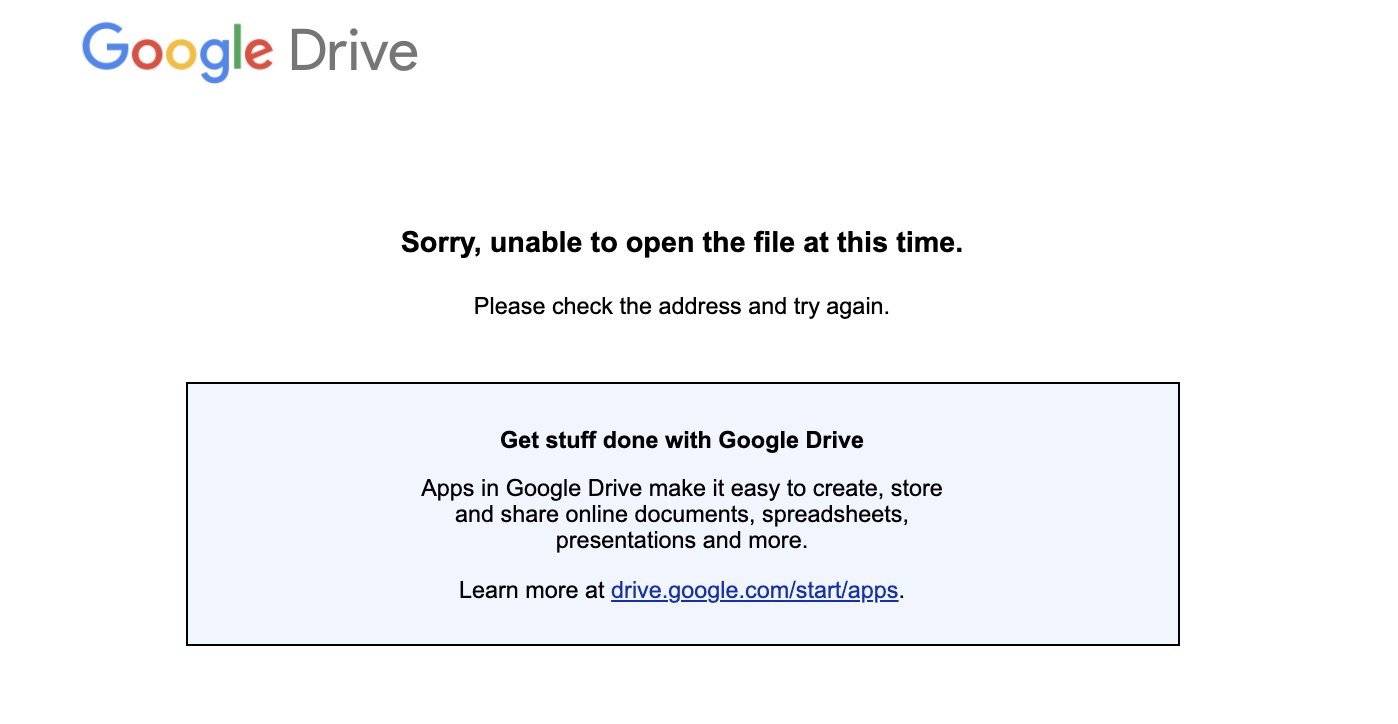 Unfortunately, I got stuck and wasn't sure what to do at this point.
This is what I want my app to look like (and what the user interface looks like in AppSheet):
Since it wasn't working well for me and it was too late to get TA help at this point after Thanksgiving break, I moved on to attempt to use Processing. Below is a tutorial I tried to follow for connecting my Servo Motor to an app using Processing:
https://www.instructables.com/Servo-Motor-Control-Using-Arduino-and-Processing/

Here's the associated Arduino code:
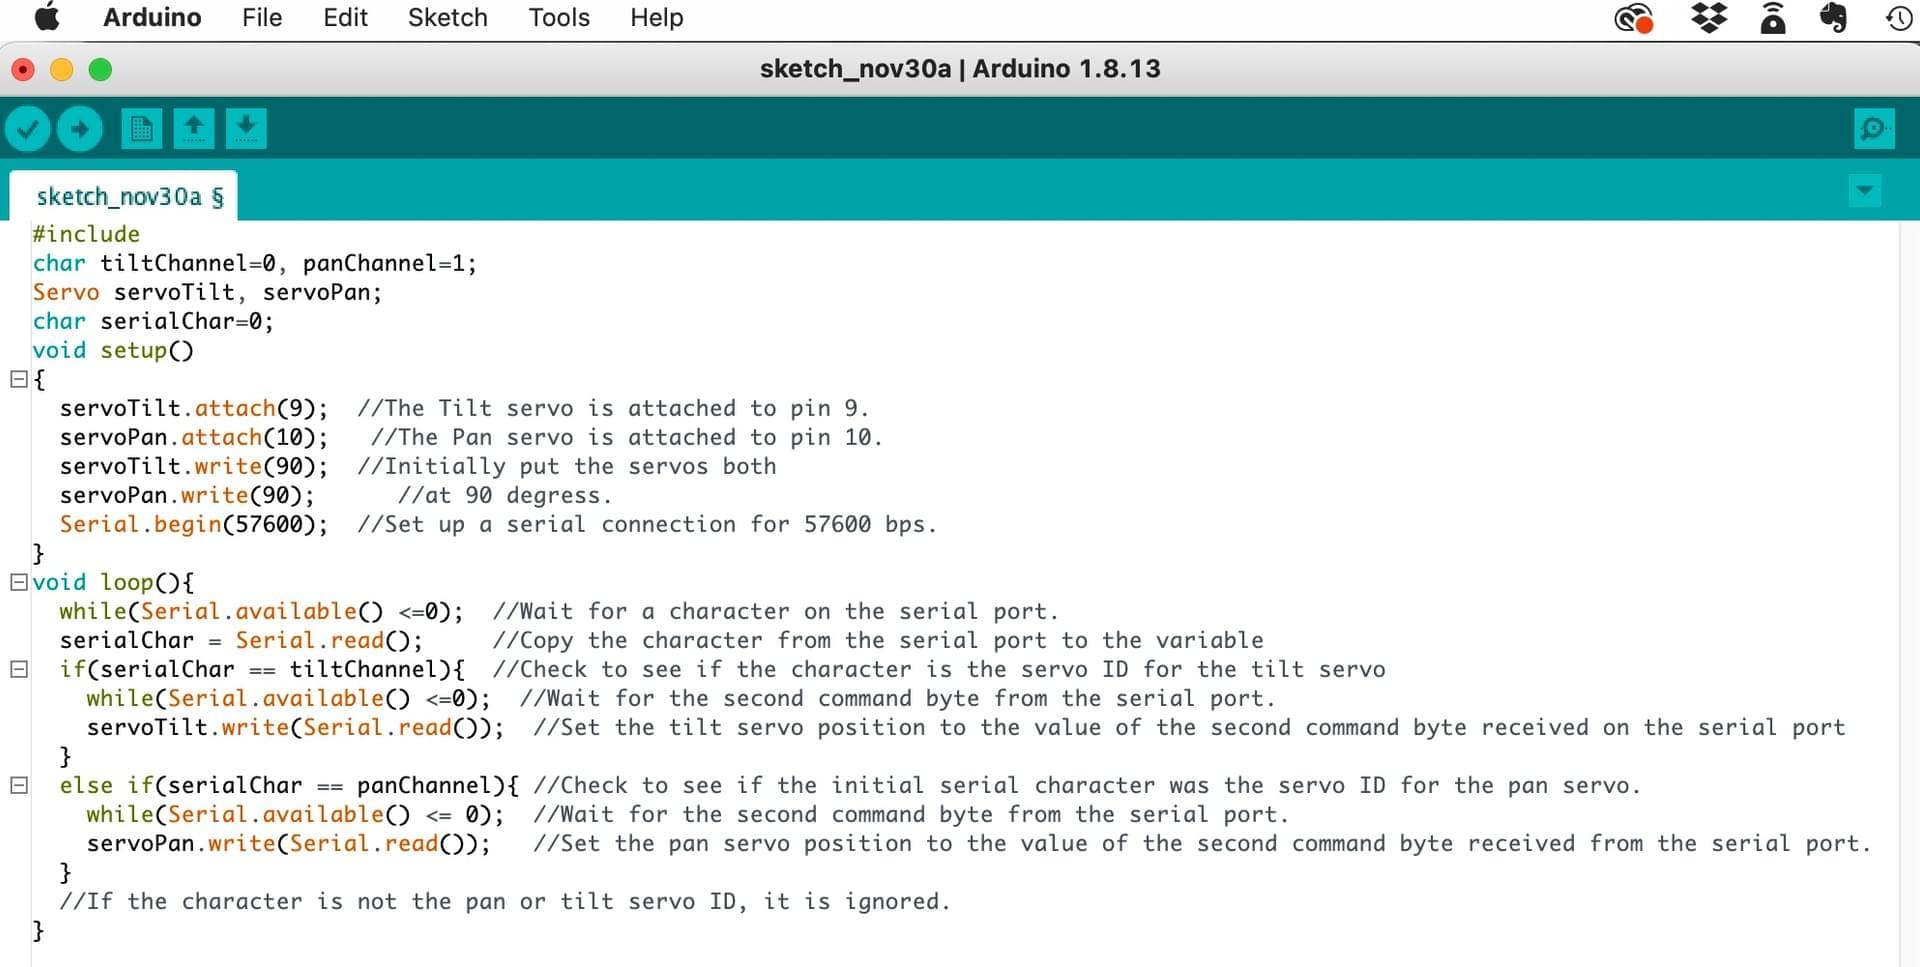
Unfortunately, I didn't have a tilt-able Servo with me and was unable to get it to work. But, here's how I would connect the ESP32 to the Servo motor:
After going to office hours later, I learned that perhaps just a basic interface in Processing would be best. For example, Jordan Gowen from 2020 for HTMAA class has a wonderful example of an app in processing:
http://fab.cba.mit.edu/classes/863.20/Architecture/people/JordanGowen/week12.html
My goal, in preparation for the final project, is to make an interface with several buttons that can start timers:
1) 50 min timer button
2) 10 min timer button
Each of these buttons, respectively, should start timers so that the motor will turn in a particular direction after that time is up.
Ok, time to start over... I found a good ESP32 web app tutorial here!
https://randomnerdtutorials.com/esp32-web-server-arduino-ide/
This worked wonderfully!!! Hooray!! I was able to click the different buttons to change the state of LED's or other output devices on the ESP32.

Below are two views of the web app for the ESP32 that I made. You can click on a button to change the state of an LED or other output device, and it will change color in real time in the web app, and show that you have pressed the button.
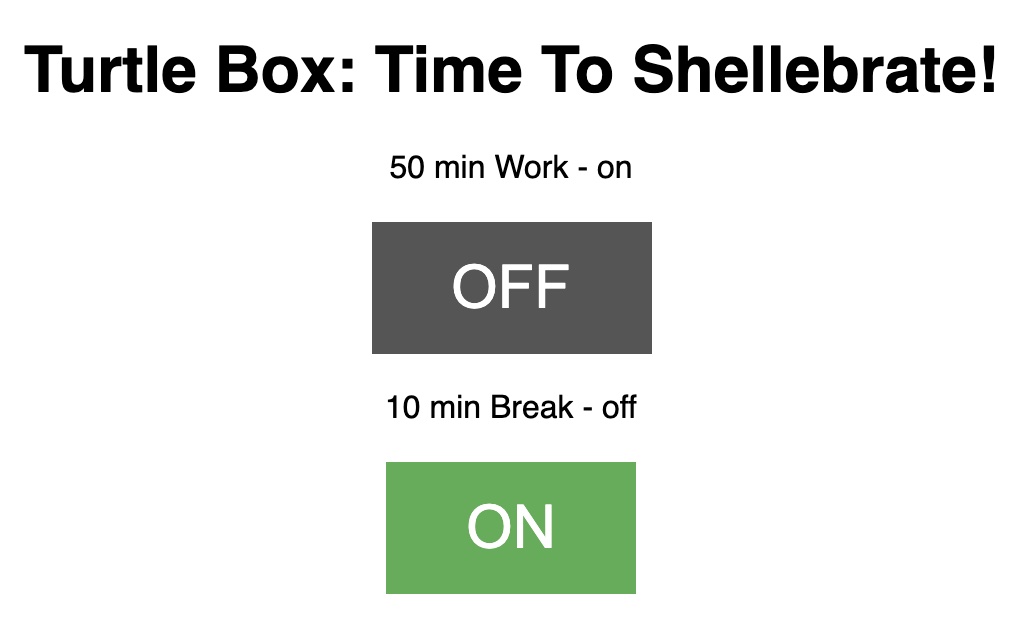

Yay! Super easy and it worked great, especially with the EECS_Labs wifi in the EECS shop! I plan to use a similar interface for my final project.
Note that this was the ESP32 Board that I used:
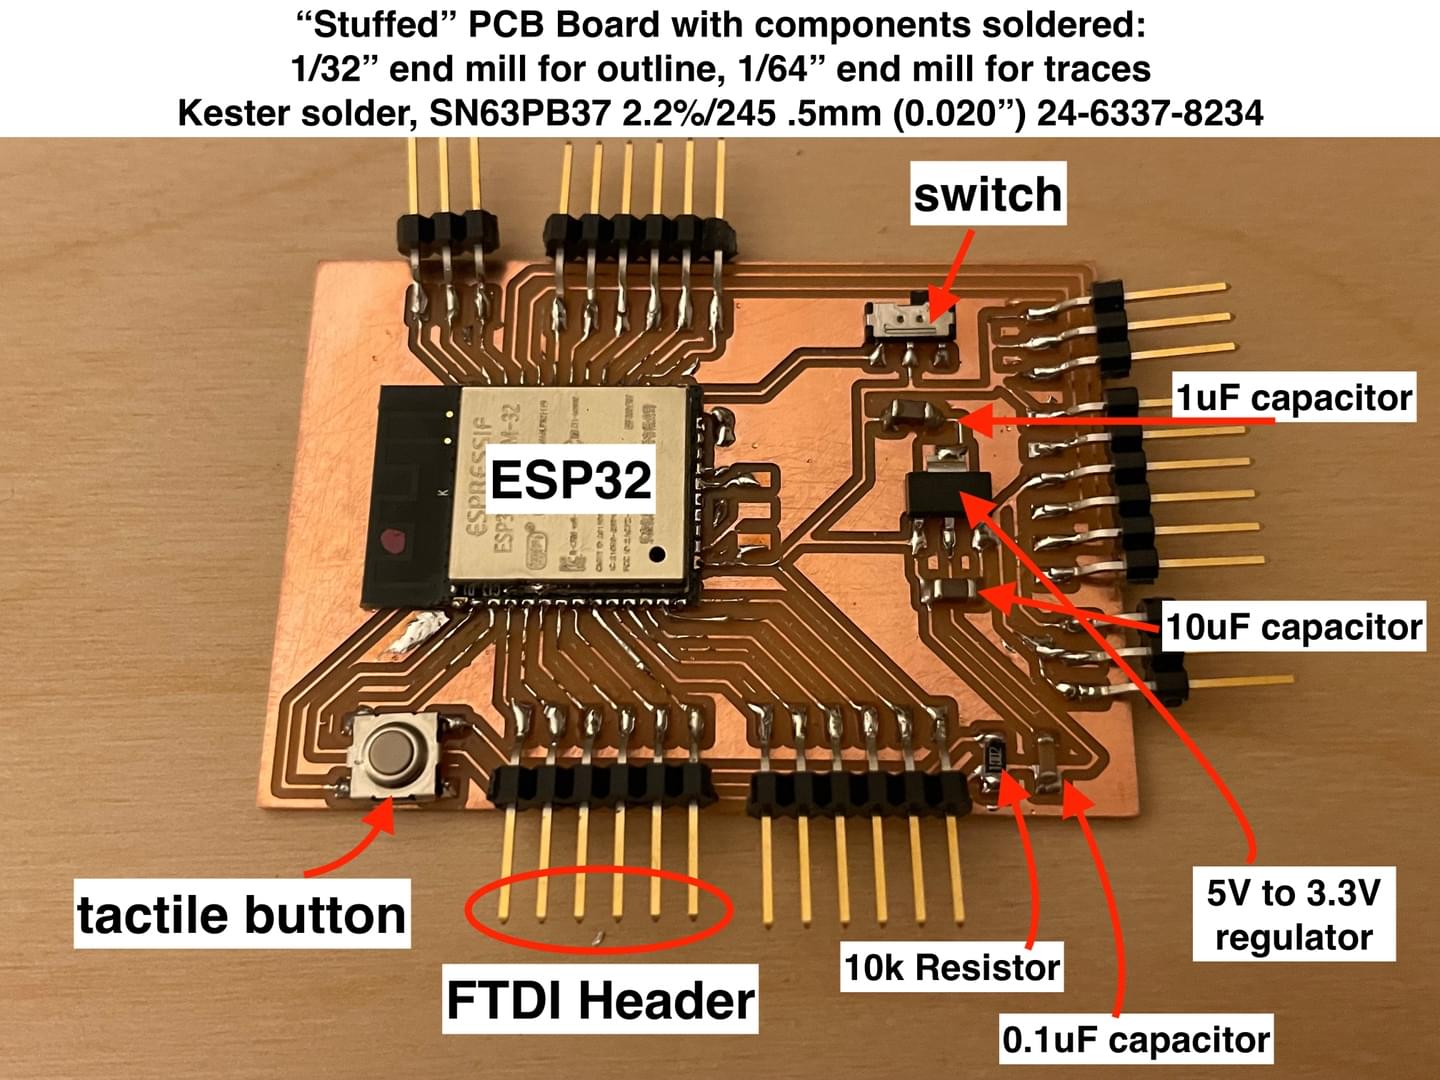
You can see below the pins specified:

I used a 3.3V FTDI-to-USB cable to attach the GND, CTS, 5V, TX, and RTS to my laptop. When uploading the Arduino IDE code, I switched the switch so the black switch faces towards the ESP32, press the tactile button, then click Upload arrow symbol in Arduino. After that, once the code gets processed in the Arduino IDE, I then turn the black little switch in the other direction away from the ESP32 microcontroller component on the board, and press the tan-colored tactile button one last time.
Here's the code:
| /********* | |
|
|
Rui Santos |
|
|
Complete project details at https://randomnerdtutorials.com |
|
|
*********/ |
|
|
|
|
|
// Load Wi-Fi library |
|
|
#include <WiFi.h> |
|
|
|
|
|
// Replace with your network credentials |
|
|
const char* ssid = "EECS_Labs"; |
|
|
const char* password = ""; |
|
|
|
|
|
// Set web server port number to 80 |
|
|
WiFiServer server(80); |
|
|
|
|
|
// Variable to store the HTTP request |
|
|
String header; |
|
|
|
|
|
// Auxiliar variables to store the current output state |
|
|
String output26State = "off"; |
|
|
String output27State = "off"; |
|
|
|
|
|
// Assign output variables to GPIO pins |
|
|
const int output26 = 26; |
|
|
const int output27 = 27; |
|
|
|
|
|
// Current time |
|
|
unsigned long currentTime = millis(); |
|
|
// Previous time |
|
|
unsigned long previousTime = 0; |
|
|
// Define timeout time in milliseconds (example: 2000ms = 2s) |
|
|
const long timeoutTime = 2000; |
|
|
|
|
|
void setup() { |
|
|
Serial.begin(115200); |
|
|
// Initialize the output variables as outputs |
|
|
pinMode(output26, OUTPUT); |
|
|
pinMode(output27, OUTPUT); |
|
|
// Set outputs to LOW |
|
|
digitalWrite(output26, LOW); |
|
|
digitalWrite(output27, LOW); |
|
|
|
|
|
// Connect to Wi-Fi network with SSID and password |
|
|
Serial.print("Connecting to "); |
|
|
Serial.println(ssid); |
|
|
WiFi.begin(ssid, password); |
|
|
while (WiFi.status() != WL_CONNECTED) { |
|
|
delay(500); |
|
|
Serial.print("."); |
|
|
} |
|
|
// Print local IP address and start web server |
|
|
Serial.println(""); |
|
|
Serial.println("WiFi connected."); |
|
|
Serial.println("IP address: "); |
|
|
Serial.println(WiFi.localIP()); |
|
|
server.begin(); |
|
|
} |
|
|
|
|
|
void loop(){ |
|
|
WiFiClient client = server.available(); // Listen for incoming clients |
|
|
|
|
|
if (client) { // If a new client connects, |
|
|
currentTime = millis(); |
|
|
previousTime = currentTime; |
|
|
Serial.println("New Client."); // print a message out in the serial port |
|
|
String currentLine = ""; // make a String to hold incoming data from the client |
|
|
while (client.connected() && currentTime - previousTime <= timeoutTime) { // loop while the client's connected |
|
|
currentTime = millis(); |
|
|
if (client.available()) { // if there's bytes to read from the client, |
|
|
char c = client.read(); // read a byte, then |
|
|
Serial.write(c); // print it out the serial monitor |
|
|
header += c; |
|
|
if (c == '\n') { // if the byte is a newline character |
|
|
// if the current line is blank, you got two newline characters in a row. |
|
|
// that's the end of the client HTTP request, so send a response: |
|
|
if (currentLine.length() == 0) { |
|
|
// HTTP headers always start with a response code (e.g. HTTP/1.1 200 OK) |
|
|
// and a content-type so the client knows what's coming, then a blank line: |
|
|
client.println("HTTP/1.1 200 OK"); |
|
|
client.println("Content-type:text/html"); |
|
|
client.println("Connection: close"); |
|
|
client.println(); |
|
|
|
|
|
// turns the GPIOs on and off |
|
|
if (header.indexOf("GET /26/on") >= 0) { |
|
|
Serial.println("GPIO 26 on"); |
|
|
output26State = "on"; |
|
|
digitalWrite(output26, HIGH); |
|
|
} else if (header.indexOf("GET /26/off") >= 0) { |
|
|
Serial.println("GPIO 26 off"); |
|
|
output26State = "off"; |
|
|
digitalWrite(output26, LOW); |
|
|
} else if (header.indexOf("GET /27/on") >= 0) { |
|
|
Serial.println("GPIO 27 on"); |
|
|
output27State = "on"; |
|
|
digitalWrite(output27, HIGH); |
|
|
} else if (header.indexOf("GET /27/off") >= 0) { |
|
|
Serial.println("GPIO 27 off"); |
|
|
output27State = "off"; |
|
|
digitalWrite(output27, LOW); |
|
|
} |
|
|
|
|
|
// Display the HTML web page |
|
|
client.println("<!DOCTYPE html><html>"); |
|
|
client.println("<head><meta name=\"viewport\" content=\"width=device-width, initial-scale=1\">"); |
|
|
client.println("<link rel=\"icon\" href=\"data:,\">"); |
|
|
// CSS to style the on/off buttons |
|
|
// Feel free to change the background-color and font-size attributes to fit your preferences |
|
|
client.println("<style>html { font-family: Helvetica; display: inline-block; margin: 0px auto; text-align: center;}"); |
|
|
client.println(".button { background-color: #4CAF50; border: none; color: white; padding: 16px 40px;"); |
|
|
client.println("text-decoration: none; font-size: 30px; margin: 2px; cursor: pointer;}"); |
|
|
client.println(".button2 {background-color: #555555;}</style></head>"); |
|
|
|
|
|
// Web Page Heading |
|
|
client.println("<body><h1>Turtle Box: Time To Shellebrate!</h1>"); |
|
|
|
|
|
// Display current state, and ON/OFF buttons for GPIO 26 |
|
|
client.println("<p>50 min Work - " + output26State + "</p>"); |
|
|
// If the output26State is off, it displays the ON button |
|
|
if (output26State=="off") { |
|
|
client.println("<p><a href=\"/26/on\"><button class=\"button\">ON</button></a></p>"); |
|
|
} else { |
|
|
client.println("<p><a href=\"/26/off\"><button class=\"button button2\">OFF</button></a></p>"); |
|
|
} |
|
|
|
|
|
// Display current state, and ON/OFF buttons for GPIO 27 |
|
|
client.println("<p>10 min Break - " + output27State + "</p>"); |
|
|
// If the output27State is off, it displays the ON button |
|
|
if (output27State=="off") { |
|
|
client.println("<p><a href=\"/27/on\"><button class=\"button\">ON</button></a></p>"); |
|
|
} else { |
|
|
client.println("<p><a href=\"/27/off\"><button class=\"button button2\">OFF</button></a></p>"); |
|
|
} |
|
|
client.println("</body></html>"); |
|
|
|
|
|
// The HTTP response ends with another blank line |
|
|
client.println(); |
|
|
// Break out of the while loop |
|
|
break; |
|
|
} else { // if you got a newline, then clear currentLine |
|
|
currentLine = ""; |
|
|
} |
|
|
} else if (c != '\r') { // if you got anything else but a carriage return character, |
|
|
currentLine += c; // add it to the end of the currentLine |
|
|
} |
|
|
} |
|
|
} |
|
|
// Clear the header variable |
|
|
header = ""; |
|
|
// Close the connection |
|
|
client.stop(); |
|
|
Serial.println("Client disconnected."); |
|
|
Serial.println(""); |
|
|
} |
|
|
} |
The group assignment for this week is to compare as many tool options as possible.
Here is a link to the Group Assignment for this week on the Architecture site: https://docs.google.com/document/d/1hW7gOiqgb8SjjVqJJjOXGXEUXpyKwsEAWuTmP_ajesc/edit
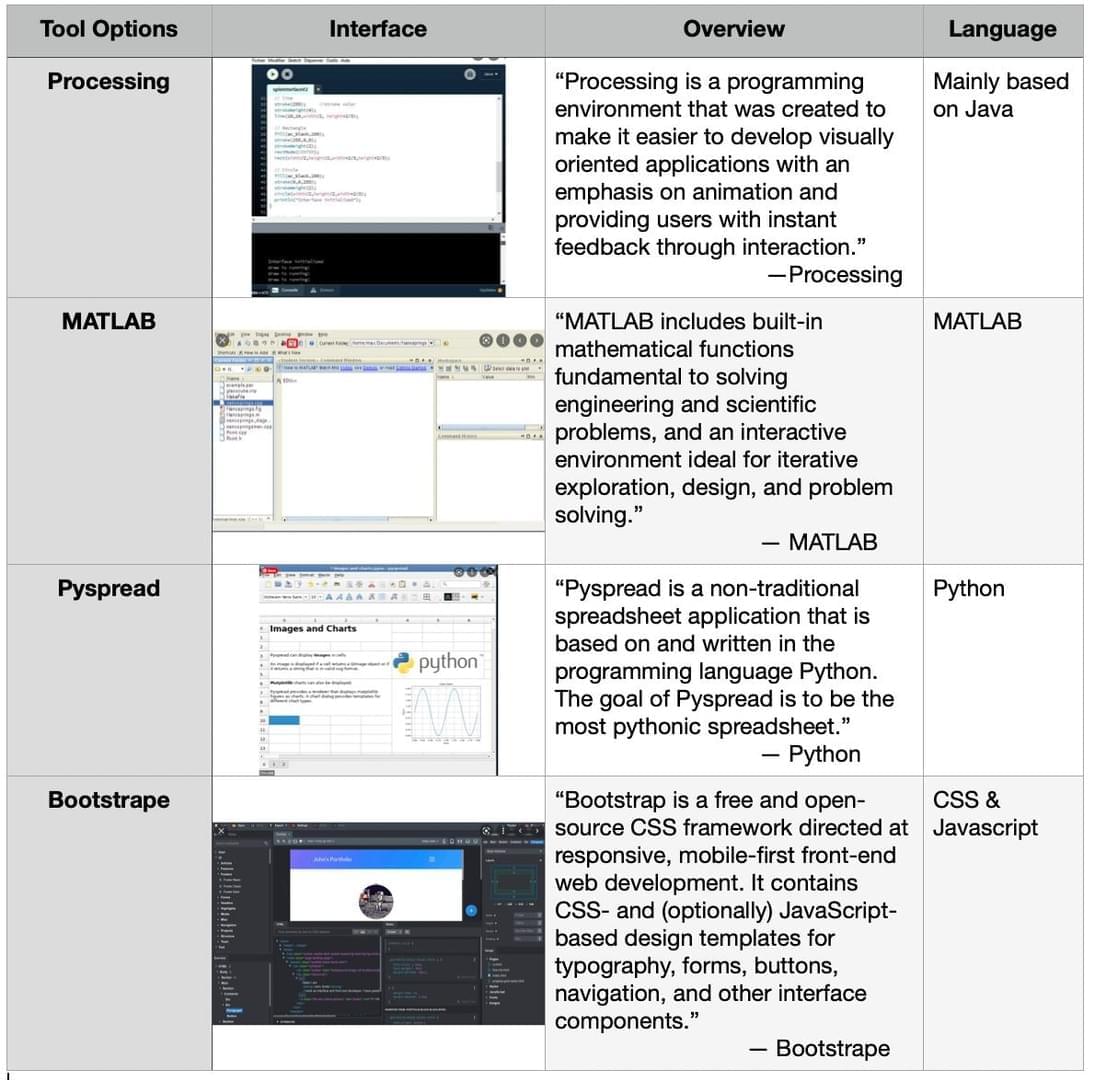
This document compares several different tools that can be used for application programming. On my end, I am aware of Python, Processing, and AppSheet as my primary preferences for application programming, but there are many others that exist too!
Below is a very wonderful chart comparing some of these (and other) application programming languages / tools
Learnings:
Advanced Applications:
created with
Website Builder Software .