Week 14
Wildcard Week: 3D Laser Glass Engraving
Introduction
For Wildcard Week, I chose to explore 3D laser glass engraving — a digital fabrication process not covered in any other assignment. This technique uses a high-powered UV laser to create three-dimensional images inside transparent K9 crystal by causing controlled fractures at precise points within the material.
📋 Assignment Requirements Met
- ✅ Digital process: UV laser engraving controlled by computer
- ✅ Computer-aided design: 3D model created in Blender
- ✅ Computer-aided manufacturing: xTool F2 Ultra UV laser system
- ✅ Not covered elsewhere: No other week used 3D glass engraving
- ✅ Reproducible: STL file, machine settings, and process documented
Why Glass Engraving?
I was immediately drawn to this process for several reasons:
- Visual impact: 3D images suspended inside clear crystal look magical and impossible
- New technology: The xTool F2 Ultra UV had just arrived in the lab this week — I wanted to be among the first to test its capabilities
- Reuse opportunity: I could repurpose my cute character model from Week 4's 3D printing assignment, but in a completely different medium
- Permanent keepsake: Unlike 3D prints that can break, crystal engravings last forever
- Creative challenge: Translating a 3D model designed for printing into something that works inside transparent glass
What is 3D Laser Glass Engraving?
The Physics Behind It
3D laser glass engraving (also called subsurface laser engraving or 3D laser crystal engraving) works by focusing a high-powered laser beam to a tiny point inside the glass. At this focal point, the laser energy is so intense it causes a microscopic fracture or "crack" in the crystal structure.
🔬 Technical Process
- Laser focusing: A UV laser beam is focused to a point inside the crystal, not on its surface
- Controlled fracture: At the focal point, intense energy causes a tiny crack (~0.1mm) that appears white
- 3D positioning: The laser moves in X, Y, and Z axes to create thousands of points
- Point cloud rendering: Together, these dots form a 3D image visible from all angles
- Surface preservation: The crystal surface remains perfectly smooth and clear
Why K9 Crystal?
K9 crystal (also called K9 optical glass) is specifically chosen for this process because:
- Optical clarity: Extremely clear with minimal impurities
- Uniform structure: Consistent density throughout for predictable engraving
- High lead content: Makes it easier to create visible fractures
- Stability: Won't shatter or crack from the engraving process
- Brilliance: High refractive index creates sparkle and depth
Comparison to Other Processes
| Process | Method | Advantages | Limitations |
|---|---|---|---|
| 3D Laser Engraving | Internal fractures | True 3D, fast, no surface damage | Requires expensive laser |
| Surface Engraving | Etching surface | Sharp detail, accessible | Only 2D, surface roughness |
| Sandblasting | Abrasive particles | Low cost, DIY friendly | Low resolution, surface only |

xTool F2 Ultra UV Laser System
Machine Specifications
The lab's brand new xTool F2 Ultra UV is a desktop laser system capable of both surface engraving and 3D crystal engraving. Key specifications:
🔹 Laser Specs
- Type: UV (ultraviolet)
- Wavelength: 355nm
- Power: High enough for glass fracturing
- Spot size: ~0.1mm focus point
📐 Work Area
- X/Y movement: Laser galvo system
- Z movement: Motorized stage
- Max crystal size: 100mm cube
- Our cubes: 50mm × 50mm × 50mm
⚡ Performance
- Speed: 10,000+ points/second
- Resolution: Up to 0.05mm
- Typical time: 2-5 minutes
- File types: STL, OBJ, 3DS

Software Interface
The xTool software (XCS - xTool Creative Space) provides an intuitive interface for loading 3D models and configuring engraving parameters:
- Model import: Drag and drop STL/OBJ files directly
- Auto-centering: Software centers model in the crystal automatically
- Size adjustment: Scale model to fit crystal dimensions
- Preview: 3D preview shows how it will look before engraving
- Point density: Adjustable resolution vs speed tradeoff
- Auto-focus: Laser automatically adjusts focus depth
⚠️ Safety Features
- Enclosed laser path — no UV exposure risk
- Emergency stop button easily accessible
- Auto-shutoff if door opens during operation
- Fume extraction for any vapor produced
- Protective eyewear recommended but not required (enclosed system)

3D Model Preparation
Reusing Week 4's Character
Rather than create a brand new model, I decided to repurpose the cute character I designed in Blender for Week 4's 3D printing assignment. This character was originally intended as a bag charm, but I thought it would look amazing suspended inside crystal!

🔗 Design Continuity
Using the same model across two different fabrication processes demonstrates an important principle: a well-designed 3D model can be manufactured in multiple ways. The same digital design can become:
- ✨ A physical 3D print (Week 4 - additive manufacturing)
- 💎 A crystal engraving (Week 11 - laser manufacturing)
- 🔮 Potentially a mold for casting, CNC milling, etc.
Model Requirements for Glass Engraving
While my model worked great for 3D printing, glass engraving has different requirements:
| Requirement | 3D Printing | Glass Engraving |
|---|---|---|
| Watertight mesh | ✅ Required | ✅ Required |
| Supports | ⚠️ May be needed | ✅ Not needed! |
| Overhangs | ⚠️ Limited (<45°) | ✅ No limits! |
| Thin features | ⚠️ May be weak | ✅ Perfectly fine |
| Detail level | ~0.2mm layer height | ~0.05mm resolution |
File Export and Preparation
Since I already had the model from Week 4, preparation was straightforward:
- Open original Blender file: Located my Week 4 .blend project file
- Check mesh integrity: Ran "Select Non-Manifold" to ensure watertight
- Scale appropriately: Scaled model to fit comfortably in 50mm cube (left ~5mm margin on all sides)
- Export as STL: File → Export → STL with default settings
- Verify in slicer: Opened in PrusaSlicer to check for errors (even though we're not printing)
💡 Design Tip
For glass engraving, simpler shapes with clear silhouettes work best. Too much fine detail can look muddy inside the crystal. My character's simple, bold features were perfect for this process!

📥 Download Files
Complete 3D model files available for download:
Download STL File Download OBJ FileNote: This is the same model from Week 4, exported in multiple formats
The Engraving Process
Step-by-Step Workflow
1️⃣ Crystal Preparation
- Clean K9 crystal cube with isopropyl alcohol
- Remove any dust or fingerprints from all surfaces
- Place crystal on foam-padded stage holder
- Ensure crystal is level (machine will auto-adjust focus)
2️⃣ Software Setup
- Open xTool Creative Space (XCS) software
- Create new project and select "3D Crystal Engraving" mode
- Import STL file: File → Import → Select character_model.stl
- Model appears centered in virtual crystal preview
3️⃣ Model Positioning & Scaling
- Adjust scale to fit within 40mm × 40mm × 40mm safe zone
- Center model both horizontally and vertically
- Rotate if needed to show best angle
- Preview from multiple angles using 3D viewer

4️⃣ Engraving Settings
| Parameter | Value Used | Notes |
|---|---|---|
| Resolution | High (0.05mm) | Finer detail |
| Point density | Standard | Balance speed/quality |
| Engraving depth | Auto | Software calculates |
| Estimated time | 3-4 minutes | Actual: ~3.5 min |
5️⃣ Start Engraving!
- Close machine safety door
- Click "Start" button in software
- Machine performs auto-focus calibration (~30 seconds)
- Engraving begins — laser rapidly pulses at thousands of points per second
- Watch through viewing window as the image appears layer by layer
The Engraving in Action
The engraving process is mesmerizing to watch. The laser moves so quickly it appears to draw the character in thin slices, building up from bottom to top. You can see the white dots appearing inside the crystal as the laser creates microscopic fractures.
⚠️ What to Expect
- Faint crackling sound as laser pulses (normal!)
- No smoke or vapor (laser never touches surface)
- Machine may pause briefly between layers
- Total process faster than you expect — just a few minutes!
- Crystal stays cool to touch throughout
Post-Processing
Unlike 3D printing, there's essentially no post-processing required!
- ✅ No supports to remove
- ✅ No sanding or smoothing needed
- ✅ No painting or finishing
- ✅ Surface remains perfectly clear
- ✅ Simply wipe with microfiber cloth if dusty
The crystal is ready to display immediately after removal from the machine!
Final Results
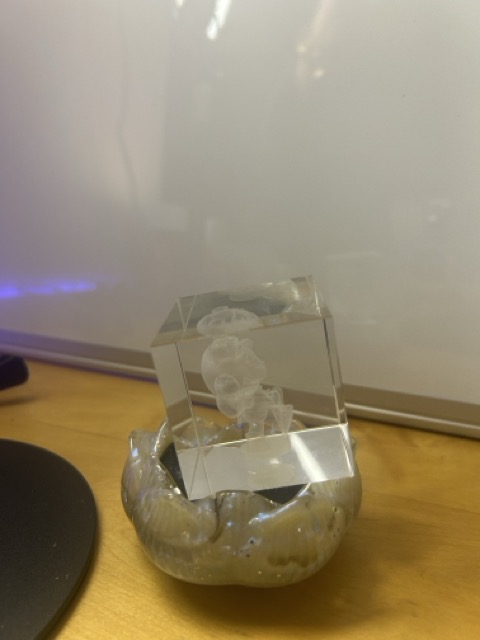
The Finished Crystal
The result exceeded my expectations! The character appears to float magically inside the perfectly clear crystal, visible from all angles. The detail is crisp and the effect is truly three-dimensional — you can see depth and parallax as you move around it.


Quality Assessment
✅ What Worked Perfectly
- Character features clearly visible
- Excellent depth perception
- Surface remains flawless
- No distortion or errors
- Fast process (under 4 minutes!)
⚠️ Observations & Learnings
- Very fine details slightly less crisp
- Best viewing angle: front and sides
- Bottom view shows laser entry pattern
- Lighting dramatically affects visibility
- Larger features read better than tiny ones
Comparing 3D Print vs Crystal Engraving
Having made the same character in two different processes, here's a direct comparison:
| Aspect | 3D Print (Week 4) | Crystal Engraving (Week 11) |
|---|---|---|
| Time | ~2 hours printing | ~4 minutes engraving |
| Material | Opaque PLA plastic | Clear K9 crystal |
| Durability | Can break or crack | Permanent, scratch-resistant |
| Detail | Good (0.2mm layers) | Excellent (0.05mm points) |
| Post-process | Support removal, cleanup | None! |
| Visual impact | Cute, tactile, colorful | Magical, premium, elegant |
| Cost | ~$0.50 filament | ~$15 crystal blank |

Display and Presentation
One of the best features of crystal engravings is how they can be displayed:
- LED base: Backlit display makes the engraving glow
- Rotating stand: Showcases the 3D effect from all angles
- Natural light: Window placement creates interesting refraction
- Shelf display: Premium look without any frame or case needed

Reflection & Learnings
Technical Insights
- Process speed is incredible: Going from digital model to finished crystal in under 5 minutes total is mind-blowing compared to 3D printing
- No post-processing is a huge advantage: The crystal is ready to display the moment it comes out of the machine
- Resolution exceeds FDM printing: The 0.05mm point size captures finer detail than my 0.2mm layer height prints
- Design simplicity matters: Bold, clear shapes work better than intricate fine details
- Lighting is crucial: The same engraving looks completely different under various lighting conditions
Advantages of Crystal Engraving
✨ When Glass Engraving Excels
- High-end gifts, awards, and trophies
- Commemorative pieces that need to last forever
- Artistic pieces where transparency and light play are important
- Quick turnaround projects (make in minutes, not hours)
- Pieces that need premium presentation without finishing work
Limitations to Consider
⚠️ When Other Processes Are Better
- Functional parts that need strength (3D printing is better)
- Very large objects beyond ~100mm cube
- Projects requiring color (crystal is monochrome white points)
- Hollow objects or objects with internal cavities
- Budget projects (crystal blanks are expensive)
- Iterative prototyping (reprinting is cheaper than re-engraving)
Design Lessons Learned
If I were to create another crystal engraving, I would:
- Simplify small details: Very fine features don't read as well inside crystal
- Consider all viewing angles: Design for 360° visibility, not just front view
- Test at smaller scale first: Use a smaller crystal cube for initial tests
- Design for backlighting: Think about how LED bases will illuminate the piece
- Add a base element: A flat bottom surface helps orient the piece visually
Broader Applications
This technology opens up exciting possibilities beyond cute characters:
- Medical imaging: 3D scans of organs for surgical planning
- Scientific visualization: Molecular structures, protein folding
- Architecture: Building models for client presentations
- Astronomy: 3D star maps and celestial bodies
- Personalization: Face scans, pet portraits, fingerprints
- Data visualization: 3D graphs and statistics
Final Thoughts
3D laser glass engraving perfectly demonstrates the magic of digital fabrication. You take bits and bytes (a 3D model), apply physics (focused laser energy), and create something that looks impossible — a three-dimensional image frozen inside solid crystal. It's technology that still feels like magic.
I'm thrilled I got to be among the first people to use the lab's new xTool F2 Ultra UV, and I'm excited to see what others will create with it!
Related Documentation
This wildcard project connects with other weeks:
🖨️ Week 4: 3D Printing
Original character modeling in Blender, 3D printing process, and bag charm creation.
View Week 4 →💎 Final Project
See how digital fabrication processes come together in my complete hydration monitor system.
View Final Project →📥 Download Files
All files for reproducing this project:
Character STL Character OBJ Machine Settings