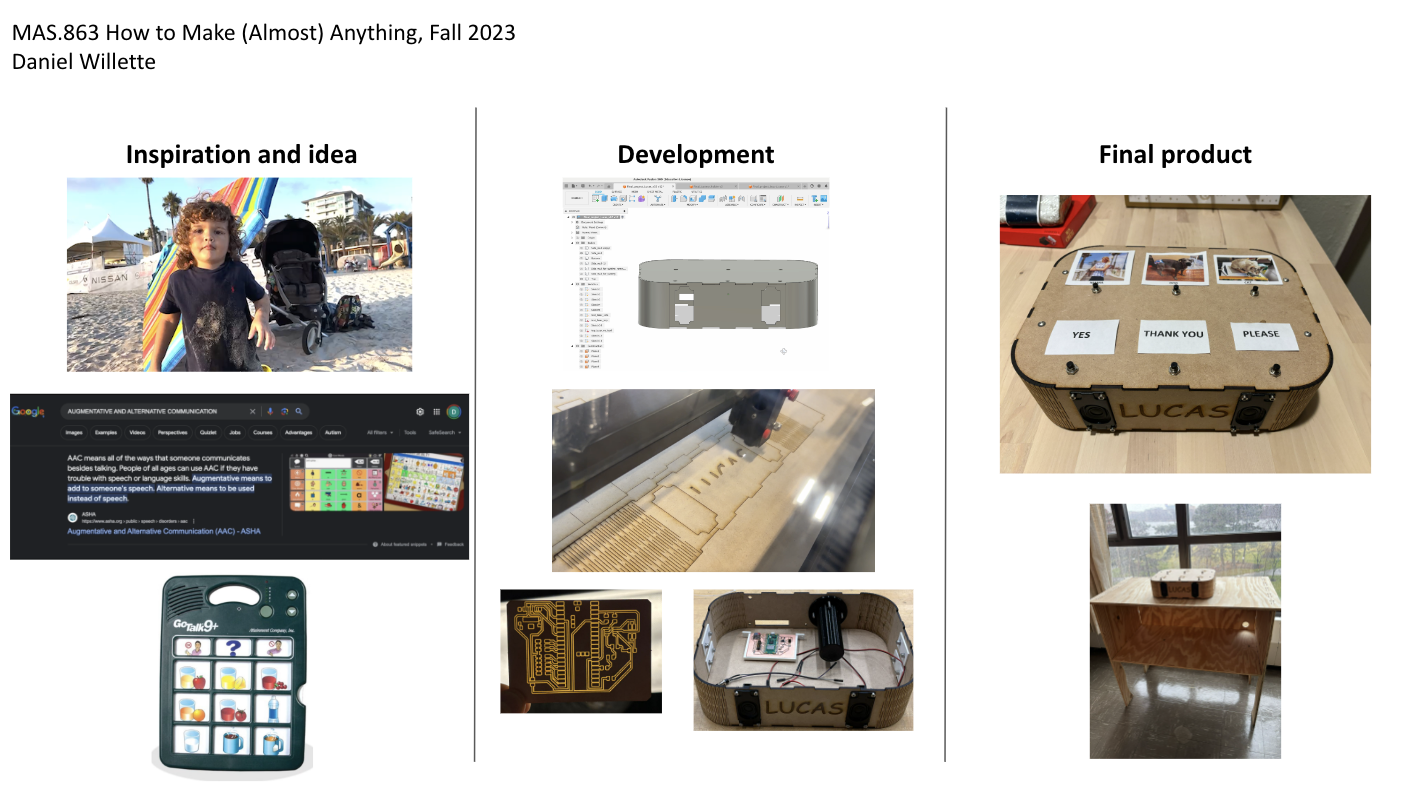
Lucas is 2 and a half years old, growing fast, loves to climb the structures at his local playground, and is fascinated by music and sounds. However, he is struggling to speak or fully grasp the meaning of words. In addition to the support he is receiving from a speech therapist and other resources, I want to make a christmas toy for Lucas that will help him in his journey to develop a vocabulary and improve his speech.
Final Project Page
A documentation of creating my final class project
Summary video
Here is a 1-minute video explaining the motivation behind the project and final product. As of December 18th when publishing this video, the toy is still partially in development, and I intend to fix the timeout issue with the sd card and reduce the static when playing .wav files.
One-slide summary of project
Initial Idea
I expected my idea to evolve over the weeks of the fall 2023 term. At the start of the semester, I imagined creating a small physical toy that can be placed on a dining table or coffee table.
The toy will have multiple buttons, each with different functionality. For example, one button can be pressed to record Lucas' voice, or his mom's voice as she anunciates words.
Another button would play back the recording; the device could potentially modify the voice to make it more interesting and exciting, such as an autotune modifier.
This idea did evolve, and I later sought to create a toy using augmentative and alternative communication techniques to help Lucas with language. Specifically, I aimed to create a toy
where pictures could be placed next to buttons, and when the corresponding button is pressed, a voice recording describing that image would play. This is a tool to help toddlers develop
language and vocabulary.
Continue reading to learn how I went about making this toy, and some pivots made along the way due to challenges I experienced, particularly with playing .wav files.
Inspiration
The inspiration for this project is my nephew Lucas. You can learn more about Lucas on the left sidebar of this page.Here is a short video of little Lucas entertaining himself on the piano:
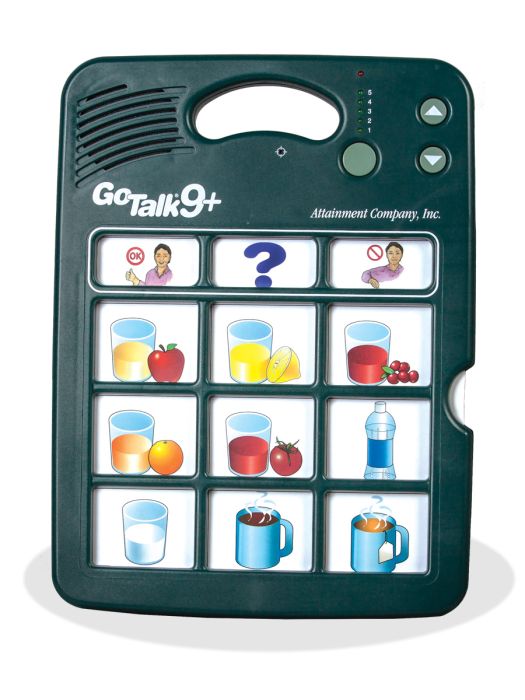
Augmentative and Alternative Communication is a means to help toddlers to improve their speech and develop their vocabulary. Here is an example of an Augmentative and Alternative Communication (AAC) toy that is available on Amazon.
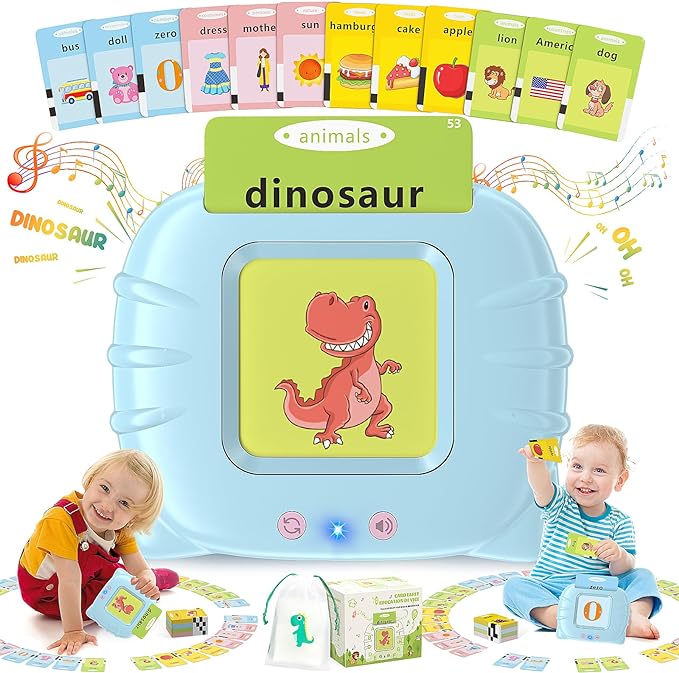
Existing commercial product available on Amazon. Amazon link
This Attainment Company website has a product that I want to emulate and customize for Lucas.
First Drafts
Here is the first sketch I made of what I envisioned the toy could look like.
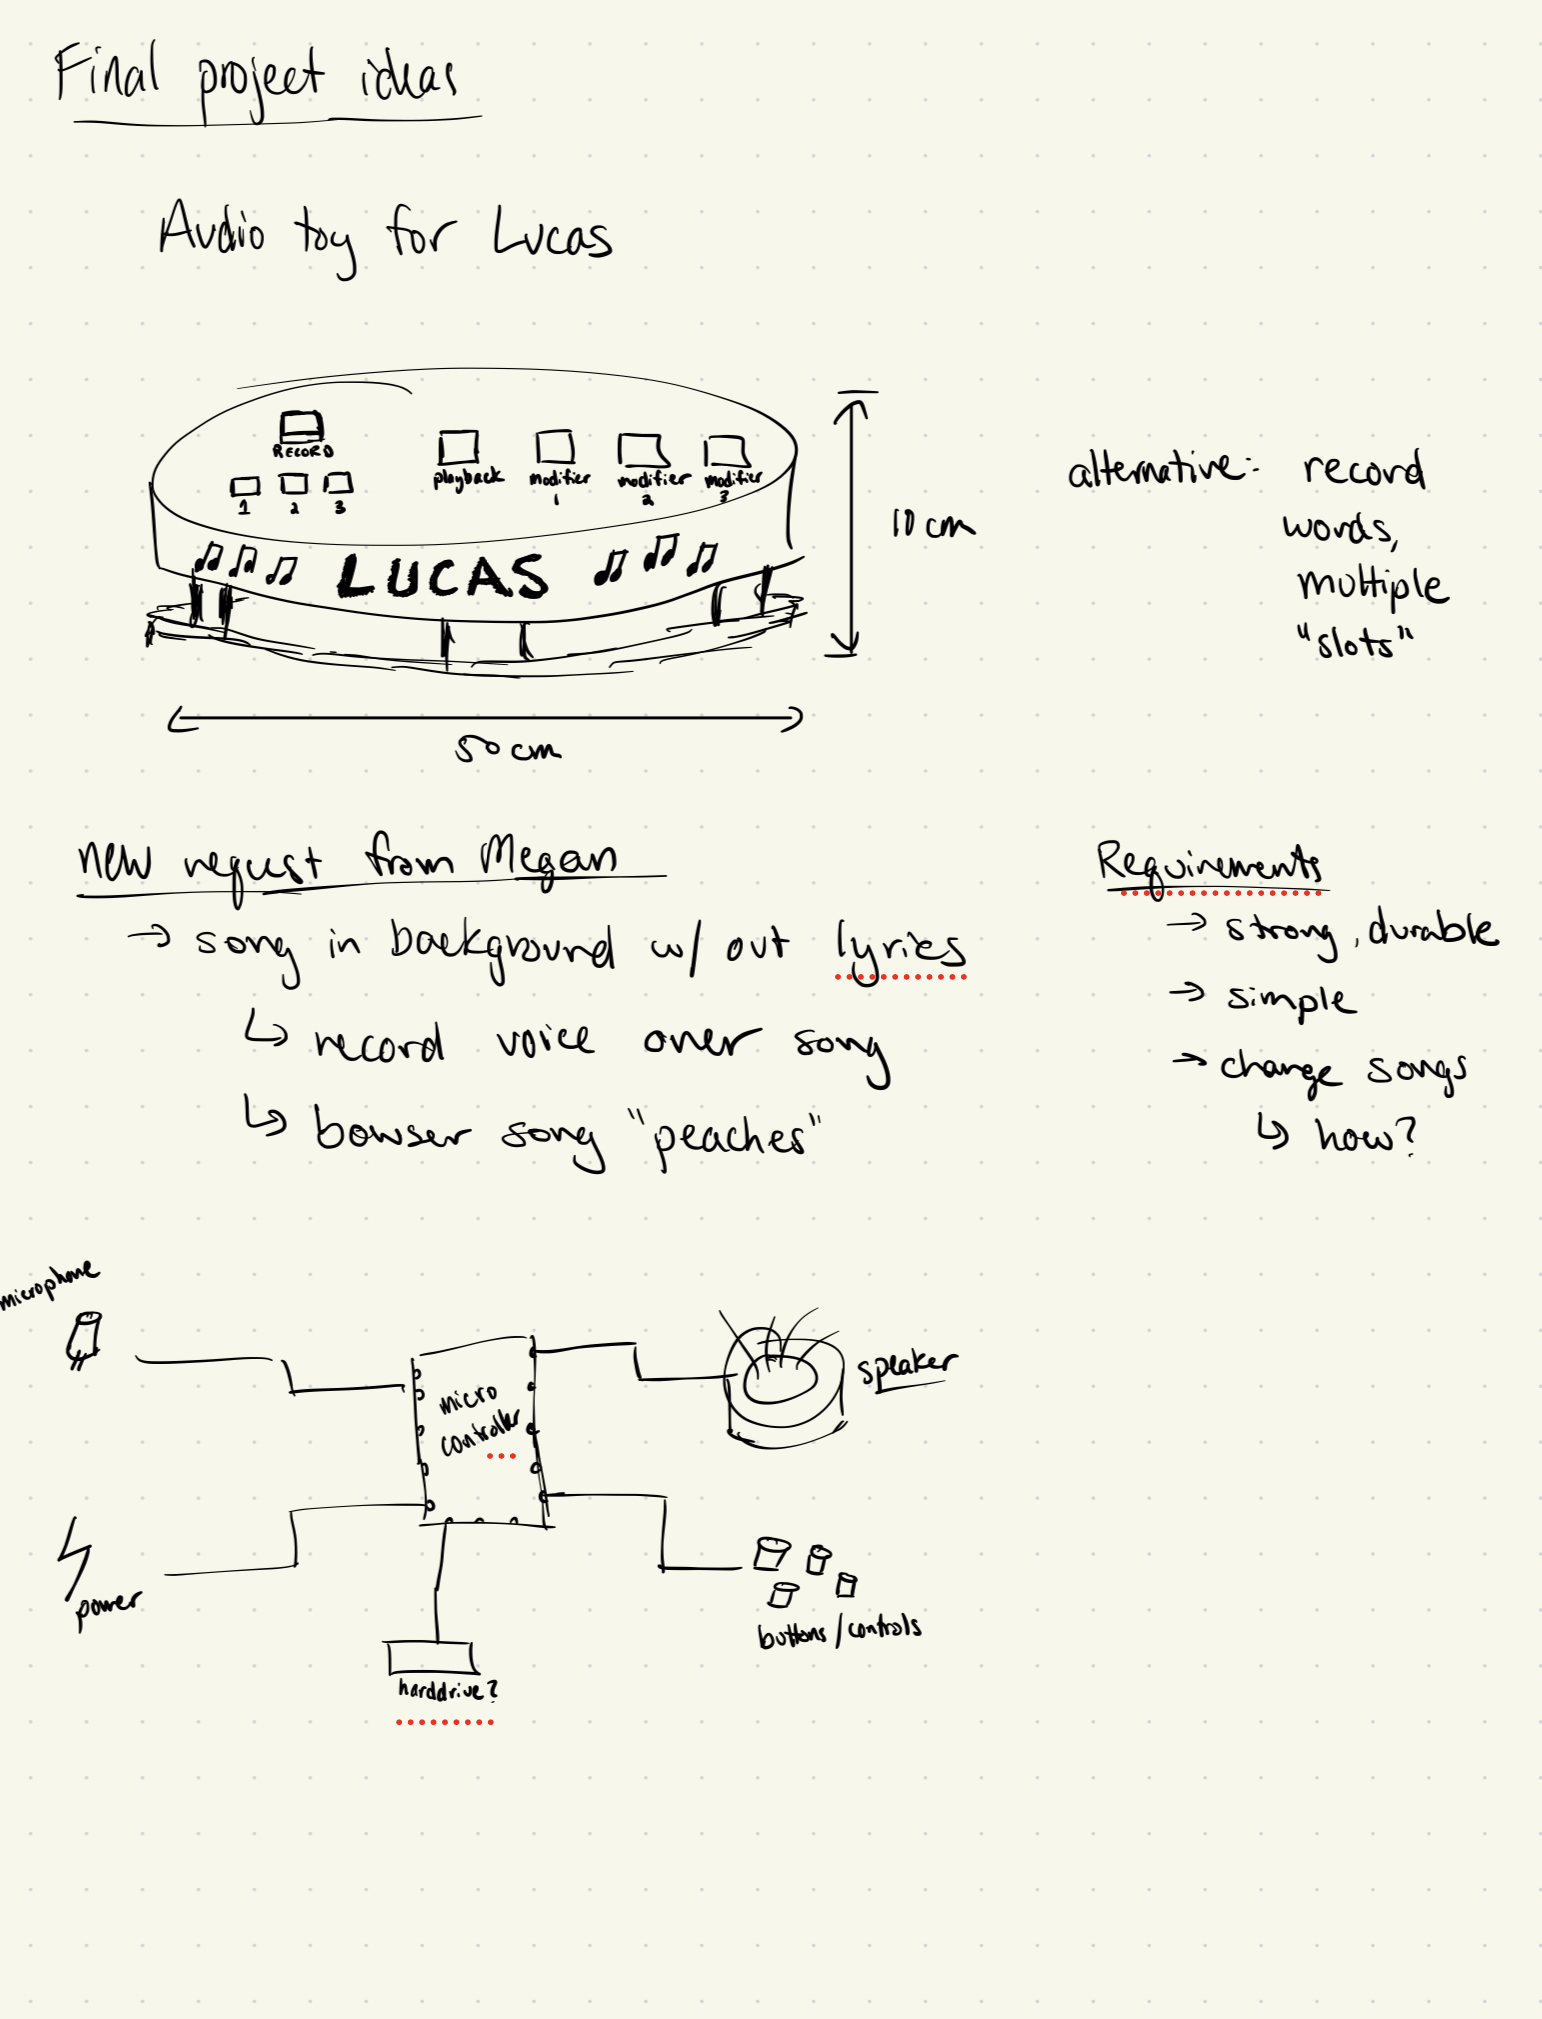
Sketch of the final project.
Materials
This is a list of all the components I used for this project:
Circuit board
- Copper PCB blank board
- Three 1.0 uF capacitors
- Three 10k Ohm resisters
- Two 0 Ohm resisters
- One 2x2, one 2x3, and one 2x5 header
- One LM4871M amplifier for $2.80 digikey link
- One CONN MICRO SD CARD PUSH-PULL SD card reader/writer for $1.75 digikey link
- One 32 GB SD card for $8.17 Amazon link
- One Raspberry Pi Pico W microcontroller for $7.80 Amazon link
Wooden case/box
- 2' x 4' tempered hardwood for $8.50 from Home Depot
- Mini push buttons for $7.99 from Amazon
- Two DIY 4 Ohm speakers for $11.99 from Amazon
- A lithium ion battery for $8.98 from Amazon
- 3D printed battery holder, PCB holder, and brackets
- M4 bolts and nuts
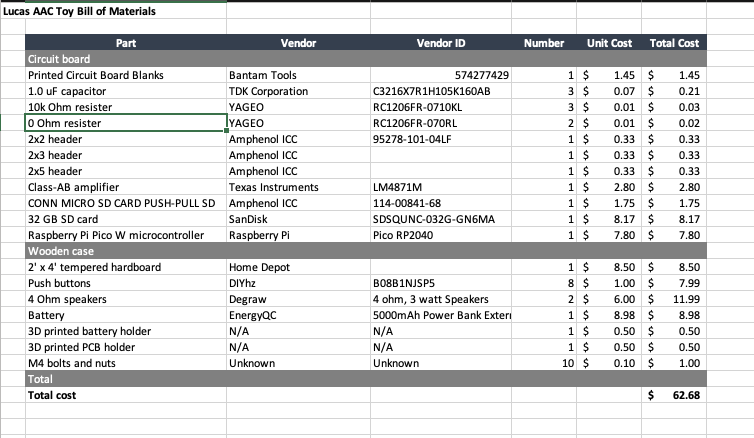
screenshot of bill of materials (BOM)
Excel file with all materials used: Excel file link
Final Project Questions
What does it do?
Overall, the final product is a toy that helps Lucas with language. It follows insights from augmentative and alternative communication (AAC) research - you can read more on the sidebar on the left. It is able to play sounds when a unique button is pressed. It has the following capabilities:
- A physically strong toy that can withstand being dropped or hit
- 6 placeholders for images and a corresponding button, so that Lucas can practice learning new words and sounds
- The ability to store sound files (in .wav format) on an SD card mounted on the PCB
- The ability to play back sound recordings via a small connected speaker and amplifier
- Some fun designs that are unique to Lucas's interests, including his name
Who's done what beforehand?
- Matt Keeter made a boombox with a similar concept in HTM(A)A: link
- DIY boombox on Amazon
- This Attainment Company website has a product that I aimed to emulate and customize for Lucas.
- Many other similar projects have been made to play sounds, tones, and audio files on a device.
What did you design?
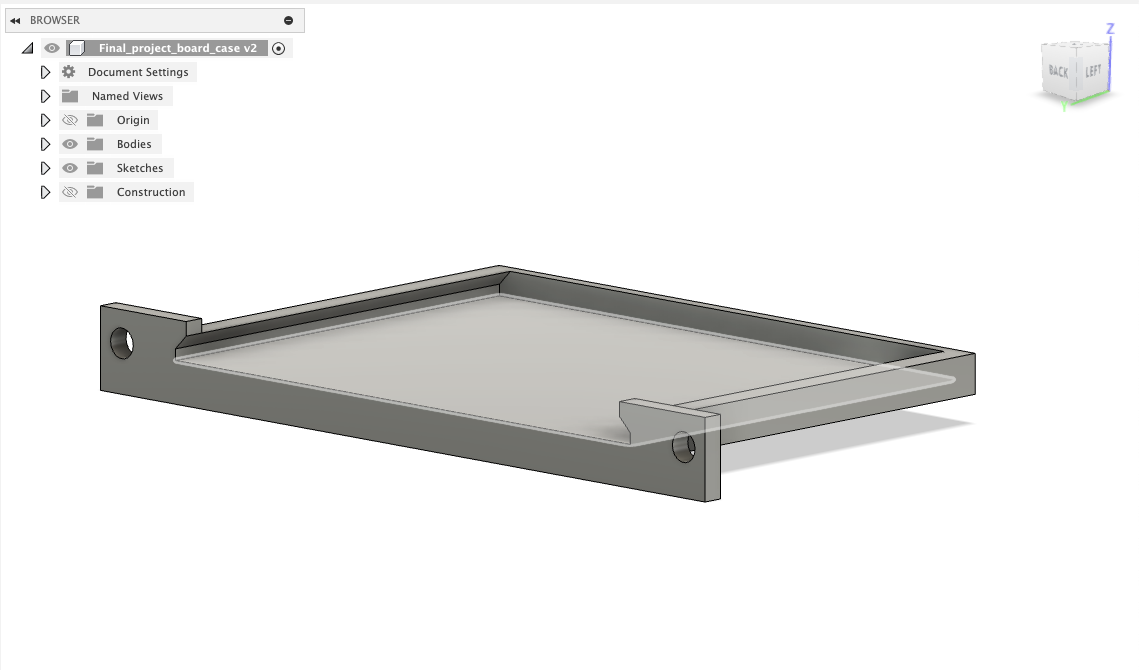
I designed the following elements of the final project:- The case of the toy, made of 1/8" hardboard wood from Home Depot, with living hinges
- A 3D printed battery holder which attaches to the toy case with M4-sized bolts
- A 3D printed PCB holder which attached to the toy case with M4-sized bolts
- 3D printed brackets which are secured inside of the toy to provided stability and durability to the wooden outer case
- A printed circuit board (PCB) which includes a Raspberry Pi Pico W microcontroller, an SD card reader/writer, multiple headers, an analog amplifier, and headers for speakers.
- A table which the toy can stand on to be played with, designed to require no fasteners or glue
What materials and components were used?
See the "Materials" section above.Where did they come from?
See the "Materials" section above.How much did they cost?
See the "Materials" section above.What parts and systems were made?
I made the following parts and systems:- The wooden case of the toy
- 3D printed cases for the battery and PCB
- 3D printed brackets
- The PCB which Raspberry Pi Pico W microcontroller, SD card reader/writer, amplifer, and speaker header
- Micropython code on the microcontroller which plays tones and .wav files when different buttons are pressed
What processes were used?
- CNC milling to create the PCB
- CNC milling on the large ShopBot to create the table
- Laser cutting to create the toy box
- 3D printing on a Creality Ender S1 Pro machine to create the 3D printed components
- Soldering to secure the components, such as a class-D amplifer, to the PCB
What questions were answered?
- How can someone create a toy that plays tones and .wav files when buttons are pressed?
What worked?
- Laser cutting to create a beautiful wooden case with living hinges
- 3D printing to create brackets, a battery holder, and PCB holder
- Milling and soldering to create a working circuit board with multiple components
- Basic micropython code to create tones on the device with button presses
What didn't work
- Playing .wav files with clean, clear sound. This sound in this project was created using Pulse Width Modulation, a digital output of the Pico W microcontroller. However, PWM create a digital binary output, and the amplifer used is an analog device. I had difficulty in writing code that would read a .wav file and play clean sound via PWM and the analog amplifier/speaker setup. The work documented on this website was borrowed and followed to try to play .wav files on my device, but ultimately I was unable to play clear, clean sound. The .wav files will play, but they sound distorted with large amounts of static. For this reason, the playback of .wav files was temporarily abandoned, and instead I focused on playing tones, such as the C major scale, with the buttons on the device.
How was it evaluated?
The project was evaluated on its ability to perform the original intended functions, specifically to play .wav files upon a button press. In this regard, the project objectives met, but not as well as intended. The playback of .wav files has a higher level of static and sound distoration than desired. Due to difficulties with playing .wav files, I modified the toy to include the ability to play tones from the C major scale. This "mode" can be accessed by pressing and holding the extra button on the rear of the device. Since the original objectives were not met, I intend to continue working on the toy over the next few days to improve the sound quality before Christmas. Today is December 19th, 2023 - the due date of the final project.What are the implications?
Despite not meeting the original objectives, the creation of this toy demonstrates an incredible amount of knowledge and skills gained over the course of the fall 2023 term. Prior to this class, I would not have known how to create any of the components that were made during this project.How can the toy be further developed?
- I would like to add the ability to record and store audio files wtih a microphone. Here are instructions on how to store audio files from microphone: link
- I am still working on cleaning up the quality of the sound output, and I would like to integrate the system with an SD card. I have a mounted SD card, but I get a timeout error when trying to read the card.
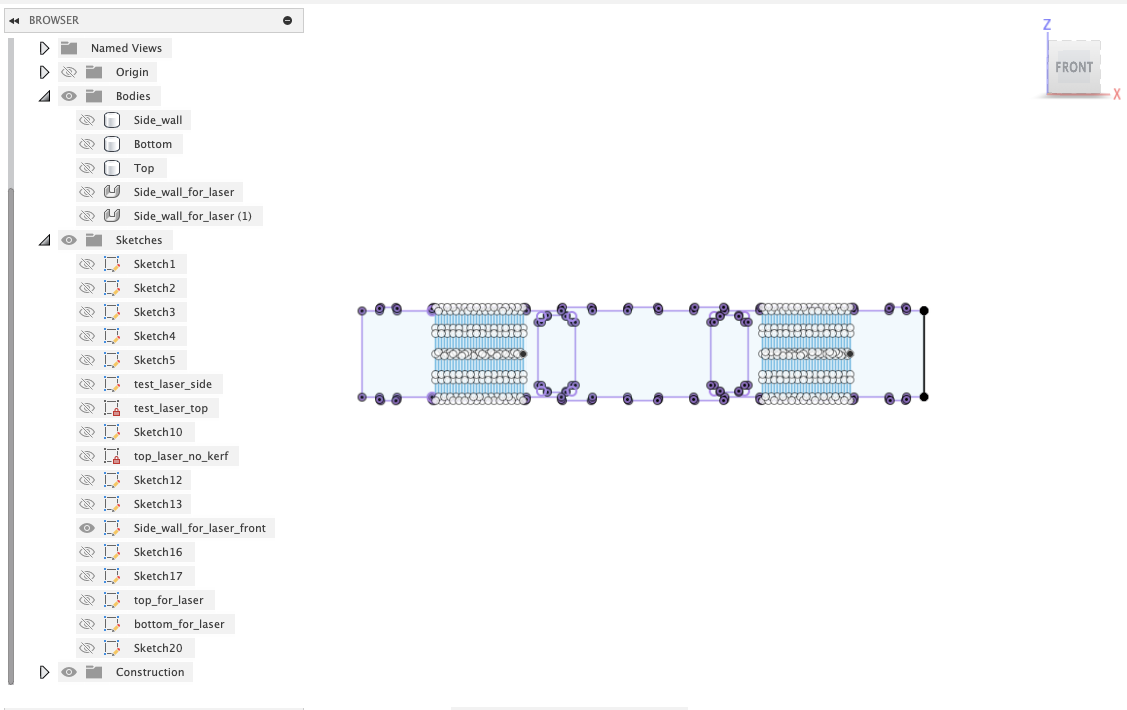
Design
I designed the following components:
- Wooden box in Autodesk Fusion 360
- PCB in Autodesk Fusion 360/Eagle
- 3D printed components in Autodesk Fusion 360
- A small wooden table that can be milled from the large CNC shopbot and assembled without fasteners or glue
Here are the files I created:
Video of the initial box design in Autodesk Fusion 360
Sketch of living hinges used on laser cutter
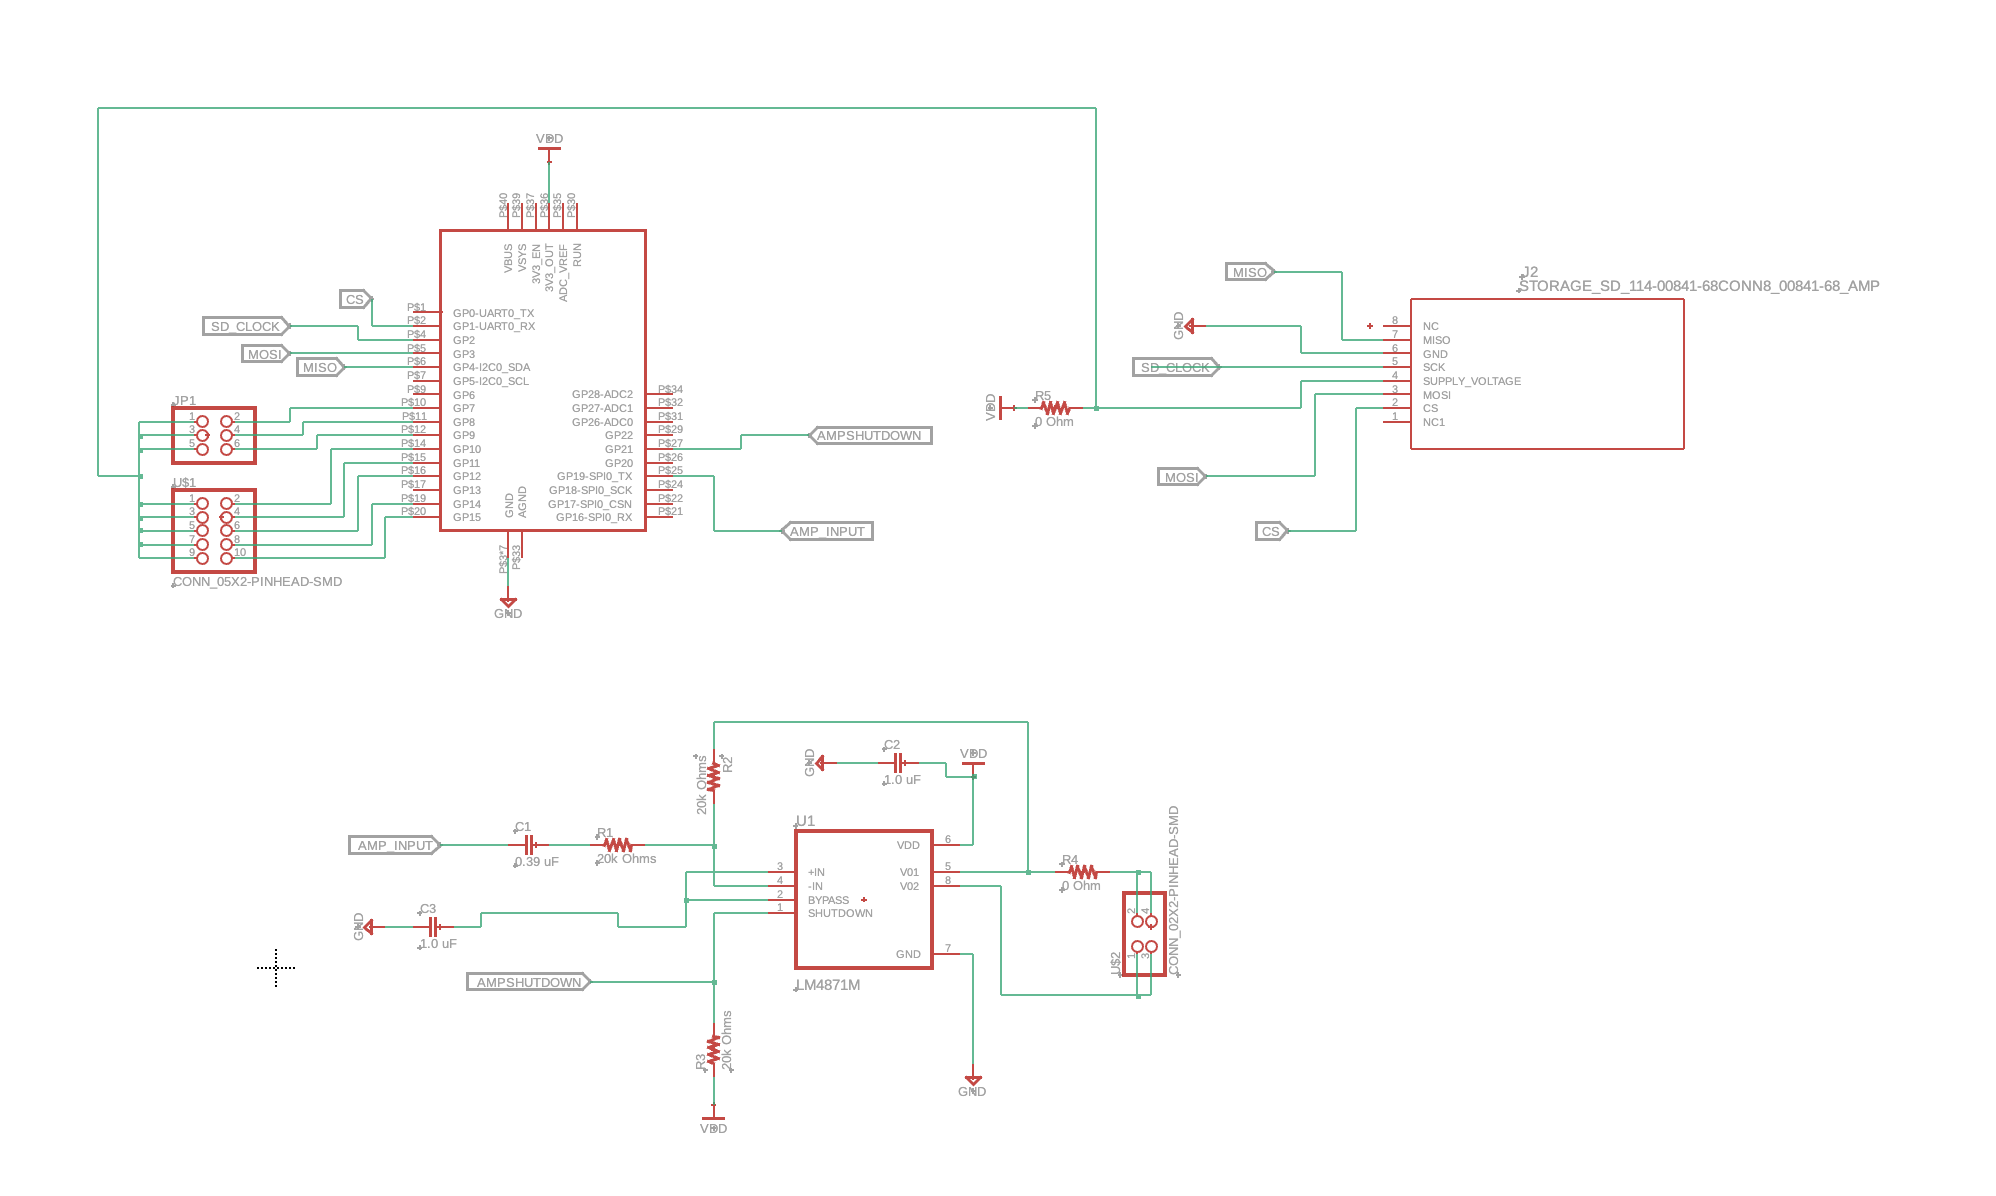
Screenshot of PCB design for final project
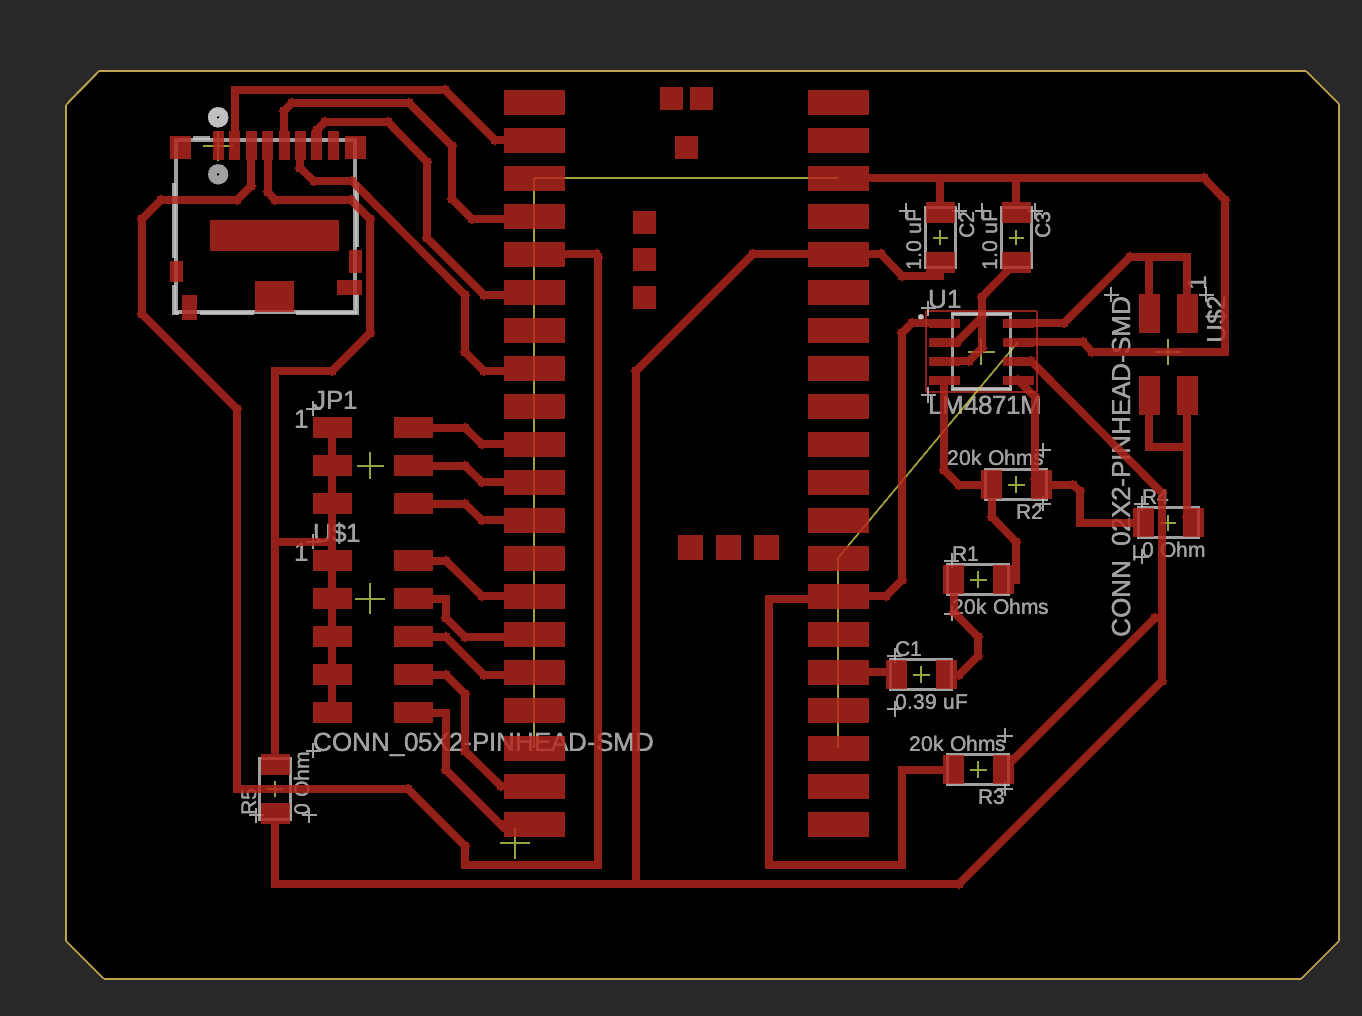
Screenshot of PCB design for final project
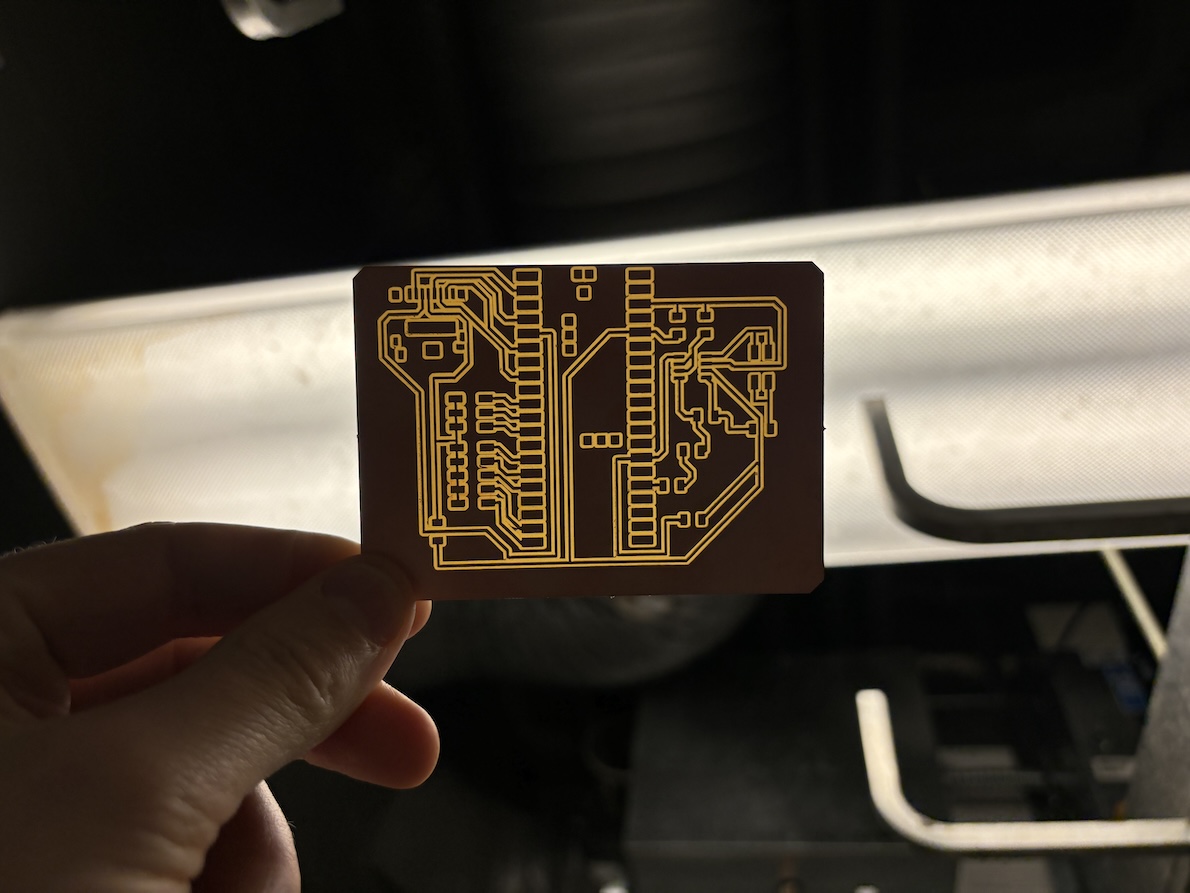
PCB for final project under E15-043 light
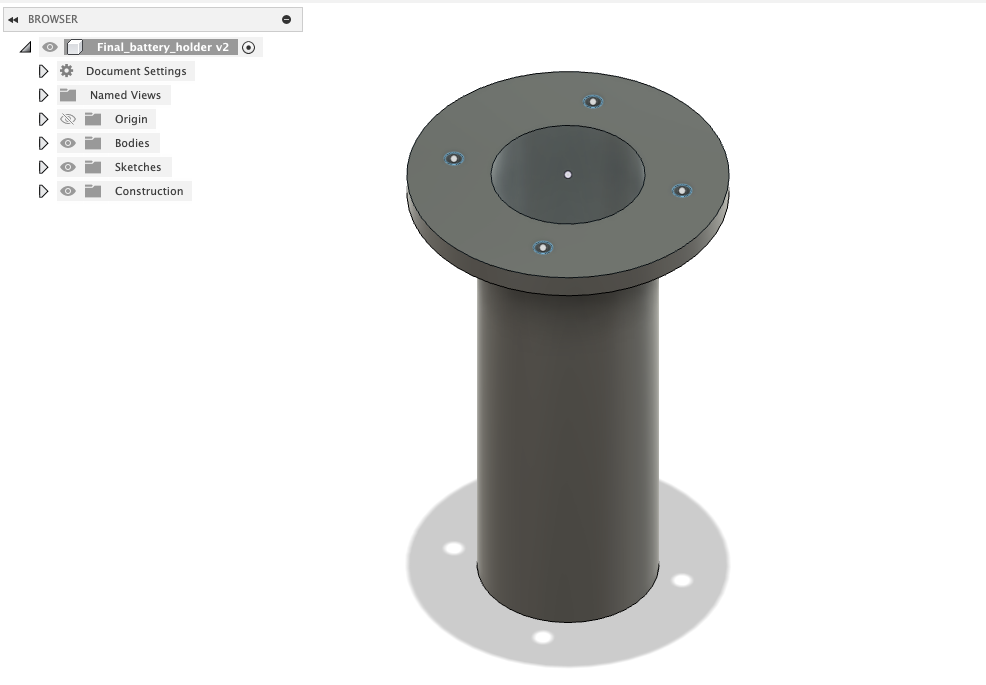
Screenshot of battery holder design in Fusion 360
Screenshot of PCB holder design in Fusion 360
Manufacturing and Assembly
I used the following hardware tools to make all the components of the toy:
- GCC laser cutter for the wooden box. I created new sketches in Fusion 360 of all the box "bodies", then saved the sketches as .dxf files and uploaded them to the software program "Corel Draw" which was used to communicate to the GCC laser cutter. I had the following settings when using the laser cutter to make vector cuts: Speed: 2.0, Power: 100%, PPI: 170, with "Vector" and "Air" checkboxes on. I had to make two passes on the hardboard to cut entirely through the material.
- Creality 3 S1 Pro 3D printer for the 3D printed components. I used the software program "Creality Pro" to slice the .stl files from Fusion and create .gcode files for the 3D printer.
- Genmitsu milling machine for the PCB. I created gcode files from the gerber files in Fusion 360. See my "Week 06" page for details on how I created these files and used the milling machine.
- ShopBot CNC machine to mill the table. I created .dxf files from the Fusion 360 bodies and uploaded them to the software program "Vcarve Pro", which was used to operate the ShopBot milling machine. You can see my "make something big" week page with details on how to use the ShopBot machine.
Video of the laser cutter creating the living hinges on the toy box
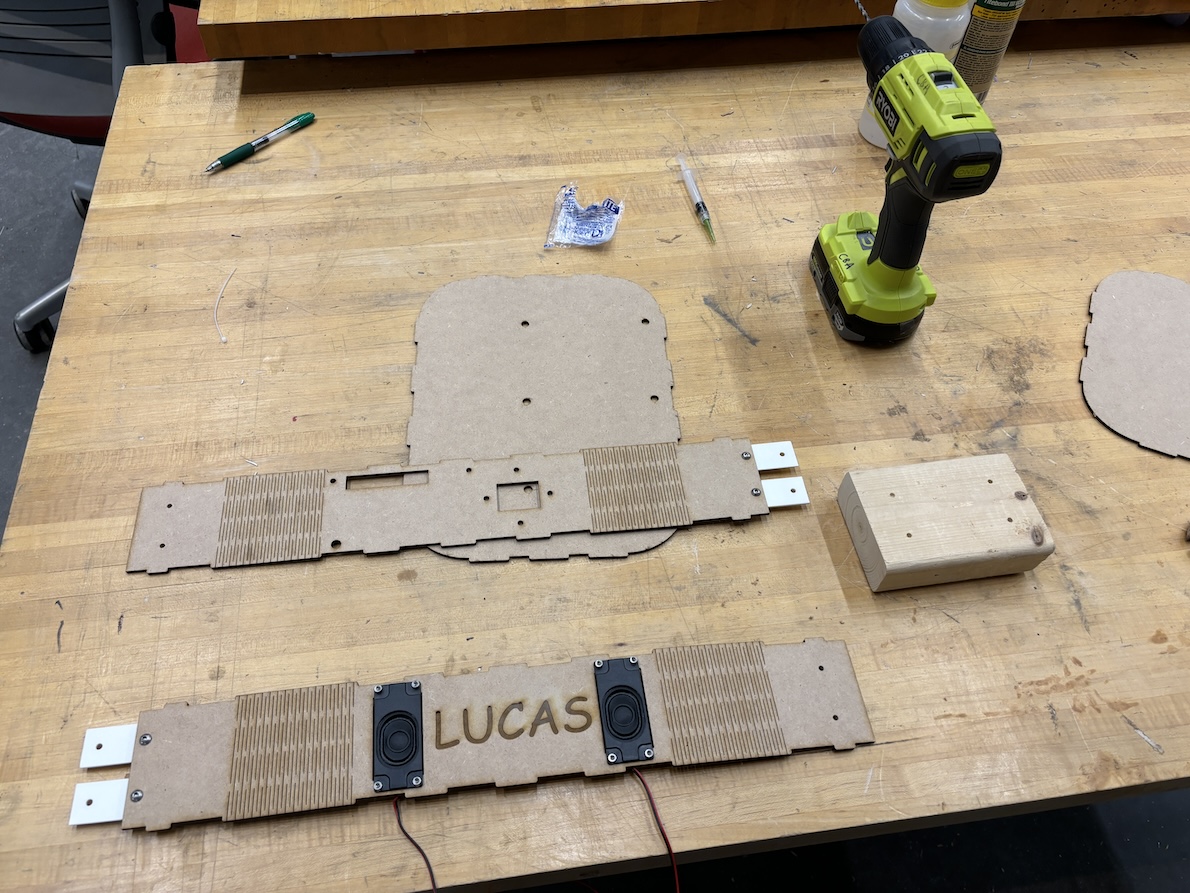
Assembling the wooden box after creating components in the laser cutter machine and 3D printer

Assembling the wooden box and components with M4 bolts and nuts
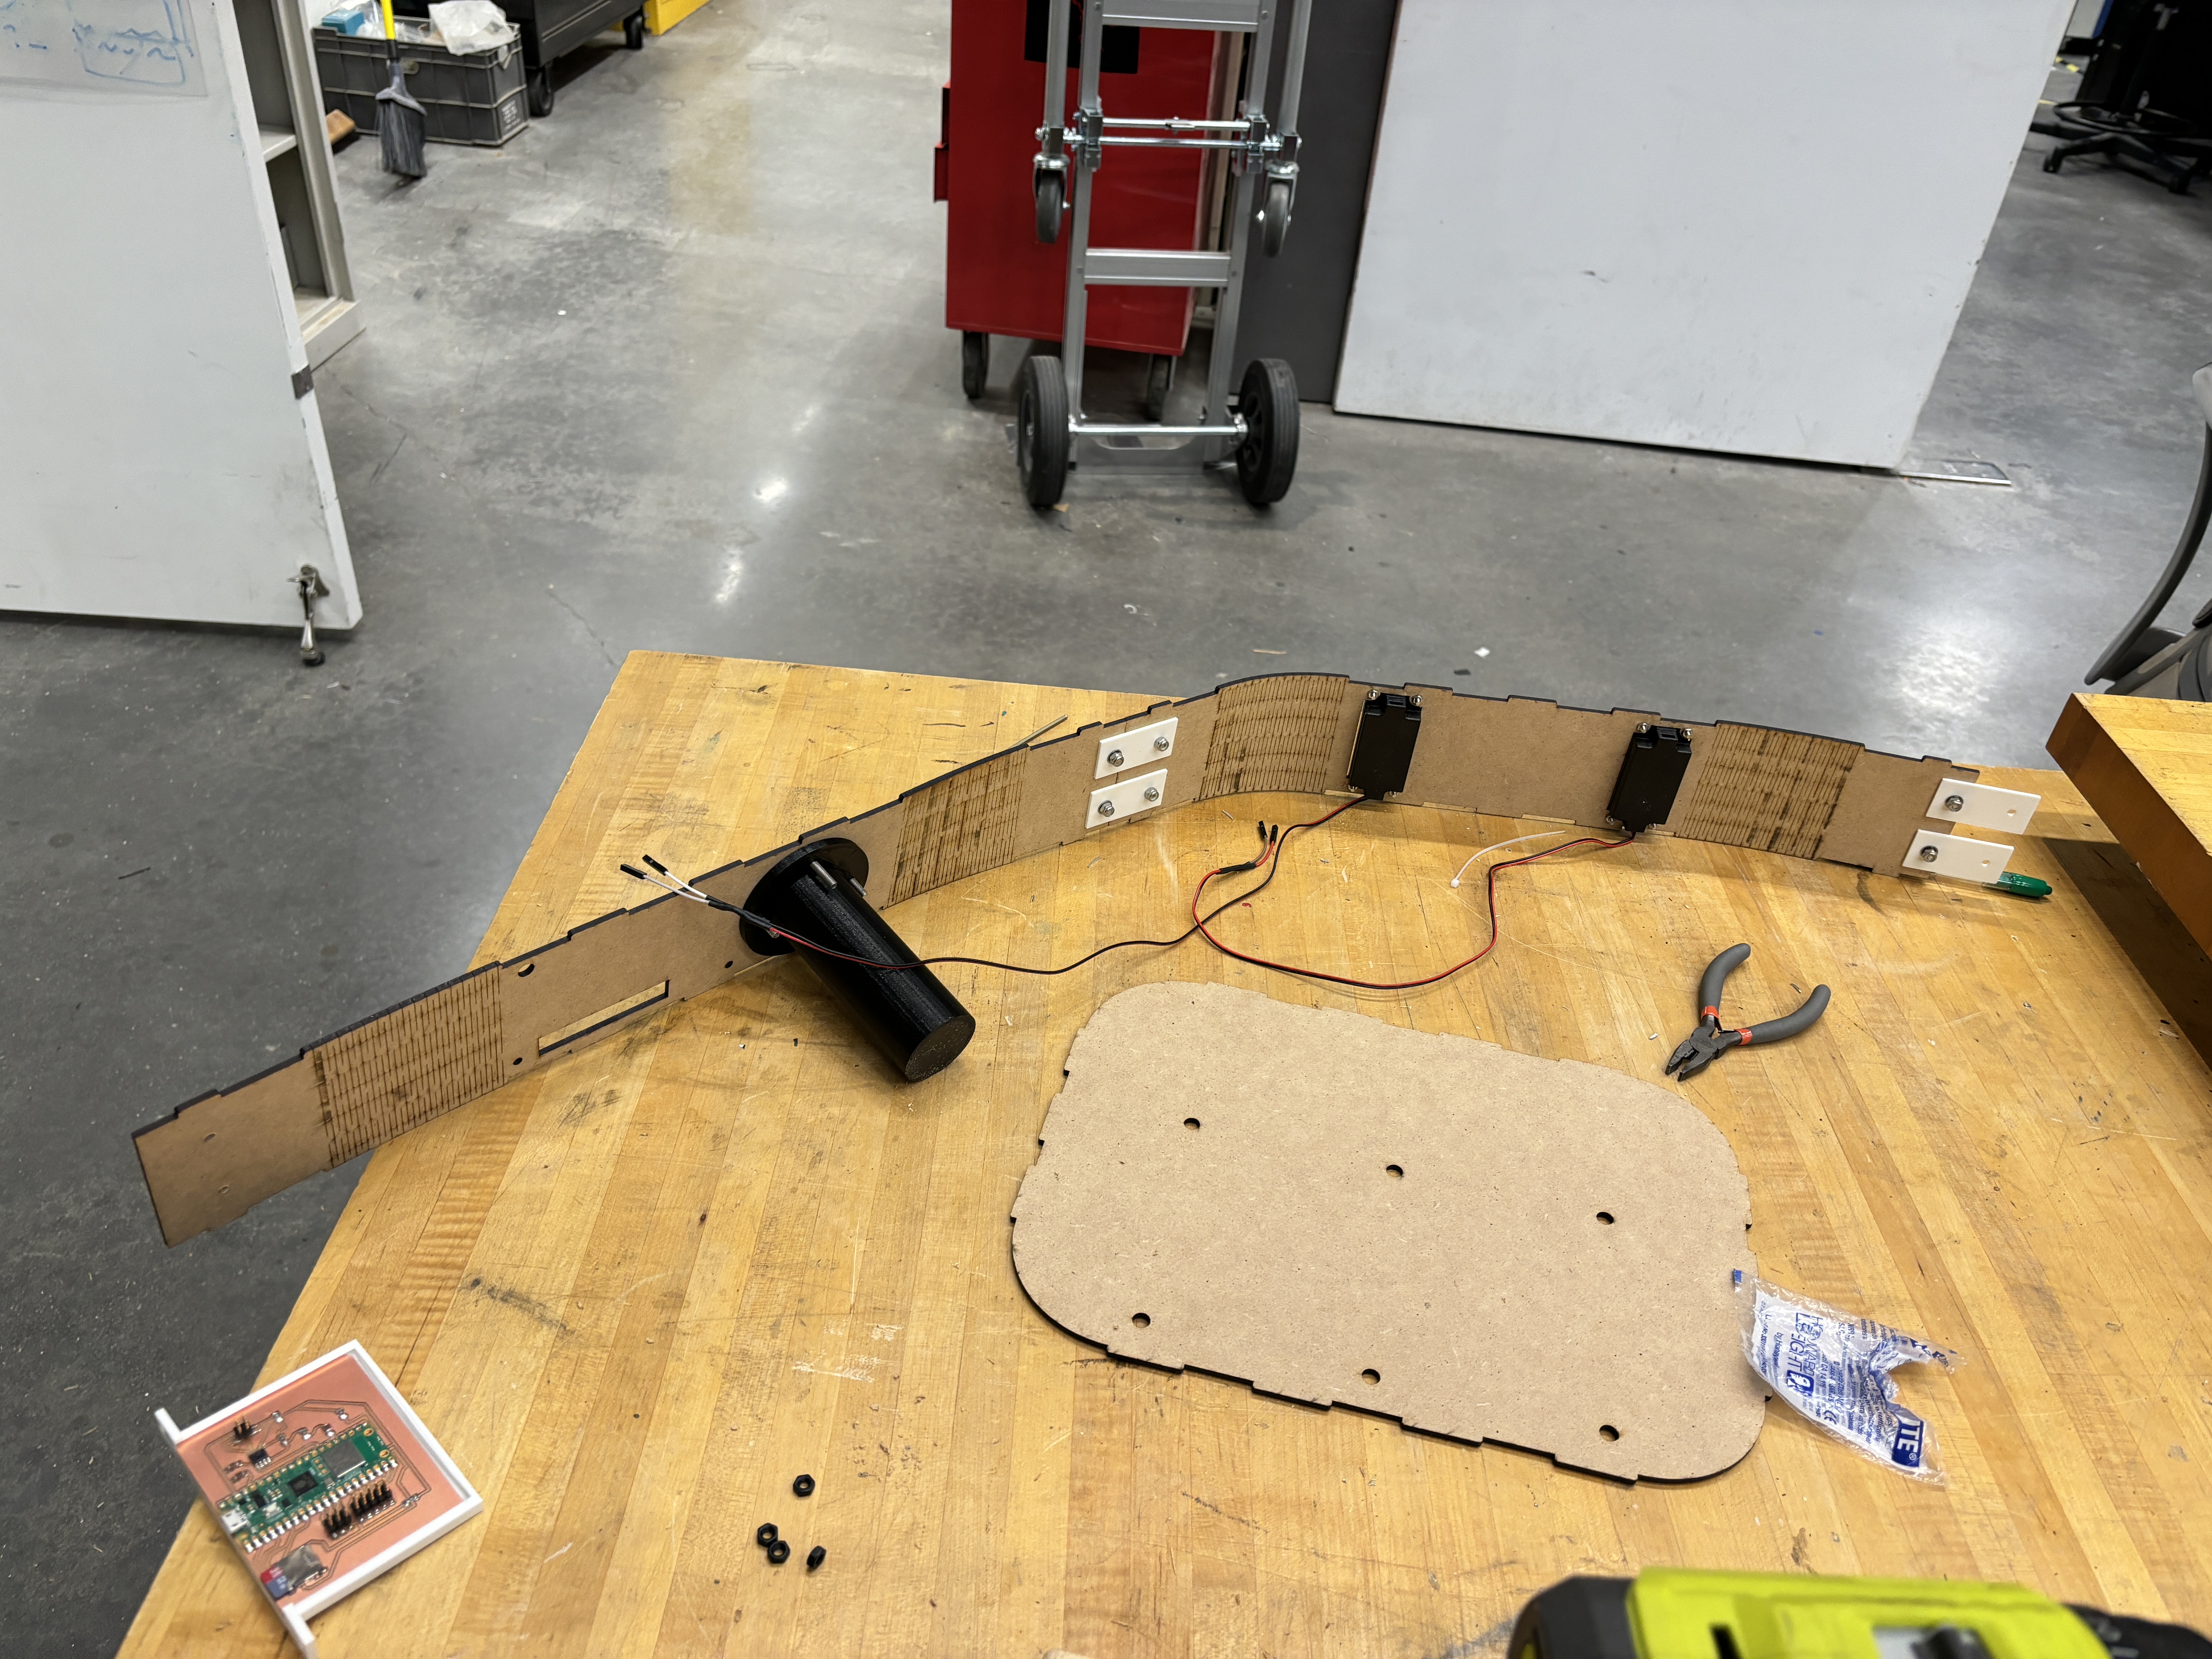
Assembling the wooden box and components
Demonstration of the living hinges in the laser-cut wooden box.
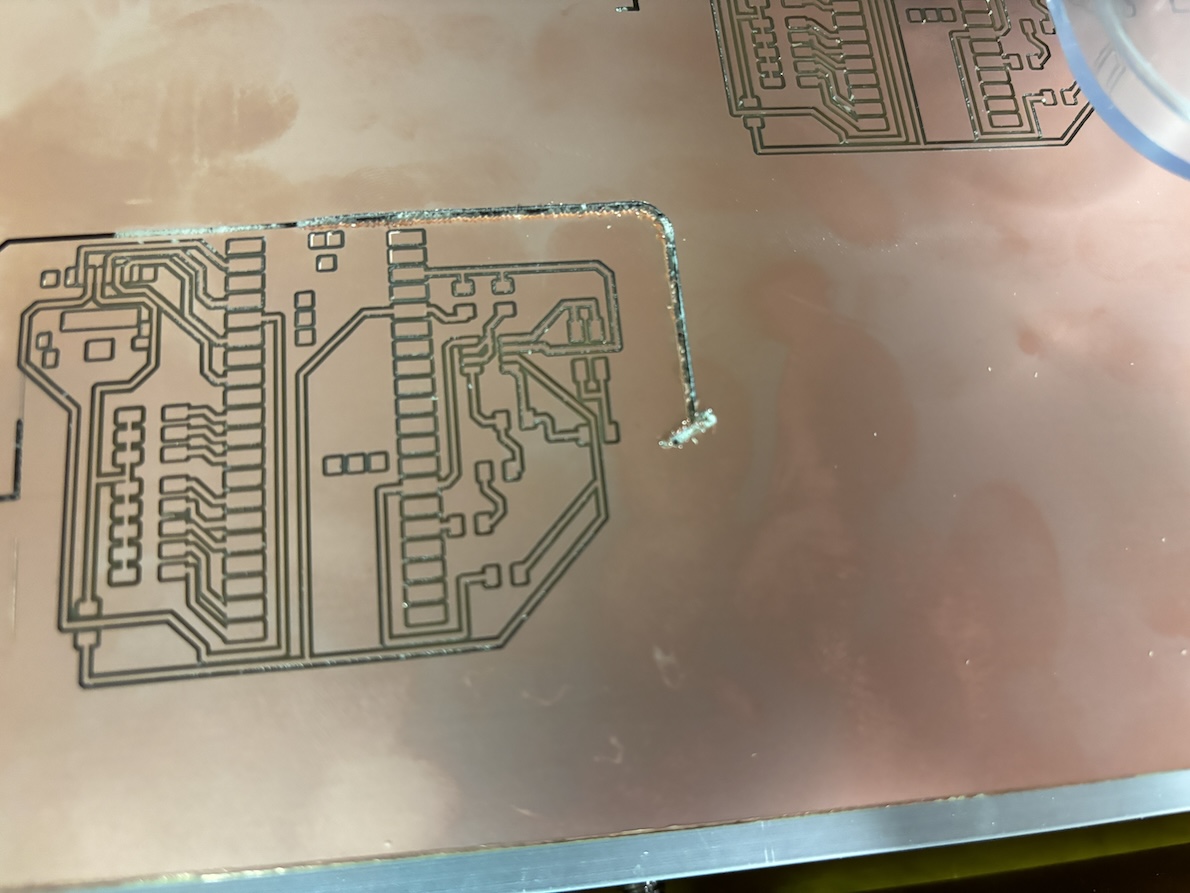
Something went wrong with the Genmitsu milling machine when milling the outline. I broke a 1/32" endmill, but still do not know exactly how. I replaced the endmill seen here and ran it a second time, which worked perfectly normally.
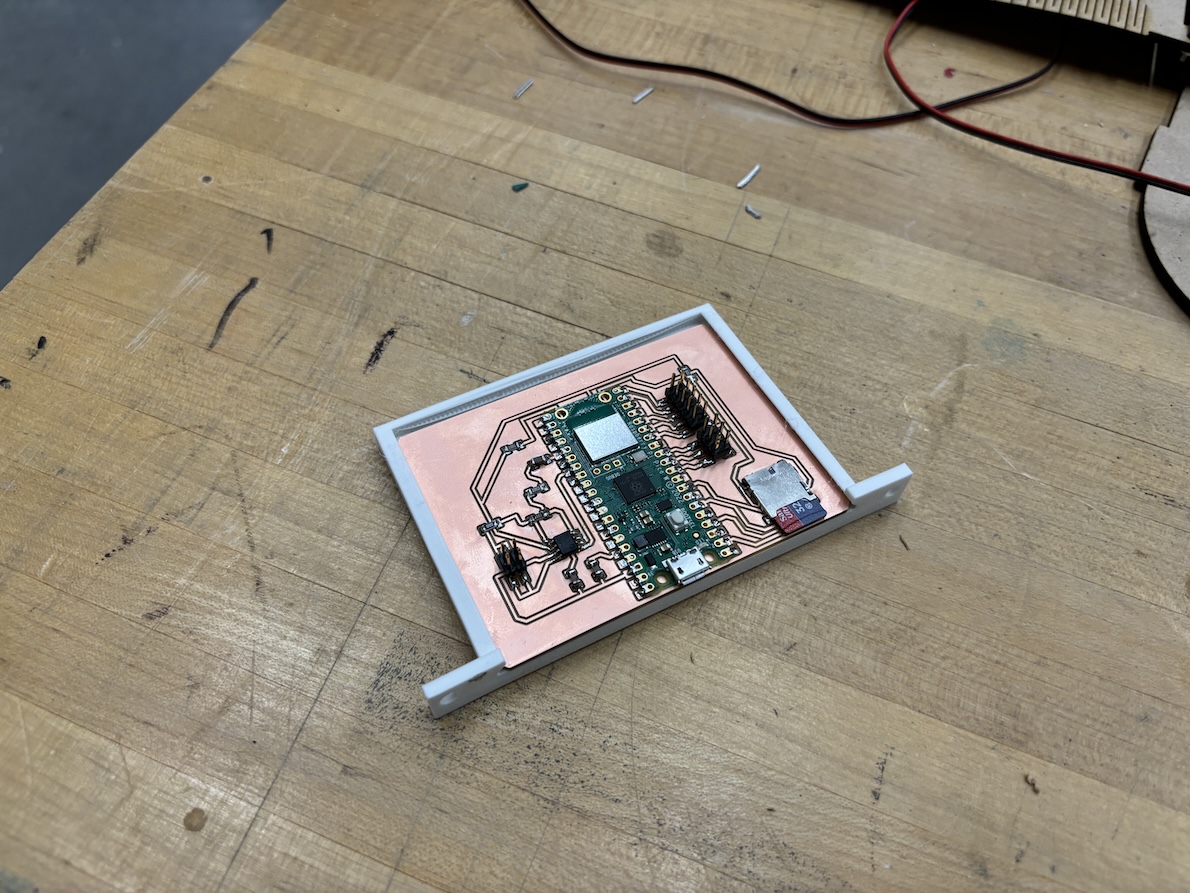
The milled PCB sitting snugly in its 3D printed holder
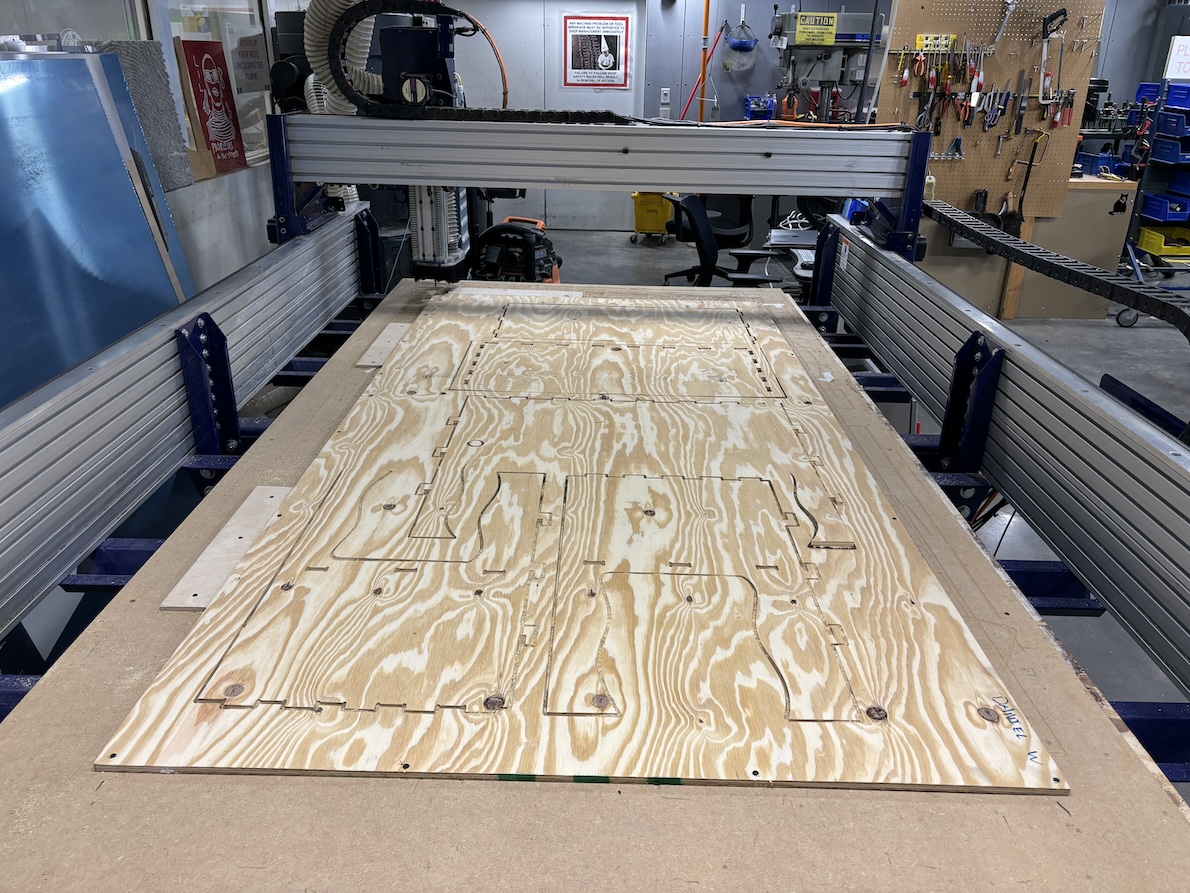
Pieces of small table on the ShopBot CNC machine
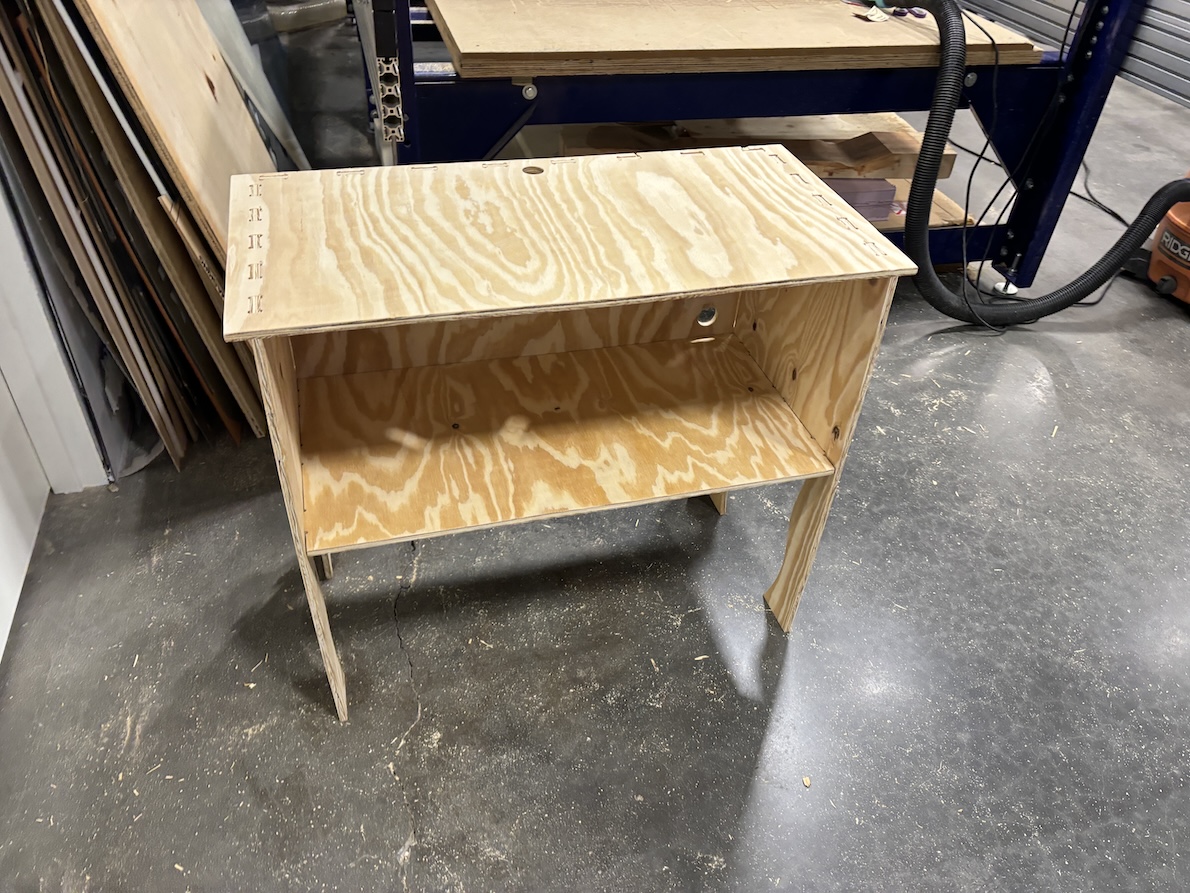
Assembled table for toy to sit on
Playing tones and .wav files
I used a Raspberry Pi Pico W microcontroller, a class AB amplifer, an SD card, two small 4 Ohm speakers, and micropython files to play tones and .wav files.
I followed much of the guidance on this website to play .wav files on the device.
Thanks to Quentin, we were able to modify the code above and use an oscilloscope to understand exactly what was going on with my setup. While we could play tones with relatively good quality, I was
unable to play .wav files with good resolution as of December 19th. I intend to continue modifying the code and the hardware to improve the quality of the sound playback.
Here are the .py micropython files on the microcontroller:
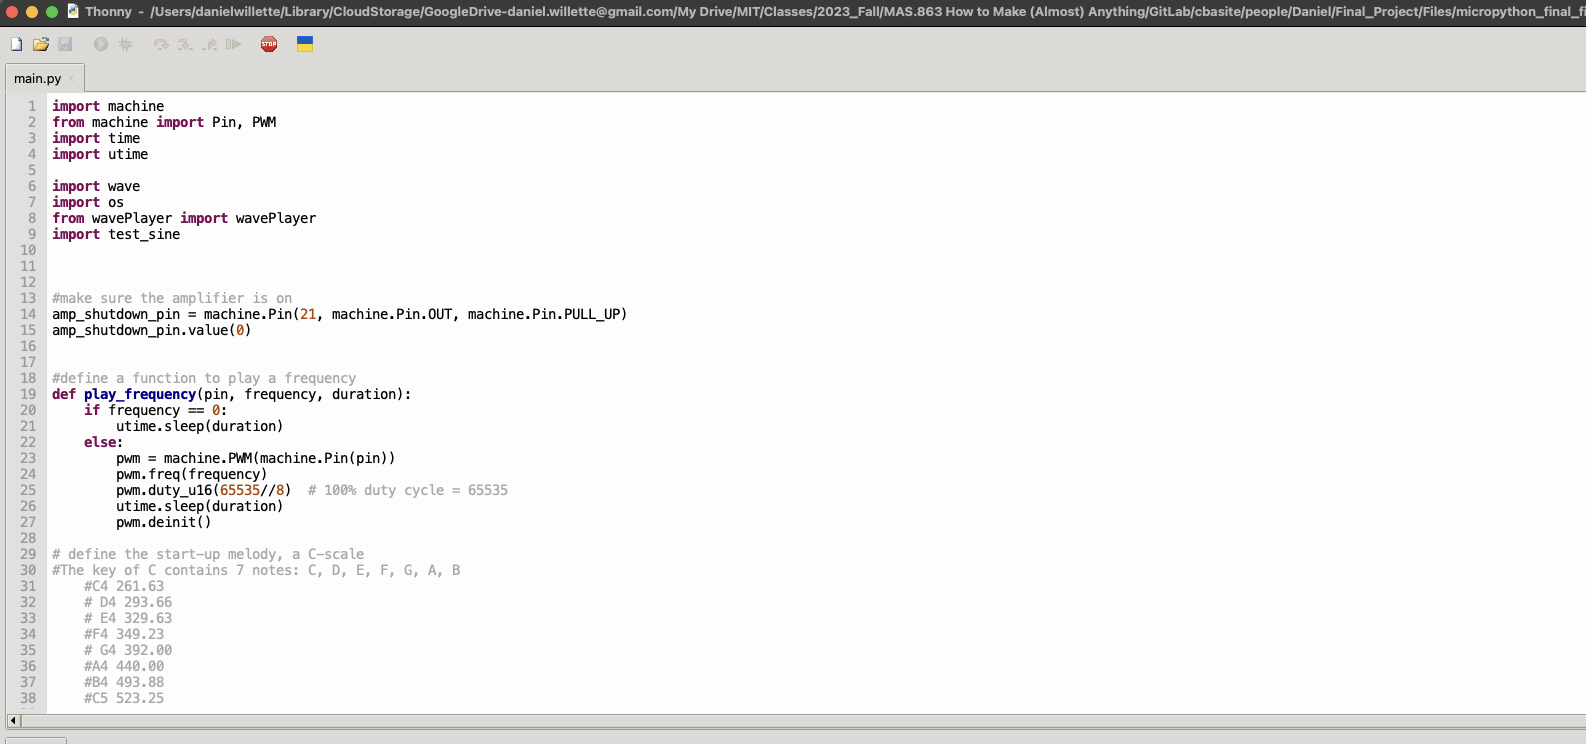
Screenshot of the main.py file in Thonny, which was used to write and upload micropython files to the microcontroller.
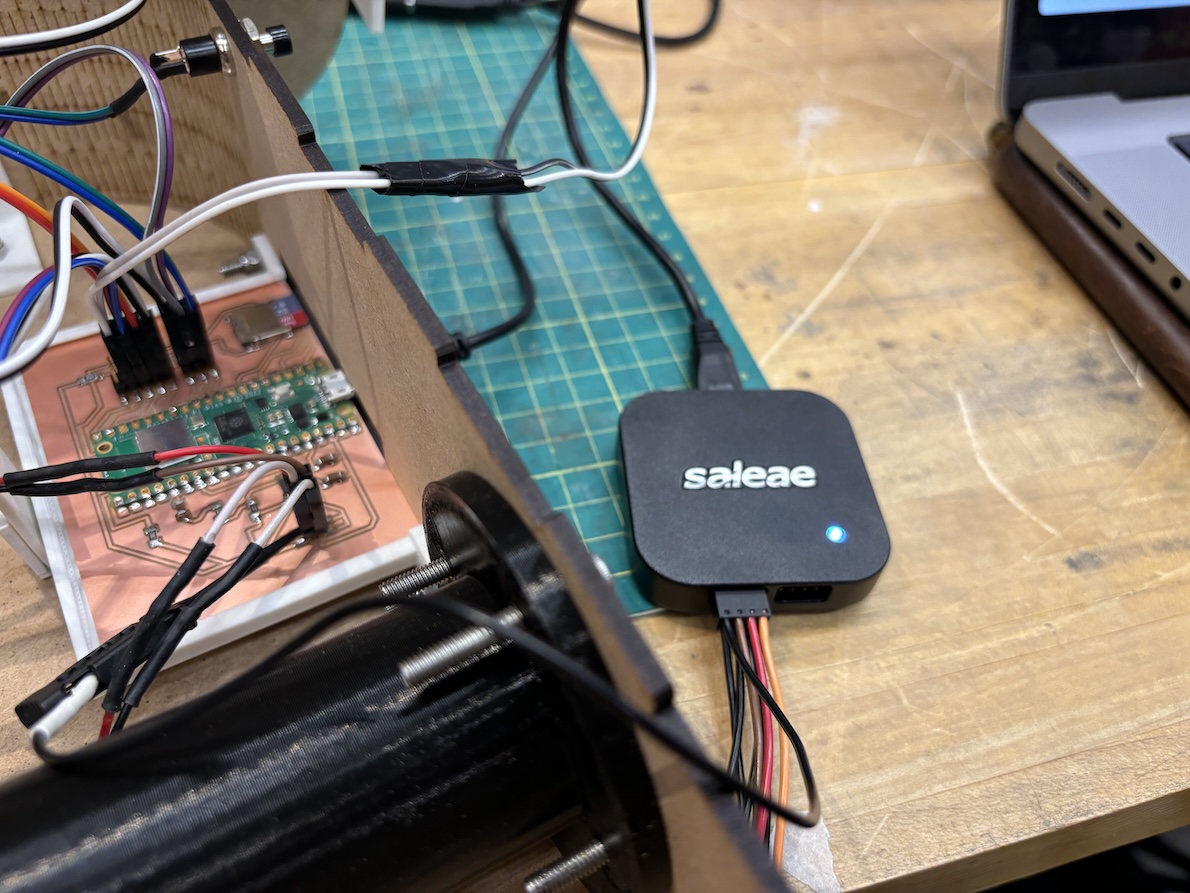
Connecting the oscilloscope to the speaker line on the board
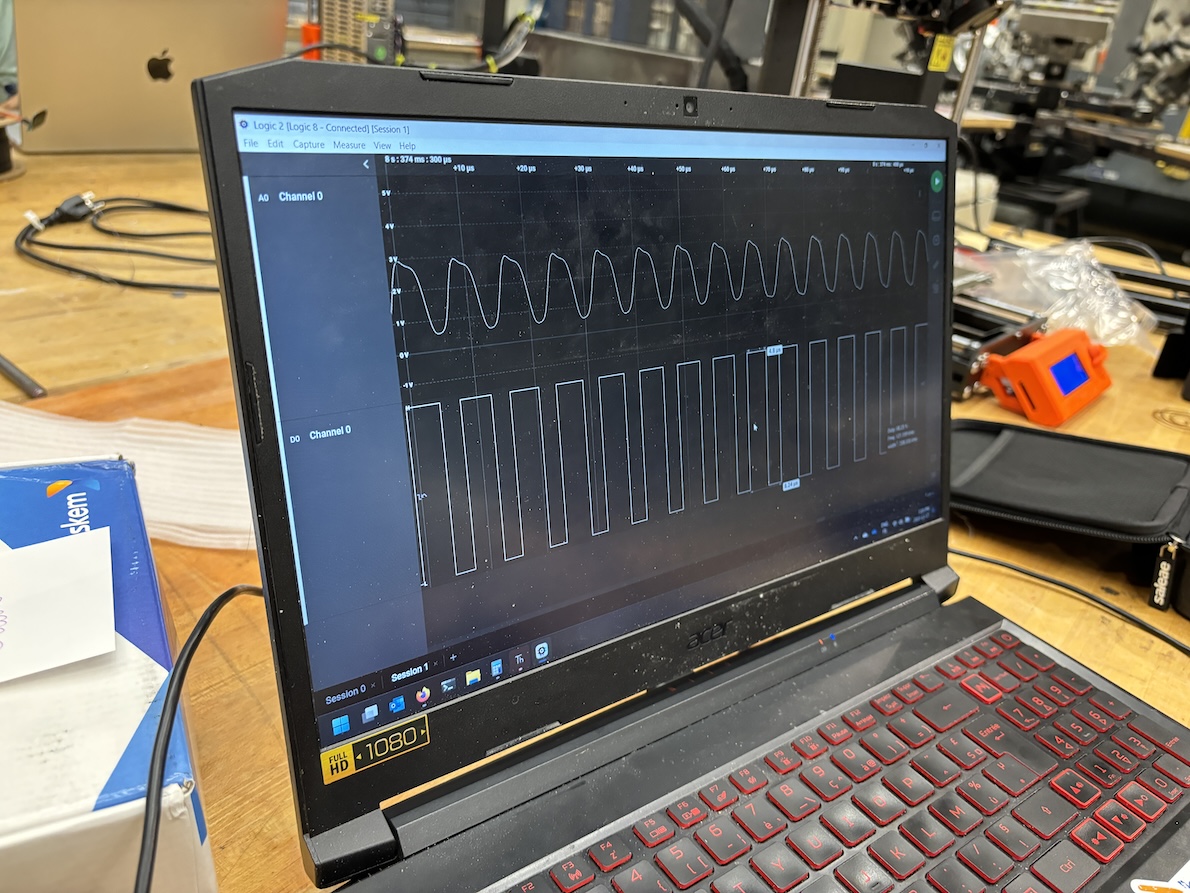
Viewing the signals captured by the oscilloscope on Quentin's laptop. We can see the digital PWM and analog signals here
Video of the toy playing only tones
Final products
The summary video at the top of the page describes the final product well, but here are some more pictures and videos.
Video of the toy playing .wav files, with the ability to change modes to playing tones in the C major scale
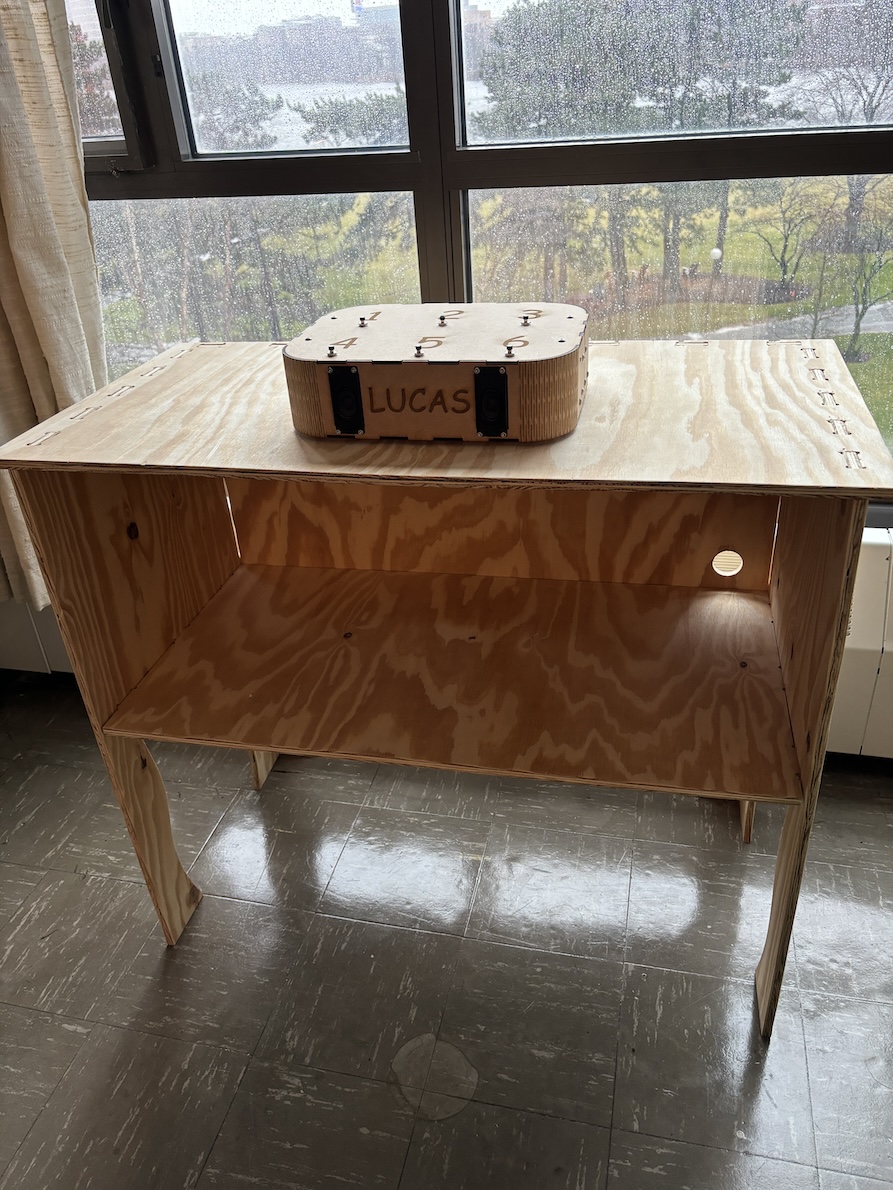
Toy sitting on its table