# Vinyl Cutting
Using the Roland Vinyl cutter, I cut a small sticker of the state of california. I obtained the .png file of the map of california and scaled and converted it to a .dxf file using Inkscape. Followed a similar process to cut a plane sticker. I cut them both separately to be able to print them on different color vinyls. This sticker combines my love for maps and planes :).


## Laser Cutting
During the laser cutter training, our group (Daniel, Shea, Andy and I) laser cut ~4.2mm thick cardboard into a few simple rectangles and determined the following parameters:
- **Speed:** 2.3. We played around with the few numbers ranging from 2 to 3 but noticed that 2.3 seemed to work best. I later updated this to Speed = 2 while working on my project.
- **Focus:** 17 mm. This was done by measuring the distance of lens from the cardboard after fixing the cardboard to the prescribed height given by the focus tool. No changes were made here.
- **Power:** 100% for vector and 50% for a raster cut.
- **Rate:** 200 pulses per inch. Increasing this resulted in smoother cut but also increased risk of fire.
- **Kerf:** Experimenting with a simple cut - I noticed the laser kerf varied considerably between the earlier determined value and subsequent tests. In the image below, I cut a block 15 mm wide. The resulting dimensions after the cut were 14.75 and I approximated the kerf = 0.25/2 ≈ 0.15. However in practice, I realized that a kerf of 0.25 seemed to give a much tighter fit because of the flexibility of the cardboard.
### Design
I wanted my theme for this week to be a Tropical Island paradise and so, I decided to design a coconut tree in Fusion 360. The challenging part came from a CorelDraw software weirdity which refused to import any spline shapes. This resulted in a more than a few hours of debugging. Alfonso helped me figure out the root cause, and I eventually got his help to upload my design to Rhino and import it in a different "old dxf" format in CorelDraw and finally cut my design.
What my design looked like in Fusion 360

How it showed up in Corel Draw (the Splines did not import into Corel Draw and had to be converted to Polylines. This took up way more time than I imagined and prevented me to try more complex 3D designs for this week).

Laser Cut
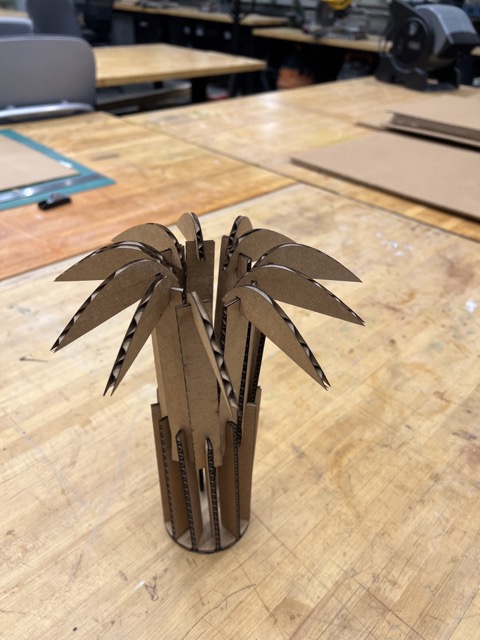
In the coming weeks, I plan to use living hinges and flexures to make a hammock and other features to complete the tropical island.
### Lessons Learnt
- I did several small tests on the laser cutter to familiarize myself with all the parameters, however, I forgot how flexible cardboard is and that there is a lot of wiggle room while working with this material. Just doing one test would have sufficed.
- Thinking in 3D is hard :( and each software has its weirdities. I should have left enough time to ensure I could in fact import my design to the software on board.