Elective Affinities:
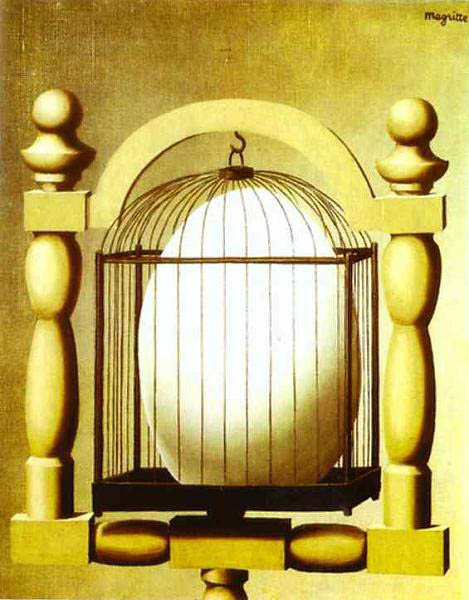
One night, I woke up in a room in which a cage with a bird sleeping in it had been placed. A magnificent error caused me to see an egg in the cage, instead of the vanished bird. I then grasped a new and astonishing poetic secret, for the shock which I experienced had been provoked precisely by the affinity of two objects -- the cage and the egg -- to each other, whereas previously this shock had been caused by my bringing together two objects that were unrelated.
-Rene Magritte
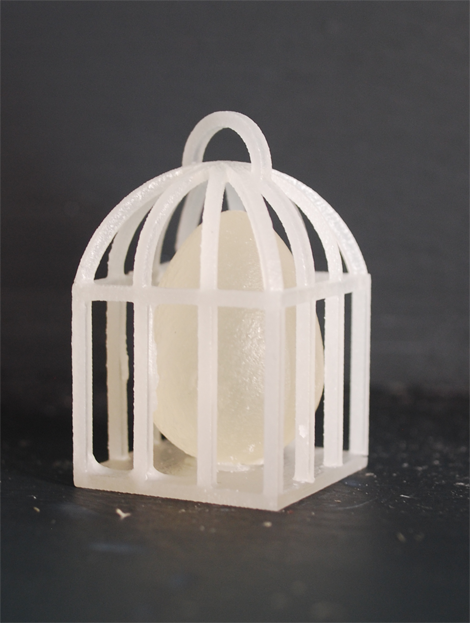
This week, I found myself in a room in which a machine with incredible capabilites had been placed. This magnificent creator allowed me to print an object inside an object, impossible with any other machine. I then grasped a new and astonishing and poetic secret, for the shock which I experienced had been provoked by the perfection of the printed object -- the cage and the egg -- one inside the other, whereas previously this shock had been caused by the fascination of being able create such a thing.
-me
3D scanning and printing
This week we explored the magical world of printing and scanning 3D ojbects. I've used 3D printers before, but they never fail to amaze me. I several different printing and scanning techniques this week to get a good taste for it.
printing something inside of something
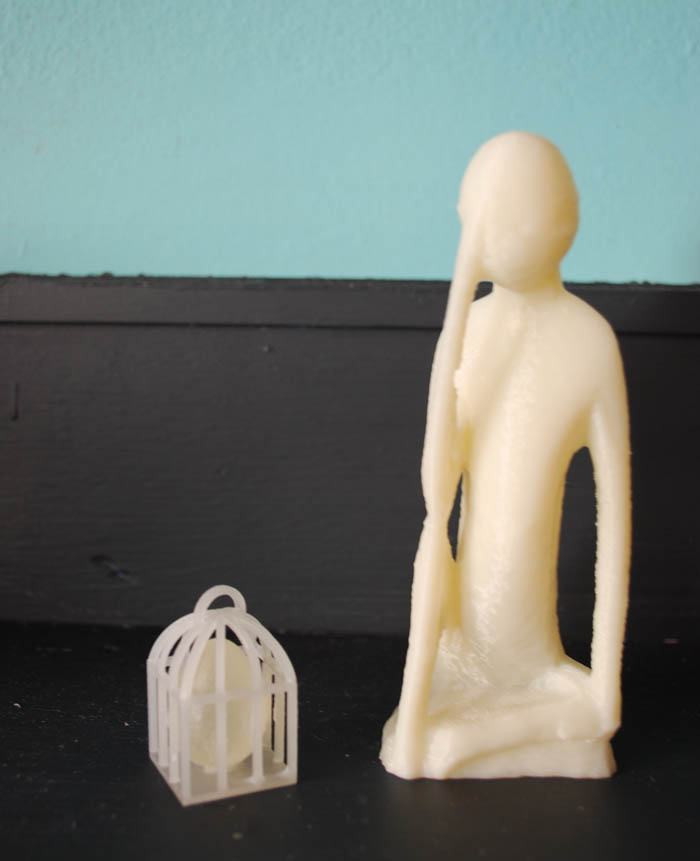
One of the most magical stunts 3D printers can perform is printing an object inside an object. With no assembly necessary, only some post-processing to remove the support material. This is not possible with any other manufacturing technique. So I wanted to make sure I tried it. I was inspired by Maritte's painting, Elective Affinities. Magritte was a philosopher who spoke through paintings. In this painting, he depicts an egg inside a cage. In describing it (see quote above), he tell us that upon imagining this egg inside a cage, his first reaction was identifying these two objects as unreated. A bird is supposed to go in a cage, not an egg. But thinking about it even more, Magritte realized that the cage and the egg actually share many similarities. They are both rigid housing for a bird. they perform the same function, only at different stages of the bird's life. (Note: This is my interpretation of Magritte's painting and of his comments about it.)
Using a 3D printer, I was able to create his image of an egg inside a cage, and all in one print. I'm still shocked and fascinated by the ease of the process and the quality of the result.
I created my file in Solidworks. I exported my completed assembly as an STL file. The all the individual parts saved as separate STL files, but I opened them all in Rhino and exported one final STL. This STL can be send directly to the printers. I printed this magnificent object in the InVision printer, which prints clear acrylic. The acrylic is not as strong as the ABS printed by the Dimension, but the InVision is much faster when there are many parts, since it's speed is determined by the height of the prints and not the quantitiy or volume of the prints. Once the printing was finished, the support material, in this case wax, was melted off my placing the entire pring in an oven.
Here is an unnecessarily complete first angle projection of my Solidworks assembly.

Troublesooting: I decided to print two cages, in the hopes of wearing them as earings. One of them came out very well. There was a bit of extra wax, but I got rid of it by cooking my egg-in-a-cage in warm, not boiling, oil. The second egg-in-a-cage, however, did not print correclty. There was a large v-shaped v-grove in the egg, and part of the cage has sheared off as well.
scanning and printing
I was extremely pleased with the 3d scanning process. I had a couple of unseccessful attempts, but I ended up with a great scan that I was able to 3D print.
I really wanted to scan an organic form, something I cannot model in CAD. My first attempt was a tomato with many curves and wrinkles. The scanner was only reading the bottom third of the tomato, and it was a very rough and porous sketch. The surface of the tomato was very shinny and reflective, so I spray painted tomato with white paint to try to give it a surface finish more conducive to scanning. But even with a more matte finish, the scanner was unable to read the tomato well. I tried changing the focus many times to make sure the tomato was in range, but the results didn't improve.
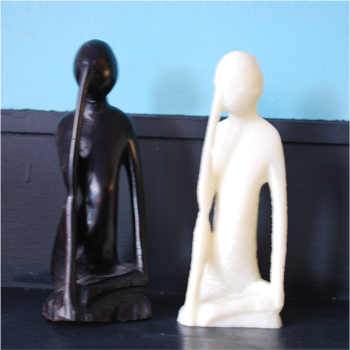
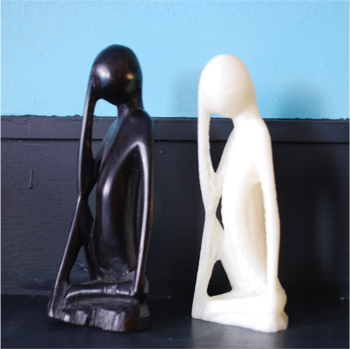
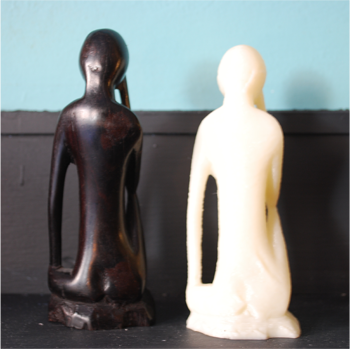
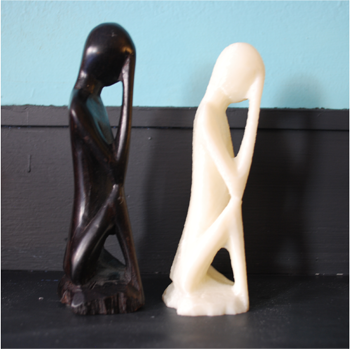
I had a few other objects I wanted to scan. I had a small sculpture I bought while traveling in Colombia. It's a sculpture of a body with one elbow on it's knee and it's hand supporting it's head. This sculpture is both black and shinny, two qualitites that make an object not ideal for scanning. But I stubbornly went throught he motions of settng up the scanner. I did a multishot scan, taking scans at 45 degree increments. To my extremely pleasant surprise, the scan came out very well. It took me about an hour of post-processing to smooth it out, but I was able to print it, and I looks just like the original. I first removed all extraneous pieces in the scan. Then I slowly removed any excess material on the surface of the scan. After removing as many as I could find, I started filling all the holes. I went through this process several times. There were a few instances where I had to "flat fill," I think because the holes were to big for the software to predict what the shape would be like. These were the areas there the final print was rough and almost pixelized. I also decimated the scan and reduced the number of polygons it contained, which helped create a smoother finish. Once satisfied with the scan, I exported it as an STL and printed it on the Dimension printer, which prints ABS. This printer only has one jet, which moves on 3 axes and deposits material to create a 3D shape. This print is stronger than the acrylic print, but requires more post-processing.
Here is a juxtaposition of the real sculpture (right) and the 3D scan during post-processing.
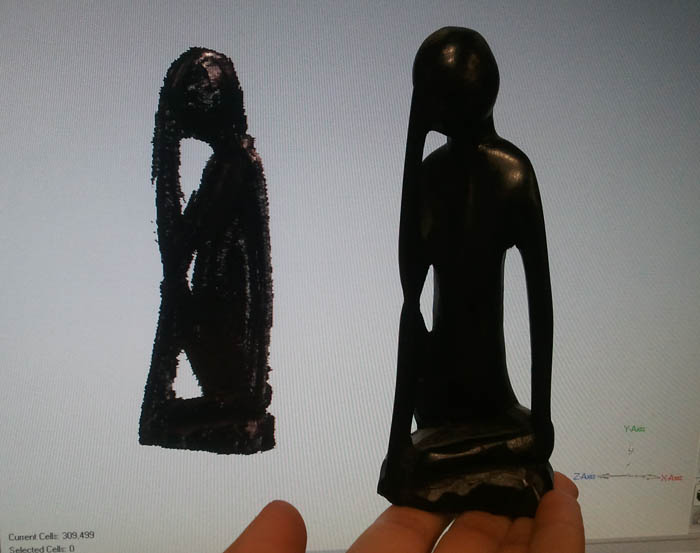
Here is a juxtaposition of priginal scupture and the 3D printed sculpure.
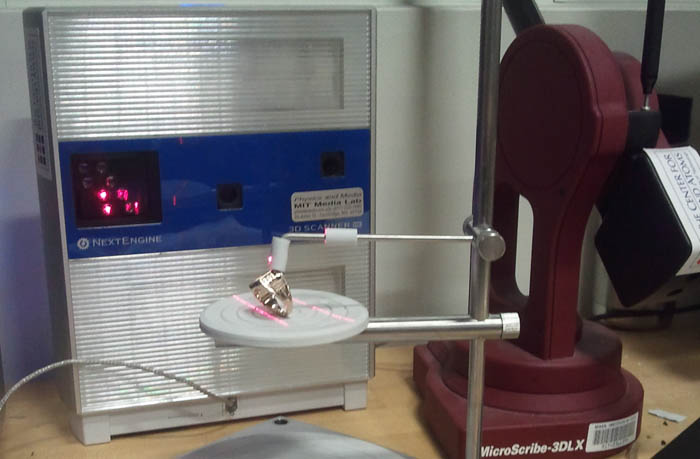
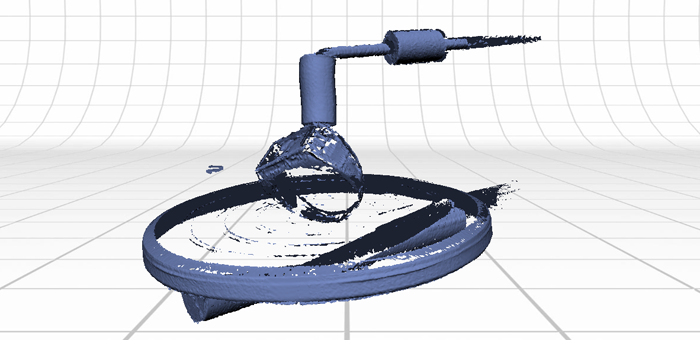
Finally, I attempted the smalled 3D scanner with my Brass Rat. I Brass Rat, made of a polished metal alloy, was too relfective and had too many small details, that the resolution of the scanner was not enough to capture it.