Final Project
Demo
Ideation
I’m taking another class this semester called Interactive Music Systems (6.809/21M.835) that explores digital synthesis of music and design of engaging music applications, and I thought it’d be cool to make something at the end of the semester the incorporates the skills I gained from both classes.
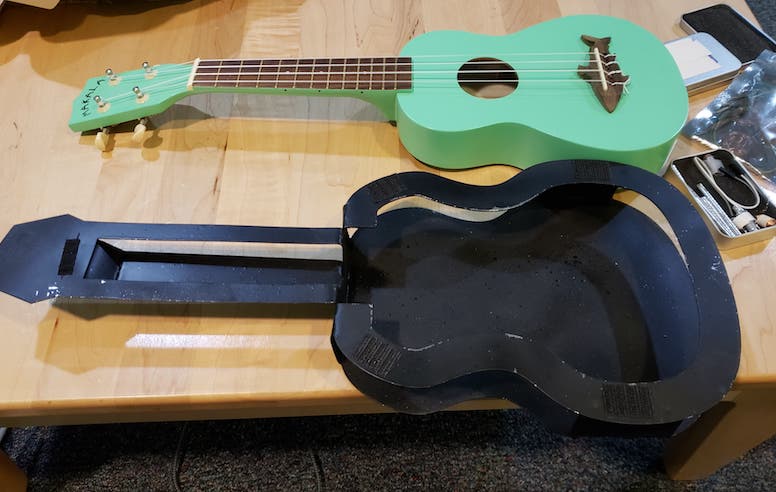
I’m teaming up with Elliott on the final project, building an electronic ukulele. He’s going to work on the capacitative touch sensors on the neck, and I’m going to work on the strumming part. We’ll each be making our own ukulele body. We pivoted from the original design of a full guitar, since a ukulele involves many of the same parts and but is much smaller and easier to work with.
Hopefully spitting up the work like this will give us enough time to not just make the ukulele work, but to make it work well and incorporate some other features of an actual guitar, such as bends. This will be a challening task that requires our different sections to communicate.
Strum Electrionics and Software
I want to be able to not only detect a strum, but to be able to detect which specific string was plucked. Originally, I wanted to use a single piezo-electric sensor, which detects vibrations. This didn’t end up working, since the serial communication rate was too slow for any sort of interpolation on a separate computer and I didn’t want to figure out how to do it on the microcontroller. More details in Week 9 – Input Devices.
I then switched to magnetic pickups, which most electric guitars use. These rely on coils and magnets, and when a string is plucked it changes the magnetic field around the coil, which induces a charge through the coil that theorectically can be detected through the input pins on the microcontroller. To detect each individual string pluck, I’ll need four coils and four magnets – one for each string.
Iteration 1: Small Coils with Small Magnets
I started off using the same board as I did for the piezo sensor, which just connects the output directly to an input pin on the microcontroller. The initial coil I designed wound around a stack of six 5mm x 3mm neodymium (strong) magnets, and included around 150 coils. I continuously sent readings from my coil serially to my computer, and then plotted the points using Matplotlib (Week 12 - Interfaces). To cause a change in the magnetic field, I would just bring another magnet closer.
When I hooked it up, all I got was noise. The points would be all over the place, seemingly random, from 0 to 1023, the entire possible range.
Iteration 2: Adding an Voltage Divider
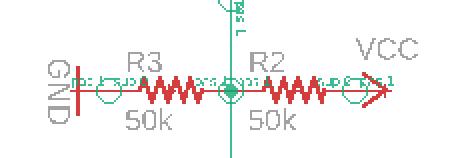
I added a voltage divider, which is two strong resistors that filter away small changes and hold the voltage at half. This held the values I was getting costant around 500 to 520, but my board sill could not detect any changes at all. I hooked it up to an oscilloscope and it dected some changes one day, but when I tried the same setup the next day, it also failed to detect anything. I thought I was going crazy. I made another coil, larger and with around 200 coils, and hooked that up to the oscilloscope as well. It only detected the changes as tiny blips – on the scale of microvolts, which definitely isn’t enough.
Iteration 3: Using an OpAmp to Amplify Signal
After consulting Ben, who consulted the Internet, we decided to try using an opamp in differential mode to amplify the signal. I kept the voltage divider on the input of the opamp to keep filtering weak signals.
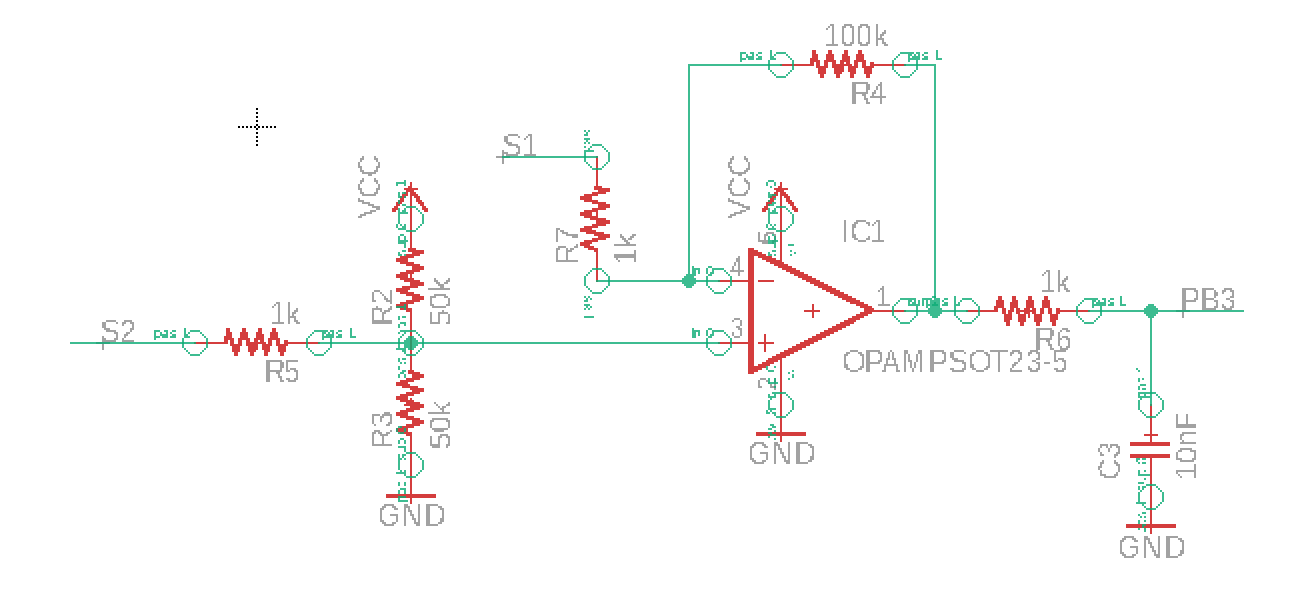
It still wasn’t great, but the oscilloscope detected strong singals and the graph interface could see consistent changes when I moved the magnet, as long as I held the coil still.
I made another coil, around a wooden peg with a hole drilled in the middle to add in magnets later. These coils would detect changes when a magnet was brought in when there weren’t already magnets present, but couldn’t detect a magnetic field that was already there (if I put magnets in the peg and brought more magnets close). I needed the present magnets to detect the string vibrations.
Iteration 3: Tuning Electronic Parameters
I brought up the gain resister on the opamp circuit from 100k to 499k, which magnifies the result much more, and brought the resistors in the voltage divider down from 50k to 10k, which means a larger change is required to change the voltage, theoretically filtering out more noise. This gave a better result, but it still wasn’t strong enough.
Through experimentation, I also found that having less magnets already present seemed to detect changes better. I decreased the count from six 5mm x 3mm magnets to three.
Iteration 4: Big Coils with Big Magnets
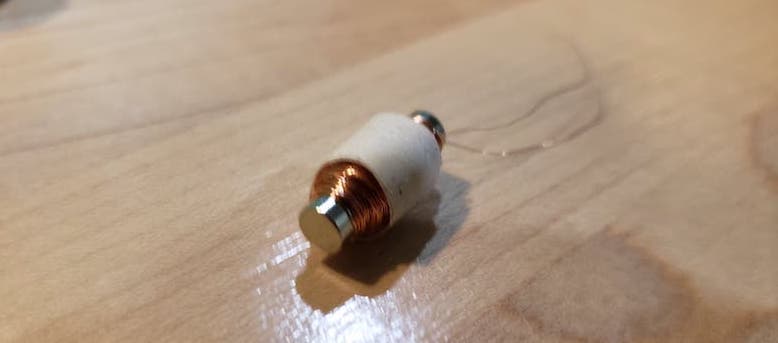
I figured I should make better coils and give that a shot. I found these little plastic doohickeys in my, and wound magnet wire around them. Each coil consisted was wound 1000 times around. I also ordered larger magnets to experiment with, since all the magnetic pickups I found on the Internet seemed to use larger magnets.
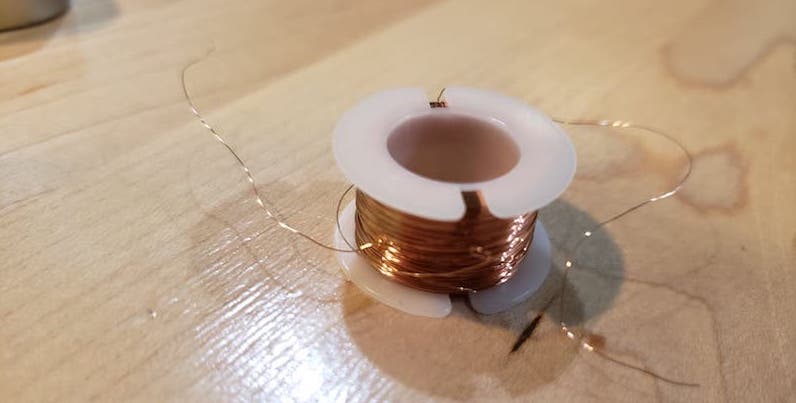
These magnets were much stronger, and fit into my coils better. I experimented with a two stack and a one stack, and decided that the one-stack worked slightly better.
Combining Multiple Coils
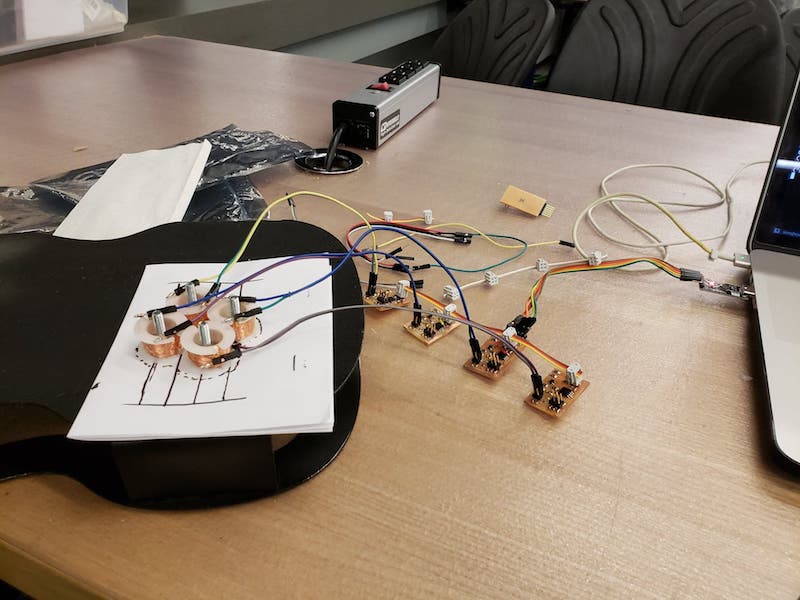
Now that I got one coil working, I could start working on getting them to communicate with each other. Since a ukulele has four strings, I needed four coils, so I could detect the strings independently. Once I got two coils working (see Week 13 - Networking and Communications), adding a third and fourth was just a matter of fabrication. I spent a few hours in lab one day milling and stuffing more boards and winding more coils, and thankfully, everything went fairly smoothly.
Tuning Software Parameters
I spent a lot of time trying to make the sensors detect the string plucks more, but once I got to this step, they sensed plucks a little too well. Plucking a string would set off the other pickups too. I spent some time messing around with parameters, and in the end I got it working semi-consistently, but you had to pluck the strings pretty hard. Each board had it’s own c file where I saved the thresholds that would trigger a “pluck”.
Neck Electronics and Software
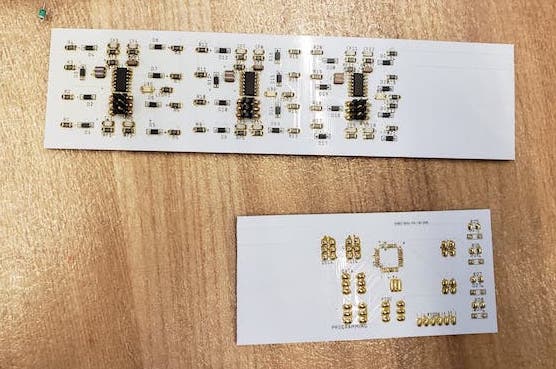
Elliott designed the electronics and sent them to a board house. When we received them, we soldered all the components onto them using a solder mask and solder paste (much faster than regular stuffing), and I chopped off his strum detection part so I could use my own instead.

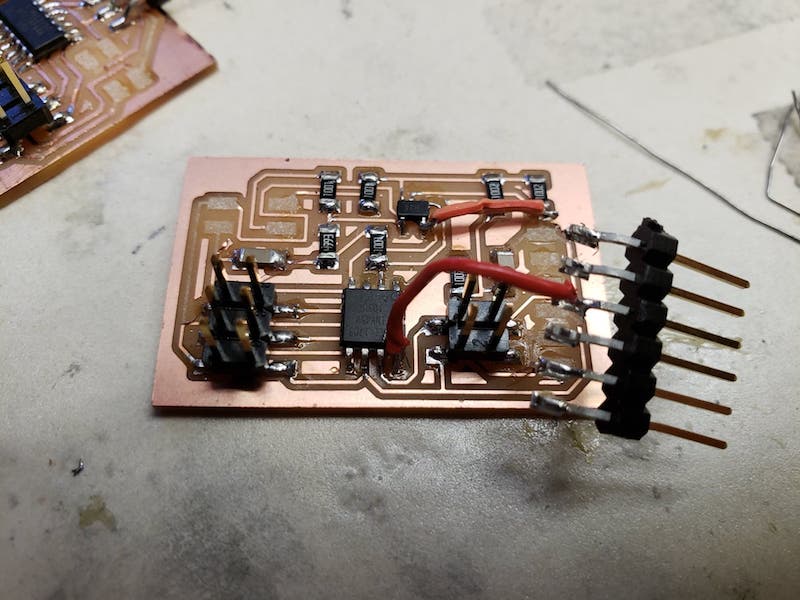
I designed my own breakout board that would collect all the data from Elliott’s boards and interface with the rest of my ukulele.
Programming
I based the code for detecting touches on the pad heavily off of what Elliott had already done in previous weeks, but wrote my own code for the breakout and the serial communication between the breakout, the neck, and my computer. First, I got the serial communication working, which was tricky due to timing. I had to place delays in the code to make sure the receiving board was listening before anything was sent, or it would miss it and the program would block there. Once I got the necks sending the value of one pad to the breakout and then to the computer, I moved on to sending all eight for each board.
I was getting all 0s as the detected value, which wasn’t correct. I thought it might’ve been a problem with an offset or something in the serial communication, but I probed it with an oscilloscope and the multitouch boards were indeed sending 0. I directly pulled Elliott’s mulititouch code (without modifications) and loaded it on my boards, and connected it directly to my laptop, and it worked – I was getting reasonable numbers (and by reasonable I mean non-zero), so I tried adding my breakout serail communication code to that directory and it wouldn’t work – I couldn’t connect to my breakout board at all, I couldn’t even send a series of 1s. I copied-pasted the working multitouch code into my directory with the working serial communication, and the multitouch doesn’t work. So I have two directories, with almost exactly the same code, one for which the serial communication works but the multitouch doesn’t, and the other for which the multitouch works but the serial communication doesn’t. I was going crazy.
Turns out, the guy who Elliott based his code off of, Matt Keeter, modified Neil’s macros (such as set, clean, input, output, pin_test, and bit_test), so that it bit shifts inside the function instead of assuming bit-shifted input, so half the time, I was providing the wrong input for the macros.
Neil’s macros

Matt’s macros

I bit shift all the inputs to the macros in the multitouch code, and lo and behold, it works. That’s got to have been one of the most annoying bugs I’ve faced.
A Night of Misfortune
All within a two hour time period, I ripped the traces from my neck breakout board and the mag0 board, the two boards I had the ftdi connection with. Without these, I couldn’t make any progress, so I spent several hours remaking these boards. I also dropped my project and the acrylic neck snapped clean off.

Speeding it up
Turns out, sending 24 characters over serial to determine which pads are pressed is really slow, so I baked the threshold values into the embedded programs on the multitouch boards, which reduces the space we need to 24 bits, 0 for not pressed and 1 for pressed. This means we only need to send three characters over serial. This sped things up significantly.
I decided to do the fret calculations on the breakout board, which I thought fit the purpose better. In the end, I got four values out from the breakout board: a fret number for every string.
Synthesizing Audio
I’m using a framework we used in my other class to synthesize audio, called kivy. At first, this was extremely slow, and the audio lagged really bad. Turns out, kivy handles everything in frames, and everytime I queried the boards, the audio would pause. I solved this issue by creating a separate thread and running that in the background, separate of the app, and communicating everything via global variables (not the best but I didn’t have a lot of time).
The audio no longer lagged, but the strum detection was still a second or two behind. I’m not entirely sure why this was happening, since the finger tracking was updating in real time. I tried querying for the strums 3 times as often as the multitouch, and this made things a lot better.
(click to play)
Graphics
I initially wanted to combine the final projects I have this semester, one for 6.809 (Interactive Music Systems) and one for this class, and build a beginner guitar tutor that tracks your finger positions and gives live feedback on your performance. Unfortunately, I didn’t have a chance to finish this project before that one was due, so I couldn’t use my ukulele. Fortunately, the professor had a Fender Squire Guitar, built for Rockband 3, that also tracks finger position and strumming, and allowed us to build and test the application.
I was able to adapt that software from a guitar tutor using the Fender Squire Guitar to a ukulele tutor using my custom hardware, and the results are pretty cool.
6.809 demo
Mechanics
Ukulele Body
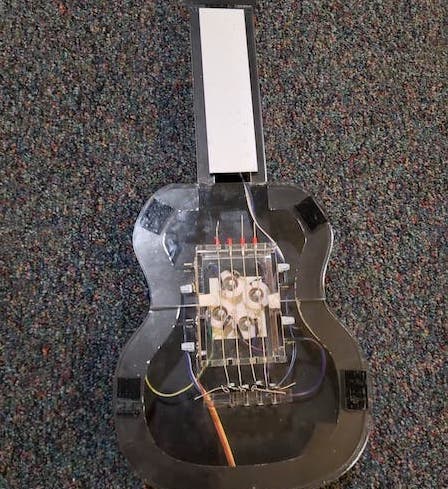
I decided to stray away from a traditional wood body for the ukulele both to have something to do for wildcard week and to differentiate my ukulele from Elliott’s. I designed and fabricated a sheet metal body, whiched turned out really nice. See Week 14 - Wildcard Week
Strumming Mount
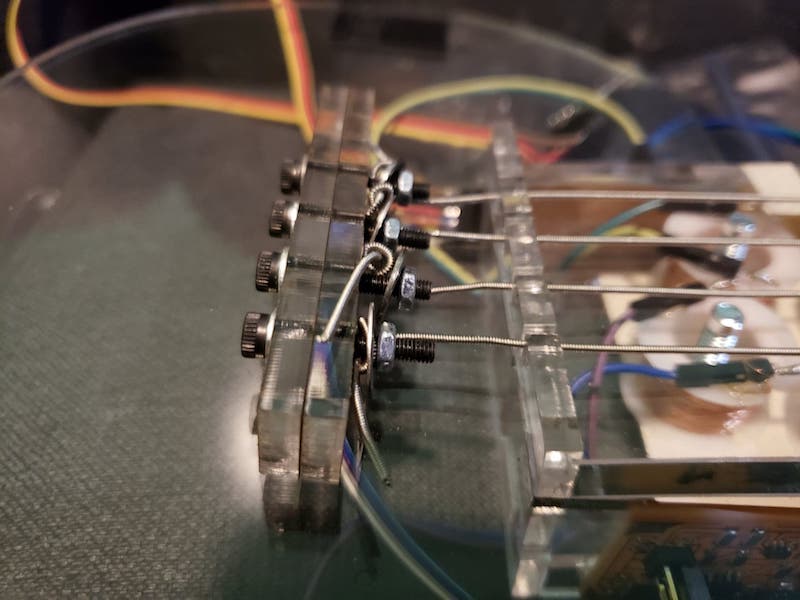
I designed a box to mount the strings and hold the coils and electronics out of acrylic. To tension the strings, I crimped one side and tied the other side to a bolt, holding it back with a washer and nut. I only had to tighten the bolt to tension the strings.
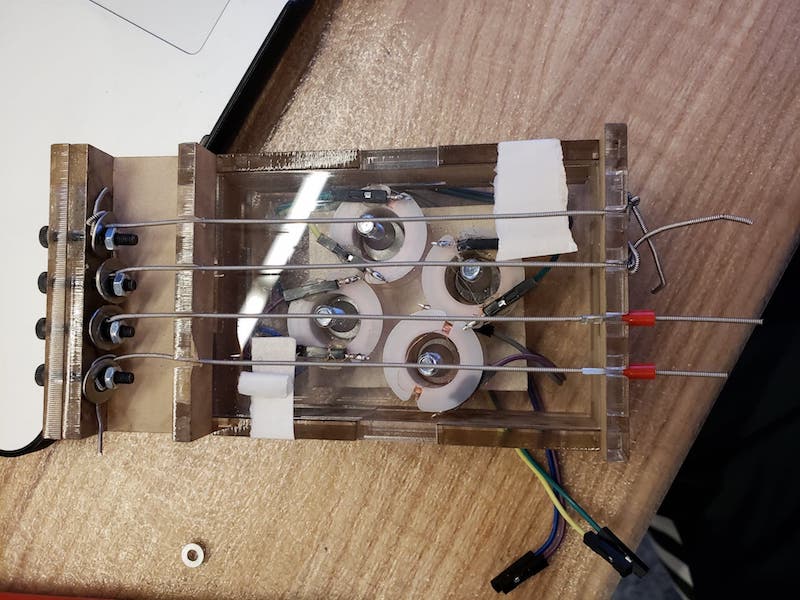
The box itself is held up by a sheet of acrylic, the same shape as the outline of the metal body. This sheet attaches to the metal body with velcro, and is strangely difficult to remove once attached. The multitouch board along the neck also attaches to this acrytic sheet, with double-sided tape.
Injuries
It’s been a brutal time. Over the period of two weeks I’ve gotten 7 cuts, 1 burn, a stiff neck, back pain, a rash, and a header pin stabbed 1/8” deep into my nailbed. I can truly say I poured my blood, sweat, and tears into this project.
Bill of Materials
I bought my own guitar strings ($8) and magnets ($6 x 2); the rest of the materials, including the acrylic, was provided by the shop.
Evaluation
Not going to lie, it doesn’t work as well as I hoped it should. But, it was an ambitious project and I’m proud of the countless hours I put and the result I have.
Pros:
- Looks cool, or at least I think so. It doesn’t have a sleek, modern look but it’s unique and you can see all the work put in.
- Outputs music. You can play it.
- Connects (very buggily) to a nice application that teaches you to play ukulele along to songs.
Cons (Future work?):
- Neck too wide. Uncomfortable to hold.
- Individual string strum detection needs work. I think it’s mostly a thresholding problem, but more time needs to be spent in this area.
- Audio is a little bit laggy. It’s not terrible, but it’s noticeable.
- Needs to connect to the laptop. It would be nice to have a synthesizer built in, so you wouldn’t be tethered.
Files
neck_code.zip
strum_code.zip
laser_cut_acrylic.zip
ukulele_sheetmetal.dxf