Final Project
SUPPLY SIDE TIME MANAGEMENT DEVICE
A device to help manage supply side time; to spark productivity; to generate pressure for performance.
A device to help win at capitalism!
Ideation
The inspiration for this project comes from my desire to measure my habit of procrastination. In the process of ideating about such a device, Neil's lectures on supply side time management seemed useful to integrate into my potential final project. That way, instead of merely measuring how well I'm keeping up with some projects, I may actally be able to build something that can help me hack this habit and put me on the path to better time management.
Inducing this behavioural change within myself through technology seems unrealistic. Therefore, I decided to have a less serious take on my original problem statement. I thought about what kind of thing/situation might motivate me to get to work. What could contribute to pressure for performance? If the stakes were higher, would I be better at time management? More productive. More efficient. Basically, winning at capitalism! My mind quickly went to dark places, imagining hostage scenarios, where something critical would be dependent on me finishing a task within a given time period. Like a plant that needs watering. (I briefly imagined tadpoles, but I'll spare you the details). I soon gave up on that idea. Firstly, I had ethical qualms about it: do the ends justify the means? Secondly, I wasn't sure if I would care enough for the plant in question in order to care for its wateredness. This discouraged me from pursuing this idea further.
And so I settled on the idea of a sculpture or artwork that would somehow give me feedback on my procrastinating tendencies. This was my first iteration.
Version 1: Landscape of Work
The following depicts one of my preliminary takes on a potential product. I imagined a landscape (ambitious, I know) of work, a landscape representing the amount of work I have in terms of the time needed to complete the various long-term projects (like my thesis). I thought about this sculpture somehow "deforming", like going more off-centre, the farther I stray from a given timeline. This negative reinforcement is probably not going to push me to stay on track, but I liked the idea of something keeping track of my progress (or lack thereof) and giving me feedback. I attempted trying to flesh out what this could actually look like. As the class progressed, I became painfully aware of all that it would take to actually build this thing and I decided this version would be probably the last spiral (if at all still in scope) in the spiral development of this project.

Version 2: Doomsday Clock
Title credits: Anthony. Also a device meant to help visualize the available time for long-term projects (and maybe give me feedback on how well I'm keeping up). I quickly flattened, quite literally, my original idea to a 2D visualization rather than the 3D interpretaion above. Something like a pattern of LEDs that could measure the available time for an x number of projects and keep track by adjusting the time left across the entire "landscape of work" depending on my progress in one or more of these projects. Maybe there could be a small celebration if I completed something in time. The most basic version of this would be an LED array with a bar chart. I would set the initial times and this device would keep track. It would be nice to somehow compile these recordings over months and have a graph of my performance over time.
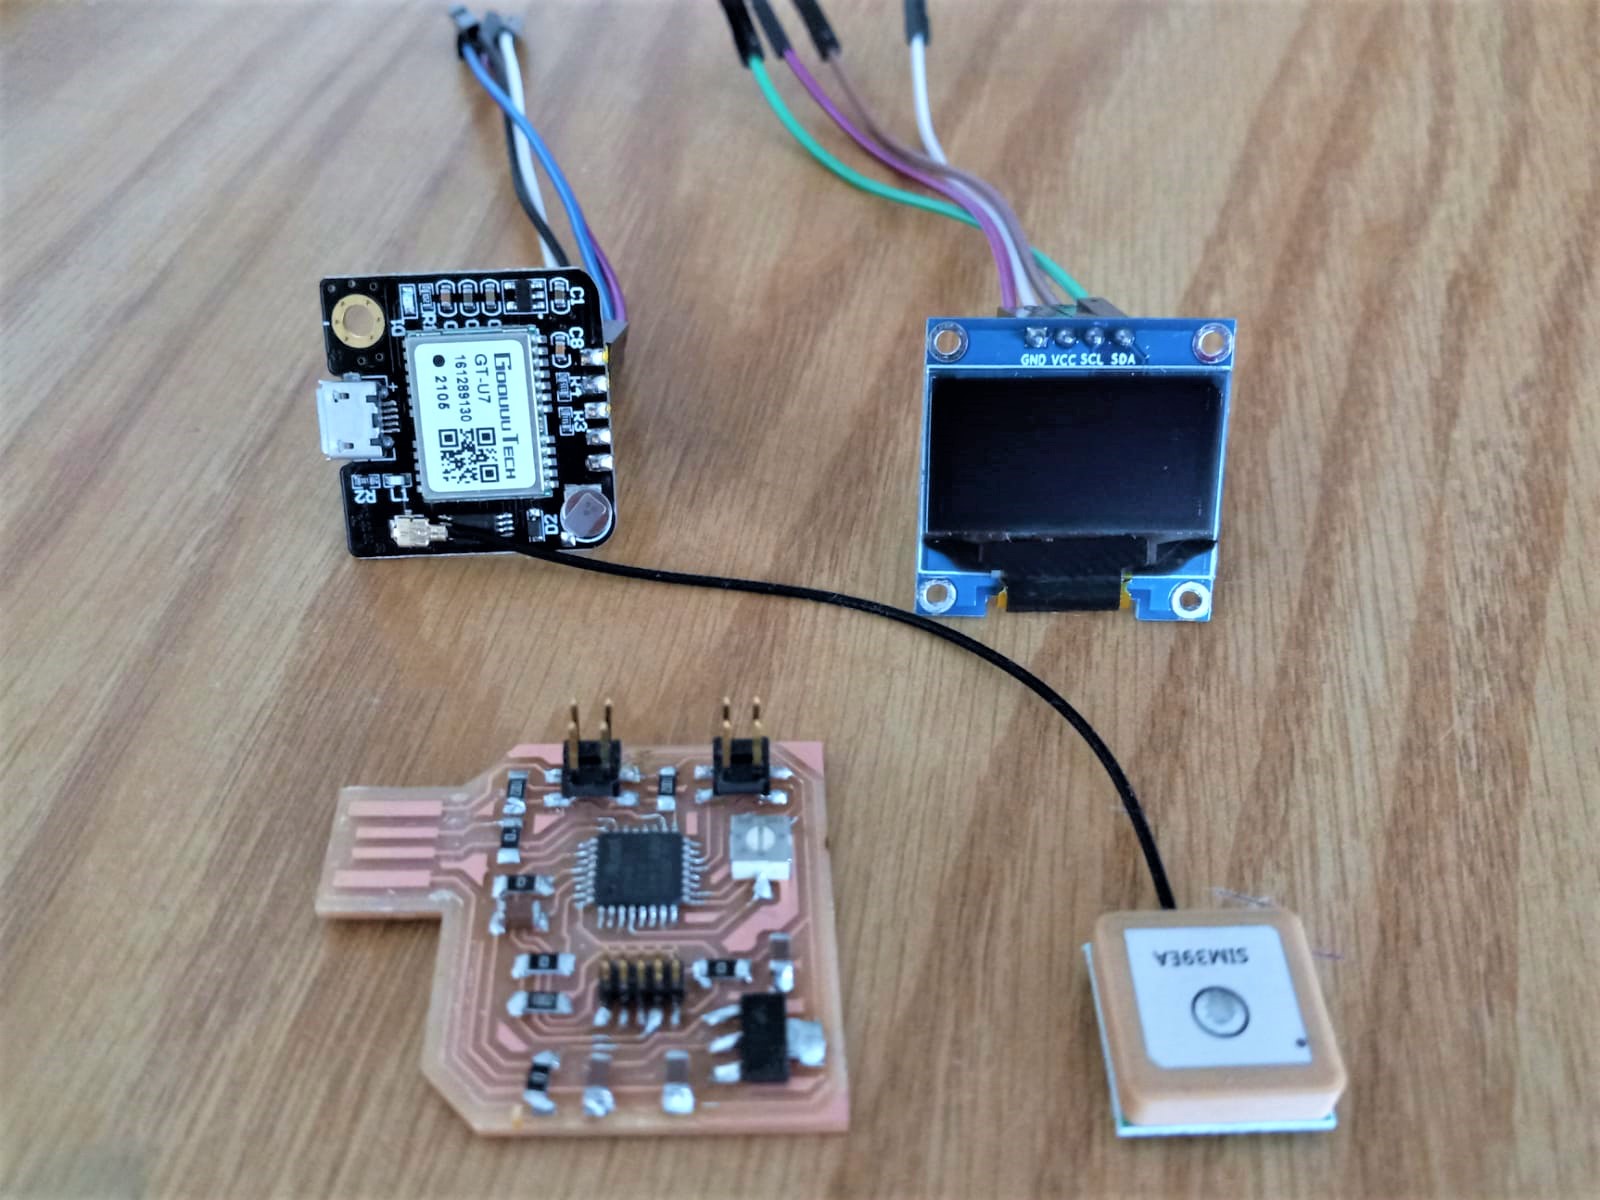
Progress: For input and output devices weeks, I worked a board that would use a potentiometer to set time, through an RTC module and then display it on an OLED. This would soon be irrelevant for my final version of the project.

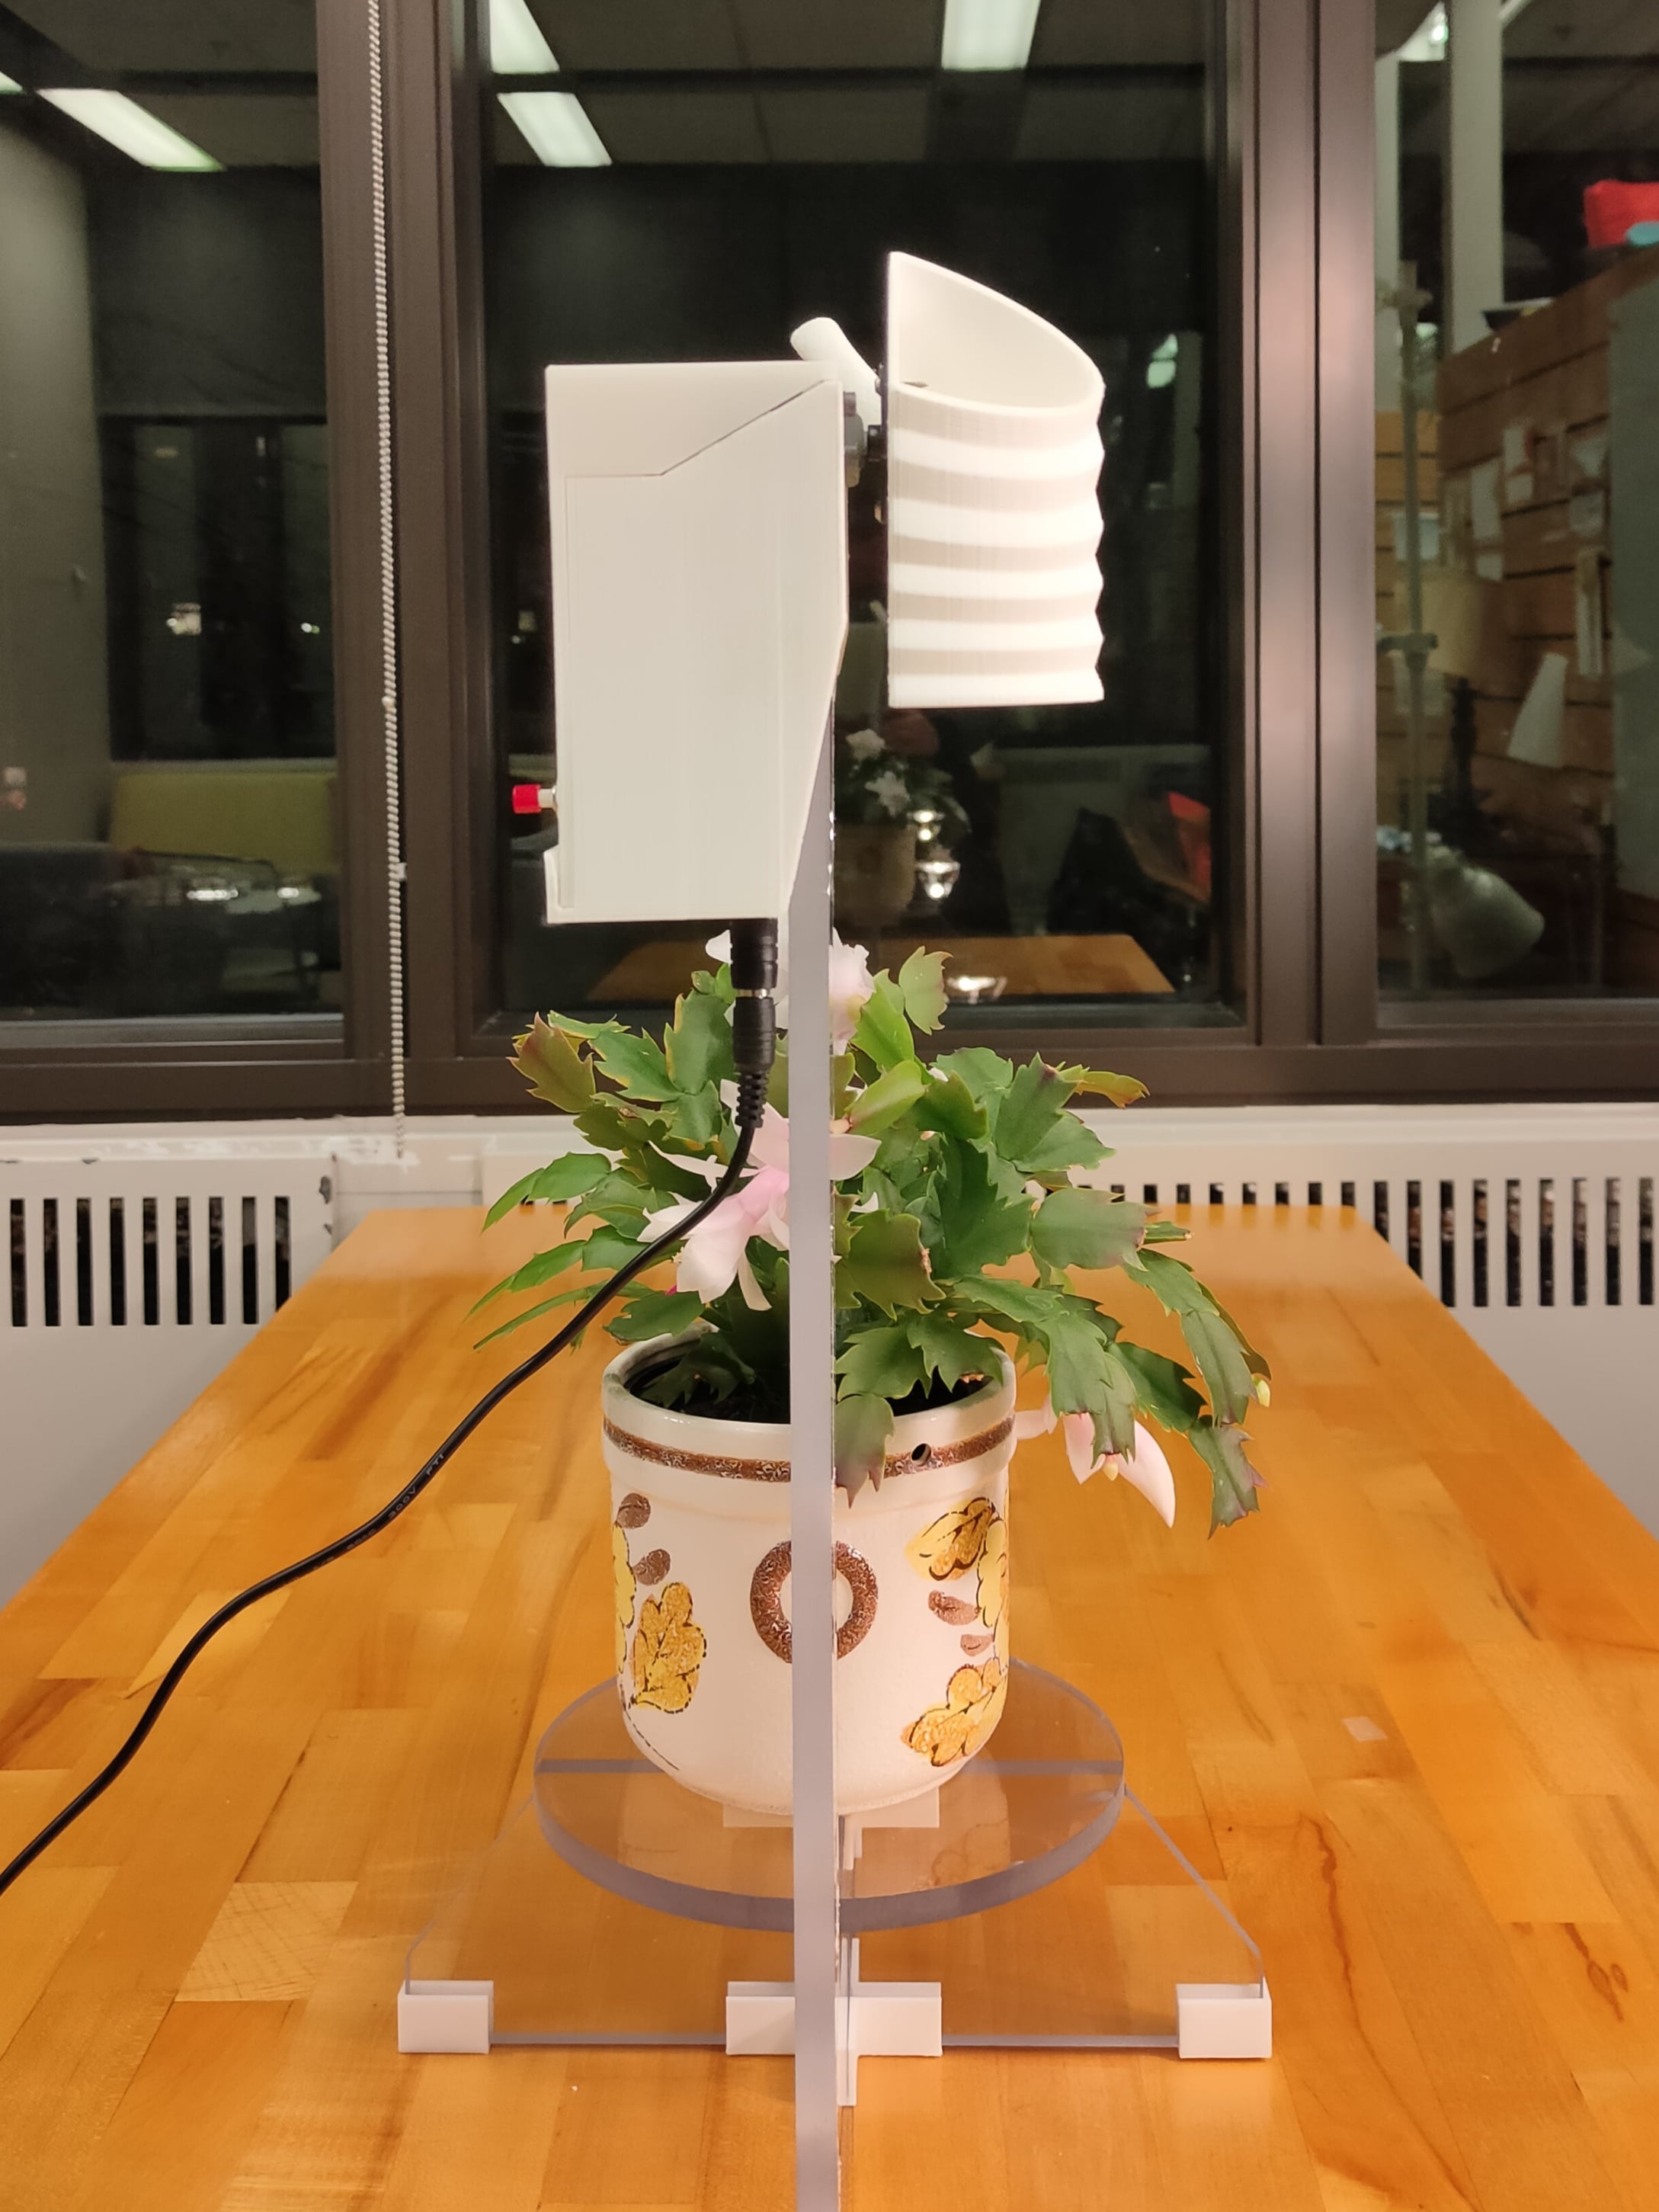
Version 3: Plant Pal (or Accountability Buddy/Hostage?)
During the machine building week I was overcome by a newfound enthusiasm for my final project. The "modular things" made motors seems more friendly and prior ideas suddenly seemed possible. So I pivoted to one of my very first ideas of a hostage plant--one that is only watered if I make progress on my project. I reasoned with the ethical qualms of potentially causing plant suffering by deciding to use a cactus if things get dire for the plant at any stage.
How would I log progress? Initially, I wanted to connect the word count on the thesis file to the plant's watering mechanism. However, since I'm not feeling too confident about the networking and communications aspect, I decided to use a back-up button to input my progress. An OLED will show me when the plant was last watered. The type of plant would depend on how important the project is and how frequently progress on the project needs to be made.
Juxtaposed below are my intial conceptualization of the design against the final product. I'm impressed by how well I could actualize my design!
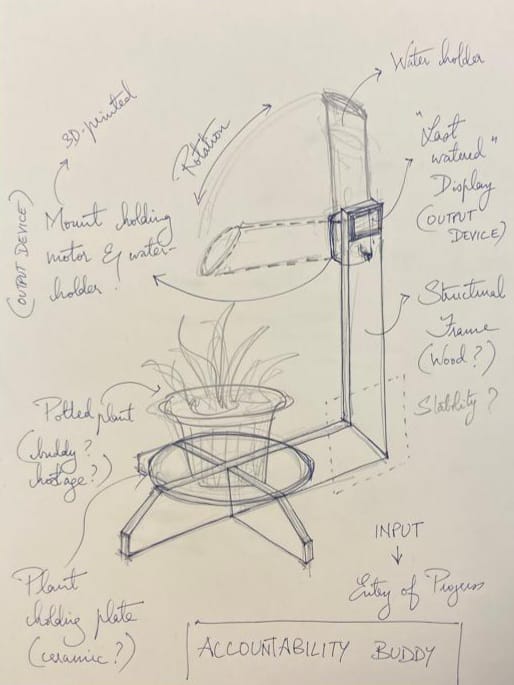
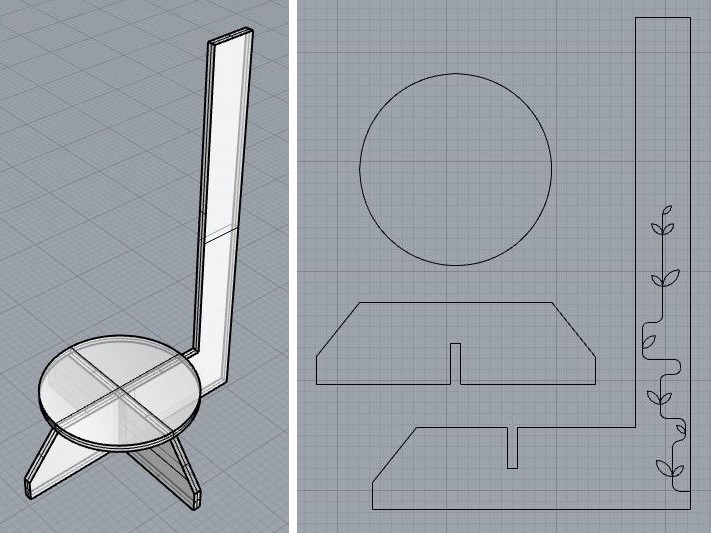
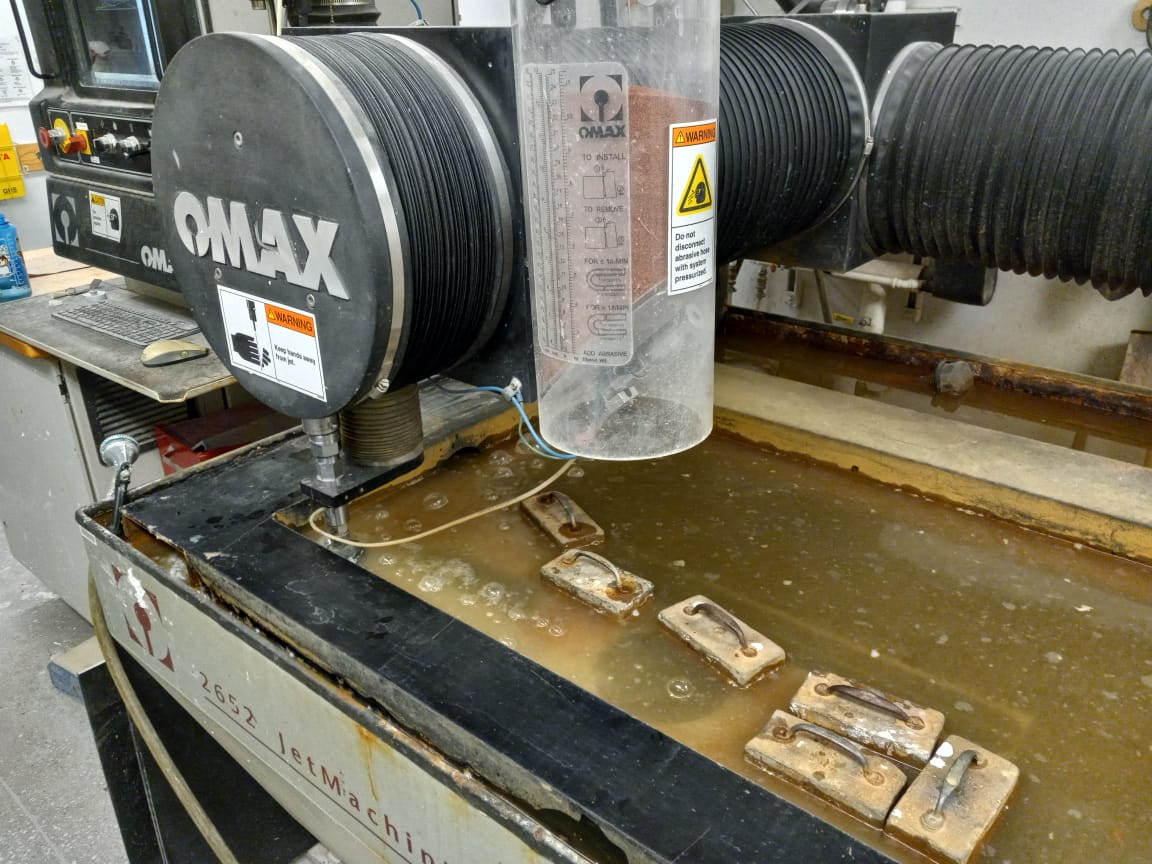
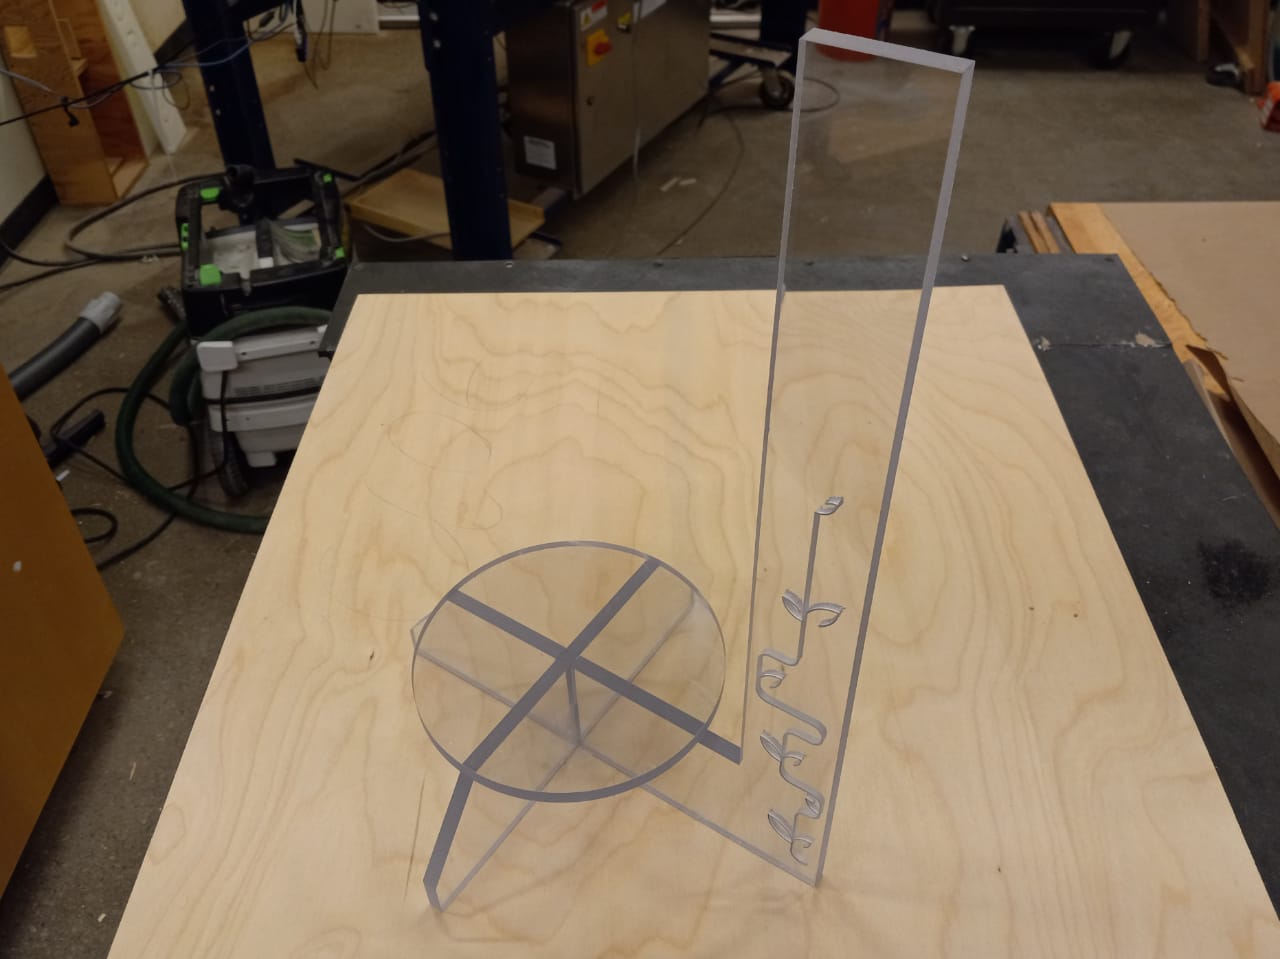
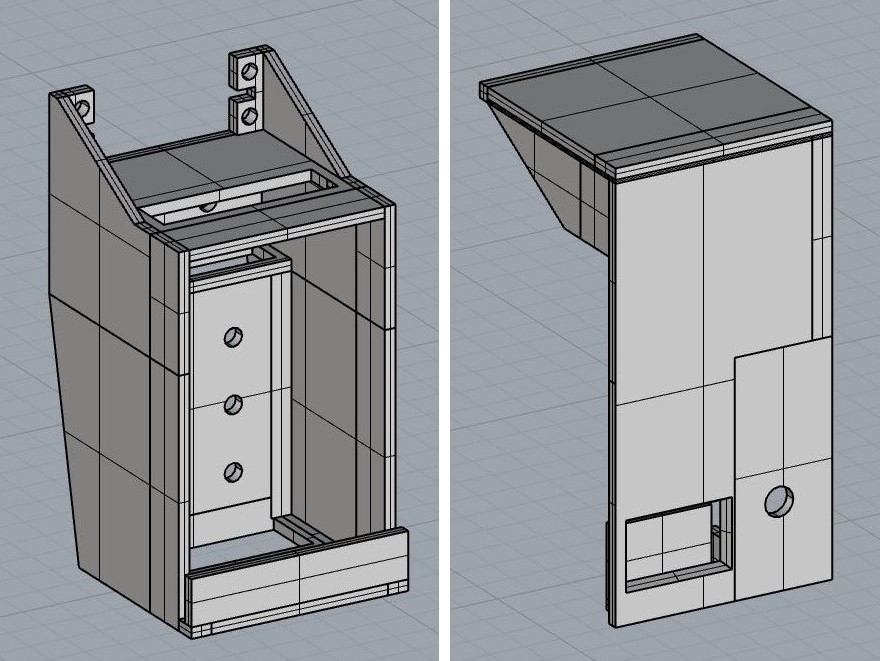
Frame
The frame for the project is very much inspired by the one we built during the machine building week. I used the wildcard week to work on this. I cut the parts from polycarbonate on the archshop waterjet. For more details on the design and fabrication, see the documentation for week 14.
Watering Mechanism
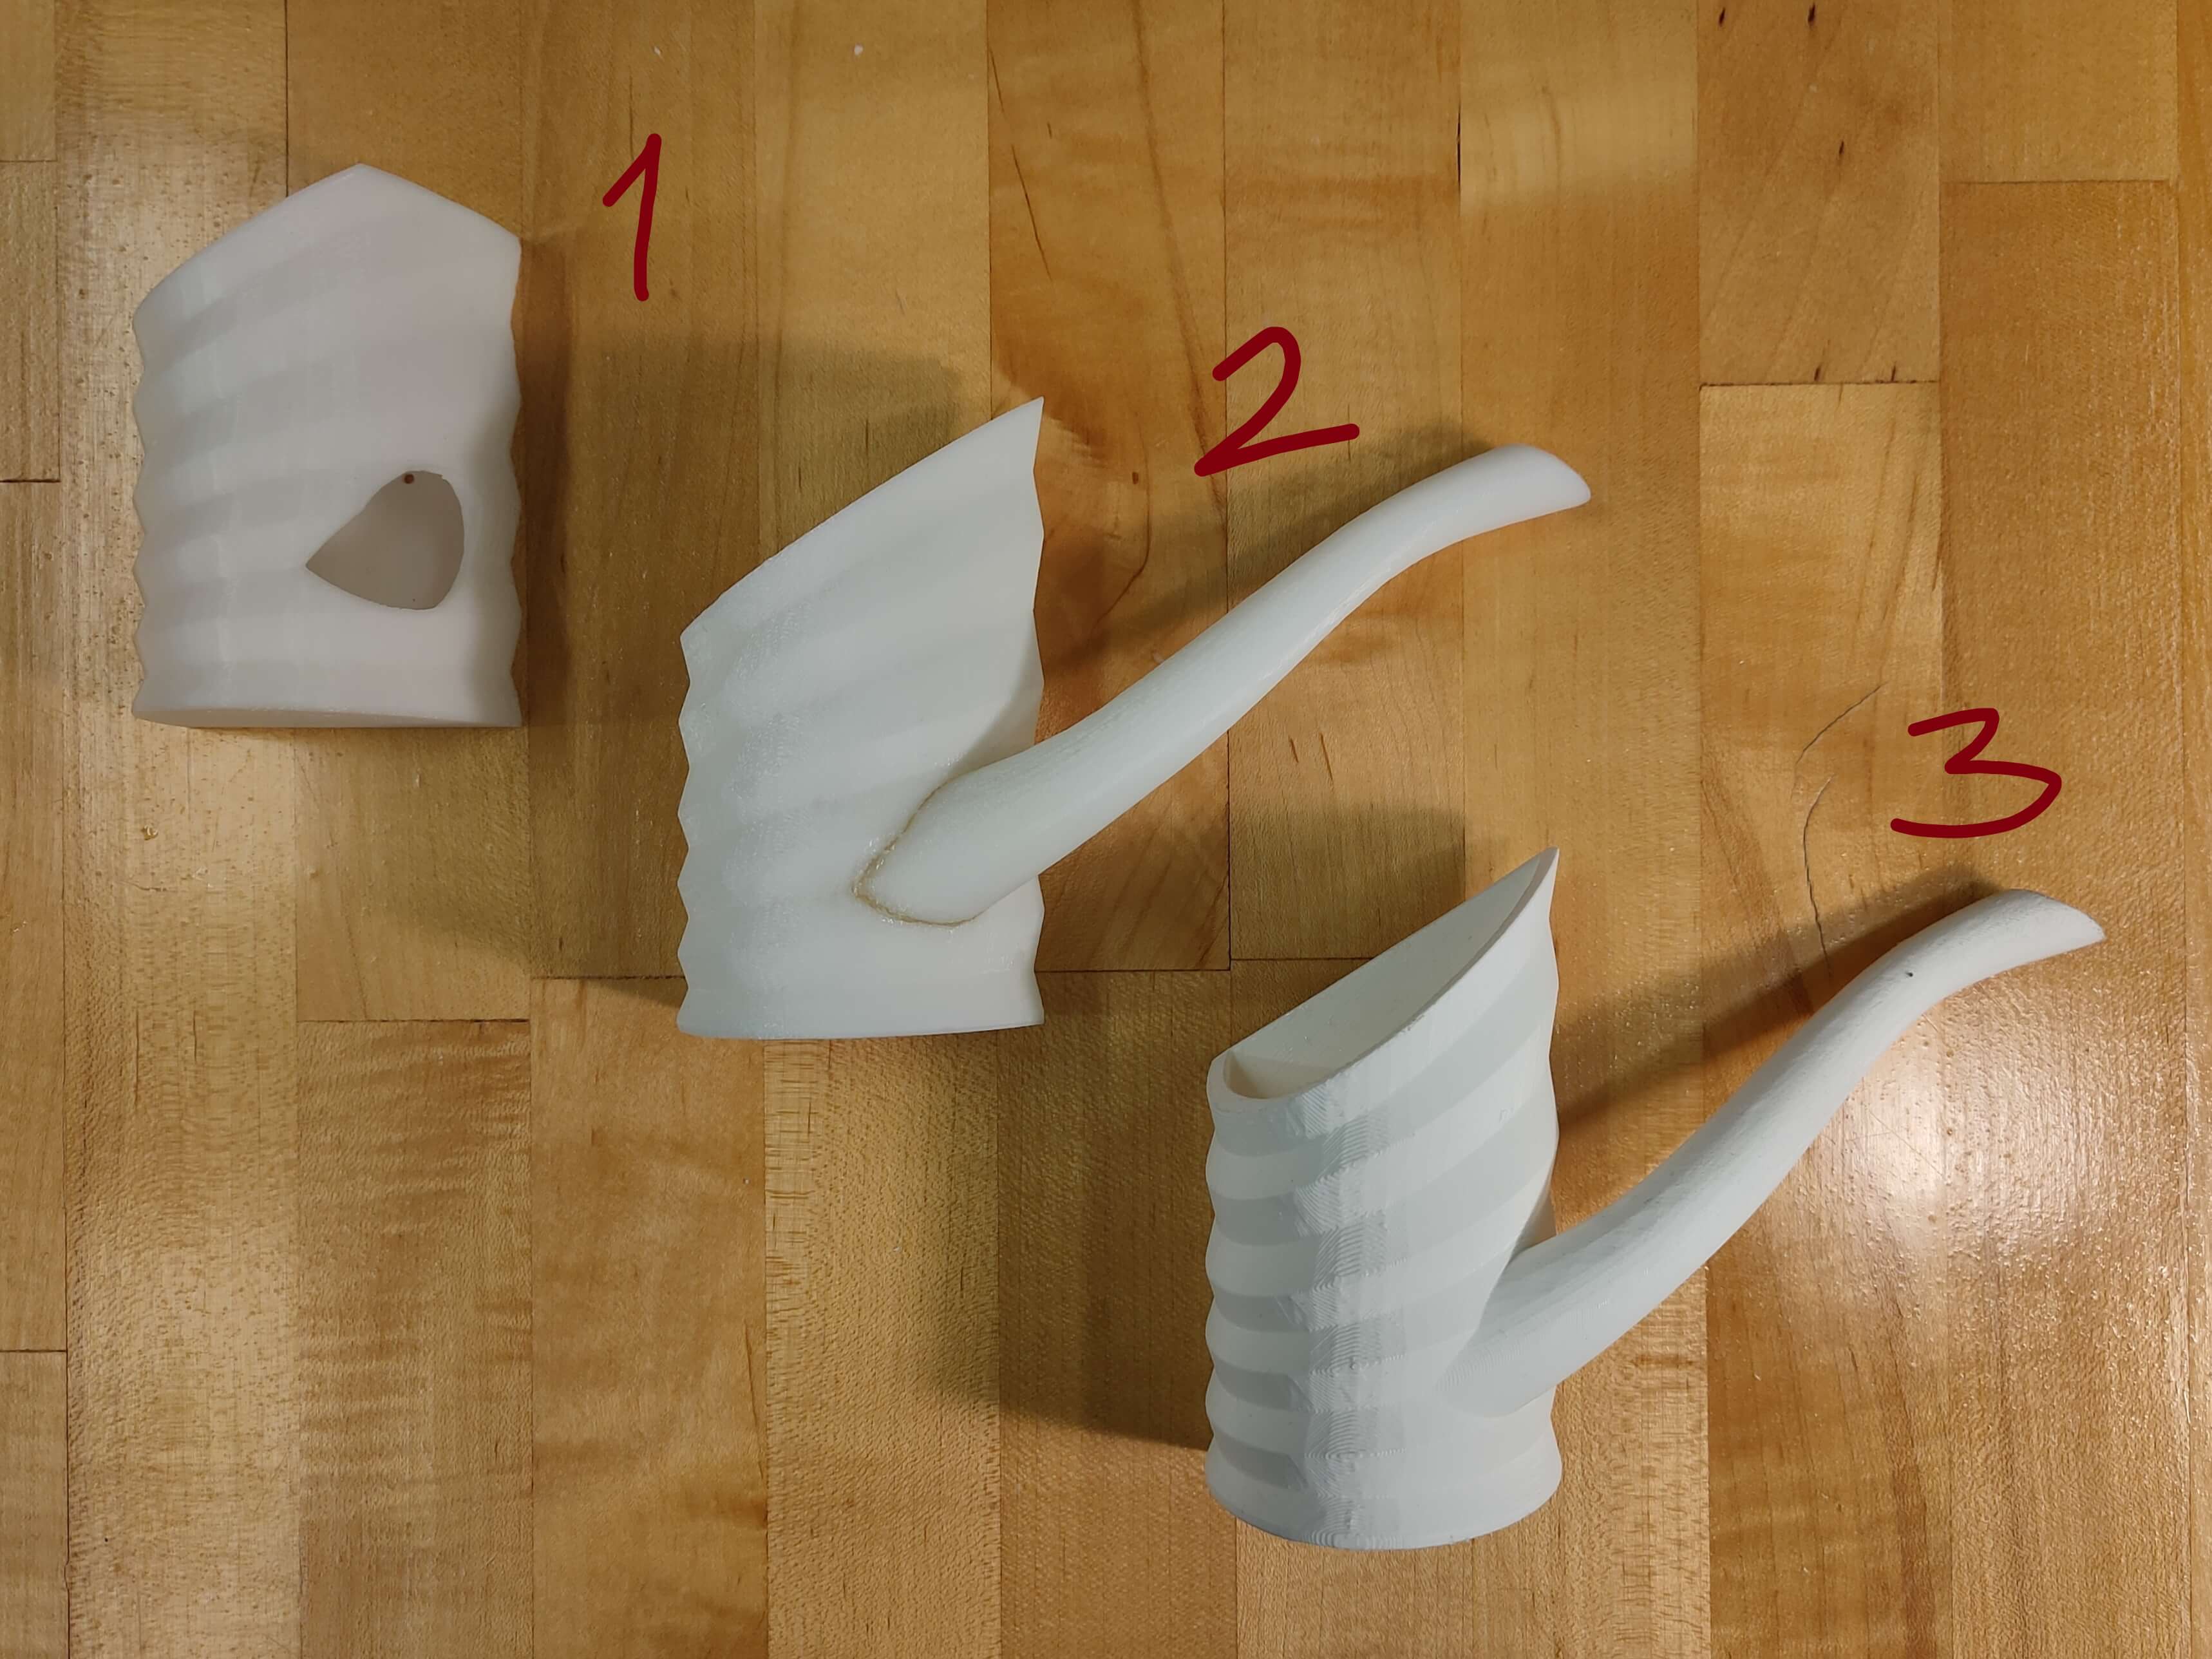
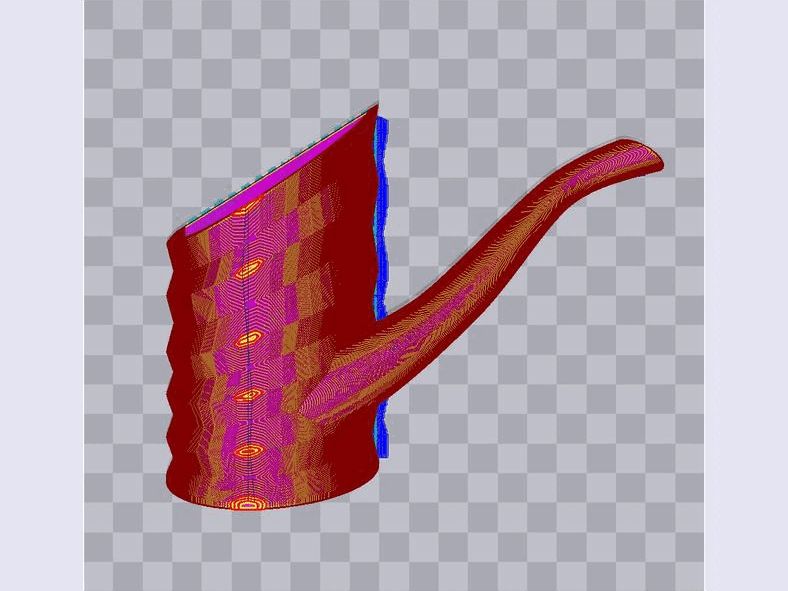
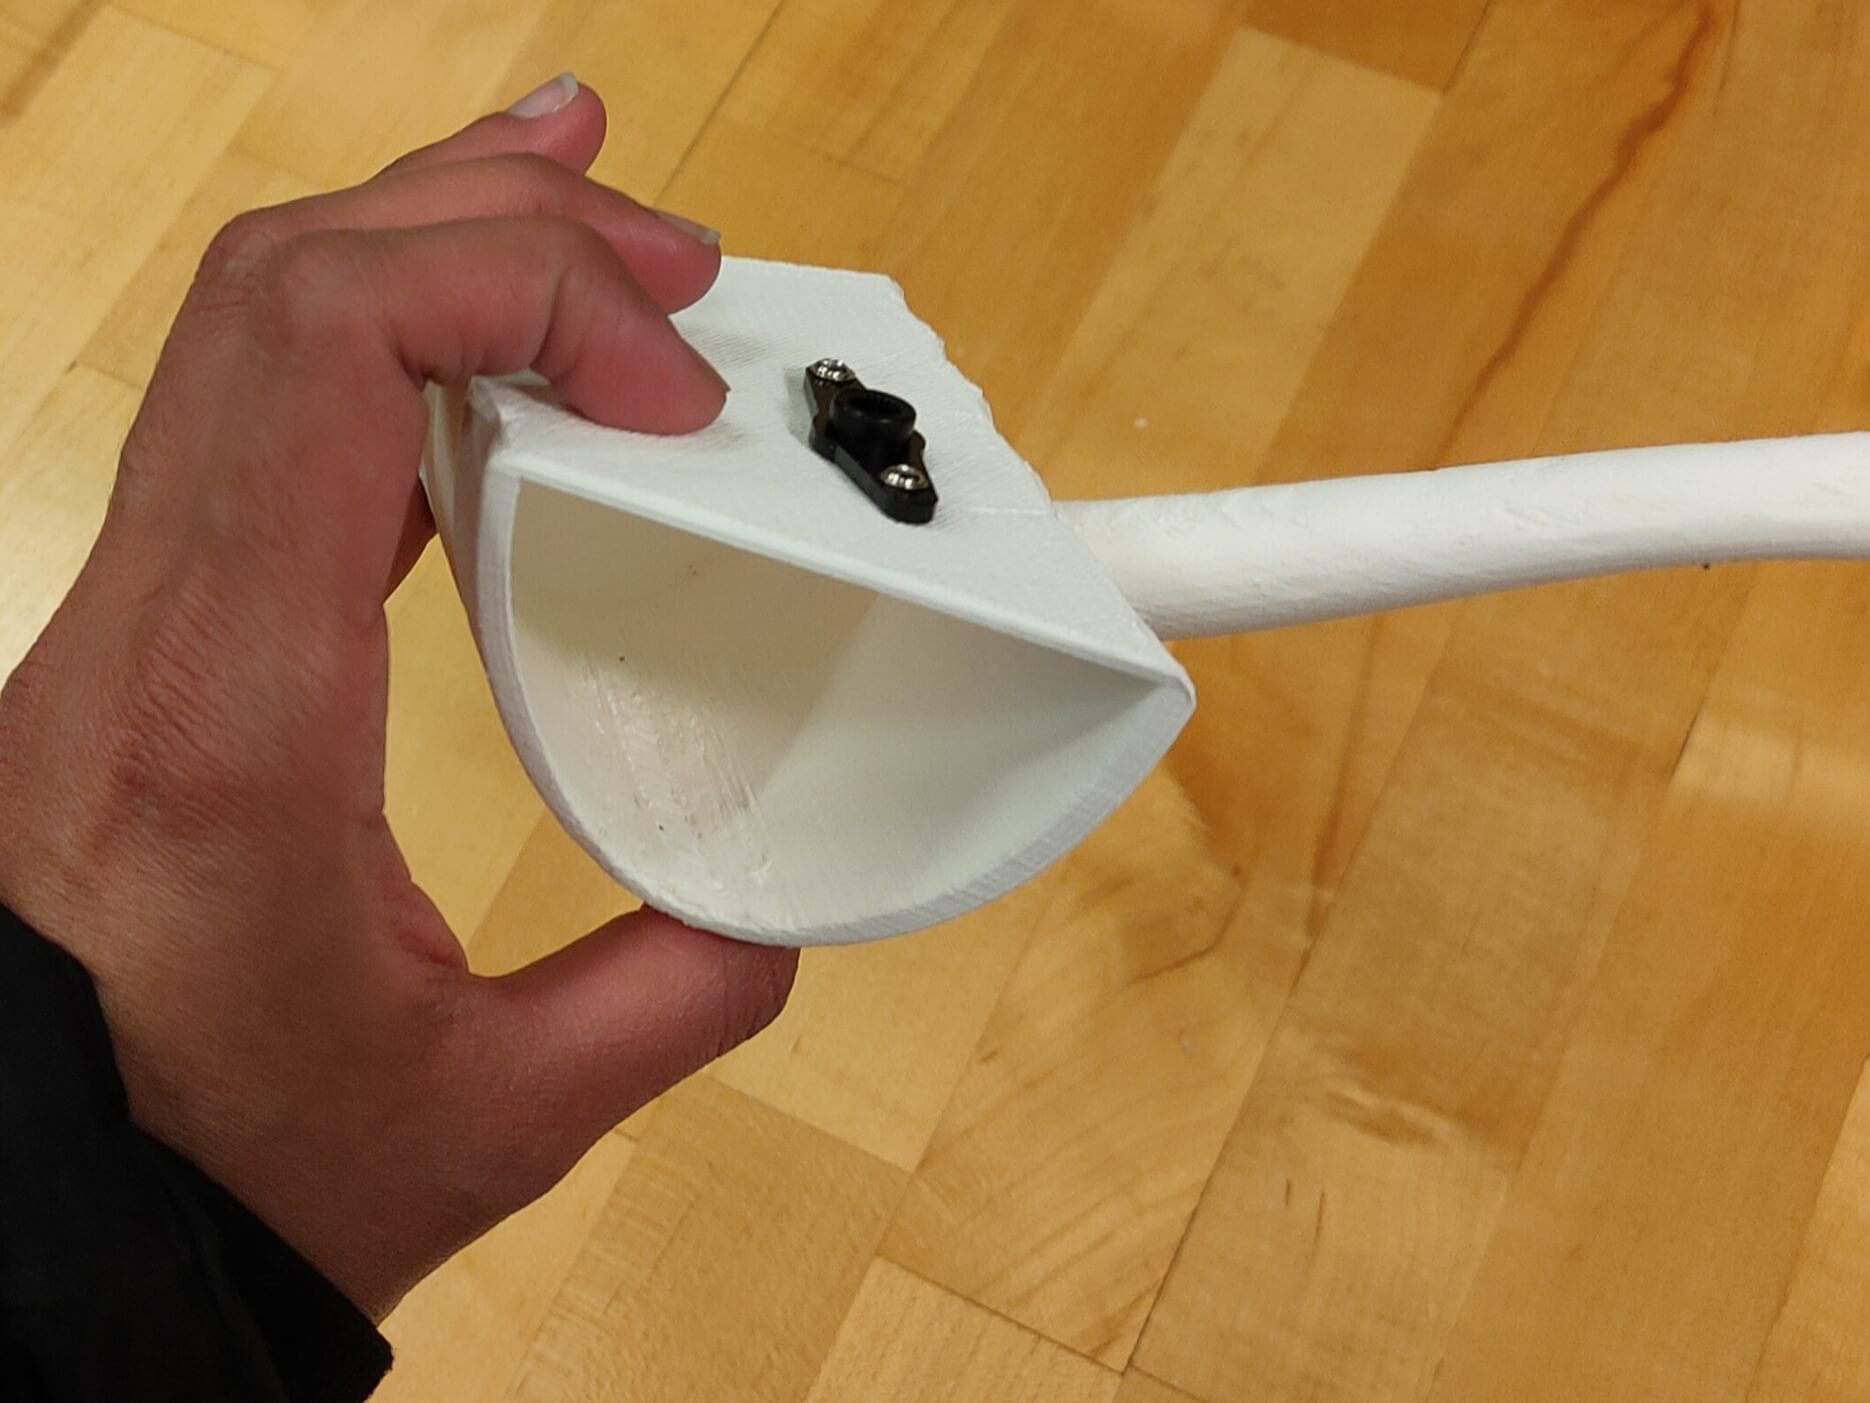
As is evident above, the watering can is meant to rotate in order to water the plant. For this purpose, I planned on mounting the can run by a motor at the top of the frame. For more details on the design, see the documentation for week 1. The fabrication was long drawn and went through multiple attempts. I designed the part to be 3d-printed because plastic would be a good material to hold water in, and the additive method allows a more complex design. However, I did not pay attention to the supports in my first attempt at printing it, which left the spout without enough suppor. During my second attempt, I changed the orientation of the part to allow for better supports but later realized that I had erroneously subtracted the intersection between the can's body and the spout while performing "BooleanDifference" so had to superglue them together. Finally, I fixed all these problems and printed, then sanded the part before screwing on the servo motor's horn to its flat surface.
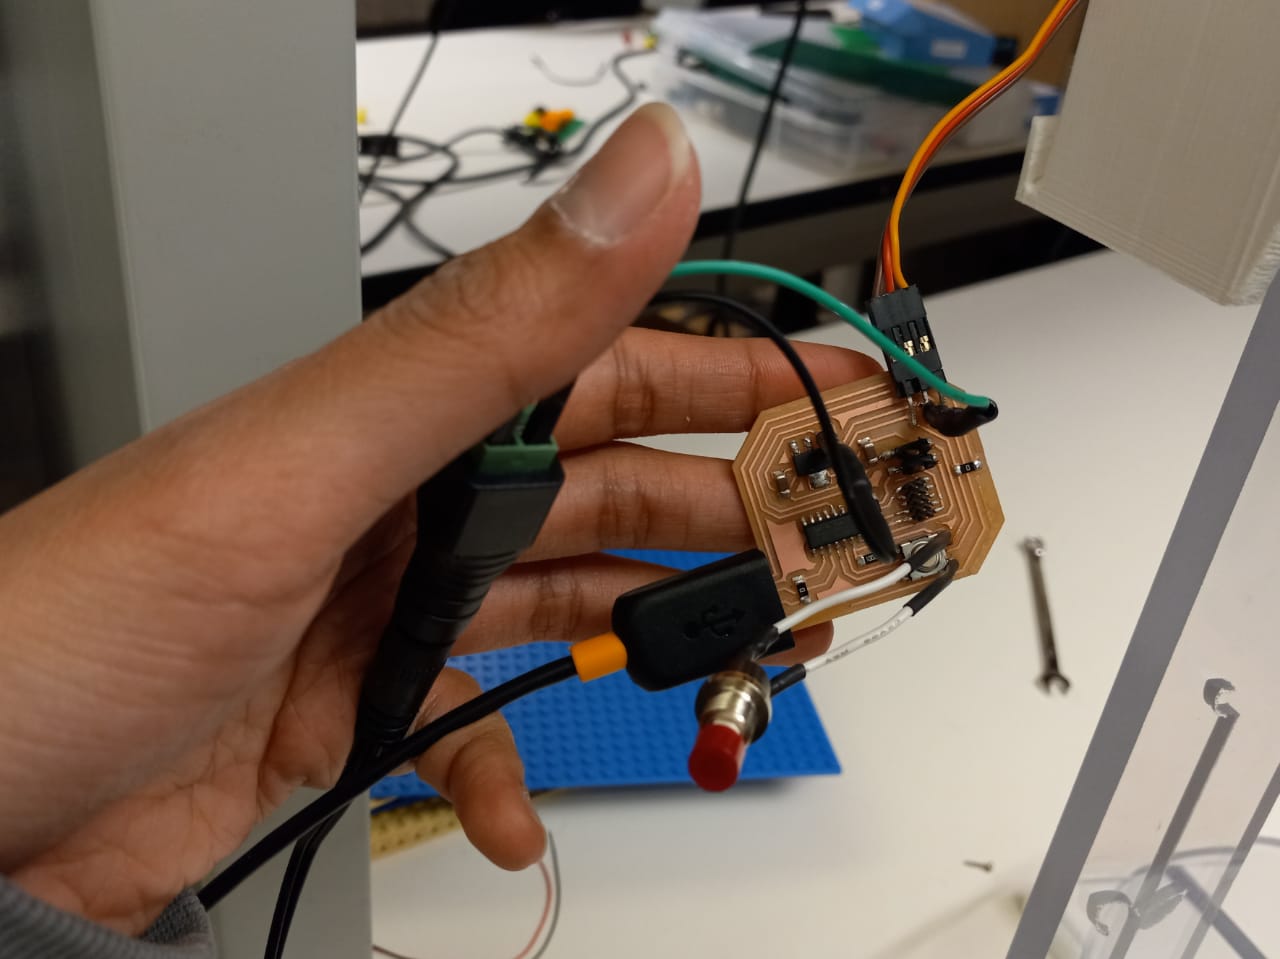
Electronics
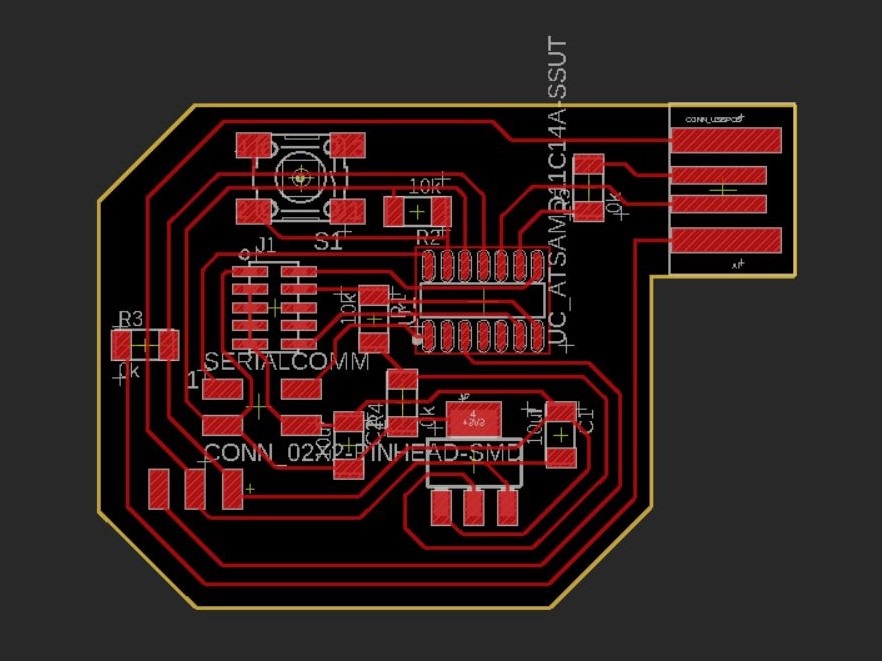
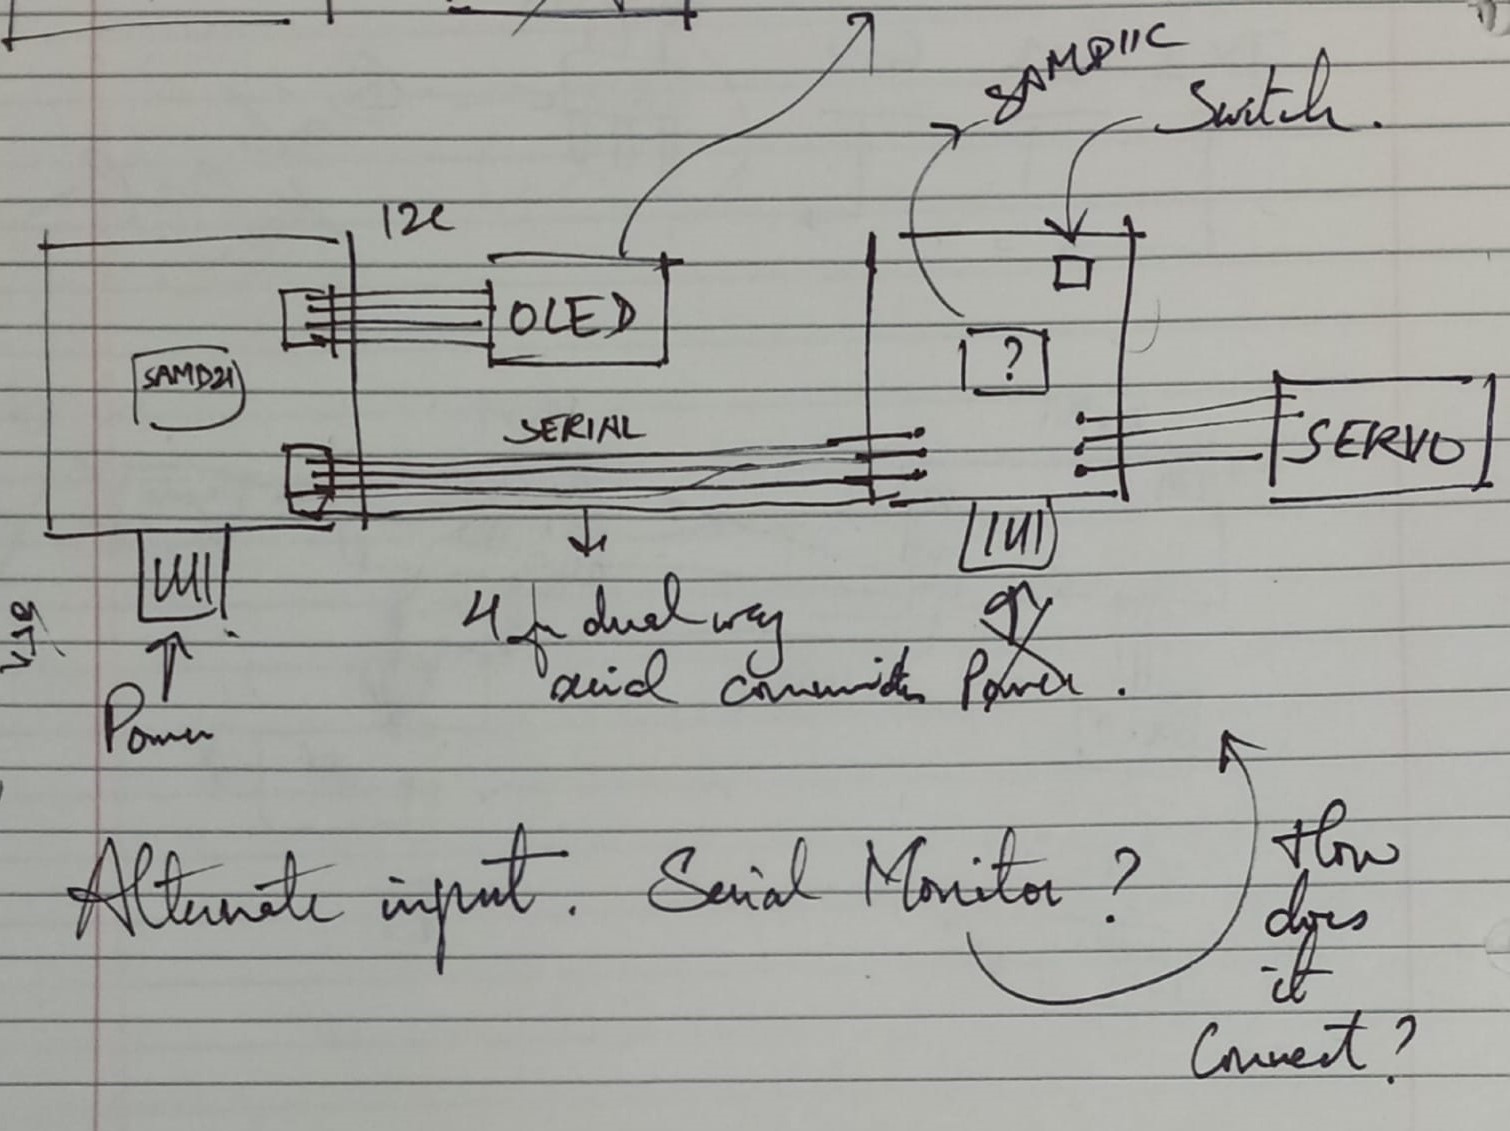
The device uses has two main boards, one controlling a servo motor and button and another controlling the OLED. These boards communicate through Serial communications (also called UART). For details on these aspects, see week 9, week 10, and week 11 respectively. The board I made for week 9 was originally intended for a different purpose, but ended up having the right connections to allow for it control an OLED and communicate via the Serial pins. The board for week 10 was designed to serve as the main board that both sent the data to the OLED board as well as powered the whole network.
Inputs would be received both through the serial monitor (primary mode) or the button (secondary mode). The serial monitor was an inbetween solution to my original idea of linking my thesis document's word count to this device. This would hence need a USB connection as of now. Eventually, I hope to turn this communication into a wireless process and also link a document's word count directly to the device so it can assess progress without active data input.
The outputs will be the watering (by the servo motor) and feedback (from the OLED). The default display on the OLED would be the timer which is only updated upon inputs. This display is only reason that the device needs to be powered constantly and is hence hooked onto a power jack that connects to a 5V power adapter.

Programming
Week 11 discusses the process of establishing the communication between the boards. Besides that, the programming also involed coding how the data is processed and how the user receives feedback on the same.
The OLED would serve as a source for pressure (to be productive) by displaying the time that passed since the plant was last watered. I used the delay() function in Arduino to measure the seconds (delay(1000) = 1 second delay), and then converted it into the Days:Hours:Minutes:Seconds format. Added to the time, the OLED would also celebrate a little everytime I log progress, and get a little disappointed when I make the opposite of progress. I used simple animations and messages for this purpose. I intend to add a greater range of messages to the device, to make it more snarky. The timer also resets every time positive progress is logged.
The OLED also shows the new and old word count, evertime it receives a new input through the serial monitor. The serial monitor takes integer inputs that represent the current word count and process this data to assess progress and give feedback. Its default display otherwise would be the "Last Watered" timer.
The servo motor locks in position based on the angle of rotation. I set the motor to rotate about 40 degrees to lower the spout of the watering can. Interestingly, there is no way to change the speed of the motor besides reducing its extent of motion (angle covered) in one loop and adding delays in the process. I proceeded to do that, to slow down the experience of logging progress and receiving feedback.
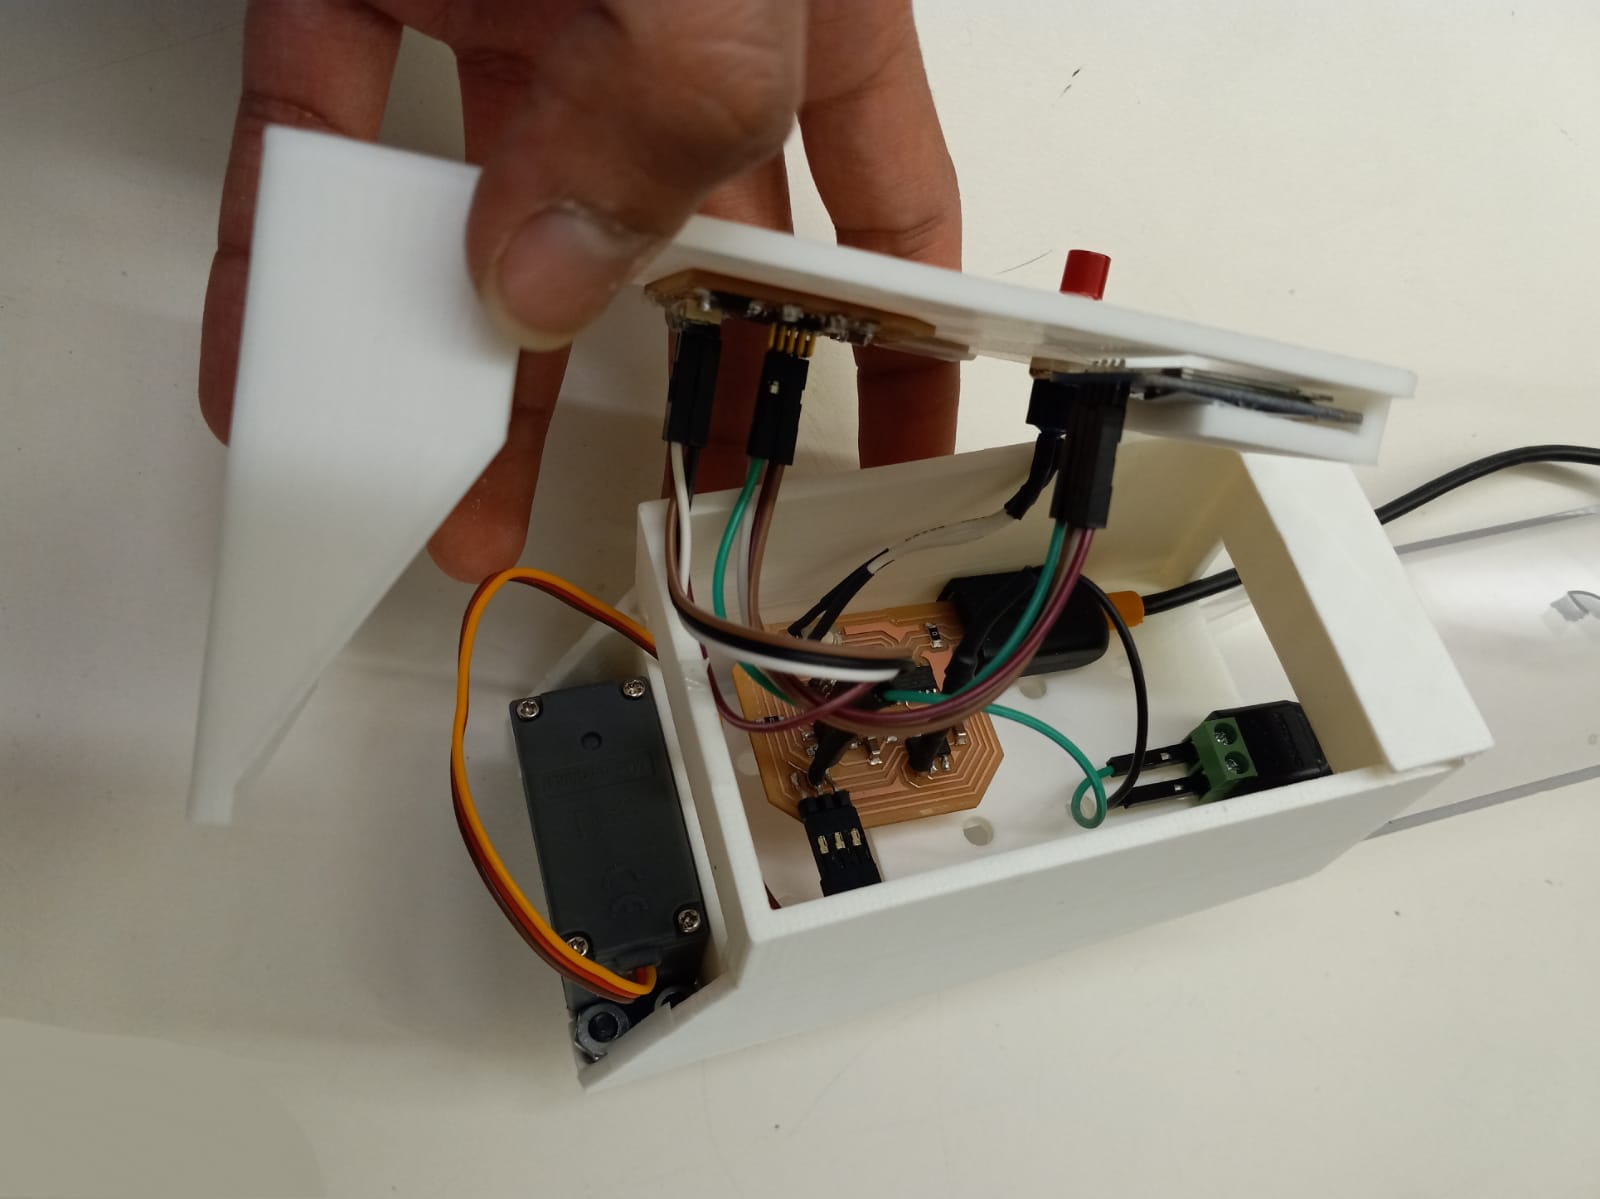
Electronics Case
The design for the case holding the boards and the wires went through two iterations. I had intially misjudged the amount of space the boards would require and made it a little too tight. The second version is more roomy and has more space for the power jack and the USB cord. This was also helpful because the heatshrink around some wires was making them less flexible.
The lower part of the case fits tightly onto the frame--I had to use a clamp to align the faces. The motor is bolted to this part. The upper part of the case could use a little more support--it tends to splay open a little bit. It covers the motor and was made to be easily removable to allow access for any necessary debugging.
Assembling and Testing
In the process of assembling and testing, I had to bootload both boards again because of errors that were unclear to me. At some point the servo motor also started to begin with a jerk--not sure why, but it helped to add a delay before activating the motor's motion.Besides that, all the parts worked exactly like they were meant to!
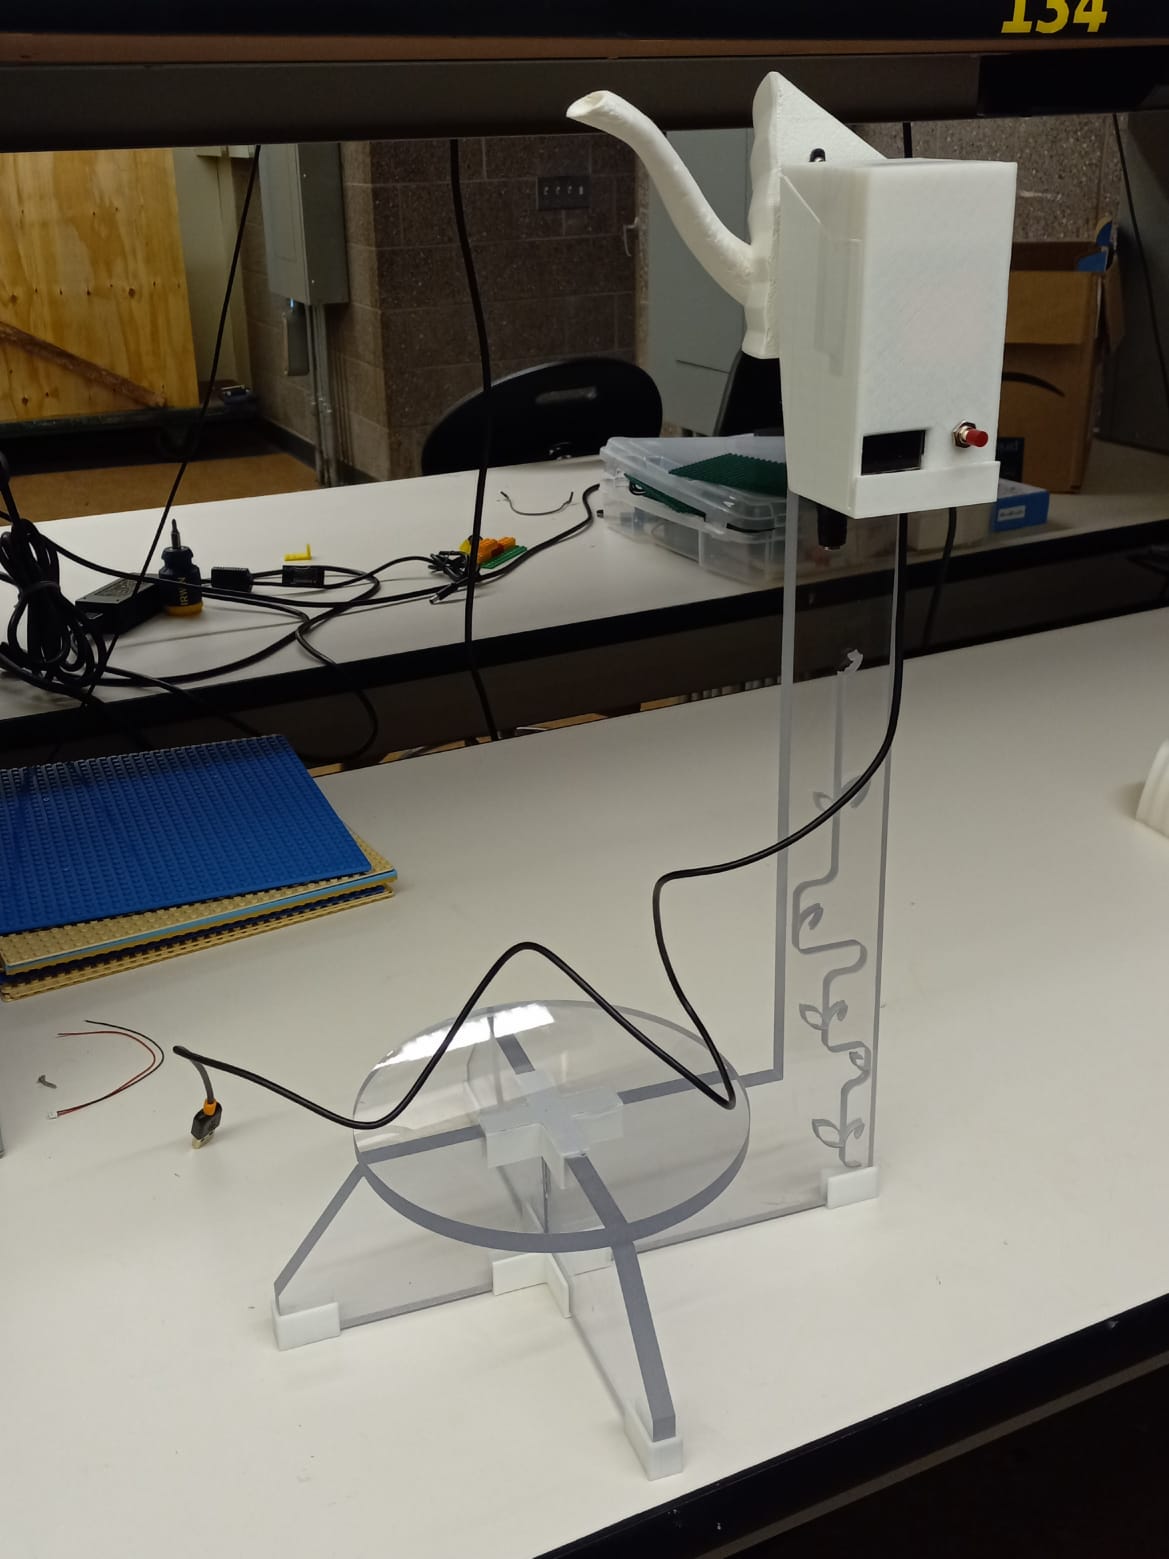
Final Product
I am very pleased with the final product. It received a mix of interest/concern during the showcase. Some seemed confident the plant is doomed to die of thirst. Ironically, all the demoing on the final exam day ran the risk of overwatering my placeholder plant. In the long run though, the struggle will be to maintain a less erratic pace of work and keep the plant healthy and optimally watered. (I also need to choose a plant that needs to be watered about once a week.)