Week 2 - Embedded Programming
Avoiding the mines

This week we started embedded programming .
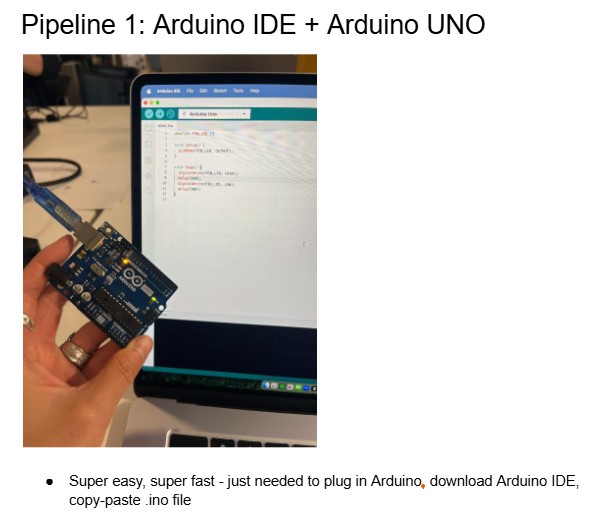
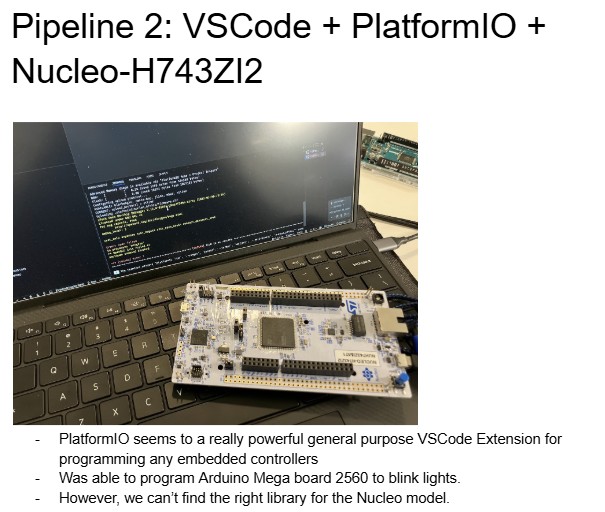
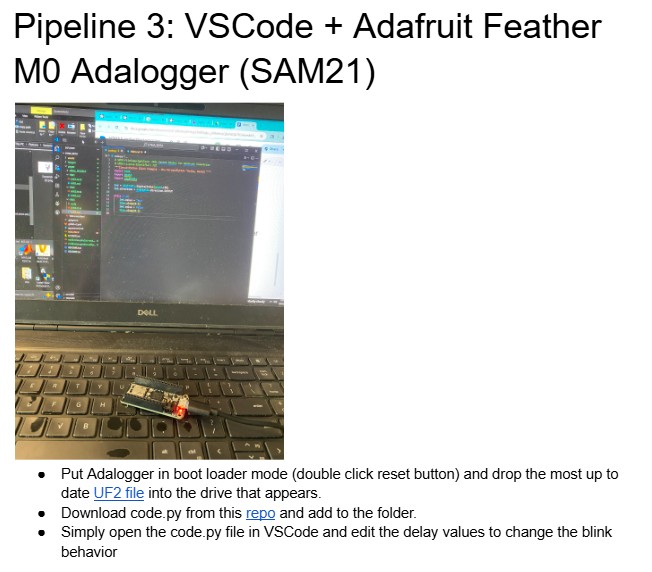
We got together to test different pipelines in arduino Uno, arduino Mega and Nucleo H743ZI2 my lab had lying around. We tested how to use the Arduino IDE and Visual Studio Code to program them. Logged in a shared google doc
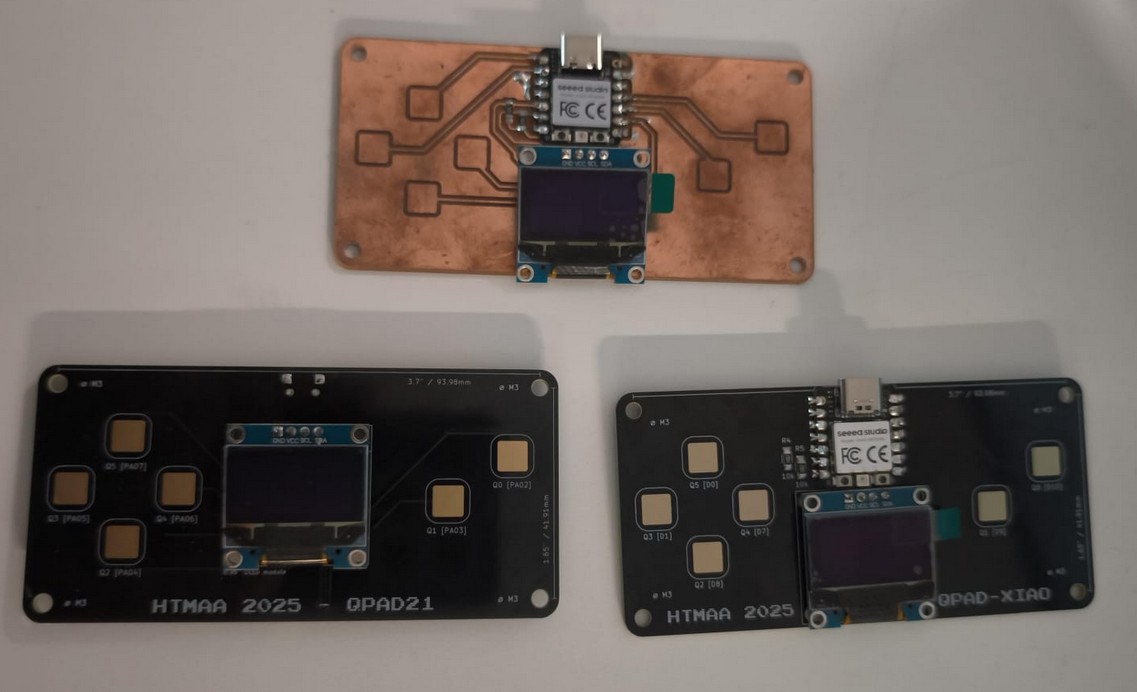
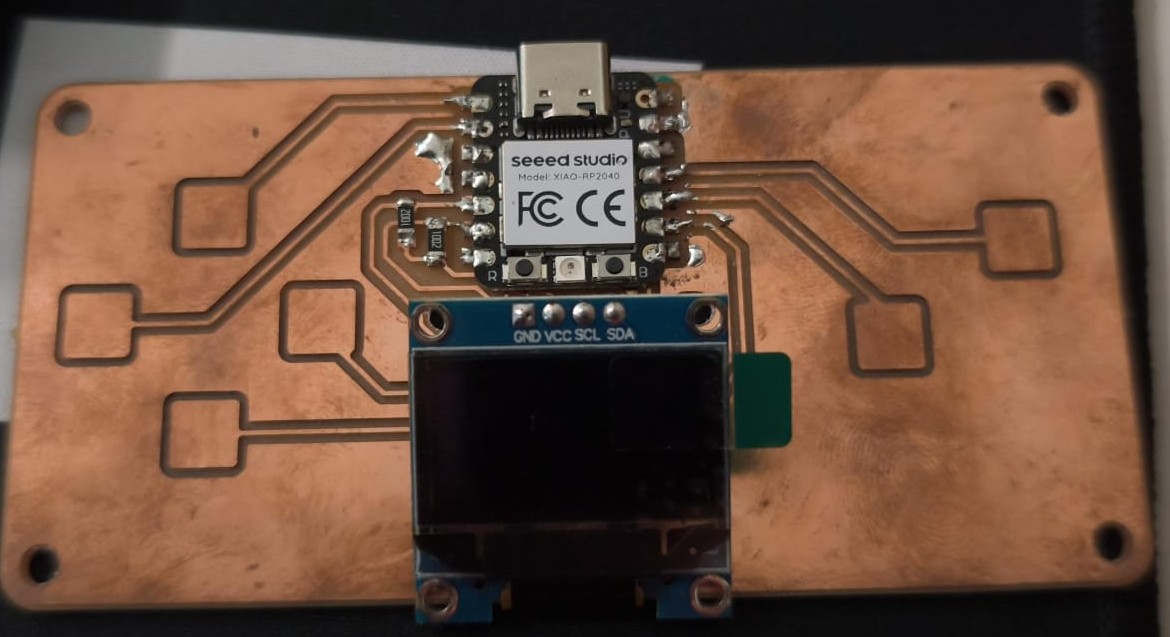
Then on the lab, I did the soldering. I used the copper ones made in CBA to begin with. I am going to use the time honored tradition of blaming the tools for the quality of the soldering and not my lack of practice.
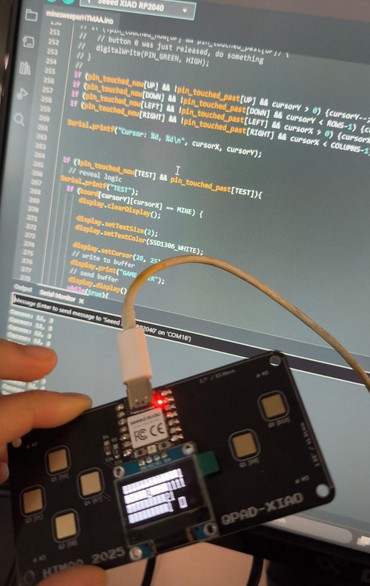
I also soldered the black silkmask option when the extra boards arrived on monday and I tried my best at the challenge, but could not manage to solder the 0201, I was defeated.
Anyway, after testing everything was soldered correctly using Quentin's example codes, I could get to work.
In the beginning, I tested using Adafruit's examples. I played around with the different examples and testcode available to understand how the display worked.
I decided to make a minesweeper game. I started looking into different projects to figure out how the logic of minesweeper. I read this arduino project and this implementation . I started taking notes to break down the different blocks of code I needed.
Unfortunately, I let a couple of days pass, as one does. I have not learned the documentation lesson quite yet, so the notes I had were not enough to get me back on track. Those days was enough to completely lose the thread of what I was doing.
As I struggled to think, I remembered I can ask the machine to think for me.
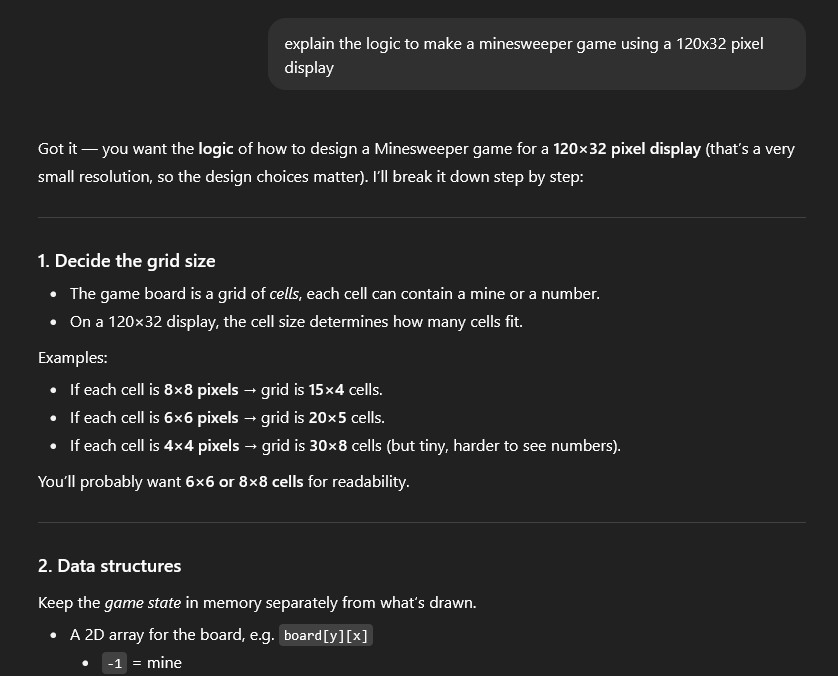
You can read the full conversation here but since I have prior experience coding I could follow along pretty well and just asked some clarifying questions. The full code is in this file, where you can see comments explaining the logic. Minesweeper is basically a grid of objects that can have four states: unknown, flagged, clear, or mine. In addition to this, the clear state would have a number indicated how many mines are adyacent to that object. The other layer of the game is the cursor, in order to have the player move around and select or flag part of the grid. The logic part did not stump me quite as much as the graphics did. It's hard to wrap my head around the position of the cursor in relation to other things and the resolution of the display. Overall. it's a fun simple game and I was amazed by how easy ChatGPT broke down the logic. This vibecoding business is really time saving. I did review the code, add comments, changed some minor things to make it clearer for myself, but it was mostly GPT-5 who pulled it off.
So the beginning of the code is inlcuding libraries and constant definitions that will be used later on the code.
									include
#include
#include
#include
#include

#define PIN_RED 17
#define PIN_GREEN 16
#define PIN_BLUE 25


#include
#include
#include
#include

#define SCREEN_WIDTH 128 // OLED display width, in pixels
#define SCREEN_HEIGHT 32 // OLED display height, in pixels

#define OLED_RESET     -1 // Reset pin # (or -1 if sharing Arduino reset pin)
#define SCREEN_ADDRESS 0x3C ///< See datasheet for Address; 0x3D for 128x64, 0x3C for 128x32
Adafruit_SSD1306 display(SCREEN_WIDTH, SCREEN_HEIGHT, &Wire, OLED_RESET);

#define CELL_SIZE 8 // Size for a mine

const int COLUMNS = SCREEN_WIDTH/CELL_SIZE; // amount of columns
const int ROWS = SCREEN_HEIGHT/CELL_SIZE; // amount of rows
int TOTAL_MINE = 10;
After this, it is the code from Quentin to read the touch of the capacitance buttons.
									include
//CODE FROM QUENTIN EXAMPLE

#define N_TOUCH 6 //how many buttons
#define THRESHOLD 20 //what number is interpretted as touching

int touch_pins[N_TOUCH] = {3, 4, 2, 27, 1, 26}; //pins connected to buttons
int touch_values[N_TOUCH] = {0, 0, 0, 0, 0, 0};
int MINE = -1;

int FLAG = 0;
int TEST = 1;
int DOWN = 2;
int LEFT = 3;
int RIGHT = 4;
int UP = 5;

bool pin_touched_now[N_TOUCH] = {false, false, false, false, false, false};
bool pin_touched_past[N_TOUCH] = {false, false, false, false, false, false};

void update_touch() { //read touching
  int t;
  int t_max = 200;
  int p;

  for (int i = 0; i < N_TOUCH; i++) {S
    p = touch_pins[i];

    // set to low
    pinMode(p, OUTPUT);
    digitalWriteFast(p, LOW);

    // settle
    delayMicroseconds(25);

    // make sure nothing else interrupts this
    noInterrupts();

    // enable pull-up
    pinMode(p, INPUT_PULLUP);

    // measure time to rise
    t = 0;
    while (!digitalReadFast(p) && t < t_max) {
      t++;
    }
    touch_values[i] = t;

    // re-enable interrups
    interrupts();

    // update state
    pin_touched_past[i] = pin_touched_now[i];
    pin_touched_now[i] = touch_values[i] > THRESHOLD;
  }
}
//END CODE FROM QUENTIN EXAMPLE
Then we start making the functions. The first one will randomly put mines in the board. It will use the rows and columns to go through a double loop that sweeps the entire grid. First it gets cleared, and then as long as there are still mines it will pick a random column and a random row to place a mine. If there is already a mine there, it will try again. Once all the mines are placed, it will go again through the entire grid and for every cell that is not a mine, it will check all adjacent cells to count how many mines are around it and assign that number to the cell.
void placeMines(int mineCount) {
  // clear board first, have the board array all in 0
  for (int y = 0; y < ROWS; y++) {
    for (int x = 0; x < COLUMNS; x++) {
      board[y][x] = 0;  // start with no mines
    }
  }

  int placed = 0; //there are no mines yet
  //randomly pick a column and row to place a mine, if there is already a mine, try a new spot
  while (placed < mineCount) {
    int x = random(COLUMNS); // Arduino random()
    int y = random(ROWS);
    if (board[y][x] == MINE) continue; // already a mine here?
    board[y][x] = MINE;
    placed++; //add to the total mines placed. The mine code will be a -1
  }

  // calculate neighbor counts to add the numbers of adjacent mines
  for (int y = 0; y < ROWS; y++) {
    for (int x = 0; x < COLUMNS; x++) {
      if (board[y][x] == MINE) continue; //if its a mine we dont count that
      int count = 0;
      for (int dy = -1; dy <= 1; dy++) {
        for (int dx = -1; dx <= 1; dx++) {
          if (dx == 0 && dy == 0) continue; //this is the cell we dont count that
          int nx = x + dx; // coordinate + the row position modifier
          int ny = y + dy; // coordinate + the column position modifier
          if (nx >= 0 && nx < COLUMNS && ny >= 0 && ny < ROWS) { //while its within the bounds of the game
            if (board[ny][nx] == MINE) count++; //add one for every mine found around
          }
        }
      }
      board[y][x] = count; //that coordinate will have a number
    }
  }
}
The draw board sweeps through the grid of rows and columns and makes an index of the location of each rectangle. First it checks if its where thr cursor is, if so it will get compltely white. If it is not the cursor, it will check the state of the cell. If its hidden, it will be a white square with a border. If its flagged, it will draw an X. If its a mine, it will draw a circle. If its a number, it will print the number.
//this refreshes the visuals of the board
void drawBoard() {
  display.clearDisplay();

  for (int y = 0; y < ROWS; y++) {
    for (int x = 0; x < COLUMNS; x++) {
      int px = x * CELL_SIZE; //X position of cell using the width
      int py = y * CELL_SIZE; //Y position of cell using the width

      // Draw cursor highlight
      if (x == cursorX && y == cursorY) {
        display.drawRect(px, py, CELL_SIZE, CELL_SIZE, SSD1306_WHITE);
      } //if its the coordinate where the Cursor is located, then its all white

      if (state[y][x] == 0) {
        // hidden
        ////if this cell is still hidden, then its all white with a border
        display.fillRect(px+1, py+1, CELL_SIZE-2, CELL_SIZE-2, SSD1306_WHITE);
      }
      else if (state[y][x] == 2) {
        // flagged
        ////if this cell is flagged, then its a X
        display.drawLine(px+1, py+CELL_SIZE-2, px+CELL_SIZE-2, py+1, SSD1306_WHITE);
        display.drawLine(px+1, py+1, px+CELL_SIZE-2, py+1, SSD1306_WHITE);
      }
      else if (board[y][x] == MINE) {
        // mine
        ////if this cell is flagged, then its a circle
        display.fillCircle(px+CELL_SIZE/2, py+CELL_SIZE/2, 2, SSD1306_WHITE);
      }
      else {
        // number
        // it will write down the numer of adyacent mines
        if (board[y][x] > 0) {
          display.setTextSize(1);
          display.setTextColor(SSD1306_WHITE);
          display.setCursor(px+2, py+1);
          display.print(board[y][x]);
        }
      }
    }
  }

  display.display();
}
Reveals any cell that is 0, and reveals neighbors if they are also 0. It calls on itself to keep revealing until it hits numbers or edges.
void reveal(int x, int y) {
  // Check bounds
  if (x < 0 || x >= COLUMNS || y < 0 || y >= ROWS) return;

  // Don't reveal flagged or already revealed cells
  if (state[y][x] != 0) return;

  // Reveal the cell
  state[y][x] = 1;

  // If it's empty (0), recursively reveal neighbors
  if (board[y][x] == 0) {
    for (int dy = -1; dy <= 1; dy++) {
      for (int dx = -1; dx <= 1; dx++) {
        if (dx == 0 && dy == 0) continue; // skip self
        reveal(x + dx, y + dy);
      }
    }
  }
}

void setup() {
  // put your setup code here, to run once:

  Serial.begin(9600);

  // initialize LED
  pinMode(PIN_RED, OUTPUT);
  pinMode(PIN_GREEN, OUTPUT);
  pinMode(PIN_BLUE, OUTPUT);
  // HIGH = LED off (they're connected to VCC instead of ground)
  digitalWrite(PIN_RED, HIGH);
  digitalWrite(PIN_GREEN, HIGH);
  digitalWrite(PIN_BLUE, HIGH);


  // SSD1306_SWITCHCAPVCC = generate display voltage from 3.3V internally
  if(!display.begin(SSD1306_SWITCHCAPVCC, SCREEN_ADDRESS)) {
    Serial.println(F("SSD1306 allocation failed"));
    for(;;); // Don't proceed, loop forever
  }

  // Show initial display buffer contents on the screen --
  // the library initializes this with an Adafruit splash screen.
  display.display();
  delay(1000); // Pause for 1 seconds

  // Clear the buffer
  display.clearDisplay();

  // Draw a single pixel in white
  display.drawPixel(10, 10, SSD1306_WHITE);


  randomSeed(analogRead(A2));   // seed randomness from analog pin not connected
  placeMines(TOTAL_MINE);              // e.g. 10 mines total

}
Everything is ready for the actual loop of the program, that will run on forever. It will first identify what if any buttons have been touched. If the state of a button changed, the cursor moves either on X or Y. If the test button gets touched, it qill first test if it was a Mine. If it was, its GAME OVER. If not a mine, it will trigger the reveal funciton which will show any/all adjacent empty squares and thier numbers. Then theree is the flag button, that allows to flag or unflag a square. Finally, it will redraw the board with the new information adn wait for 150 millisceonds to avoid debouncing of the buttons when the fingers are moving.
void loop() {
  // put your main code here, to run repeatedly:

  // update the touch sensors
  update_touch();

  // if (pin_touched_now[UP] && !pin_touched_past[UP]) {
  //   // button 0 was just pressed, do something
  //   digitalWrite(PIN_GREEN, LOW);
  // }
  // // example released button
  // if (!pin_touched_now[UP] && pin_touched_past[UP]) {
  //   // button 0 was just released, do something
  //   digitalWrite(PIN_GREEN, HIGH);
  // }
  //
  if (pin_touched_now[UP] && !pin_touched_past[UP] && cursorY > 0) {cursorY--;}
  if (pin_touched_now[DOWN] && !pin_touched_past[DOWN] && cursorY < ROWS-1) {cursorY++;}
  if (pin_touched_now[LEFT] && !pin_touched_past[LEFT] && cursorX > 0) {cursorX--;}
  if (pin_touched_now[RIGHT] && !pin_touched_past[RIGHT] && cursorX < COLUMNS-1) {cursorX++;}

  Serial.printf("Cursor: %d, %d\n", cursorX, cursorY);


  if (!pin_touched_now[TEST] && pin_touched_past[TEST]){
    // reveal logic
  Serial.printf("TEST");
    if (board[cursorY][cursorX] == MINE) {
        display.clearDisplay();

        display.setTextSize(2);
        display.setTextColor(SSD1306_WHITE);

        display.setCursor(5, 5);
        // write to buffer
        display.print("GAME OVER");
        // send buffer
        display.display();
        while(true){
          display.invertDisplay(true);
          delay(500);
          display.invertDisplay(false);
          delay(500);
        }
    }


      // Game over
     else {
       reveal(cursorX, cursorY);
    }
  }

  if (pin_touched_now[FLAG] && !pin_touched_past[FLAG]) {
  Serial.printf("FLAG");
    if (state[cursorY][cursorX] == 2)
        {state[cursorY][cursorX] = 0; } // if it was flagged → make it hidden
    else
      {state[cursorY][cursorX] = 2;  }// if it was hidden → make it flagged
  }

  drawBoard();
  delay(150); // debounce

}
And that's it! That is the whole code for the mineweeper, very exciting stuff.