SCROLL
finalProject 0000 0001 CAD 0010 cutting 0011 programmer 0100 3Dprinting 0101 elecDesign 0110 makeBig 0111 embedProg 1000 moldCast 1001 inputs 1010 outputs 1011 networks 1100 machine 1101 interface 1110 wildcard 1111 notes1101
Interface and Application Programming
This week I am going to try to make my own interface for a face detection program running on a RaspberryPi. It will be a much simpler version of the ESP32-CAM interface from networks week.
Language Choice
Python
The first steps in realizing my goals with this project are figuring out how to 1) Interface to a camera and 2) Write a face detection program. After some googling around, it seems it would be prudent to write this program in Python. This is largely because I already know a bit of it thanks to CS50, but also because it is nice to write with. Additionally, documentation for face detection projects in python seem to be the most ubiquitous, so if I get stuck it will be easier to find answers online. Python is also supported by OpenCV (Computer Vision), a library with many useful functions for face detection.
Set Up
I want to test out OpenCV with my Mac webcam before I try on a RasberryPi. Before I do anything I need to download OpenCV so I can use it in my program. This isn't actually as straightforward as hitting a download button. Lots of help from here.
DISCLAIMER: Further down I pivot to a new set up technique
DISCLAIMER: Even further down I come crawling back to this
- Install Xcode
- Install Homebrew
- Added the following to bash profile (I used emacs, a text editor by typing
emacs ~/.bash_profileinto terminal). Save and exit.
xxxxxxxxxx# Homebrewexport PATH=/usr/local/bin:$PATH- Sourced the bash profile to update with changes. Alternatively you can quit and restart terminal as this is done automatically every time you start terminal
source ~/.bash_profile - Now I need to make sure I have python 3.6 installed, apparently OpenCV is not working well with python 3.7 yet.
xxxxxxxxxxbrew install --ignore-dependencies https://raw.githubusercontent.com/Homebrew/homebrew-core/f2a764ef944b1080be64bd88dca9a1d80130c558/Formula/python.rb --ignore-dependenciesThe above returned an error. It may be because I previously downloaded a version of python with Hombrew. Used
brew unlink pythonand tried again. If still having trouble try some of these:https://stackoverflow.com/questions/51125013/how-can-i-install-a-previous-version-of-python-3-in-macos-using-homebrewThen:
brew switch python 3.6.5_1To check if all this has been done correctly:
python3.6should return something likexxxxxxxxxxPython 3.6.5 (default, Jun 17 2018, 12:13:06)[GCC 4.2.1 Compatible Apple LLVM 9.1.0 (clang-902.0.39.2)] on darwinType "help", "copyright", "credits" or "license" for more information.Used
ctrl + Dto exit the python consoleTyped
which python3.6. It should return/usr/local/bin/python3.6If instead get
/usr/bin/python(which I did a few times), it means I am using the systems default python rather than Hombrew python. I did not properly add the new path to your bash_profile (Left out quotation marks).Checked this out for solutions: https://stackoverflow.com/questions/19340871/how-to-link-home-brew-python-version-and-set-it-as-default
Install OpenCV prerequisites:
xxxxxxxxxxbrew install cmake pkg-configbrew install jpeg libpng libtiff openexrbrew install eigen tbbAnd our friend wget for downloading files
xxxxxxxxxxbrew install wgetI had to rerun brew switch python 3.6.5_1 after running the above commands. Check the versions of python again. It should be 3.6
- Next installed pip (a tool for installing Python packages)
xxxxxxxxxxsudo python3 get-pip.pywget https://bootstrap.pypa.io/get-pip.py- Used pip to install tools for setting up python virtual environment
xxxxxxxxxxsudo pip3 install virtualenv virtualenvwrappersudo rm -rf ~/get-pip.py ~/.cache/pipIt was at this point I found an article about using Python 3.7 with OpenCV. I am beginning to distrust the tutorial I was following (it is a year old).
The article turned out to be pretty trustworthy
Soooooo I decided to try the steps laid out here using Python3.7
Python3.7 comes with venv a tool for building virtual environments (similar virtualenv, which is used for older Python versions.
- Run the below to start a virtual environment. Exiting terminal will deactivate it.
xxxxxxxxxxpython3.7 -m venv worksource work/bin/activate- Run the below to install NumPy and OpenCV
xxxxxxxxxxpip install numpypip install opencv-pythonAnd DONE!
I'm pretty frustrated that I wasted hours trying to get the first way to work, but alas.
pipenv
I just read an article about why I should be using pipenv instead of pip to manage my python packages. Essentially, there are a ton of issues in software development and production centered around updates to dependencies of your program. One is that if someone has different versions of your programs dependencies your program may not work on their machine. Another is that you may have programs on your machine that require different versions of the same library. Unfortunately it is very tough for your program to distinguish between the versions you have downloaded. Often the solution is to create different virtual environments for each program so that they can both only have one option of their dependencies and it is the right version for each. It essentially keeps everything separate. pipenv combines pip and virtualenv to keep each program's environment on track.
To install:
xxxxxxxxxxpip install pipenvTo read about virtual environments click here
virtualenvwrapper
It was by reading the above article that I realized the first tutorial I was following was actually not leading me completely astray. I do in fact need virtualenvwrapper to manage my virtual environments. The install was not in vain.
Now to finish what I started with the first tutorial:
Append to bash_profile:
xxxxxxxxxx# virtualenv and virtualenvwrapperexport WORKON_HOME=$HOME/.virtualenvsexport VIRTUALENVWRAPPER_PYTHON=/usr/local/bin/python3source /usr/local/bin/virtualenvwrapper.shA handy way to append to files from Terminal is:
xxxxxxxxxxecho -e "\n# virtualenv and virtualenvwrapper" >> ~/.bash_profileecho "export WORKON_HOME=$HOME/.virtualenvs" >> ~/.bash_profileecho "export VIRTUALENVWRAPPER_PYTHON=/usr/local/bin/python3" >> ~/.bash_profileecho "source /usr/local/bin/virtualenvwrapper.sh" >> ~/.bash_profileThen source bash_profile.
Some lines appear:
xxxxxxxxxxDonaghs-MacBook-Pro:dev donaghmahon$ source ~/.bash_profilevirtualenvwrapper.user_scripts creating /Users/donaghmahon/.virtualenvs/premkprojectvirtualenvwrapper.user_scripts creating /Users/donaghmahon/.virtualenvs/postmkprojectvirtualenvwrapper.user_scripts creating /Users/donaghmahon/.virtualenvs/initializevirtualenvwrapper.user_scripts creating /Users/donaghmahon/.virtualenvs/premkvirtualenvvirtualenvwrapper.user_scripts creating /Users/donaghmahon/.virtualenvs/postmkvirtualenvvirtualenvwrapper.user_scripts creating /Users/donaghmahon/.virtualenvs/prermvirtualenvvirtualenvwrapper.user_scripts creating /Users/donaghmahon/.virtualenvs/postrmvirtualenvvirtualenvwrapper.user_scripts creating /Users/donaghmahon/.virtualenvs/predeactivatevirtualenvwrapper.user_scripts creating /Users/donaghmahon/.virtualenvs/postdeactivatevirtualenvwrapper.user_scripts creating /Users/donaghmahon/.virtualenvs/preactivatevirtualenvwrapper.user_scripts creating /Users/donaghmahon/.virtualenvs/postactivatevirtualenvwrapper.user_scripts creating /Users/donaghmahon/.virtualenvs/get_env_detailsDonaghs-MacBook-Pro:dev donaghmahon$
Docs for virtualenv
Commands:
workon -- lists env and if followed by a space and name of env, activates
deactivate
mkvirtualenv
cdvirtualenv
rmvirtualenv
pyenv
To go even further down this rabbit hole of virtual environments and python version management, I got stuck into reading about pyenv with which you can install multiple versions of python for use in all of your virtual environments. I ended up redownloading Python 3.7.5 with pyenv.
For how to do this and how it works read this.
Now that I know how to set up virtual environments I am finally ready to dig into using OpenCV.
Mind you that all of this was just to get OpenCV working on my Mac when I actually need it running on a RasberryPi... I am hoping I will be able to use my Mac for testing purposes. The truth of the matter is that I still don't know how to use all this stuff, but onwards I march.
OpenCV Installation
I'm going to download OpenCV via home-brew. Back we go to the original installation tutorial.
Start up a virtual environment:
xxxxxxxxxxmkvirtualenv opencvTest -p python3In the environment install NumPy:
xxxxxxxxxxpip install numpyIn the environment's home directory download opencv and opencv_contrib
xxxxxxxxxxwget -O opencv.zip https://github.com/opencv/opencv/archive/4.0.0.zipwget -O opencv_contrib.zip https://github.com/opencv/opencv_contrib/archive/4.0.0.zipUnzip:
xxxxxxxxxxunzip opencv.zipunzip opencv_contrib.zipRename directories for convenience:
xxxxxxxxxxmv opencv-4.0.0 opencvmv opencv_contrib-4.0.0 opencv_contribCompile OpenCV4 from source
xxxxxxxxxxcd ~/opencvmkdir buildcd buildNow, still within virtual environment ( denoted by the '(opencvTest)' before the input prompt ) execute:
xxxxxxxxxxcmake -D CMAKE_BUILD_TYPE=RELEASE \ -D CMAKE_INSTALL_PREFIX=/usr/local \ -D OPENCV_EXTRA_MODULES_PATH=~/opencv_contrib/modules \ -D PYTHON3_LIBRARY=`python -c 'import subprocess ; import sys ; s = subprocess.check_output("python-config --configdir", shell=True).decode("utf-8").strip() ; (M, m) = sys.version_info[:2] ; print("{}/libpython{}.{}.dylib".format(s, M, m))'` \ -D PYTHON3_INCLUDE_DIR=`python -c 'import distutils.sysconfig as s; print(s.get_python_inc())'` \ -D PYTHON3_EXECUTABLE=$VIRTUAL_ENV/bin/python \ -D BUILD_opencv_python2=OFF \ -D BUILD_opencv_python3=ON \ -D INSTALL_PYTHON_EXAMPLES=ON \ -D INSTALL_C_EXAMPLES=OFF \ -D OPENCV_ENABLE_NONFREE=ON \ -D BUILD_EXAMPLES=ON ..Then to build:
xxxxxxxxxxmake -j4Lastly:
xxxxxxxxxxsudo make install
Symbolic Link OpenCV to site-packages in virtual environment
OpenCV stuff is in /usr/local/python/cv2/python-3.7
Renaming it:
xxxxxxxxxxcd /usr/local/python/cv2/python-3.7sudo mv cv2.cpython-36m-darwin.so cv2.soCreate the symlink:
xxxxxxxxxxcd ~/.virtualenvs/opencvTest/lib/python3.7/site-packages/ln -s /usr/local/python/cv2/python-3.7/cv2.so cv2.soBrief explanation of symlink from here:
xxxxxxxxxxlet’s say you have a program that needs its files stored at /Library/Program. But you want to store those files somewhere else on the system—for example, in /Volumes/Program. You can move the Program directory to /Volumes/Program, and then create a symbolic link at /Library/Program pointing to /Volumes/Program. The program will try to access its folder at /Library/Program, and the operating system will redirect it to /Volumes/Program.
It works kind of like a pointer in C
Should be all good to go now!
Check by executing these commands. Should get '4.0.0'
xxxxxxxxxxworkon opencvOpenpython>>> import cv2>>> cv2.__version__'4.0.0'>>>
Writing the program
Haar Cascade
What is a haar cascade?
xxxxxxxxxxHaar Cascade is a machine learning object detection algorithm used to identify objects in an image or video and based on the concept of features proposed by Paul Viola and Michael Jones in their paper "Rapid Object Detection using a Boosted Cascade of Simple Features" in 2001.It is a machine learning based approach where a cascade function is trained from a lot of positive and negative images. It is then used to detect objects in other images.http://www.willberger.org/cascade-haar-explained/
This video nicely explains the algorithm.
There are four components to the algorithm:
Haar Feature Selection
- Compares pixel brightness at adjacent rectangular regions - different regions of the face satisfy different haar features. If a certain pattern of these features is found somewhere in an image, there is a chance that that part of the image contains a face. There are some 160,000 haar features.

Integral Images
- Well explained in the video - a way of summing values in a rectangular grid.
Adaboost training
- A way of training a machine learning model optimizing predicting power and speed
Cascading classifiers
- Haar features are divided into subsets, each with a weak predicting power. A region of an image is compared to these subsets one after the other in a chain. If the subset pattern is found, the image region is compared to the next subset. If the subset pattern is not found, then the region likely does not contain a face and we move on to the next region.
Here is a fantastic video of this process in action:
Detect Faces in a Still Image
I hope to incrementally work up to writing a program that does face recognition in real time. The first rung on this ladder is working with a single image.
First I need a .xml file containing a haar cascade that has been trained for face detection. OpenCV's gitHub has a number of .xml files each for the detection of something different (cat faces, right human eyes, license plates, etc.). Amongst these is one for "frontalface."
Downloading this file and saving it to the directory I am working in.
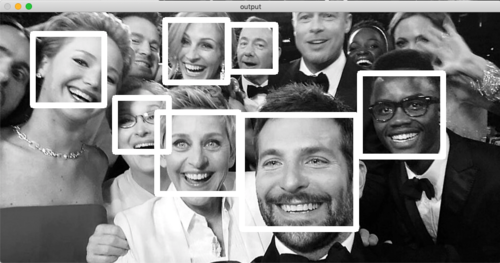
I also am saving a few test images in the directory-- one with no faces, one with one face and another with multiple faces.
Now to write the program.
<Here >are the docs for working with images in OpenCV
First, import the OpenCV package I went to great lengths to download.
xxxxxxxxxximport cv2Next, I need to load in the haar cascade for face detection.
xxxxxxxxxxcascade = cv2.CascadeClassifier('haarcascade_frontalface_default.xml')Now load in the photo I would like to analyze. I will take the image file name from the command line.
xxxxxxxxxxarg = sys.argv[1]img = cv2.imgread(arg)And some insurance:
xxxxxxxxxxif img.size == 0: print("Cannot load image") exit()Next, for simplicities sake, I need to convert the loaded image to grey scale. This is done because if I used the original image, which is in a three dimensional color space BGR, there would be 3 values to work with for every pixel. The haar cascade I am using works using only one dimension per pixel ie greyscale. OpenCV has a handy color space conversion function. The first argument is the image and the second is the code for the color space the image is to be converted to.
xxxxxxxxxxgray_pic = cv2.cvtColor(pic, cv2.COLOR_BGR2GRAY)Actually, I just found out that you can use a second argument in the imgread() function to specify what color space to convert the image to.
-1 for unchanged, 0 for greyscale, 1 for color this will mean that if I want to show the resultant image with the box around the face it would also be in grayscale (unless I load in the original color image before I draw the box). I won't need to output the image at all for this project. All I need are the coordinates for the center of the face.
Line to replace previous image read in:
xxxxxxxxxximg = cv2.imgread('passport.jpg', 0)To detect the faces I need to use detectMultiScale . The first argument is the image. The second is the scale factor (the factor at which the image is scaled down between runs):
- Our haar cascade algorithm was trained to detect faces of a specific size, and only that size. However, obviously faces in images can be many different sizes. To solve this problem, using detectMultiScale we run the algorithm through our image scaled to many different sizes. Eventually (hopefully) every face in the image will, for one run of the algorithm, be the size the model was trained on and hence detectable. A scale factor of 1.1 would mean the image is scaled down in steps of 10%.
And the third argument is minNeighbors. Good explanation here. Essentially you set how strict you want the model to be. Increasing the number means the algorithm has to find more potential positive results in a region before it decides that the region is a face.
detectMultiScale returns a list of rectangles around the faces it finds. These rectangles are in the form of the (x, y) coördinates for a corner and width and height measurements.
xxxxxxxxxxcoordinates = face_cascade.detectMultiScale(img, 1.1, 4)Now I need to draw actual rectangles around the faces in the image.
xxxxxxxxxxfor (x, y, w, h) in coordinates: cv2.rectangle(img, (x, y), (x+w, y+h), (255, 0, 0), 10)I loop through each tuple of coordinates in the list and draw a rectangle on image img from (x, y) to (x + w, y + h) in the BGR color (255, 0, 0) (blue) of thickness 10 pixels.
The color will actually be white as out image is now in grayscale.
Lastly, display the result for 10 seconds and exit program. If a key is pressed during those 10 seconds, the program will exit. For info in waitkey() see this. waitkey() returns -1 if no keys pressed during its wait time. If a key is pressed during its wait time, the ASCII code of the key will be returned (mask with & 255 to get only the first eight bits of the returned value-- the ASCII code).
xxxxxxxxxxcv2.imshow('img', img)cv2.waitKey(10000)exit()And there is my first face detection program!
xxxxxxxxxximport cv2import sys# Load the cascadeface_cascade = cv2.CascadeClassifier('haarcascade_frontalface_default.xml')# Read the input imagearg = sys.argv[1]img = cv2.imread(arg, 0)if img.size == 0: print("Cannot load image") exit()# Find facescoordinates = face_cascade.detectMultiScale(img, 1.1, 4)# Draw rectangle around the facesfor (x, y, w, h) in coordinates: cv2.rectangle(img, (x, y), (x+w, y+h), (255, 0, 0), 10) # Display the outputcv2.imshow('output', img)cv2.waitKey(10000)exit()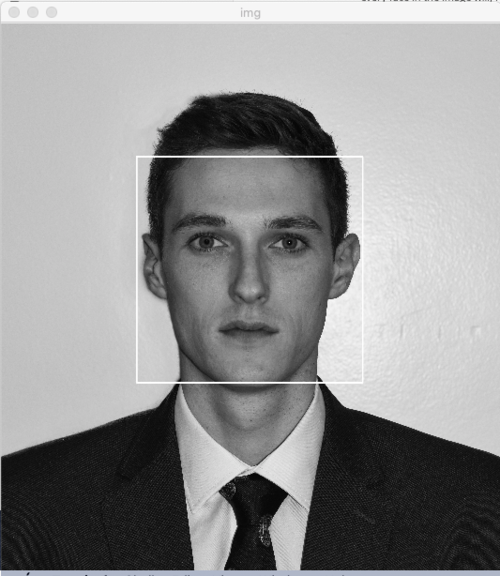
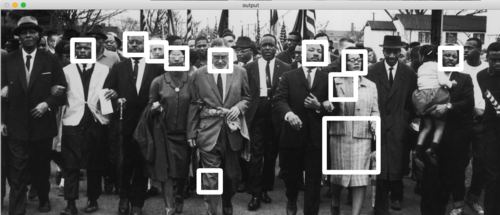
Unfortunately, it isn't great at non-frontal faces. Given the history of face detection technologies failing to identify faces of darker skin tones at a high rate than light skin tones, I want to check how badly this haar cascade performs in this regard.

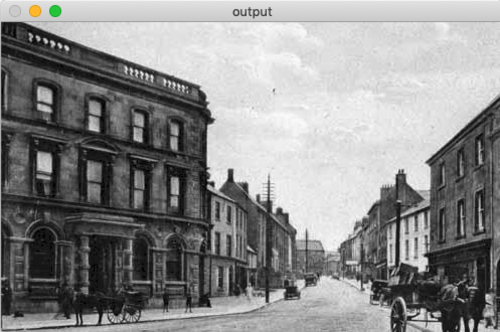
The haar cascade could definitely be improved, but it may work well enough for my purposes. Here's a photo of my home town (it hasn't changed much since the days of pony and trap) run through the program.
Detect Faces in a Video
As video is just a series of images, I don't imagine this being too much different; maybe just a loop iterating through each frame.
So how do I read in a video, specifically a live video? To the OpenCV docs!
VideoCapture() is the answer.
xxxxxxxxxx# Read in from default devicevideo = cv2.VideoCapture(0)# Read in video from filevideo = cv2.VideoCapture('filename.mp4')I will check if the video capture was successfully initialized using the below. If it was not, I will open it (apparently sometimes VideoCapture may not initialize the capture).
xxxxxxxxxxif (not video.isOpened()): video.open()Here is a good walkthrough of handling video with OpenCV.
To read the captured video frame by frame I will use .read() (in an infinite while loop) which returns a bool whose value depends on the success of the read. .read() also assigns the frame to a variable. When .read() reaches the end of file (EOF) it will return False. I could use this to break out of the while loop if I was reading in a prerecorded file. For recording live video, I will exit the program by pressing a key.
xxxxxxxxxxwhile (True): success, frame = video.read()Now I will use the same process as with the still image face detection, because this is now a still image face detection.
xxxxxxxxxx# Convert to grayscalegray = cv2.cvtColor(frame, cv2.COLOR_BGR2GRAY)# Find facescoordinates = face_cascade.detectMultiScale(img, 1.1, 4)# Draw rectangle around the facesfor (x, y, w, h) in coordinates: cv2.rectangle(img, (x, y), (x+w, y+h), (255, 0, 0), 10)# Show outputcv2.imshow('output', frame)Since I will be showing the live video frame by frame, I need to open and close the display window for each frame at the same rate as camera is snapping frames. My Mac's webcam shoots close to 30 frames per second (fps). That means each frame should take up ~33 milliseconds of viewing time. Assuming the window takes some time to open and close (or simply switch frames), I will set the output window to show for 30 milliseconds and we'll see how that goes.
I want the program to quit if I hit the ctrl + D. The ASCII code for End of Transmission (the function of the ctrl + D key stroke) is 4. As per my prior explanation of waitkey() and its return value, this is what I need to do (ANDing with 11111111 (0xff in hex) to get only the first byte):
xxxxxxxxxxpressed = csv.waitkey(30) & 0xffif pressed == 4: breakLastly I need to stop close the video capture
xxxxxxxxxxvideo.release()and exit the program.
xxxxxxxxxxexit()The full thing
xxxxxxxxxximport cv2# Load the cascadeface_cascade = cv2.CascadeClassifier('haarcascade_frontalface_default.xml')# Read in from default devicevideo = cv2.VideoCapture(0)# Make sure video capture is openif (not video.isOpened()): video.open()# Loop through each framewhile (True): # Read the next frame success, frame = video.read() # Convert to grayscale gray = cv2.cvtColor(frame, cv2.COLOR_BGR2GRAY) # Find faces coordinates = face_cascade.detectMultiScale(frame, 1.1, 4) # Draw rectangle around the faces for (x, y, w, h) in coordinates: cv2.rectangle(frame, (x, y), (x+w, y+h), (255, 0, 0), 10) # Show output cv2.imshow('output', frame) # Show frame for 30 ms, break if 'Ctrl + D' pressed pressed = cv2.waitKey(29) & 255 if pressed == 4: break# Close video capture and exitvideo.release()exit()It works! The exiting on key press is rather slow though. It sometimes takes a few clicks. I wonder if that is something to do with timing. Although, this is all being executed so quickly I doubt it.
Test run:
Video
Clearly this haar cascade was only trained to recognize faces in an upright orientation.
Centering
Now that faces are being recognized I start on getting what I really need from the video feed-- a boolean value for whether or not the nearest face is centered in the frame. I need a motor to turn the camera until that is the case.
Before dealing with multiple faces I will write a program that will work for just one.
Finding the center of the face is easy. As I already have the coordinates of the bounding rectangle ( (x, y) and (x + w, y + h) are diagonally opposite corners), this is the center: (x + w/2, y + h/2) . In fact I only need the x coördinate.
Since I am only using one motor, the chair can only center faces along one axis. The chair will be rotating on a horizontal plane hence I will be centering faces horizontally (on the x axis). To find the horizontal center line of the frame I will use cv.GetCaptureProperty(). Read docs here. Just as it sounds, it allows you to get the values of a number of characteristics from the video capture one of which is frame width. The argument for this property is CAP_PROP_FRAME_WIDTH. The center line will be the line: x = frame_width/2
xxxxxxxxxx# Get width of frameframe_width = video.get(cv2.CV_CAP_PROP_FRAME_WIDTH)I will also get the frame height so I can have a second point for my draw line function.
xxxxxxxxxx# Get height of frameframe_height = video.get(cv2.CV_CAP_PROP_FRAME_HEIGHT)Next to draw the line (this will be in the while loop because I am drawing on each frame). The line drawing function requires integer values not floats so I will do the calculation to the nearest whole and cast the values as ints. I'll make the line green (0,255,0).
xxxxxxxxxx# Draw vertical centre line midline = int(round(frame_width/2)) cv2.line(frame, (midline, 0), (midline, int(frame_height)), (0,255,0), 5)Lastly we need to constantly test if the center of the face is on this center line. This calculation will be done in the for loop for rectangle drawing. Eventually there will be an if condition that will only test the position of the largest, i.e. nearest face. For now I am assuming only one face in the frame. Here's the four loop with the new addition. I am giving a tolerance of +/- 20 around the center line.
Setting the line thickness argument to -1 will cause the function to draw a filled in rectangle. Ultimately what I actually need is this program to send a constant turn command to a motor until the nearest face in the frame is centered.
xxxxxxxxxx# Draw rectangle around the faces for (x, y, w, h) in coordinates: cv2.rectangle(frame, (x, y), (x+w, y+h), (255, 0, 0), 10) # If face in center, fill in rectangle if int(round(x + w/2)) < midline + 20 and int(round(x + w/2)) > midline - 20: cv2.rectangle(frame, (x, y), (x+w, y+h), (255, 0, 0), -1)Test:
Video
When I move quickly the rectangle doesn't fill in as I cross the center line. This slowness of the program shouldn't be a problem for me as I only need something to be done when the face is not centered. When it is nothing needs to happen. A better test for my purposes is:
xxxxxxxxxx# If face NOT in center, fill in rectangle if int(round(x + w/2)) > midline + 20 or int(round(x + w/2)) < midline - 20: cv2.rectangle(frame, (x, y), (x+w, y+h), (255, 0, 0), -1)Notice operator changes.
Test 2:
Video
Full Program at this point:
xxxxxxxxxximport cv2# Load the cascadeface_cascade = cv2.CascadeClassifier('haarcascade_frontalface_default.xml')# Read in from default devicevideo = cv2.VideoCapture(0)# Get width of frameframe_width = video.get(cv2.CAP_PROP_FRAME_WIDTH)# Get height of frameframe_height = video.get(cv2.CAP_PROP_FRAME_HEIGHT)# Calculate midlinemidline = int(round(frame_width/2))# Make sure video capture is openif (not video.isOpened()): video.open()# Loop through each framewhile (True): # Read the next frame success, frame = video.read(0) # Draw vertical centre line cv2.line(frame, (midline, 0), (midline, int(frame_height)), (0,255,0), 5) # Find faces coordinates = face_cascade.detectMultiScale(frame, 1.1, 4) # Check if any faces found if len(coordinates) == 0: print("No faces detected") continue # Draw rectangle around the faces for (x, y, w, h) in coordinates: cv2.rectangle(frame, (x, y), (x+w, y+h), (255, 0, 0), 10) # If face NOT in center, fill in rectangle if int(round(x + w/2)) > midline + 20 or int(round(x + w/2)) < midline - 20: cv2.rectangle(frame, (x, y), (x+w, y+h), (255, 0, 0), -1) # Show output cv2.imshow('output', frame) # Show frame for 30 ms, break if 'Ctrl + D' pressed pressed = cv2.waitKey(29) & 255 if pressed == 4: break# Close video capture and exitvideo.release()exit()
Dealing with Multiple Faces
When multiple people are in the frame I only want the motor to act on the nearest person. I have decided to approximate the distance of a face from the camera by its size. Again, I only really need one dimension of size, so I'll use height (I could equally use width). The assumption is: the tall the rectangle around someones face, the closer they must be. The program should only bother testing if the nearest face is off center.
The first issue is that my for loop for drawing rectangles draws them one at a time (one with every iteration of the loop). This means I cannot compare the rectangles of different faces within this loop.
No matter though because coordinates is a list of coördinates of all the rectangles surrounding faces in that frame. I need to search this list for the tallest rectangle.
The tallest rectangle will have the largest third element of all the arrays of coördinates returned. I need to search coordinates for the max 3rd element.
First I need loop through the measurements for each face and assign a variable to hold the tallest of the faces.
xxxxxxxxxx# To hold index of tallest rectangle tallest = 0 # To keep track of the height of the tallest rectangle max_height = 0Then the usual line to find faces and a check for any faces. If none found, print that information and skip the rest of the while loop. This check is important as when the program starts up it takes a second to start recognizing faces. This means for the first iteration of the loop, coordinates will be empty. That will cause an over-indexing error latter in the program causing everything to stop. I need to make sure to skip the rest of the while loop if there are no faces found.
xxxxxxxxxx# Find faces coordinates = face_cascade.detectMultiScale(frame, 1.1, 4) if len(coordinates) == 0: print("No faces detected") continueNow the loop:
xxxxxxxxxxfor index, rectangle in enumerate(coordinates): if rectangle[2] > max_height: tallest = index max_height = rectangle[2]index and enumerate work in tandem to keep count of the iterations. Index is therefore the index of the face the loop is currently checking.
rectangle[2] is the height value of the rectangle around the face found. After this loop tallest will contain the index of the largest face in the frame.
Next I will draw the rectangle around this face.
xxxxxxxxxx# Draw rectangle around nearest face x = coordinates[tallest][0] y = coordinates[tallest][1] w = coordinates[tallest][2] h = coordinates[tallest][3] cv2.rectangle(frame, (x, y), (x+w, y+h), (255, 0, 0), 10)That should be it.
Full program thus far:
xxxxxxxxxximport cv2# Load the cascadeface_cascade = cv2.CascadeClassifier('haarcascade_frontalface_default.xml')# Read in from default devicevideo = cv2.VideoCapture(0)# Get width of frameframe_width = video.get(cv2.CAP_PROP_FRAME_WIDTH)# Get height of frameframe_height = video.get(cv2.CAP_PROP_FRAME_HEIGHT)# Calculate midlinemidline = int(round(frame_width/2))# Make sure video capture is openif (not video.isOpened()): video.open()# Loop through each framewhile (True): # Read the next frame success, frame = video.read(0) # Draw vertical centre line cv2.line(frame, (midline, 0), (midline, int(frame_height)), (0,255,0), 5) # To hold index of tallest rectangle tallest = 0 # To keep track of the height of the tallest rectangle max_height = 0 # Find faces coordinates = face_cascade.detectMultiScale(frame, 1.1, 4) if len(coordinates) == 0: print("No faces detected") continue for index, rectangle in enumerate(coordinates): if rectangle[2] > max_height: tallest = index max_height = rectangle[2] # Draw rectangle around nearest face x = coordinates[tallest][0] y = coordinates[tallest][1] w = coordinates[tallest][2] h = coordinates[tallest][3] cv2.rectangle(frame, (x, y), (x+w, y+h), (255, 0, 0), 10) # If face NOT in center, fill in rectangle if int(round(x + w/2)) > midline + 20 or int(round(x + w/2)) < midline - 20: cv2.rectangle(frame, (x, y), (x+w, y+h), (255, 0, 0), -1) # Show output cv2.imshow('output', frame) # Show frame for 30 ms, break if 'Ctrl + D' pressed pressed = cv2.waitKey(29) & 255 if pressed == 4: break# Close video capture and exitvideo.release()exit()Test:
Video
Seems to work! Since Ye's face here is not actually human sized, his face doesn't need to actually be further away than mine for the program to switch to my face. All the same this proves it with real people.
Code Clean Up and Optimization for RaspberryPi
Going to make some changes to my code so that it will be easier to debug the Pi set up.
Firstly, I am going to add logging so that I can see what is happening in my program when it is running headless (without a GUI) on the pi. A good explanation of logging in Python can be found here.
Basically it will print to the console messages you set to explain an event in the program. There are 5 standard levels indicating the severity of events.
- DEBUG
- INFO
- WARNING
- ERROR
- CRITICAL
By default the logging module will only show logs of WARNING level or above. If I want to see DEBUG logs I have to configure the module to do that by including these lines:
xxxxxxxxxximport logginglogging.basicConfig(level=logging.DEBUG)Next, because I want the same code to run on both my Mac and on the Pi but slightly differently on each (no GUI output on the pi), I will establish an ENVIRONMENT variable using the os.getenv() method which "provides a portable way of using operating system dependent functionality." I need to import theos module to use this.
xxxxxxxxxximport osENVIRONMENT = os.getenv('ENVIRONMENT', 'dev')Adding a DEBUG log after detectMultiScale call to log the number of faces detected.
xxxxxxxxxxlogging.debug('{} faces detected'.format(len(coordinates)))I'm replacing the if face found check with the below as it redeuces the number of lines. I'm also replacing the operation to find the largest face with the max() function as it also takes fewer lines and does the same thing. key=lambda x: x[2] ensures that we are only evaluating the value at the 2 index in the list (height).
xxxxxxxxxx# If we have any faces, get the nearest one (by height) if len(coordinates) > 0: [x, y, w, h] = max(coordinates, key=lambda x: x[2]) # Draw rectangle around nearest face cv2.rectangle(frame, (x, y), (x+w, y+h), (255, 0, 0), 10) # If face NOT in center, fill in rectangle if int(round(x + w/2)) > midline + 20 or int(round(x + w/2)) < midline - 20: cv2.rectangle(frame, (x, y), (x+w, y+h), (255, 0, 0), -1)I only want to show the output window if I am running the program on my Mac. Here is where the ENVIRONMENT variable comes in. I do this because trying to open a window will throw an error when this runs in docker on the pi.
xxxxxxxxxx# Show output only if running locally (will throw error in docker) if ENVIRONMENT == 'dev': cv2.imshow('output', frame)The full program now looks like this:
xxxxxxxxxximport cv2import osimport logginglogging.basicConfig(level=logging.DEBUG)# Whether or not to open guiENVIRONMENT = os.getenv('ENVIRONMENT', 'dev')# Load the cascadeface_cascade = cv2.CascadeClassifier('./haarcascade_frontalface_default.xml')# Read in from default devicevideo = cv2.VideoCapture(0)# Get frame height and width then calculate midlineframe_width = video.get(cv2.CAP_PROP_FRAME_WIDTH)frame_height = video.get(cv2.CAP_PROP_FRAME_HEIGHT)midline = int(round(frame_width / 2))# Make sure video capture is openif (not video.isOpened()): video.open()# Loop through each framewhile (True): # Read the next frame success, frame = video.read(0) # Draw vertical centre line cv2.line(frame, (midline, 0), (midline, int(frame_height)), (0,255,0), 5) # Find faces coordinates = face_cascade.detectMultiScale(frame, 1.1, 4) logging.debug('{} faces detected'.format(len(coordinates))) # If we have any faces, get the nearest one (by height) if len(coordinates) > 0: [x, y, w, h] = max(coordinates, key=lambda x: x[2]) # Draw rectangle around nearest face cv2.rectangle(frame, (x, y), (x+w, y+h), (255, 0, 0), 10) # If face NOT in center, fill in rectangle if int(round(x + w/2)) > midline + 20 or int(round(x + w/2)) < midline - 20: cv2.rectangle(frame, (x, y), (x+w, y+h), (255, 0, 0), -1) # Show output only if running locally (will throw error in docker) if ENVIRONMENT == 'dev': cv2.imshow('output', frame) # Show frame for 30 ms, break if 'Ctrl + D' pressed pressed = cv2.waitKey(29) & 255 if pressed == 4: break# Close video capture and exitvideo.release()exit()
DC Motor Control
I need to design, mill and solder a board with a micro controller controlling a motor driver connected to a DC motor
- The H bridge is a component in the motor driver that enables reversing the spin of the motor. This will be useful in telling the motor which way to turn.
I need to write a program (in C) to load onto the micro controller. This program should enable the micro-controller to take input from the RaspberryPi GPIO pins ('direction to turn motor' and 'stop turning motor') and send the information to the motor driver.
Data Flow
The Pi will be running the OpenCV face detection program that outputs which direction the motor should spin. This program will control two of the Pi's GPIO pins, one for each direction of motor spin (depending on what side of the center the face is on - if it is left off center, the motor needs to turn to the left in order to center the face in the frame again).
The GPIO pins on the Pi will output (never simultaneously) to two GPIO pins on the ATTiny44 microcontroller. The micro controller will take in the "turn command" from one of these pins and send it out through another GPIO pin to one of the motor driver's input pins. The motor driver will then send the "command" out through the correct output pin for the direction of turn to the motor (the driver uses a H-bridge for this) and Bob's your uncle!
Anytime I used the word "command", what I really mean is a high voltage signal.
DRAWING!!!!!!!!!!! HERE!!!!!!!!!!!!!!!!!
I/O Port Operations for AVR Microcontrollers
Resource: http://maxembedded.com/2011/06/port-operations-in-avr/
In order to implement the above data flow. The first thing to learn is how to control the pins on the Pi and the ATTiny44. The above link gives a great explanation of pin setting. Here's my synopsis:
First, a register is place in memory comprising of 8 bits.
A port is a collection of input/ output (I/O) pins on a microcontroller (4 on the ATTiny). These can either be set to receive information or to send it. The way to decide which operation a certain pin fulfill is by altering the DDRx register (Data Direction Register, where x is the name of the register - DDRA for example. Let's say the data direction of the 4th pin of port A is controlled by the 4th bit of DDRA. If I want it to be an output pin, this bit should be 1. If I want it to receive data I should make it 0.
Pin setting is done by bit wise operations:
Bitwise Operations in C
https://en.wikipedia.org/wiki/Bitwise_operations_in_C
| Symbol | Operator |
|---|---|
& | bitwise AND |
| | bitwise inclusive OR |
^ | bitwise XOR (exclusive OR) |
<< | left shift |
>> | right shift |
~ | bitwise NOT (one's complement) (unary) |
Bitwise AND ( & )
| bit a | bit b | a & b (a AND b) |
|---|---|---|
| 0 | 0 | 0 |
| 0 | 1 | 0 |
| 1 | 0 | 0 |
| 1 | 1 | 1 |
xxxxxxxxxx11001000& 10111000--------= 10001000
Bitwise OR ( | )
| bit a | bit b | a | b (a OR b) |
|---|---|---|
| 0 | 0 | 0 |
| 0 | 1 | 1 |
| 1 | 0 | 1 |
| 1 | 1 | 1 |
xxxxxxxxxx11001000| 10111000--------= 11111000
Bitwise XOR ( ^ )
| bit a | bit b | a ^ b (a XOR b) |
|---|---|---|
| 0 | 0 | 0 |
| 0 | 1 | 1 |
| 1 | 0 | 1 |
| 1 | 1 | 0 |
xxxxxxxxxx11001000^ 10111000--------= 01110000
Bitwise NOT ( ~ )
| bit a | ~a (complement of a) |
|---|---|
| 0 | 1 |
| 1 | 0 |
xxxxxxxxxx~ 11001000--------= 00110111
Right Shift ( >> )
If the variable ch contains the bit pattern 11100101, then ch >> 1 will produce the result 01110010, and ch >> 2 will produce 00111001
This is the equivalent of dividing ch by
a >> n =
New places are filled with s
Left Shift ( << )
If the variable ch contains the bit pattern 11100101, then ch << 1 will produce the result 11001010
This is the equivalent of multiplying ch by
a << n =
New places are filled with s
Bitwise Assignment Operators in C
| Symbol | Operator |
|---|---|
&= | bitwise AND assignment |
|= | bitwise inclusive OR assignment |
^= | bitwise exclusive OR assignment |
<<= | left shift assignment |
>>= | right shift assignment |
The trailing = just means that the result of the operation will be stored in the left operand, ie after a |= b the variable a will hold the resultant value of the bitwise operation.
The operations I will use most are 1 << A, A |= B, A &= ~B. The first is used to pick out a particular bit in a register of 8 bits. The second is used with the first to set said particular bit in a register to 1. The third is used to set said particular bit to 0 in a register. More on this to come.
Embedded Programming
Things to know:
Frequency
F = frequency (Hz)
T = time period (s)
Example:
If something happens every 10 ms (1 ms = s) the time period is s. Therefore the frequency is
Microcontroller Clocks and Timers
Every microcontroller has a clock that keeps it's operations moving smoothly step by step.
Resources for learning about microcontroller clocking:
- ATTiny Data Sheet (looks daunting, read this first and then scroll down to "Clock System")
- http://maxembedded.com/2011/06/introduction-to-avr-timers/ (great intro)
- https://www.researchgate.net/post/The_usage_of_clock_circuit_in_micro_controller_chip
- https://www.avrfreaks.net/forum/configuring-clock-sources-attiny-avr
- Particularly thorough and applicable to my project (once you have grasp of the idea this should cement it)
There are a few options of clock sources in the ATTiny micro-controller that I am using. The only one I need is the internal 8MHz oscillator. It is not the most accurate of the clock options but will suffice for running the DC motor the way I want.
This clock source is the default clock selection on the ATTiny44. Clock sources can be selected by changing the lower nibble (4 bits) of the CKSEL register. The setting of these four bits required to select the internal 8MHxz clock source is 0010. However, since this clock source is the default option, I don't need to change the CKSEL register.
Another default setting of the ATTiny44 microcontroller is the CLKDIV8 fuse being at 0. For fuses, 0 means 'on' and 1 means 'off'. What this fuse does is make sure that when the ATTiny is started up the lower 4 bits of the CLKPR (clock prescaler register - see data sheet) are set to 0011. As shown on the data sheet, this pattern causes the clock source frequency to be divided by 8 for the use of the timer. This means the timer is running at the 8MHz of the clock source divided by 8 (the prescaler value), i.e. the timer is running at 1MHz.
This is something I do need to change. The pulse width modulation I need to do requires a higher frequency timer. I will set reconfigure the CLKPR pattern to 0000 which corresponds to a prescaler value of 1. Consequentially, the 8MHz frequency of the clock source will be divided by one for the timer, meaning the timer will also run at 8MHz. In order to change the CLKPR register I need to first change its highest bit from its default of 1 to 0. This bit is called CLKPCE (clock prescaler change enable). It does what it says on the tin.
The code to do all that (as per this guide on pin setting) is:
Using #include <avr/io.h> at the top of the program so that I can call the registers by their names as per the data sheet, rather than their actual addresses.
xxxxxxxxxxCLKPR = (1 << CLKPCE);CLKPR = (0 << CLKPS3) | (0 << CLKPS2) | (0 << CLKPS1) | (0 << CLKPS0);
For this first iteration of the embedded program, I will have the motor, when it is running, running at its top speed (dependent on the voltage across it). However, if later I want the option of controlling the speed of the DC motor I will have to implement some pulse width modulation in my code. For now, I'll just turn on the motor with a constant analog HIGH until I want it to stop.
Pulse Width Modulation:
This is essentially rapidly changing the voltage across a motor from full voltage to no voltage. The that at which this is done controls the speed of the motor.
Already cited at the top of this section, but this explains it very well.
To do PWM the modulation needs it to be very fast. I only want the motor to be on or off for 3-5 microseconds each time. The timer in the micro controller need to be running at its full 8MHz.
Setting Clock Frequency
With all the knowledge from the above section,
This is the first iteration of my embedded motor control program to be loaded onto the ATTiny microcontroller.
xxxxxxxxxxint main void() { // Set up clocking (8MHz internal oscillator is default clock source) // Enable change of prescale register CLKPR = (1 << CLKPCE); // Divide clock frequency by 8 is default Prescale Register (CLKPR) setting (need it to be 1) // Set prescale to divide by 1 (Timer running at 8MHz) CLKPR = (0 << CLKPS3) | (0 << CLKPS2) | (0 << CLKPS1) | (0 << CLKPS0); // Set up output pins (all pins input by default) // Clear PA3's output signal value before making it an output pin (don't want signal sent when it is set to output) PORTA &= ~(1 << PA3); // Make PA3 an output DDRA |= (1 << PA3); // Clear PA2 output signal value PORTA &= ~(1 << PA2); // Make PA2 an output DDRA |= (1 << PA2); while(1) { // PB0 turns on PA2 // PB1 turns on PA3 // While PB0 is receiving AND PA3 is off while ( ((PINB & (1 << PINB0)) == (1 << PINB0)) && (PORTA & (1 << PA3) == 0) ) { // Turn on PA2 PORTA |= (1 << PA2); } // Turn off PA2 PORTA &= ~(1 << PA2); // While PB1 is receiving AND PA2 is off while ( ((PINB & (1 << PINB1)) == (1 << PINB1)) && (PORTA & (1 << PA2) == 0) ) { // Turn off PA2 PORTA &= ~(1 << PA2); // Turn on PA3 PORTA |= (1 << PA3); } // Turn off PA3 PORTA &= ~(1 << PA3); }}
I believe that this code should do what I want it to, however, there is quite a bit of operation repletion here. I am going to condense the bitwise operations into macros* at the top of the program.
*A macro is a fragment of code that has been given a name
Makin' Macros
The repetitious bitwise operations are:
Clearing the PORT value of a pin - (making sure it is off)
- A &= ~B
- Example:
xxxxxxxxxx// Turn off PA2PORTA &= ~(1 << PA2);
Setting a pin (bit) to 1
- A |= B
- Example:
xxxxxxxxxx// Turn on PA3PORTA |= (1 << PA3);
Picking pin PA3, PA2, PINB0, PINB1
- 1 << A
- Example:
xxxxxxxxxx1 << PA2;
Macros
For the first:
xxxxxxxxxxI don't want to call is "off" because doing this isn't always turning something off. It is just making a particular bit of a register 0.
For the second:
xxxxxxxxxxThis is used for both setting the data direction of a pin and for setting the output of on output pin to 1
For the third:
xxxxxxxxxxI can't call these pins by their actual names (e.g. PA2) as they are already variables in the avr/io.h library.
I'm also adding functions to make the while loop conditions more readable. They will be at the bottom of the program and their prototypes at the top.
xxxxxxxxxx// Check if input pin receiving high signalint receiving(int pinport, int pin) { boolean = (pinport & pin) == pin ? 1 : 0; return boolean;}// Check if output pin not sending high signalint off(int port, int pin) { boolean = port & pin == 0 ? 1 : 0; return boolean;}Lastly, now that I have internalized how all this works I can condense the comments.
Cleaner Code
xxxxxxxxxx// Pin to 0// Pin to 1int receiving(int pinport, int pin);int off(int port, int pin);int main void() { // Enable change of prescale register and set prescale to divide by 1 (makes timer run at 8MHz) CLKPR = (1 << CLKPCE); CLKPR = (0 << CLKPS3) | (0 << CLKPS2) | (0 << CLKPS1) | (0 << CLKPS0); // Clear PA3 and PA3 output signals then set as output pins clear(PORTA, A3); set(DDRA, A3); clear(PORTA, A2); set(DDRA, A2); while(1) { // PB0 turns on PA2 // PB1 turns on PA3 // While PB0 is receiving AND PA3 is off while (receiving(PINB, B0) && off(PORTA, A3)) { // PA2 on set(PORTA, A2); } // PA2 off clear(PORTA, A2); // While PB1 is receiving AND PA2 is off while (receiving(PINB, B1) && off(PORTA, A2)) { // PA3 on set(PORTA, A3); } // PA3 off clear(PORTA, A3); }}// Check if input pin receiving high signalint receiving(int pinport, int pin) { boolean = (pinport & pin) == pin ? 1 : 0; return boolean;}// Check if output pin not sending high signalint off(int port, int pin) { boolean = port & pin == 0 ? 1 : 0; return boolean;}WAIT!!! For consistency maybe I should make receiving() and off() macros rather than functions. It will also shorten the code while doing the same thing as a function.
Cleanest Code
xxxxxxxxxx// Pin to 0// Pin to 1// Check if input pin receiving high signal// Check if output pin not sending high signalint receiving(int pinport, int pin);int off(int port, int pin);int main void() { // Enable change of prescale register and set prescale to divide by 1 (makes timer run at 8MHz) CLKPR = (1 << CLKPCE); CLKPR = (0 << CLKPS3) | (0 << CLKPS2) | (0 << CLKPS1) | (0 << CLKPS0); // Clear PA2 and PA3 output signals then set as output pins clear(PORTA, A3); set(DDRA, A3); clear(PORTA, A2); set(DDRA, A2); while(1) { // PB0 turns on PA2 // PB1 turns on PA3 // While PB0 is receiving AND PA3 is off while (receiving(PINB, B0) && off(PORTA, A3)) { // PA2 on set(PORTA, A2); } // PA2 off clear(PORTA, A2); // While PB1 is receiving AND PA2 is off while (receiving(PINB, B1) && off(PORTA, A2)) { // PA3 on set(PORTA, A3); } // PA3 off clear(PORTA, A3); }}
Now to add the GPIO controls to the python script that will run on the Pi.
RaspberryPi GPIO with Python
Import the RPi GPIO library.
xxxxxxxxxximport RPi.GPIO as GPIOTurn warnings off. Say you write a program that sets a pin as an input, but sometime after that set there is an error or keyboard interrupt that causes your program to exit. The program will exit, but the pin you set earlier in the program is still set the next time you go to run it. The RPi is configured to issue a warning anytime you try to set a pin that is already set. The best way to get around this is to put all of my code in a try, except, finally sequence. First my program will try to run run the program (setting the pins I tell it to). When it hits an error it will jump to the except block where I can handle the error i.e. run any code I want to be run before the program exits (maybe print an error message). Finally, I can deploy the GPIO.cleanup() function that will return all the pins to their default setting (input).
That is the best way to deal with warnings. However for now I will just tell my program to ignore "pin already set" warnings and go ahead and set the pin.
xxxxxxxxxxGPIO.setwarnings(False)Choose which pin numbering system to use.
There are two options:
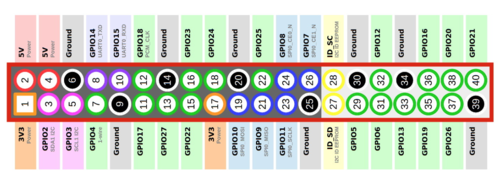
- BCM - the exterior labels pictured above. These refer to the pins on the Broadcom microprocessor to which these pins are actually connected.
- PIN number - the interior number on each pin
I am going to use BCM
xxxxxxxxxxGPIO.setmode(GPIO.BCM)Now to set two pins as output pins (one for each motor direction). The green labelled pins can be used as general GPIO pins. I will use GPIO 23 and GPIO 24.
xxxxxxxxxxGPIO.setmode(23, GPIO.OUT)GPIO.setmode(24, GPIO.OUT)Next I will simply turn on and off the output of these pins in accordance with the filling and clearing of the blue rectangle around faces the python program currently draws. When the rectangle is filled (face off center), the motor should turn in the direction in which the rectangle is offset from the center line. When the rectangle is empty the motor should be off.
I will need to write some logic to calculate the side of the line the face is on.
Current block:
xxxxxxxxxx# If face NOT in center, fill in rectangleif int(round(x + w/2)) > midline + 20 or int(round(x + w/2)) < midline - 20: cv2.rectangle(frame, (x, y), (x+w, y+h), (255, 0, 0), -1)New block:
xxxxxxxxxx# While face to camera's left while int(round(x + w/2)) > midline + 20: # Fill in cv2.rectangle(frame, (x, y), (x+w, y+h), (255, 0, 0), -1) if ENVIRONMENT != 'dev': # Turn on left turn pin GPIO.output(23, True) if ENVIRONMENT != 'dev': # Turn off left turn pin GPIO.output(23, False) # While face to camera's right while int(round(x + w/2)) < midline - 20: # Fill in cv2.rectangle(frame, (x, y), (x+w, y+h), (255, 0, 0), -1) if ENVIRONMENT != 'dev': # Turn on right turn pin GPIO.output(24, True) if ENVIRONMENT != 'dev': # Turn off right turn pin GPIO.output(24, False)There's got to be a better way for executing pi only code than check the environment every time. Until I find it, that is how it will stay.
TODO
TODO
New version:
xxxxxxxxxximport cv2import osimport RPi.GPIO as GPIOimport logginglogging.basicConfig(level=logging.DEBUG)# Whether or not to open GUIENVIRONMENT = os.getenv('ENVIRONMENT', 'dev')# If running on RPiif ENVIRONMENT != 'dev': # GPIO config GPIO.setwarnings(False) GPIO.setmode(GPIO.BCM) GPIO.setmode(23, GPIO.OUT) GPIO.setmode(24, GPIO.OUT)# Load the cascadeface_cascade = cv2.CascadeClassifier('./haarcascade_frontalface_default.xml')# Read in from default devicevideo = cv2.VideoCapture(0)# Get frame height and width then calculate midlineframe_width = video.get(cv2.CAP_PROP_FRAME_WIDTH)frame_height = video.get(cv2.CAP_PROP_FRAME_HEIGHT)midline = int(round(frame_width / 2))# Make sure video capture is openif (not video.isOpened()): video.open()# Loop through each framewhile (True): # Read the next frame success, frame = video.read(0) # Draw vertical centre line cv2.line(frame, (midline, 0), (midline, int(frame_height)), (0,255,0), 5) # Find faces coordinates = face_cascade.detectMultiScale(frame, 1.1, 4) logging.debug('{} faces detected'.format(len(coordinates))) # If we have any faces, get the nearest one (by height) if len(coordinates) > 0: [x, y, w, h] = max(coordinates, key=lambda x: x[2]) # Draw rectangle around nearest face cv2.rectangle(frame, (x, y), (x+w, y+h), (255, 0, 0), 10) # If face NOT in center, fill in rectangle #if int(round(x + w/2)) > midline + 20 or int(round(x + w/2)) < midline - 20: #cv2.rectangle(frame, (x, y), (x+w, y+h), (255, 0, 0), -1) # While face to camera's left while int(round(x + w/2)) > midline + 20: # Fill in cv2.rectangle(frame, (x, y), (x+w, y+h), (255, 0, 0), -1) if ENVIRONMENT != 'dev': # Turn on left turn pin GPIO.output(23, True) if ENVIRONMENT != 'dev': # Turn off left turn pin GPIO.output(23, False) # While face to camera's right while int(round(x + w/2)) < midline - 20: # Fill in cv2.rectangle(frame, (x, y), (x+w, y+h), (255, 0, 0), -1) if ENVIRONMENT != 'dev': # Turn on right turn pin GPIO.output(24, True) if ENVIRONMENT != 'dev': # Turn off right turn pin GPIO.output(24, False) # Show output only if running locally (will throw error in docker) if ENVIRONMENT == 'dev': cv2.imshow('output', frame) # Show frame for 30 ms, break if 'Ctrl + D' pressed pressed = cv2.waitKey(29) & 255 if pressed == 4: break# Close video capture, clear pins, exitvideo.release()if ENVIRONMENT != 'dev': GPIO.cleanup()exit()The program should be good for testing now. There are a few potential issues I am foreseeing.
- I read in the pipy docs regarding the
RPi.GPIOpackage:
xxxxxxxxxxNote that this module is unsuitable for real-time or timing critical applications. This is because you can not predict when Python will be busy garbage collecting. It also runs under the Linux kernel which is not suitable for real time applications - it is multitasking O/S and another process may be given priority over the CPU, causing jitter in your program. If you are after true real-time performance and predictability, buy yourself an Arduino http://www.arduino.cc !
This could be an issue for my program if there is a serious delay between a face appearing in the frame and the motor turning.
Another issue is that I don't know exactly how to physically connect the RPi to the DC Motor board. I don't know what voltage the signals should be at, if they or analog or digital or how to power both boards.
- Hopefully it is not that complicated.