Week02 - Computer-Controlled Cutting
This week's exciting and sleep depriving adventure matches our intrepid hero against the cunning danger of the laser cutter and his slightly less nefarious sidekick, the vinyl cutter.
The task at hand is to engineer, plot, export, and fabricate a "press-fit" construction kit out of ECT (Edge CRUST Test) 44. See I told you it was dangerous. ECT is about .15" thick but to get a good press fit requires tolerances of ~.005 and some nifty chamfering. I learned a great term called "parametric design," which I had always known as the difference between a "copy" and a "clone" or "instance." A clone or instance remains linked with the parent that spawned it, so changes made to the parent are globally applied to all the clones. This comes in handy when you want to change your design because you've made the slots just a little too big and the pieces a little too small. Ask me how I know! Ok, please don't.
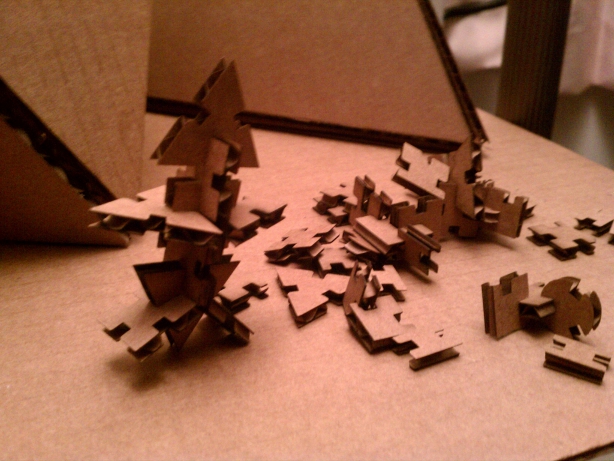
As you can see below, the kit inspired by Neil's "Gik" works well. I made a few more of the pointy pieces than was strictly necessary because I enjoy the angles at which I can spin things off.
The task at hand is to engineer, plot, export, and fabricate a "press-fit" construction kit out of ECT (Edge CRUST Test) 44. See I told you it was dangerous. ECT is about .15" thick but to get a good press fit requires tolerances of ~.005 and some nifty chamfering. I learned a great term called "parametric design," which I had always known as the difference between a "copy" and a "clone" or "instance." A clone or instance remains linked with the parent that spawned it, so changes made to the parent are globally applied to all the clones. This comes in handy when you want to change your design because you've made the slots just a little too big and the pieces a little too small. Ask me how I know! Ok, please don't.
As you can see below, the kit inspired by Neil's "Gik" works well. I made a few more of the pointy pieces than was strictly necessary because I enjoy the angles at which I can spin things off.
Having achieved the basic assignment without bodily damage or burning down the shop, an occurrence which seems more common that anyone would like based on the number of times we were told to NEVER leave the laser unattended and shown pictures of the result, I decided now was the opportunity to build something I had always wanted to make my entire life.
THE PLATONIC SOLIDS!!! (echo echo echo)...
Theplatonic solids are a great set of shapes for when you need an object to build fast. Also, and resemblance to a set of certain dice for a certain pen and paper roll playing game I may or may not have played in my youth (or last week) is completely coincidental. But seeing as the platonic solids don't include a 10 sided, I thought I'd do one of those just in the name of science. In fact I did two so I could roll percentiles.
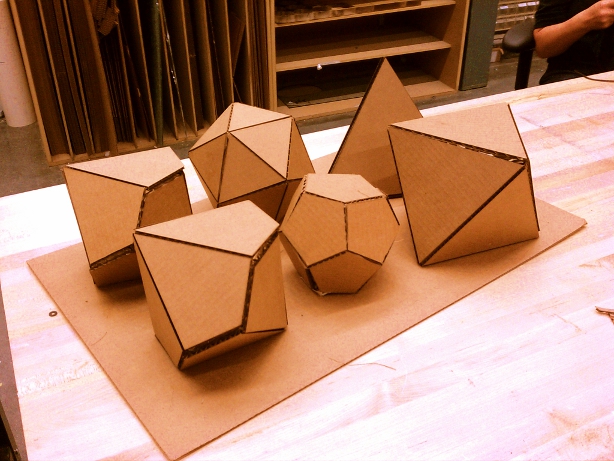
The d6 was made the night before and hence was absent from this class picture. The tricky thing about this task is that construction of the shapes involves both cutting AND scoring. I had tested out scoring on the vinyl cutter, assuming I may have to make these out of thick poster board since getting any time on the laser cutter seemed like it was going to be impossible. It seemed promising and I resolved to make them on the laser cutter despite the chance of getting near it being small. I camped out. I bided my time. I ambushed a few grads with the old, "Hey! Is that Noam Chomsky!?" and quickly stole into the shop. The laser cutter was all mine.
The first few attempts we dismal failures. There didn't seem to be anyway to score and cut with a single image, and different OS's seemed to prefer different file formatted, each preferring the other at the time I needed to do them. I developed a technique of using layers, similar to silk-screening, to do multiple cuts at different powers and speeds, and while slow and cantankerous, worked well. The d6 was born and happy, just waiting to roll 1d6 damage for an arrow. Neil then reminded me that the fab modules had a 3D function as part of the path creator for imported .png, so I collapsed my layers into a single file, with 128 gray as the "score" lines and 255 as the "cut" lines, 0 of course being for no action. Thank you, Mayans.
I struggled at first but quickly developed a hack, which became a workaround, which became a solid means of production until I figured out what I was doing. I would create a path at one threshold setting that included all the lines and run that at a power and speed setting which would score all the lines, including lines I meant to cut later anyway. Then I'd create a new path with a tighter threshold which gave me just the outline of the shape which I could run at 80-90% power and free the shape from the surrounding material. Occasionally I would underestimate the scoring speed and power, but this was easily remedied by running the file again with the same settings. There are some strange results in the path finding algorithm that would occasionally lead to a score line being gone over enough times to cut it, but I compensated for this by using less power after watching the "dry run" with the lid up. If I saw this happening in the dry run, I would reduce the power so I could safely score the piece.
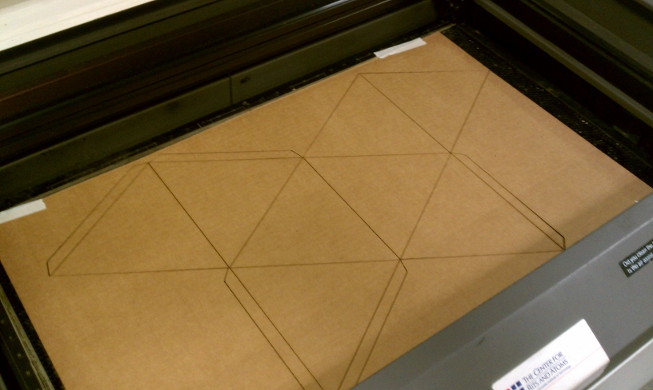
Finally I sat and really thought about what the 3D settings in the fab module were doing, and by the last piece had found the settings that scored where I needed to be scored and cut where I needed to cut, all in one pass, all from one file. You can see a nice clean example below of the d8. The waste material lifts away cleanly and the scores are them bent right into place.
The first few attempts we dismal failures. There didn't seem to be anyway to score and cut with a single image, and different OS's seemed to prefer different file formatted, each preferring the other at the time I needed to do them. I developed a technique of using layers, similar to silk-screening, to do multiple cuts at different powers and speeds, and while slow and cantankerous, worked well. The d6 was born and happy, just waiting to roll 1d6 damage for an arrow. Neil then reminded me that the fab modules had a 3D function as part of the path creator for imported .png, so I collapsed my layers into a single file, with 128 gray as the "score" lines and 255 as the "cut" lines, 0 of course being for no action. Thank you, Mayans.
I struggled at first but quickly developed a hack, which became a workaround, which became a solid means of production until I figured out what I was doing. I would create a path at one threshold setting that included all the lines and run that at a power and speed setting which would score all the lines, including lines I meant to cut later anyway. Then I'd create a new path with a tighter threshold which gave me just the outline of the shape which I could run at 80-90% power and free the shape from the surrounding material. Occasionally I would underestimate the scoring speed and power, but this was easily remedied by running the file again with the same settings. There are some strange results in the path finding algorithm that would occasionally lead to a score line being gone over enough times to cut it, but I compensated for this by using less power after watching the "dry run" with the lid up. If I saw this happening in the dry run, I would reduce the power so I could safely score the piece.
Finally I sat and really thought about what the 3D settings in the fab module were doing, and by the last piece had found the settings that scored where I needed to be scored and cut where I needed to cut, all in one pass, all from one file. You can see a nice clean example below of the d8. The waste material lifts away cleanly and the scores are them bent right into place.
I am really quite pleased with the results and realized these could be made using the press-fit technology of the original assignment, as all the angles are known or easily computed. I'm not quite sure how they'd survive being thrown though. On the next pass through, in my copious spare time leading up to Sponsor Week, I'll raster cut the numbers into the faces as well, which was something I wanted to do, but was lower on the priority list. As I had plenty of practice on the vinyl cutter while waiting for the laser, I'll cut some numbers out and stick them on, as well as filling the void of each die with 3M rigid setting insulation foam. Cheap and sturdy. Just like me.
Until next time then, Space Cadets! NovySan, OUT!
Until next time then, Space Cadets! NovySan, OUT!