how to make (almost) anything
Molding & Casting: Scarpa Detail
Week 8 Tools/Materials:
Rhino
Mastercam
Proto Trak SMX
Machinable wax
Oomoo 25
Hydro-stone
In an attempt to simplify things this week, I decided instead of designing something myself from scratch, I would take inspiration from one Architecture's greatest, Carlo Scarpa, and cast a mini fragment (with some creative license taken) of the concrete details at Brion-Vega Cemetery. In the end, I probably spent just as much time obsessing over which part of the project to use as I would have spent designing something new. Oh well...

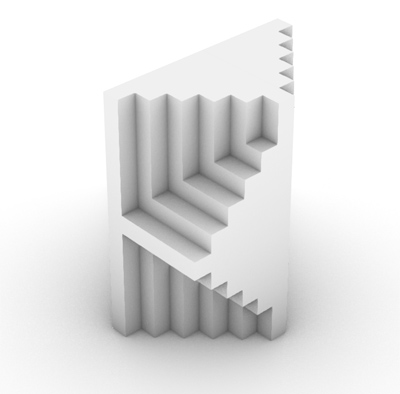
I've done a fair bit of casting before, but always directly from one mold to the finished product. I actually found it oddly difficult design the mold correctly at first, because as a habit, my mind kept reverting to think in terms of creating the negative of the final form. But since we were doing a two-mold process--milled wax to cast oomoo, then to a final hydro-stone cast--the design of the first wax mold is just the thing itself. Finally flipped the switch in my brain.
 Final wax mold in Rhino
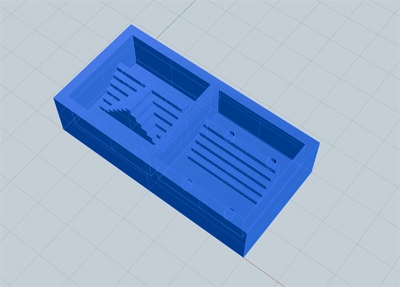
The Great Mill Saga
I won't waste too much realestate on the EPIC drama that was my effort to get from having a finished Rhino file to actually having the thing milled, but I will say it involved hours of Mastercam help/3 Mastercam versions of my model, two mills, a last minute change of plans due to a broken bit, and strings of g-code everywhere. Thanks to Molly, and especially Jung, for bearing the brunt of this on the TA front.
Take aways:
-Creating tool paths is an art and not a science
-Mastercam is impenetrable to even the not-so-casual observer
-There is a huge difference in the set up and opperation of various mills, including how they interface with Mastercam and the resulting g-code they need. Don't assume you can show up with g-code for one mill and use it on the other!
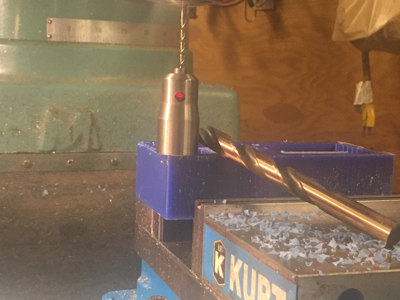
I ended up milling on the Proto Trak SMX in the Architecture N51 shop, which has a much more involved set up than the Intelletec that I was planning on using, and whose use we were walked through during orientation this week. There were a lot of brand new things to try to understand quickly, and I'm not sure how much I could do again on my own, but it was good to come away with some familiarity on another machine. My favorite 'new thing' is the way you find the X/Y/Z zero settings.
Setting zero, don't blink
 Setting Z
1/4" Roughing it
1/8" Finishing pass
But wait--this week wouldn't be complete without having to push the emergency stop button! On one of the last areas of the finishing passes, the 1/8" bit got stuck and lifted the mold partially out of the clamps as the mill arm raised. Luckily, I saw it and stopped it quickly before the mill continued on to the next path. There was a slight gouge in the bottom ground of the mold and along the outer wall, but miraculously nothing on the area to be cast. A new tool path needed to be created to finish off the last bit of milling, but it finally completed.
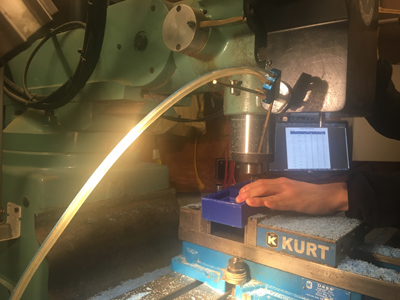
Carefully removing the stuck bit from the wax
Casting Oomoo
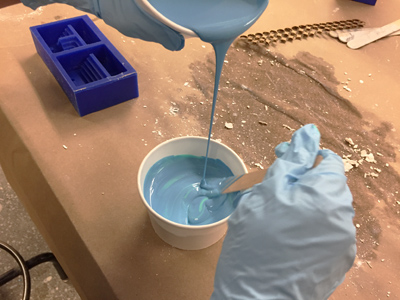
The Oommoo mix comes in two parts, which are mixed 1:1. Pouring the mixture in a thin stream from a little bit of a distance helped rid it of a lot of the bubbles created during mixing, as did tapping the fully-filled mold against the table surface for a few minutes to allow trapped air to rise to the surface. Releasing the mold took a little time as I needed to slowly work the edges of the cured Oomoo up and out of the wax. The results were good--the Oomoo cast was very even with little to no visible bubbles in the final mold. The area on the wax mold which was gouged during milling made an extra and unwanted feature along the registration surface, but a quick snip with scissors helped smooth that out well enough to close the mold halves together tightly.
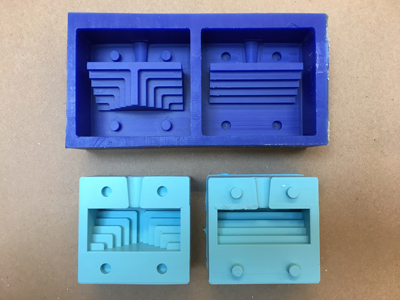
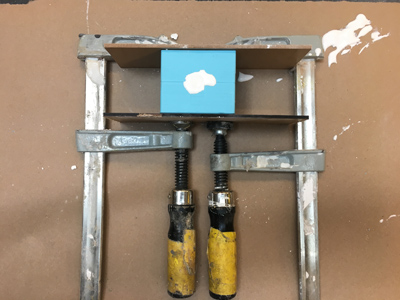
The next step was to join the two halves of the mold via the regisration marks, mix and then pour the hydro-stone into the full/closed mold. The hydro-stone is mixed 32/100 parts water to plaster, which I measured using a small scale. The resulting mix was similar to a very liquid milkshake, and was easy to pour into the mold. I was a little concerned during this step, because I had forgotten to incorporate air vents into the design of the molds. Gently squeezing the filled mold brought a few air bubbles to the top of the pour spout and made room for a lot more hydro-stone in the mold, but there was no way to tell at this point, if the mold had filled completely; time will tell.
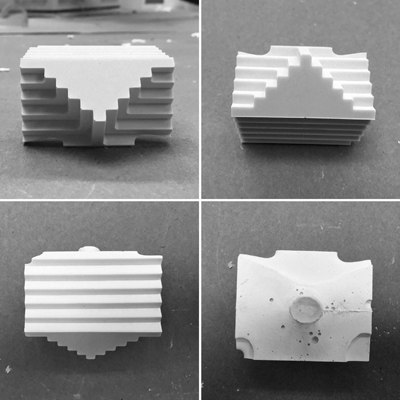
The quality of the surface, and accuracy of the final cast was really impressive. Unfortunately, there were still areas at the top of the mold that had not filled fully with hydro-stone during the pour. There may be the possiblity of cutting vents into the Oomoo mold to solve this issue.