
Molding and Casting
"Casting is a manufacturing process in which a liquid material is usually poured into a mold, which contains a hollow cavity of the desired shape, and then allowed to solidify." -Wikipedia
Group Assignment
1. With my group I learned how to safely cast and mold.
When dealing with potentially toxic substances, it is important to review their safety data sheets. This week we were to create a silicone mold and cast material into it, so I reviewed the SDS documents I found online for the substances (Fig. 1A).

Fig. 1A. Reading the SDS for "OOMOO" silicone.
Under the guidance of Jen O'Brien, we learned how to mix and then pour the silicone into a premade mold (Fig. 1B). A tip she gave is was to ensure complete mixing though a shearing, not scooping, motion before pouring in a slowed and controlled manner.
Fig. 1B. Mixing the silicone.
To prepare for the individual assignment, Jen told us to send her a CAD file of our mold design and she would assess it to see if it would be feasible to make.
Individual Assignment
2. I designed a mold and casted functional LEGO bricks.
Wanting to make something fun this week, and inspired by a comment Neil made during class about the manufacturing process of LEGO bricks, I took it upon myself to design a mold to cast the common 2x4 LEGO brick. I found the dimensions of the brick online so I could design the brick to specification and have it fit with other LEGO bricks I had on hand (Fig. 2A).

Fig. 2A. Dimensions of a 2x4 LEGO brick (www.bartneck.de).
Jen provided us with a template of the machinable wax that would serve as the positive mold to be used to create a negative mold out of silicone (Fig. 2B). This CAD file included a the design split into two parts in the machinable wax, a representation of the maximum volume available to design a part, the tool part that would be used to mill the wax, the registration features that hold the two halves of the mold together, and the inlet for pouring the casting material into the mold.

Fig. 2B. Template for creating a mold of a part.
Despite having the template, I designed my positive mold from scratch, as I wanted to have the two halves of the mold fit together with one inside of the other instead of connected through registration features (Fig. 2C). This would allow for my LEGO brick to be created without any parting line in the brick. Furthermore, my design would make the inlet for pouring the casting material to instead be an outlet for excess casting material to exit the mold after the two halves of the mold are fit together.
Fig. 2C. Timelapse of designing my LEGO brick mold.
I sent my CAD file to Jen, who ran it through the toolpath simulation program and determined it would be able to be machined in the shop (Fig. 2D-2E). This was promising, but I was still potentially concerned as I had a lot of sharp edges and relatively small features that could be an issue for the machine to mill.
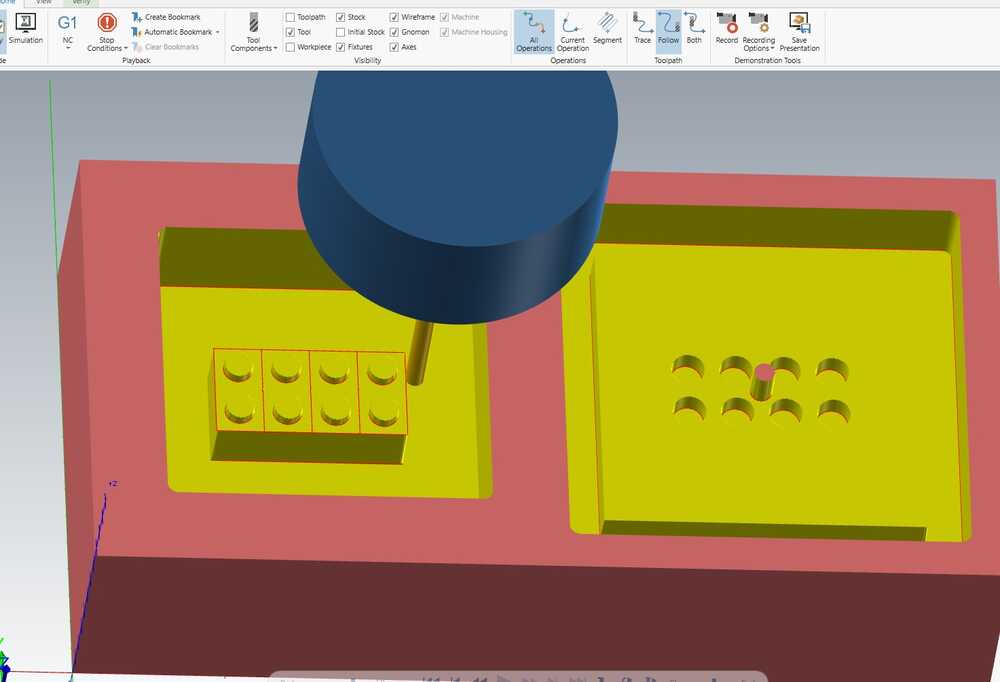
Fig. 2D. Toolpath simulation for milling.

Fig. 2E. Program for creating toolpath simulation.
When we were ready to machine the castable wax, we secured it to the board and leveled the machine with the 1/4" tool for a broad sweep to remove a majority of the material (Fig. 2F). Starting the program, the machine produced a lot of wax filings that required vacuuming to reveal the result (Fig. 2G).
Fig. 2F. Milling the castable wax.

Fig. 2G. Excess wax produced during milling.
To mill the finer features, we swapped the 1/4" tool to a 1/8" tool, in order to mill the finer features of the positive mold design (Fig. 2H). This was the part I was wary about, as although I designed for the smallest feature to be larger than the diameter of the tool, there would still be a chance of machine error in not producing the desired result. Fortunately, this was not the case! The milled part turned out great, and we removed it from the board by scraping off the hot glue securing it down (Fig. 2I).

Fig. 2H. Changing to a 1/8" milling tool.

Fig. 2I. Removing the final positive mold from the board.
I prepared all of the materials needed for creating the negative mold with my positive mold (Fig. 2J). I poured the two components of the silicone into separate cups, ensuring equal volumes (Fig. 2K). I learned when reading the instructions that these components have different densities, so it is not possible to just measure out equal masses with a scale.

Fig. 2J. Materials for making a silicone mold.

Fig. 2K. Two components of OOMOO poured out and ready for mixing.
After mixing the components just like in Fig. 1B, I carefully poured the silicone mixture into the positive mold (Fig. 2L). I let this set for 75 minutes as recommended in the instructions.
Fig. 2L. Pouring silicone into the positive mold.
While the silicone was almost finished setting, I acquired the materials for the next step: drystone casting media and water (Fig. 2M). The instructions recommend 100 lbs. of drystone to 20 lbs. of water, so I approximated this ratio by weight for the amount that I needed. I then stirred them together, creating a slurry that could be poured into the silicone mold after it finished setting (Fig. 2N).
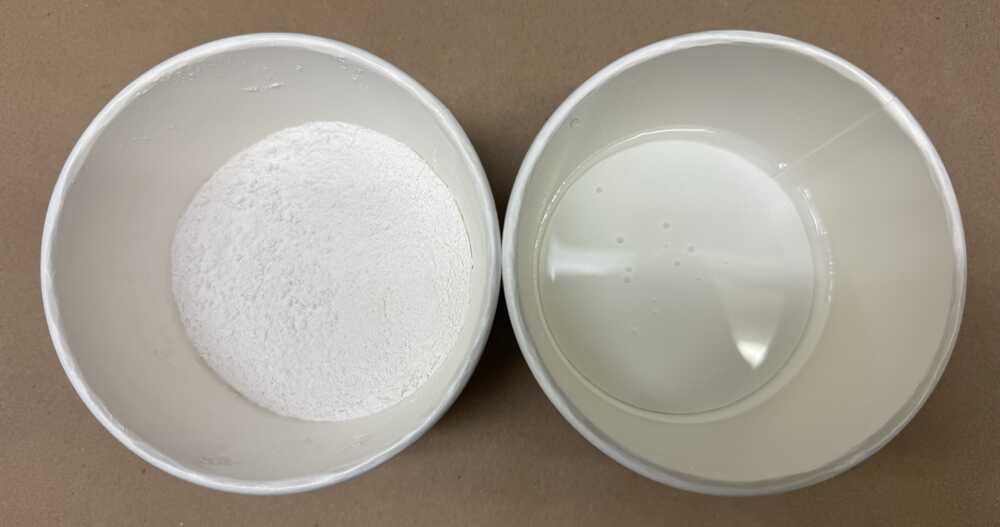
Fig. 2M. Two components for casting poured out and ready for mixing.
Fig. 2N. Mixing the drystone and water to create the material for casting.
I removed the two halves of the negative mold from the positive mold. I noticed the positive studs in the negative mold (that would create the negative studes in the casted brick) did not form properly. This was likely due to air bubble formation due to pouring the silicone mixture into the positive mold too quickly. While this was unfortunate, the good thing is that I can easily make another negative mold given that my positive mold is intact. I poured the casting material into the negative mold carefully and secured both halves together, noting the expulsion of excess material through the opening, just as I had envisioned in the design (Fig. 2O).
Fig. 2O. Pouring the casting material into the negative mold.
After approximately 30 minutes, I opened the negative mold to reveal the casted piece inside (Fig. 2P). Having to bend the silicone slightly to ease the piece out, I removed the brick and inspected it (Fig. 2Q). Despite a few imperfections, it looked pretty good!
Fig. 2P. Opening the negative mold.
Fig. 2Q. Removing the casted brick from the negative mold.
I admired the work of the long process required to create a single brick (Fig. 2R). I could see how this process could be used to rapidly create parts in a much larger production scale, such as in the LEGO factory.

Fig. 2R. Positive mold to make the negative mold to make the casted brick.
Wanting to make additional use of the molds I created, I made another brick so naturally I could test how well they connect to each other (Fig. 2S)!

Fig. 2S. Connected LEGO bricks.
Despite some bubbles that had formed in the studs of the bricks, they were still able to connect to each other. Of course, real LEGO bricks have much tighter tolerances due to a thoroughly optimized manufacturing process, so the functionality of these bricks pale in comparison to the real ones. However, I still met the goal I set out do to at the beginning of the week: to make something fun!