


Press+Fit_files/shapeimage_5_link_0.png)


Here’s what happened ...
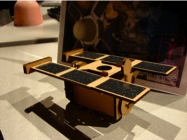
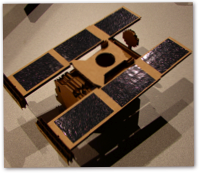
I built a cardboard model of the NASA Stardust spacecraft which launched in 1999 and successfully returned samples to Earth in January 2006. I took information about components and dimensions from the Stardust site and constructed a press-fit 1/26 scale (approximately) model in cardboard. It's close to scientifically accurate, though I had to eliminate the communications dish and simplify the design of the re-entry capsule because cylinders and dishes are very hard to make with cardboard. At the suggestion of TA Amon, I attempted to migrate the design to acrylic with partial success ... the result doesn't stay in one piece for very long. As Amon pointed out, my acrylic effort was mainly to discover that substantial modifications do need to be made to account for the different material properties.
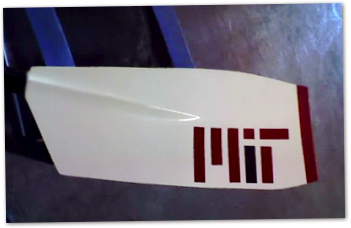
I used the vinyl cutter to add solar panels to my cardboard Stardust. I also undertook a project to create vinyl decals featuring the MIT block logo for two of my crew team's recently-repainted oars (approved by TA Amy). Photos above.
Tutorial Updates
I'm the guru for week 2, so here are a few updates and corrections to the existing tutorials, lasercutter and vinyl cutter. I realise that they should eventually go elsewhere, but as of 2nd October I don't have access instructions/privileges for the tutorials area.
Lasercutter Tutorial Update
Most people like using software tools they are already familiar with. This is definitely true for graphics design programs. Cam.py will accept SVG files as input for the lasercutter. Unfortunately as of October 2006 not all SVG files are compatible with cam.py. If you can't get cam.py to open your SVG but you can export an EPS file from your preferred graphics software, try the following procedure:
1) Open CorelDraw
2) Choose "open" from file menu, choose your .eps file, accept the defaults that show in the following window (to do with Virtual Memory size, etc.)
3) If there is a grey background to your image, delete it
4) Select all, choose Arrange>Order>Reverse. This ensures that inner cutouts will be lasered before outlines, making for more accurate designs.
5) Select all the lines and set them to hairline, colour black (assuming you will want all your lines cut with the same power). This can be done from the side toolbar on the left of the screen.
5a) Select all the objects and ensure fill is clear. Again, use the side toolbar.
6) Choose page size LC (top left) - LC stands for lasercutter.
7) Select File>Print Preview to move your cutout to the correct position.
8) Print to the lasercutter, making sure to choose Properties>Set in the print dialogue box beforehand. For cardboard, choose black ink to mean HIGH gas, 60% power, 5% speed, then click SET. It will not register anything if you do not click set.
Some advice:
Hitting the "pause" button on the lasercutter will often not have an immediate effect. Often the cutter will continue for a few seconds afterwards. If you need to make the laser stop instantaneously, open the cover. If you're concerned about fumes, just open the cover slightly before reclosing.
Vinyl Cutter Tutorial Update
1) I don't think the vinyl cutter does rotate an image from cam.py before printing. The vinyl cutter should cut in the same orientation as cam.py displays on the computer screen.
2) The lever for loading material is located at the rear left of the machine, not rear right as stated in the current tutorial.
3) When you put your piece under the rollers, recognise that the location under the blade will be the origin, equivalent to the lower left corner of the cam.py viewing zone. In other words, make sure your piece of vinyl sticks out of the back of the machine sufficiently far to accommodate the y-axis height of your design.
4) The test button on the vinyl cutter is incredibly useful.
5) Recognise that different types of vinyl will cut more/less readily. Force settings do need to be adjusted. I could never get the new holographic stock to peel off neatly.