Final Project: The DishPenser
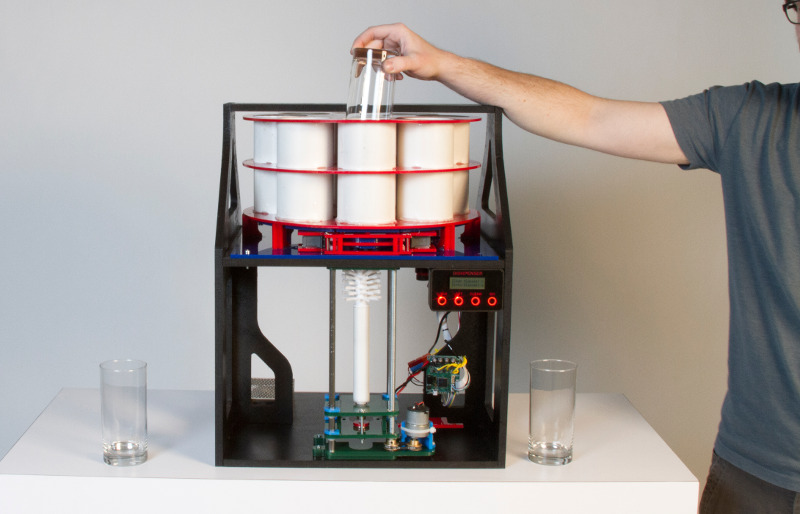
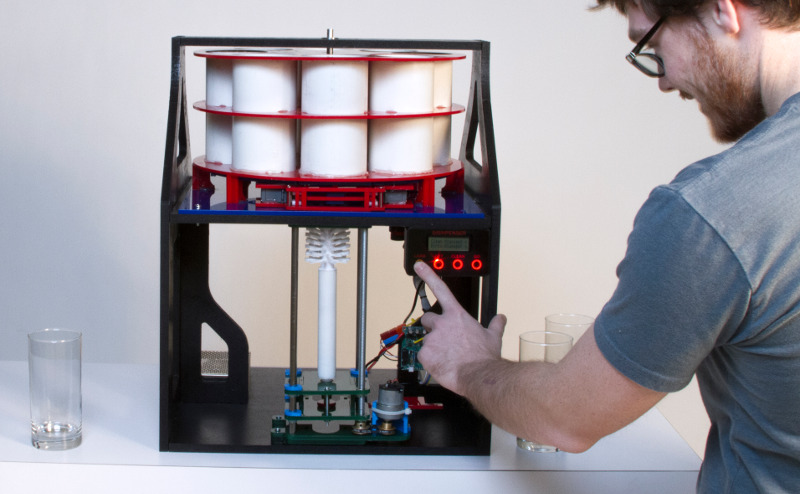
The DishPenser is the world’s first integrated dishwasher and cabinet. The device stores and clean your dishes. It saves you money, time and energy.
No need to pre clean dishes.
No need to empty the dishwasher and place the dishes in cabinets.
Never run out of clean dishes.
No more dirty dishes soaking in the sink.
Overview
What does it do? It stores and clean dishes (only glasses for this prototype)
Who's done what beforehand? It’s a direct competitor to common dishwasher. As far as I know, nothing similar was attempted in the past.
What did you design? Everything except stock components.
What materials and components were used? See below for a description of the subsystems and a list of the processed/machines that I used.
Where did they come from? Fab supply, hardware store, Digikey, Biomechatronics leftovers
How much did they cost? Other that electronic components, I bought some MDF (30$), paint (10$), pumps and heating elements (100$) and miscellaneous hardware (20$)
What parts and systems were made? See details below.
What processes were used? See details below.
What questions were answered? Is it possible to imagine, design and build an alternative to dishwashers? Although this is only a rough first prototype, the answer is
clearly yes. Now remains one question: is there a wide interest for such a product? If you read this page and think there is, contact me.
How was it evaluated? From the technical standpoint the goal was to get used to manipulating complex objects and trying to integrate the
whole system in a small appliance. I also tried to build in a decent user interface. Now that this project will be presented to the public,
we will see what are the reactions.
What are the implications? It has the potential to shock the white goods industry. Adding a Twitter account to a conventional dishwasher isn’t what I call
good innovation. The DishPenser is.
Technical details: sub systems
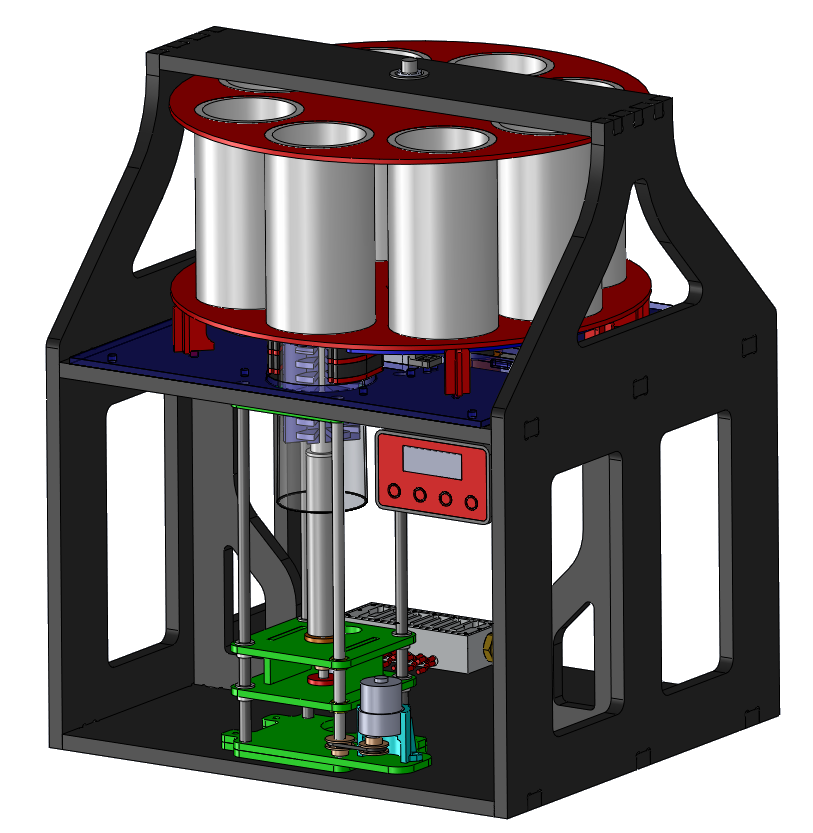
[Round chamber]
Goal: to move and store glasses
Fabrication: PVC pipes (cut on the horizontal bandsaw, faced on the lathe), acrylic discs (laser cut), aluminum shaft (lathe), gear (salvaged), BLDC motor (note: the only justification of a BLDC instead of a stepper is that I’m combining my research projects with this design). Everything is assembled with a combination of press-fitting and epoxy glue.
[Brushing mechanism]
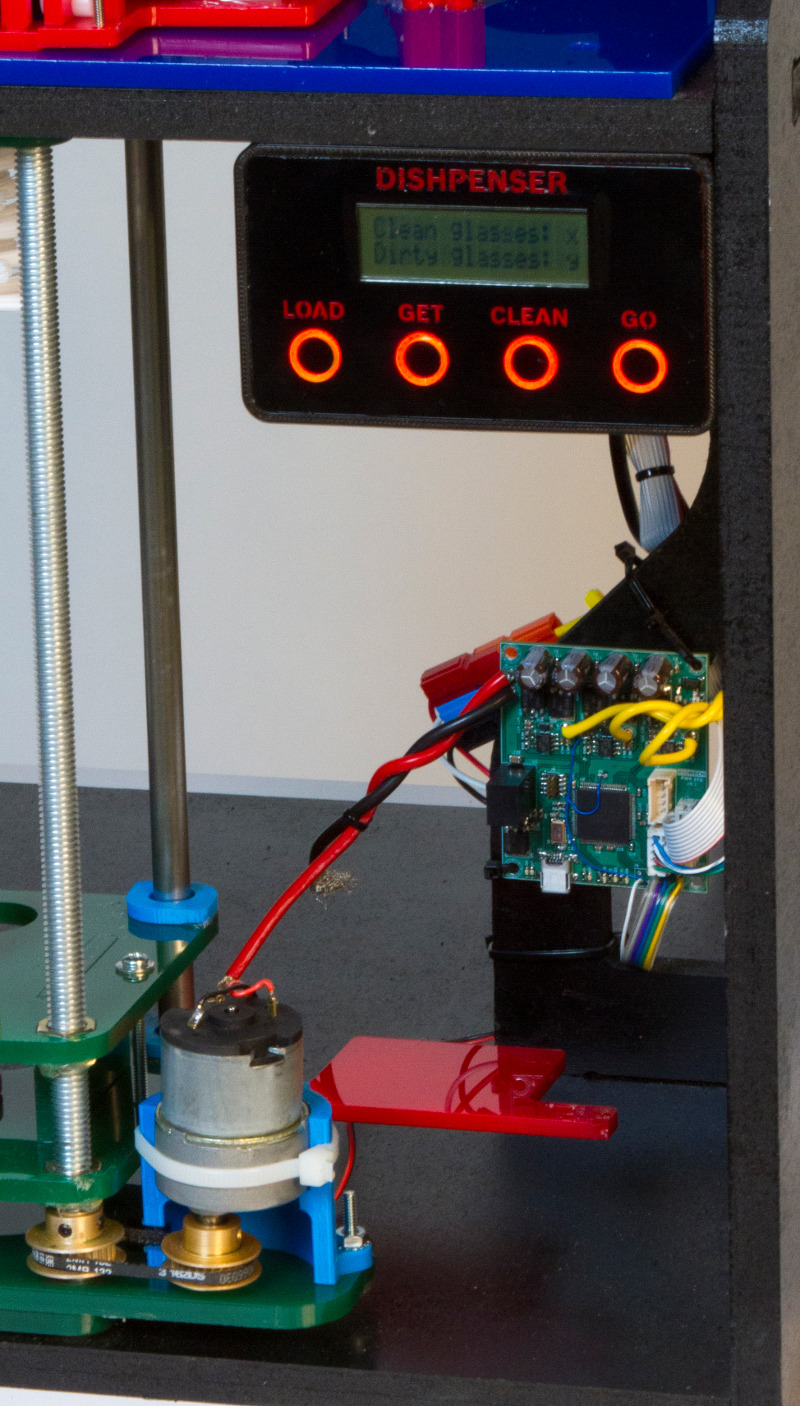
Goal: move a brush up and down to clean the glasses. Also used as the input and output mechanism.
Fabrication: Steel rods, threaded rod and nuts, plastic bushings, acrylic plates (laser cut), bushing holders (3D printed), miscellaneous holders (3D printed), 2x DC motors with pulleys and belts (fab inventory + salvaged), ultrasonic distance sensor (from the Object Based Media group)
[Frame]
Goal: to hold everything together
Fabrication: painted MDF, cut on the ShopBot.
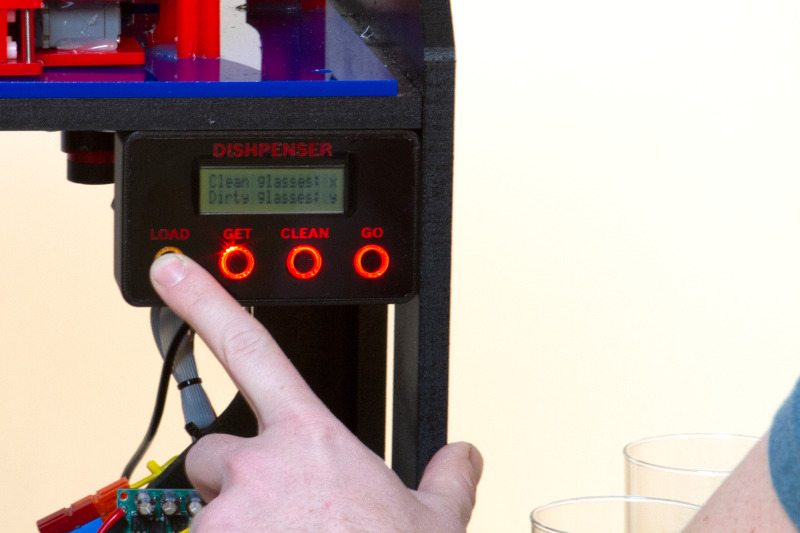
[User interface]
Goal: To allow the user to interact with the appliance.
Fabrication: capacitive touch sensors behind laser cut acrylic. A clear ring was added around every button with a LED behind as a way to provide feedback. A vinyl sticker covers the red plate and provides information about the functions.
[Gripper/Retainer]
Goal: dual function: it allows or prevents the glasses from going in the cleaning hole and it can clamp them while they are brushed.
Fabrication: laser cut acrylic, HDPE rods, servo motors with laser cut gear and racks, hot glue and screws
To get more details, please refer to the design and build logs.
Processes and machines
And now if we look at the weekly topics, how many of those skills were used to create the DishPenser?
Computer-aided design: all the electronics was designed in Altium, in full 3D. All the mechanics were designed in Solidworks.
Computer-controlled cutting: dozens of acrylic parts were laser cut. The user interface sticker was wade on the vinyl cutter.
Electronics production: 5 DIY PCBs, all done with toner transfer and etching. 1 professional 4-layer PCB (made by Advanced Circuits)
3D printing and scanning: multiple 3D printed parts. Most of them were made on the Makerbot Replicator 2. Few parts were made on the Dimension (not for structural reasons, just because the Makerbot was busy). No 3D scanning was used.
Computer-controlled machining: the MDF frame was milled on the big ShopBot.
Molding and casting: not used for this project as all the parts are unique and different. Could be used in the future to cast parts that are currently 3D printed.
Embedded programming: multiple PSoC 4 (ARM Cortex-M0) and 5 (ARM Cortex-M3) controllers are used in the DishPenser. They are programmed in C and with Cypress GUI tools.
Composites: I designed a burlap shell to go around an earlier version of the frame but I didn’t not end-up making it.
Input devices: the user interface has 4 capacitive buttons. The BLDC driver has a quadrature encoder. The brushing mechanism uses an ultrasonic range finder to know its position.
Output devices: a Maxon brushless DC makes the round chamber spin. Two Jameco DC gear motors are used by the brushing mechanism. A hobby servomotor actuates the parallel gripper. An LCD and some LEDs are used for the user interface.
Networking and communications: all the boards are networked with RS-485.
Interface and application programming: a simple Matlab script was used while debugging the system (mostly to print serial data). The final product is completely stand alone and does not require a PC.
Mechanical design: the round chamber is actuated by a BLDC motor. A reduction box was designed with 2 pulleys (1:4) and two gears (1:4) for a final ratio of 1:16. Many small servo actuated mechanisms were designed; only the parallel gripper is being used. The brushing mechanism uses a linear stage with a rotating brush. All the shafts were made on the lathe.
Acknowledgements
Here’s a list of people who helped me at any stage of the project and that I would like to thank (alphabetical order).
- Matt Carney
- Ermal Dreshaj and his OBM colleagues
- Felix Heibeck
- Arthur Petron
- Sam Spaulding
- Basheer Tome
- And finally, the guy who invented the concept of iterative design – it sounds much better than trial and error
For all the details
- Week 1: Final Project Ideas - Introducing the DishPenser
- Week 6: First mention of the BLDC driver
- Week 7: Final Project Update
- Week 8: Programming the BLDC driver (part 1) and Final Project Update (dishwasher video, rough sketches, heater CAD)
- Week 11: BLDC PI position controller and Final Project Update (CAD)
- Week 12: Linking boards with RS-485 and Final Project Update (updated CAD for 8 glasses, glass lifting mechanism)
- Week 13: Servo controller, Dual DC motor controller, User Interface, Fabrication and Updated CAD
- Week 14: Mechanical design & Fabrication
- Week 15: Final week Lots of mechanisms, pictures and 4 videos
Conclusion
I thought about the DishPenser concept two or three years ago. I added the idea to my list of projects but I never worked on it. It was on the back of my mind, but I knew that it
would be extremely challenging to build. Just before I started at MIT my best friend reminded me of the DishPenser. He believed in the idea. It’s not that common that people will
talk to you about a 2 years old vague project idea – it meant something to me.
How to Make (almost) Anything was the perfect excuse to work on this project. Without the pressure of the short deadlines my work would have been way slower. While working on this
project I learned a lot about fast prototyping and about mechanical design. It wasn’t easy, I spent countless hours on designs and fabrications that should have been simple, but at
the end I built working subsystems.
Although the result is below what I hoped to build, I can’t say that I’m sad or disappointed. I did everything that was in my power to make this project work and I’m proud of the
achievement. I now know how not to design and build many of the components and I have a clearer picture of the appliance. If like me you believe that this product should be developed
way more than what’s possible in the frame of a semester project, contact me.


Jean-Francois (Jeff) Duval - jfduval(@)media(.)mit(.)edu - 2013
Top | MIT Media Lab | How To Make (almost) Anything 2013 | Index
"Hidden" keywords: Jean-François Duval, JFDuval, Jeff Duval, PCB, Dishpenser, MIT Media Lab, Biomechatronics, Electronics, Robotics, DIY, Hack, Hacker