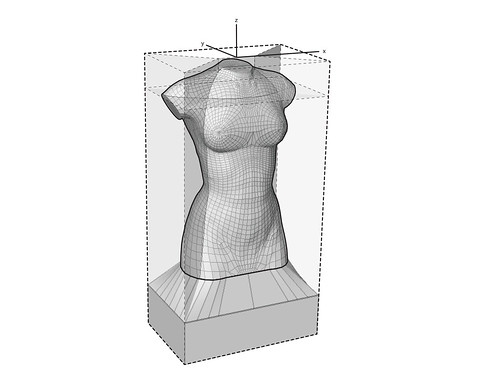
I wanted to make a garment mannequin that was the size of my girlfriend so clothes could be made or mended in her size. I downloaded a torso model from the internet. It seemed to be for character animation. I was a little too anatomical so I simplified the geometry a little. I adjusted the neck, shoulders, bust, waist, and hip to the right proportions and scale. I added wing walls to the model as check surfaces for milling to limit how far the cut paths would go on each side. I also set the top/center of the stock for the material I was using as the origin of the model so that I could use that as the registration point and axis of rotation,
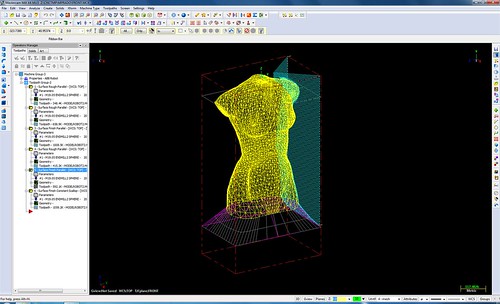
The model was imported into mastercam. I programmed several different ways to mill the form. At first I was going to try and test out the new CNC machine that the GSD purchased this summer. It has more travel in the z direction. Th problem was the form also required a longer bit. This negated the extra travel and also made it impossible to effectively cut with that machine. I also feared that cutting from two sides only would create poor surface resolution on the sides of the torso.
I decided to set up the file for the robot which had more flexible milling capabilities. I tried to stick to 3 axis milling from multiple sides though the robot can mill with a 5 axis toolpath to follow the surface more precisely. Using the robot required a great deal more setup than the 3 axis CNC machines even while using a 3 axis toolpath. Mastercam has the capability to simulate the material cutting to check for error and collision.
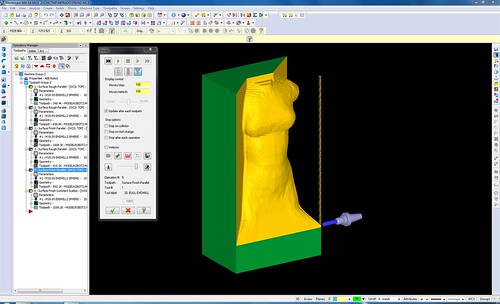
Robotmaster is a plugin for Mastercam that configures and simulates the robotic movements to run a file. These actions can be very complicated and require extra information to run correctly. The GSD has several preset tools defined for the robot such as a router and waterjet for example which have been setup for the robot simulation. Since I was using the router to mill i already had some information define. I still need to find out some information about the end mill I was going to use. I'll talk a little about this later. In Robotmaster you setup axis configurations, workobject origins (which defines the location of the local origin of your geometry) and movements. These movement can be optimized to avoid joint collisions or wrist flips. (this starts to deal with joint quadrants and quaternion rotations that I am not going to attempt to explain.) Your workspace must also be fully modeled to avoid collisions with other objects.
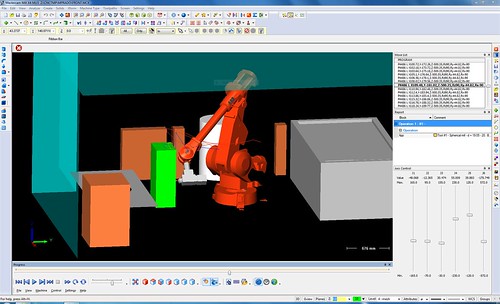
The robot can read a .PRG or .PGF file, which includes basic commands, target locations and speed for example. It also list the tool information that I need to determine on the robot. The tool center point (TCP) and orientation must be defined. This is determined by attaching the tool to the robot and then running a procedure which touches the tip of the tool to the same point in space from different orientations (in my case I used a pointy contraption the GSD uses specifically for this.) It is also necessary to test the load and center of gravity of the tool. The robot will compensate for this when it moves so as not to damage itself. This information would typically be written into the file but due to some problems with the post file I needed to copy it into the .PRG after the fact.
This video shows the process of testing and milling the post files. The file milled in 4-5 hours, the setup time was more than 1.5 weeks. You see several failed attempts at running the file. This is due mainly to the tool definition that I patched into the file. It took almost 10 tries to get it right. There are several safety procedures in place at the GSD including the yellow striped air curtain, which shuts the machine off if the robot or someone crosses the line. I am standing inside the cutting area of the robot in part of the video to get a better view of the process and to be able to stop it if necessary, This is dangerous...DO NOT DO THIS. The robot is also equipped with a control pendant that requires the user to maintain constant pressure. If the "kill switch" is released or squeezed too hard the robot will stop moving. Fortunately the file was completed without any problems.