Week 4 - 3D Printing and 3D Scanning
Design and Print an object for additive Manufacturing; Scan a 3d object
3D printing
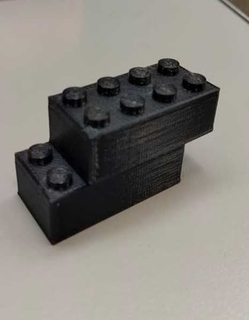
(Image 1) 2 Connected Lego 2x4 Bricks
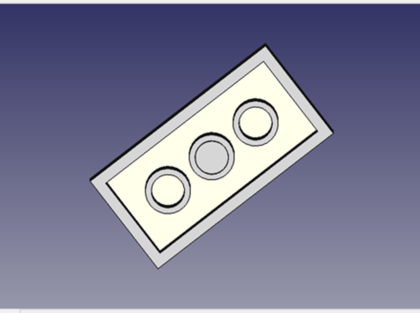
(Image 2) CAD showing hollow, enclosed bottom cylinder
3D printing is the bulk of this week and depending on what you decide to print is super important for a few reasons. Firstly, there are limited machines --- 1 Prusa and 1.5 Sinnohs (one of them is funky) --- in the EDS, which means you need to coordinate with your lab mates how to run print jobs so they are done in time. Secondly, an overly complex object will likely result in multiple print jobs and extended print times per job, hence the complexity of the object is related exponentially to the time spent in 3D printing.
I was very sick this week and barely had any time so I ended up downscaling my original plans significantly. For reference, my original plan was to print a 3D fabric-like object that can be used as basis for the upper/lower flaps of my final project mask (based off the kf94 design). However, given time constraints, I decided to 3D print legos! I absolutely love legos from a play and design pov, but they also prove to be an interesting challenge. For the legos to work, they need to be the right scale and I need to minimize all printing artifacts in order for the legos to fit with one another (Image 1).
This week we were tasked with desinging an object that could only be made additively and not subtractively. To understand this I typically refer to an analogy Anthony told me --- can it be made with an infinitely small hammer and chisel? For example, an object inside of another object (e.g. a sphere within a sphere) or a hollow, enclosed object (e.g. a hollow sphere) cannot be made subtractively. I have always wanted to print legos, especially entire sets so this was a must have print (turns out the legos make great fidget items too)! To satisfy the aforesaid constraint and still print legos, I made one of the bottom studs that are typically open-faced, hollow cylinders into an enclosed, hollow cylinder (Image 2). One of the main aforesaid printing artifacts I had to minimize actually had to do with these cylinders. If the printer always moved up the layers of the cylinder at the same spot, then a seam running up the cylinder would be printed, which could prevent one lego from stacking on top of the other because of the offset in fit. Thus, I redrew the tool path so that the seam would spread itself out diagonally across the cylinder.
Overall, the print was successful. As you can see in the above images, the legos actually fit together (and nicely)! In fact, I did a test with real legos, and my legos bind to them! Obviously, some of the downsides to this approach are the materials and consequentially the longevity of the fit. Lego uses a patented plastic, which somehow holds all the reminisce of childhood and the structural stability to minimize wear. Nevertheless, I am hopeful and look forward to using different materials (perhaps I'll go in the direction of flexible legos) in the future!
Click here to download the step file for my lego scale 2x4 brick.
3D Scanning
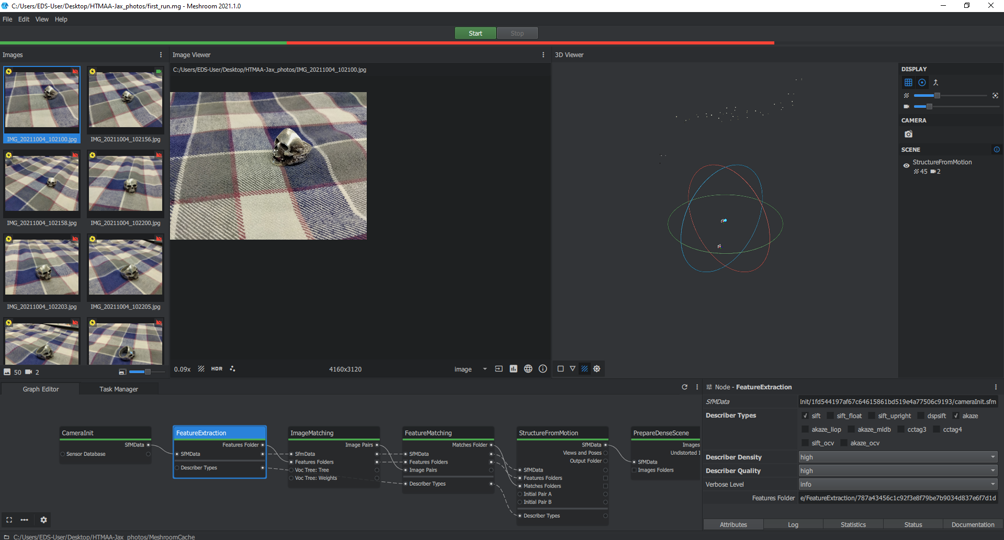
(Image 3) Failed Photogammetry attempt
There are three techniques to 3D scan in the EDS: photogammetry, laser-projected dot matrix, and lidar. I chose photogammetry for a few reasons. Firstly, I find photogammetry interesting as it has many applications including the preservation of cultural sites. Secondly, a laser-projected dot matrix requires the user to remain absolutely still while scanning for several minutes. That doesn't sound very fun. Finally, the EDS lidar is made by Intel, but does not have propiertary software to pair with the technology and known third party softwares have been lack luster (according to Anthony).
I was unsuccessful in scanning my ring as shown by the meshroom software failing to develop a camera model 30 minutes into runtime (Image 3). The reason it failed is likely due to the size of the object. However, Anthony and I were hopeful because all of the other conditions were met. I used my shirt to create a featured background so that the software can more easily identify the ring as said features change relative to lighting, camera angles, and other environmental factors. Though it is said meshroom works best outside, I had to work inside so I ensured the lighting was maximized. I also set up a table for the object so walking around the object to facilitate taking pictures. However, none of it mattered because the object was too small. Lesson learned.
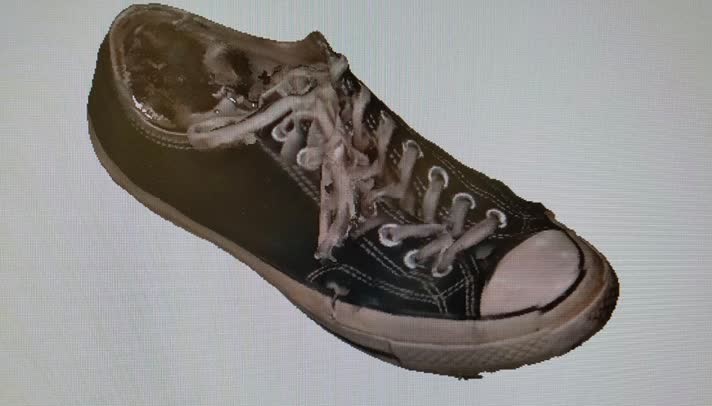
(Image 4) Successful 3D scan using Sense
After meshroom failed, I turned towards what everyone else was doing: the Sense scnaner from 3D systems. Sense uses a laser-projected dot matrix and calculates how the dots deform to reconstruct the object. Projected dot matrix methods are not very ergonomic, and the Sense was no exception. I would recommend placing your object on a small table to make walking around the object easier. However, I would also first check if your cord reaches around said table because I was too closely tethered to a wall and couldn't get the full backside of my object. As a result, It took me about 4 tries to get my scan (Image 4) and one time the software crashed!
Meshroom failing was probably the best thing that could've happened because I ended up scanning my shoes. Let me explain. Originially, I was scanning my ring with photogammetry because it was very detialed and I wanted an understanding of my lab's ability to high fidelity 3D scan objects. However, after being forced to choose another object, I realized how much having a 3d model of my shoes meant to me. I am a freestyle dancer from Los Angeles, Southern California. Everyone back home wore "Chucks" and I wear them proudly 365 days a year. There is culture and values deeply rooted in my shoes and knowing what they mean gives me great pride. When dancing, especially freestyle, being comfortable is everything so when I tell you I can only dance in my chucks, it is true. Every dancer has to relearn how to move when changing shoes as the sole flexibility, height difference, weight difference, and even aesthetics all affect how you approach the dance. I have had my particular chucks for about 4 years now and they were given to me by my sister who I have not seen in a long time. My chucks are pretty beat up now, littered with holes, and I will probably have to reluctantly replace them soon, but it is nice to know that I can look back on my shoes years down the line as a symbol of growth as a dancer and as a person for this period in my life.