
Molding & Casting
Making forms to make other forms.
Making forms to make other forms.
Design a mold around the stock and tooling that you'll be using. Then mill it (rough cut + three-axis finish cut), and use it to cast parts!
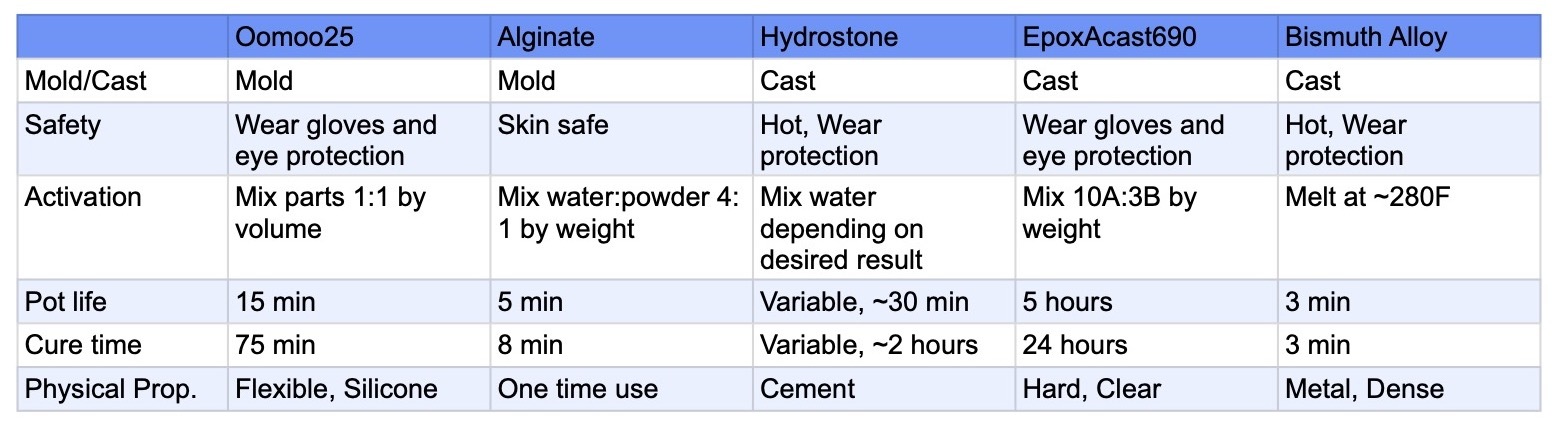
Review the safety data sheets for each of your molding and casting materials, then make and compare test casts with each of them.
For this week's group project, led by Jessica, Taili, and Sondos, we tested out a variety of different mold materials.
This included looking at the different materials' safety sheets and casting with each one.
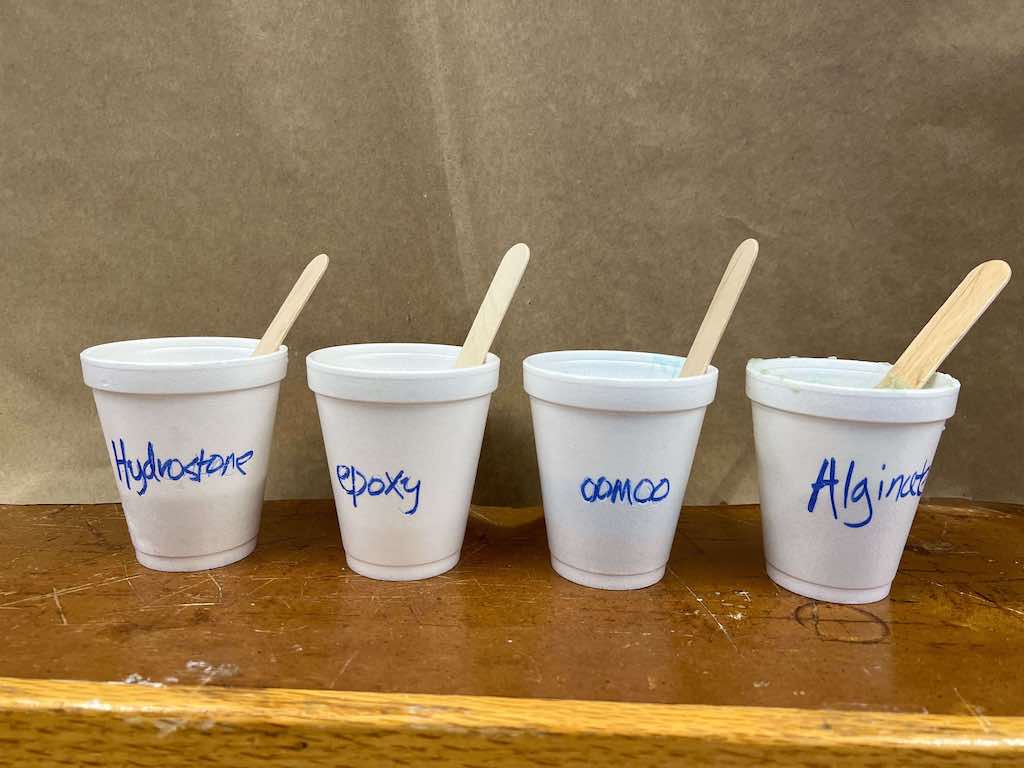
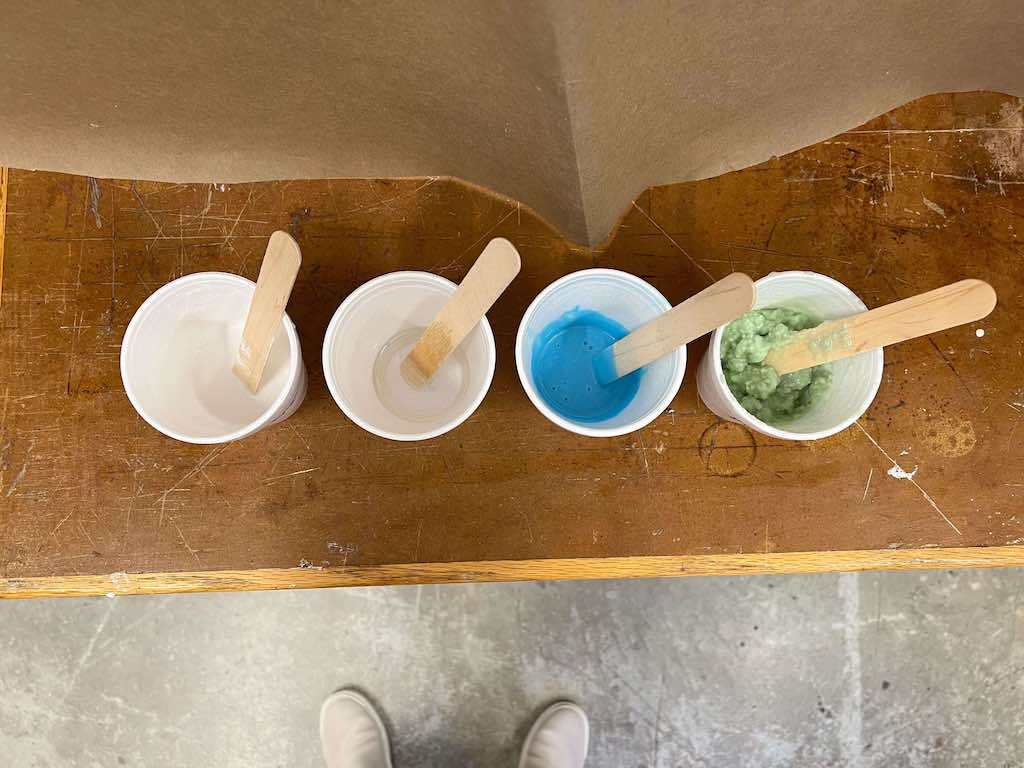
We determined that alginate is best for skin-casting; drystone is great for a smooth and solid finish, but is also quite brittle; and bismuth-tin alloy is a quick and beautiful option for metal casting (though it requires an oven and comes with risk of burns). Furthermore, many resins produce toxic fumes and should be handled with care.
Pretty much across the board, gloves are recommended to minimize skin contact.
Also, someone in a different section poured drystone down the sink: don't do this! Since drystone solidifies with water, this is a great way to cause expensive damage to plumbing. Wait for it to set in a cup, etc. before throwing it in the trash.
This week, I designed a spinning top in Fusion 360 and cast it out of bismuth-tin alloy. This was a multi-step process, requiring me first to mill a positive, two-part version out of machinable wax, then to cast oomoo into that mold to create a new negative mold, and finally to cast metal into that.
As usual, this week started with file design in Fusion 360.
I knew I wanted to make a two-part mold of something more dynamic than static (meaning something I could actually do something with, as opposed to a decorative knick-knack). I also wanted to cast out of metal.
Since I was traveling home to Cleveland for the grand opening of a STEM-themed playground and collection of manufacturing exhibits I've spent the last two years developing (check them out here !), I had to start thinking about ideas early.
After a lot of brainstoming, I decided to make either a spinning top or a stamp (like the kind you'd press into hot wax to seal a letter). The stamp would have been more complex to design—I think I'd need a three or four-part mold in order to create anything resonably sized with the handle and stamp all cast together as one piece—and I wasn't sure what pattern I wanted on it anyway. So, I set out to make the top!
I chose to do this by designing one full half of my mold first, and then duplicating / tweaking that to get my second half. Lots of cutting and joining!
SPINNING TOP DESIGN:
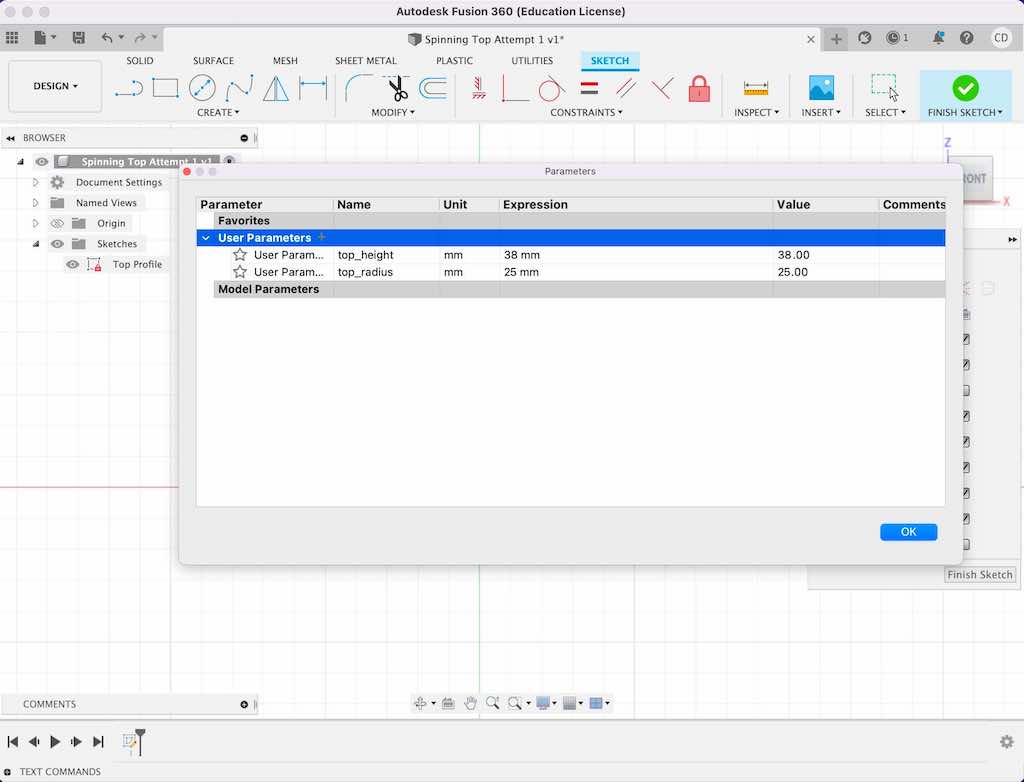
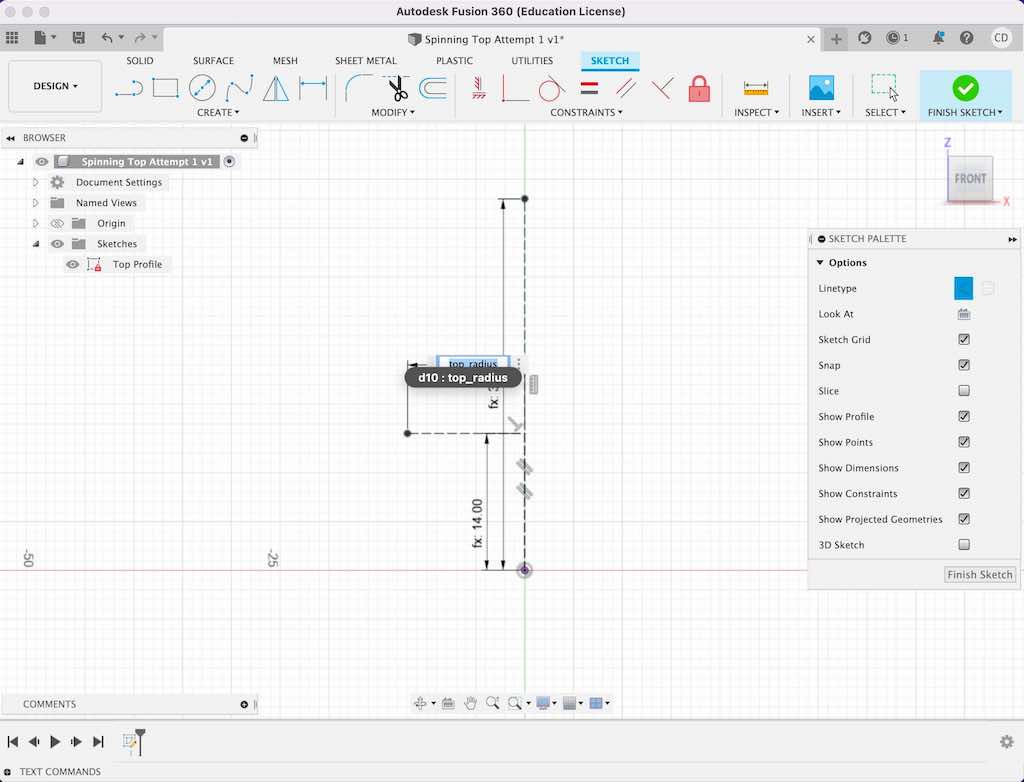
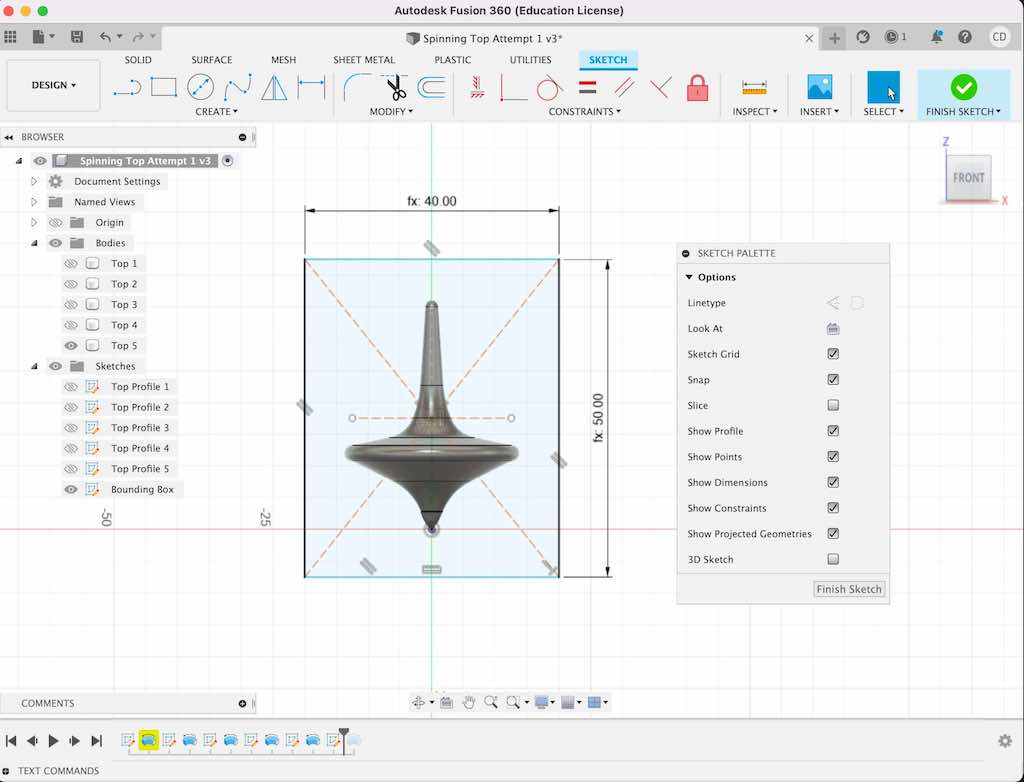
As usual, I set out to parameterize everything I could. This started with setting the height and radius of the top.
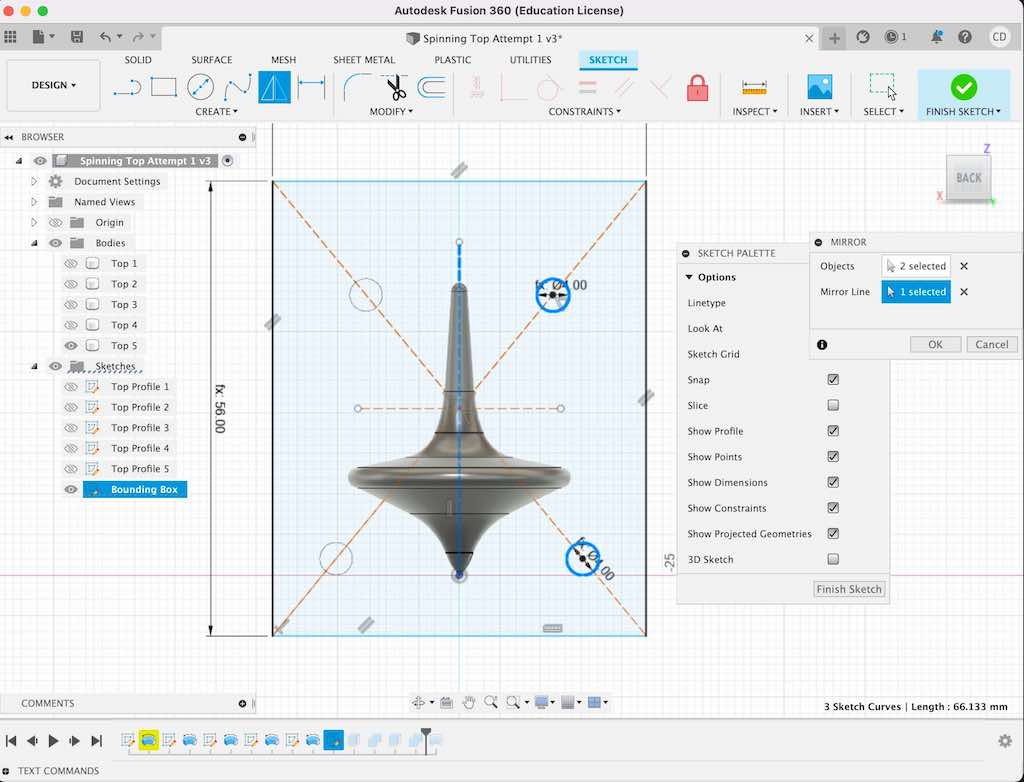
I added construction lines to my sketch to function as a point of reference for my top's general size and shape, and then designed its actual silhouette around them. I ultimately also added a third parameter to set the distance from the unit's bottom to the flareout just in case I needed to change this later.
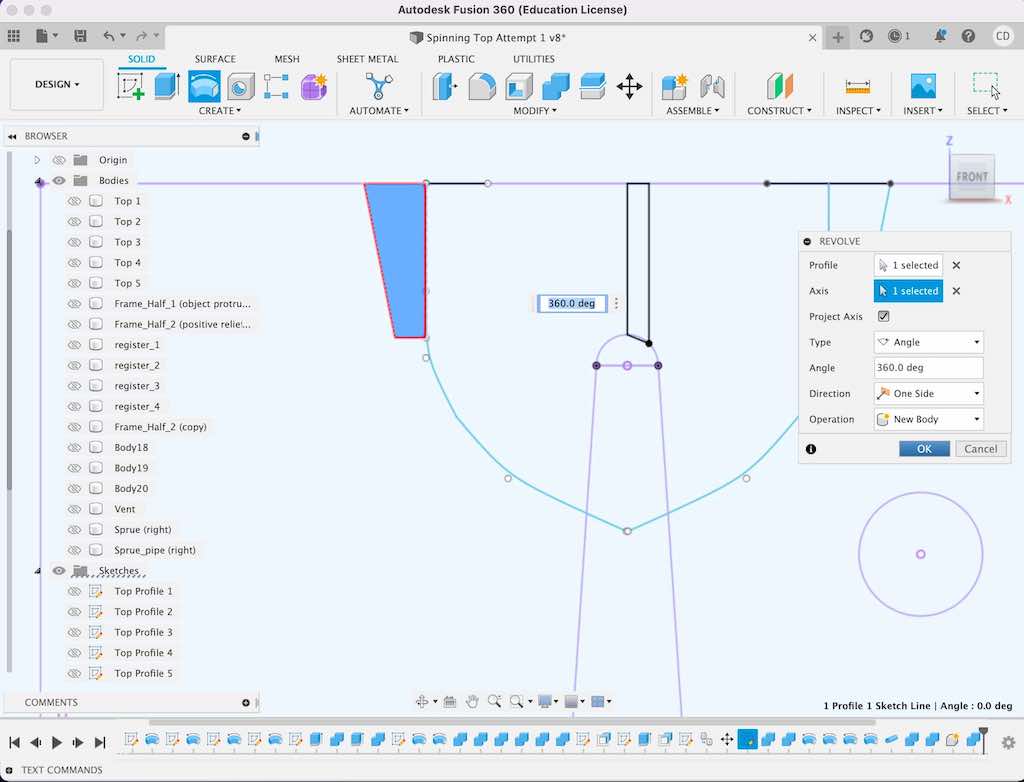
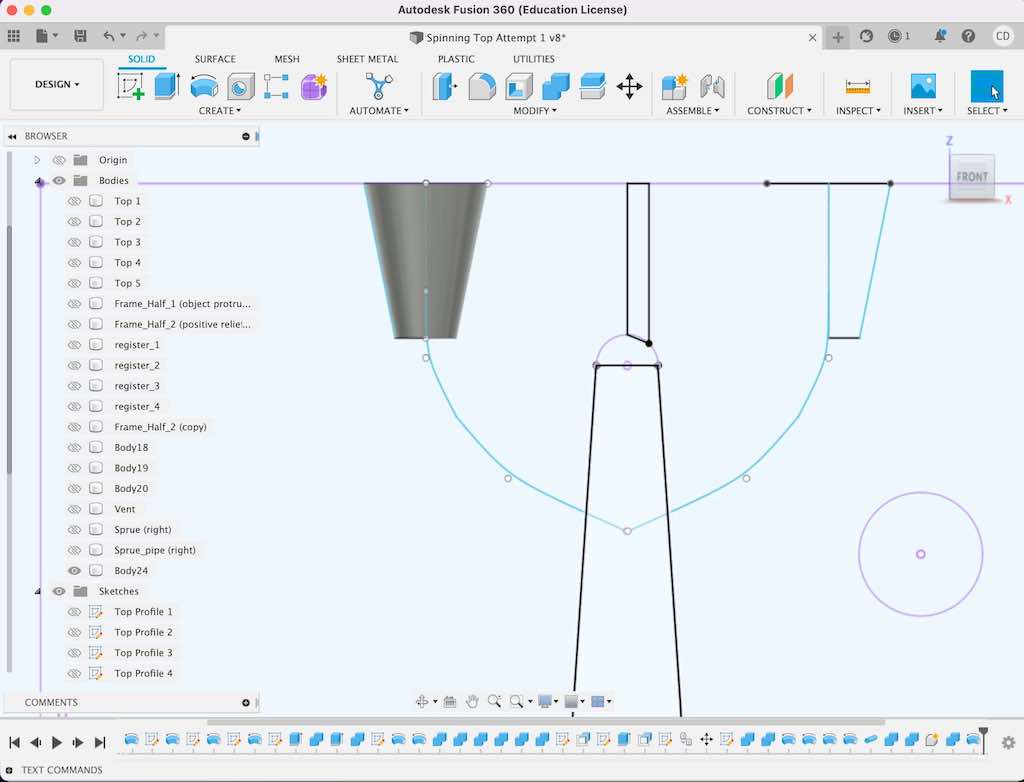
Note that since I wanted to use Fusion's "revolve" feature, I would only need to design half of the top's profile. Then, I could revolve it around the central z-axis to make a three-dimensional form.
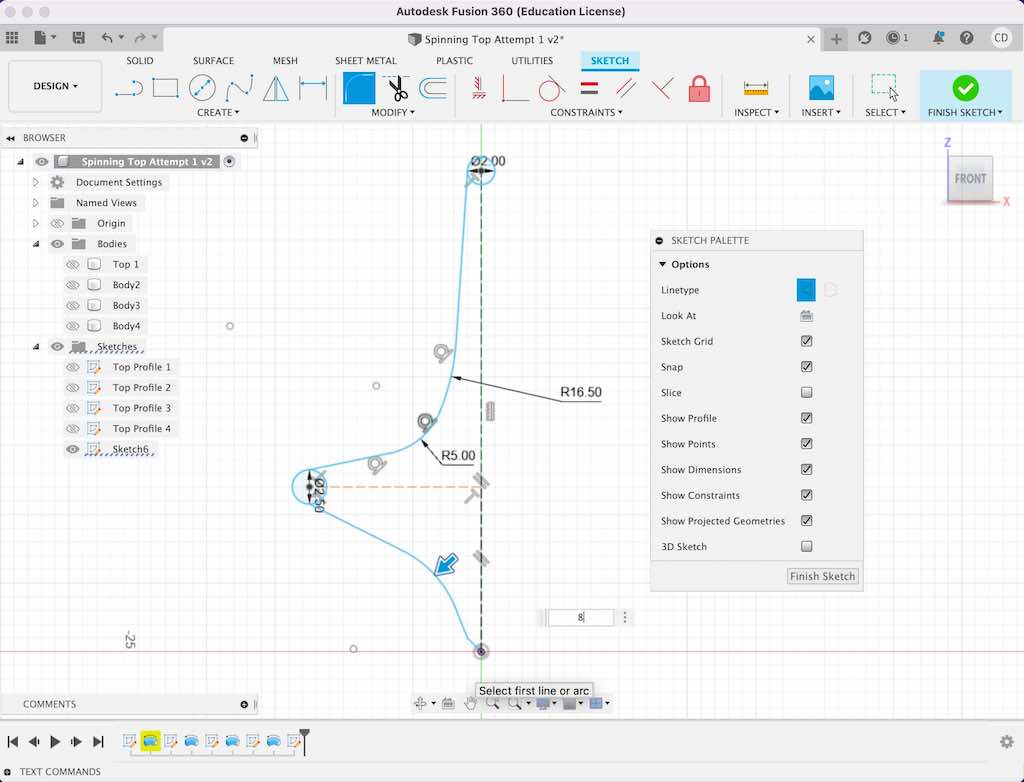
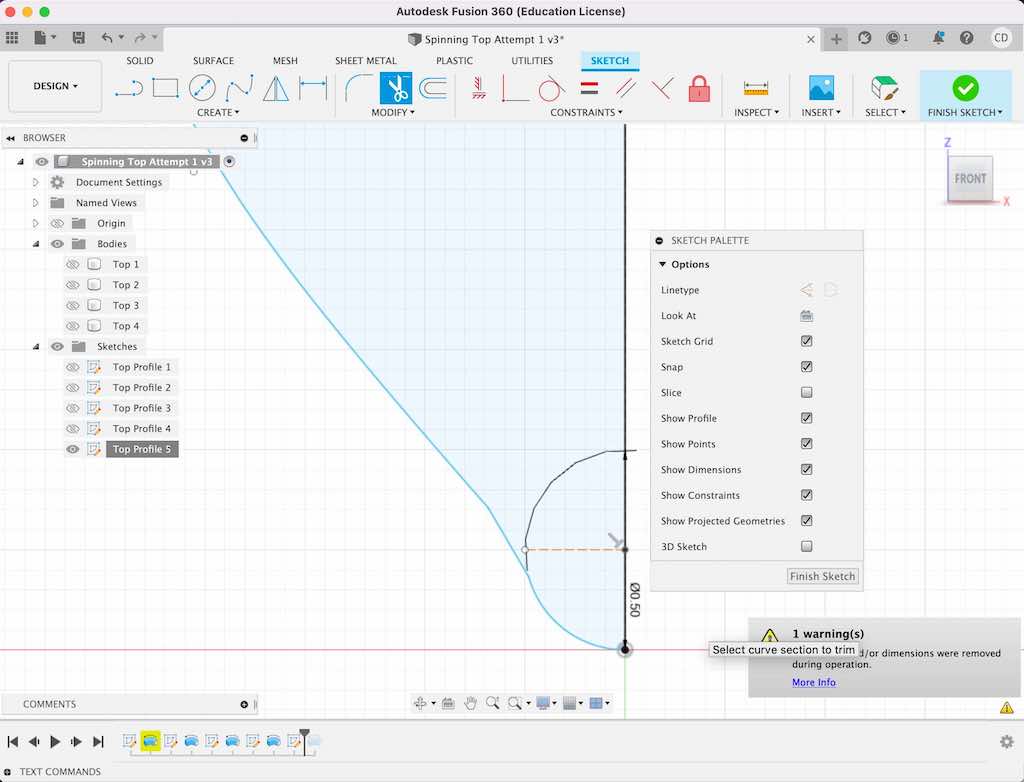
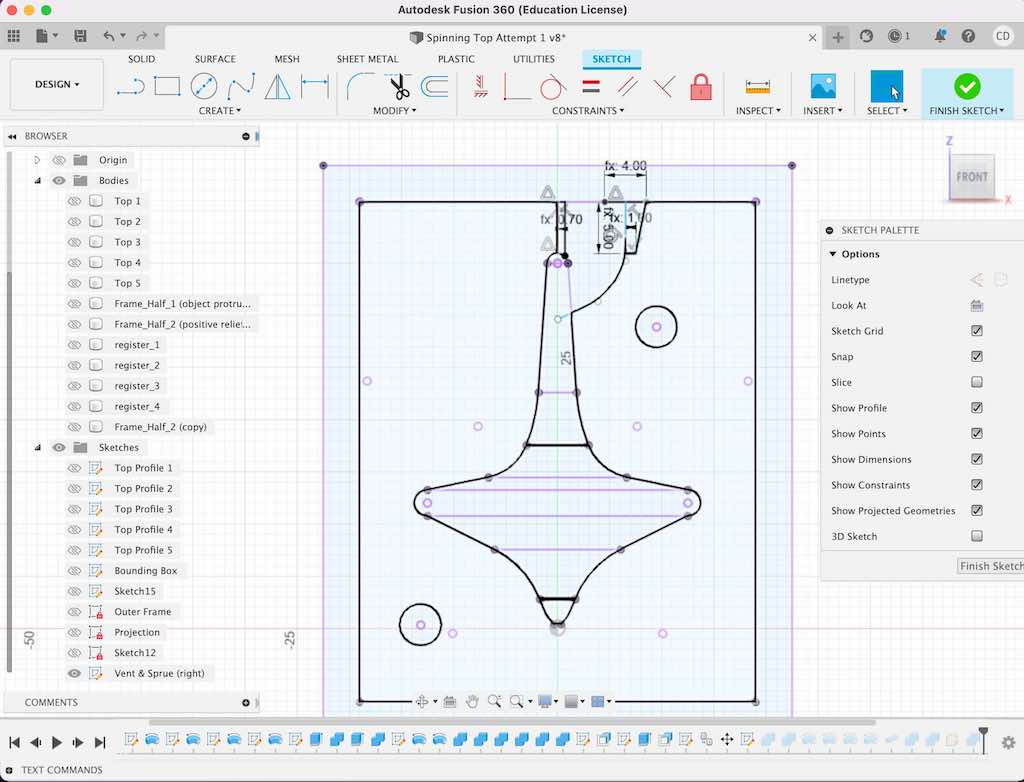
I ended up playing around with the shape for quite a while, experimenting with different techniques for each new attempt. I tried various combinations of lines, splines, and conic curves before landing on a design I liked. Fifth time was the charm!
For the winning design, I ended up creating a circle at the end of my flareout. Then, I drew straight lines from the handle to the top of that circle, and used the fillet tool to smooth out the angles. I did the same thing for the bottom.
Finally, I added a tiny circle to the bottom so I wouldn't end up with a super sharp point. I also trimmed away everything excess that extended past my center line, since I wanted to be able to rotate the shape a full 360 degrees to create my final form.
Pro Tip #1: Measure your wax block before you do any design work! You want to make sure everything will fit within its constraints. Also note that there are some limitations for the Roland milling machines. I would recommend keeping your design relatively shallow rather than using the full depth of your wax block. Mine ended up being 24mm at its deepest point, which was pushing the limits of how far the endmills could reach before the collet would rub against the mold's walls. Alternatively, use the shopbot which can get deeper, or slope your walls gradually outward from the bottom of your mold rather than designing them at a perfect 90 degrees. This will allow the endmill to step down more gradually so you are less likely to run onto the collet crowding problem.
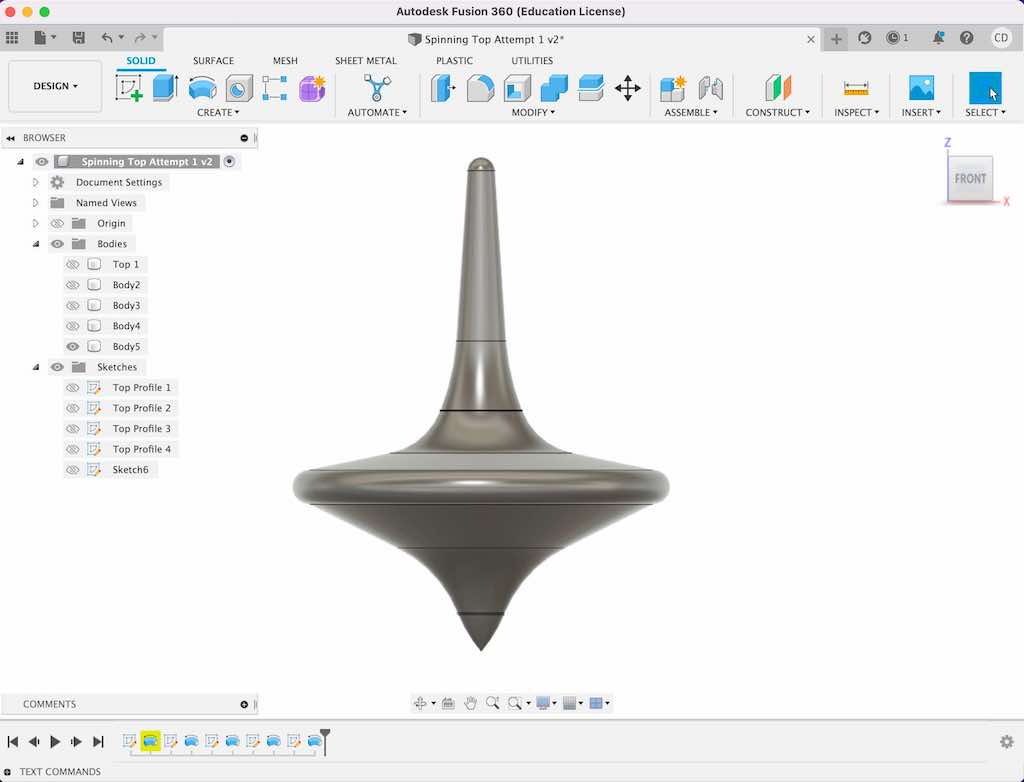
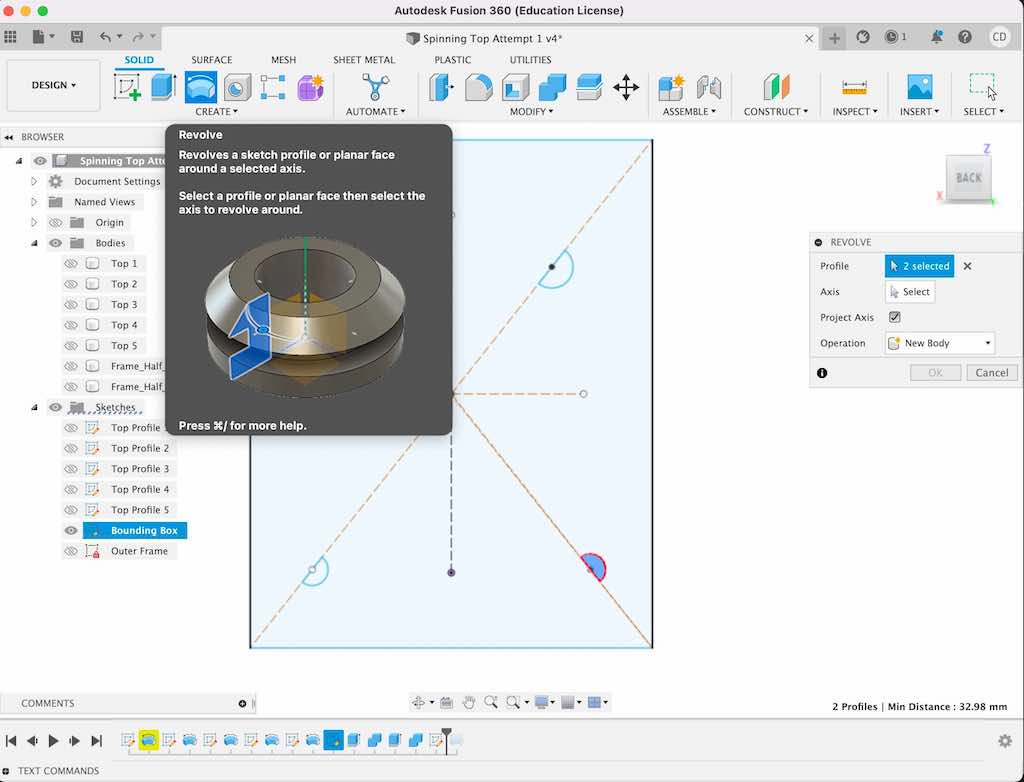
Finally, once I had my half silhouette finished, I used the rotate function to make my top three dimensional.
MAKING A MOLD:
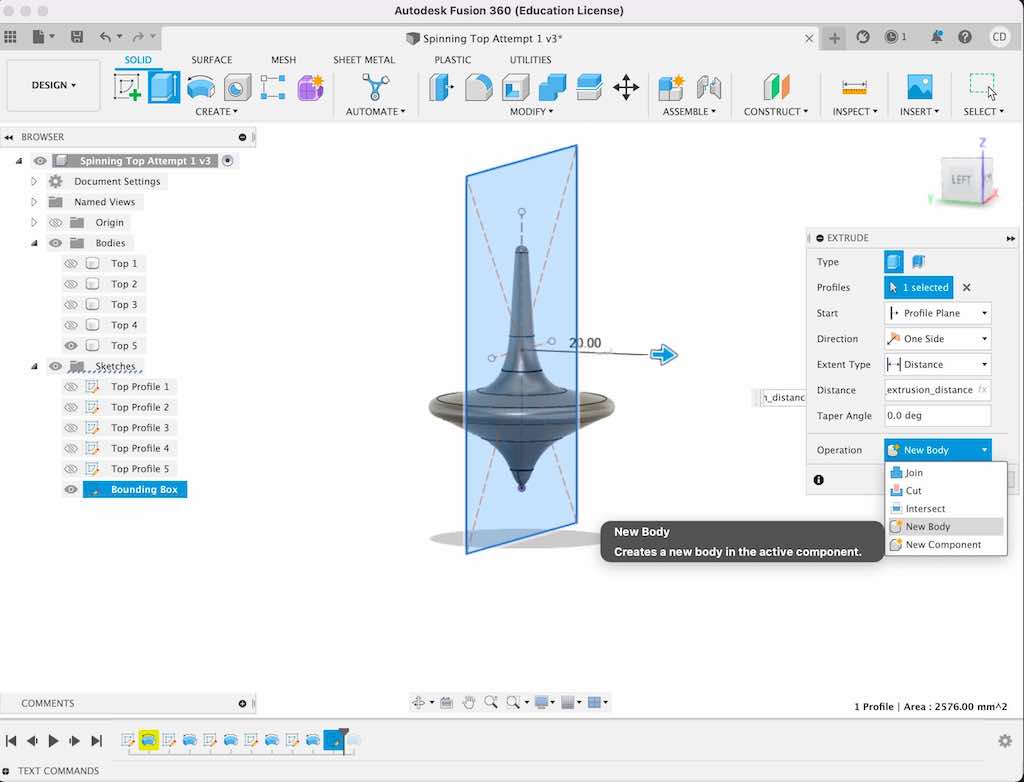
I order to form the bottom of my mold I created a new sketch and drew a rectangle with parameterized sides named: frame_outer_width and _frame_outer_length (this is relevant later).
Then, I extruded this (I eventually went back and parameterized the extrusion distance, which was useful later).
Note that you'll also need to add walls to your mold, but I chose to leave this for the end and focus on creating registers first.
Pro Tip #2: Make sure when extruding that you choose "new body" under the operation menu! That way, you don't lose your top as an independent form. You can always go back in and perform a different operation later in order to combine the two, or cut one from the other. Keeping both units as separate bodies gives you way more flexibility later on. (And thank goodness I did, because I 100% messed up in the next step!)
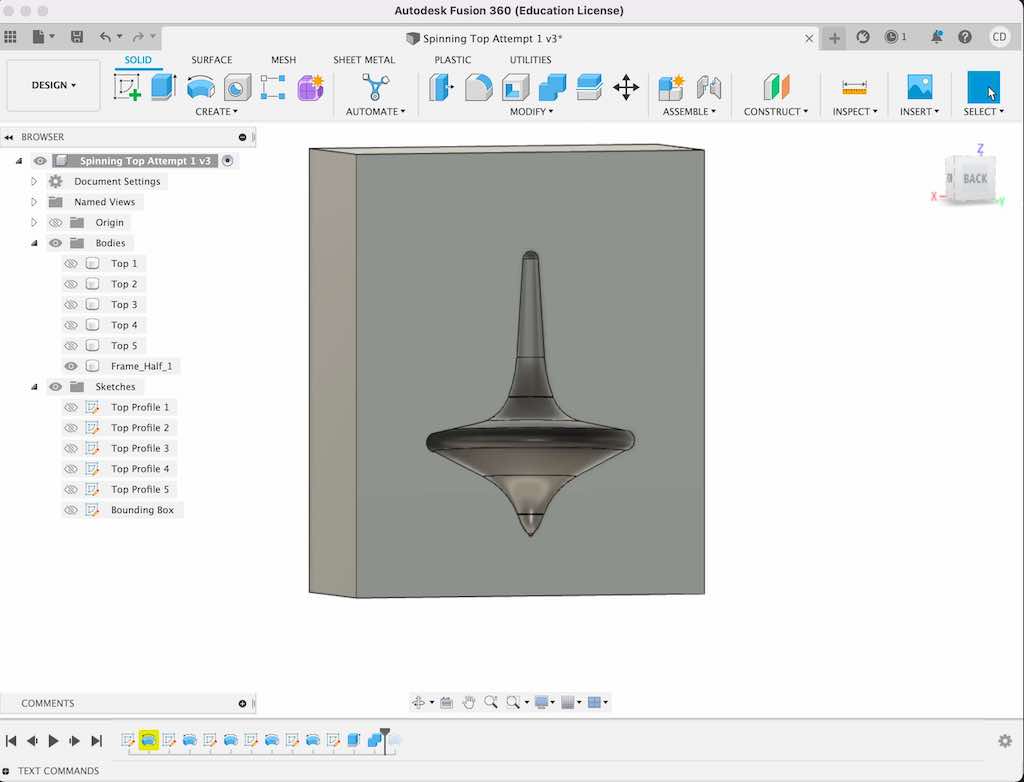
The next step is to join your newly extruded back wall with your design.
Here's where I initially messed up: even though I had been reminding myself repeatedly that this needed to be a convex / positive form since this design is not for the final mold itself, but rather for an intermediary mold with which to create the final mold, this is so unituitive that I still got it backwards at first. Instead of using "join" I used "cut" to end up with a concave / negative form (left, below).
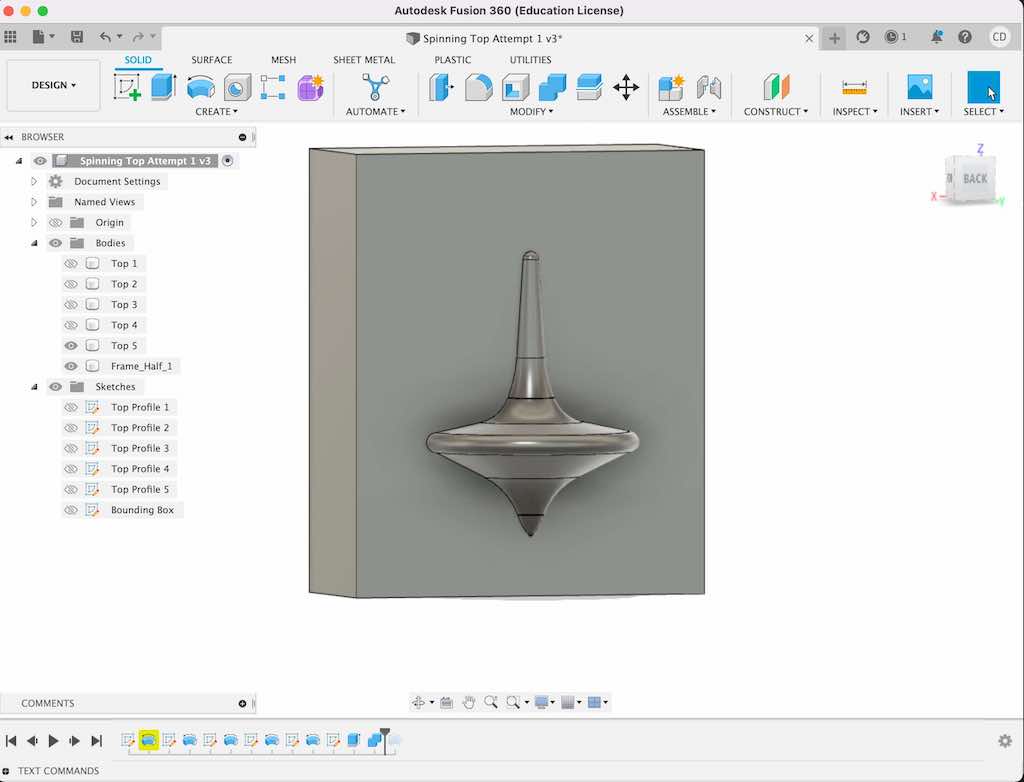
Thankfully, I realized my mistake pretty quickly and was able to easily fix it because I'd preserved my top as its own body. Thus, I was able to go back in and "join" it with the hole I'd made previously to give myself its exact opposite: the positive version I needed (right, below).
ADDING REGISTERS:
Registers help the two halves of a mold line up and lock together cleanly.
There are multiple ways to approach this, including: (A) a positive cylinder or hemisphere on one half that nests into a corresponding hole on the other half, (B) matching holes on both halves of the mold into which a rigid positive form like a marble or section of dowel can be inserted, or (C) a step around the perimeter of one half of the mold that fits into a matching trough on the other half.
Although I ultimately added step registers, (discussed at the end of this section), I initially chose to create hemisphere-and-hole registers.
(Note: Neil suggests the step approach, since it tends to be the most reliable. I found that using both helped ensure everything was lined up and tight, and would personally use this strategy again in the future.)
I opted for four registers, two of which would be positive (hemispheres) and two of which would be negative (holes) on each half of the mold.
To design registers like mine, use the following steps:
Note: You only have to do this once! If your design is symmetrical like my top is, you'll just create a copy of it (prior to adding anything asymmetrical) in order to create the second half of your mold, since doing so will create the correct positive hemispheres and negative holes to fit flushly with the first half. (This is counterintuitive, but I promise it works.)
However, if your design is already asymmetrical, you need to create a mirror image of it BEFORE adding your registers. Then add the registers to both, in the same place on each. The design needs to be mirrored across the halves, but the registers need to be identically positioned if you're doing what I did (with each half having containing two positive and two negative registers).
That means if your top left register is a positive hemisphere on half #1, the top left register on half #2 should also be a positive half sphere. If your bottom left register is a negative hole on half #1, your bottom left register on half #2 should also be a negative hole. Remember that you'll be flipping one half over when you join it with the other!
VENTS AND SPRUES:
My next step was to add my last symmetrical component: a vent.
First, some vocabulary and reference points:
-Vents are tiny tunnels that allow displaced air to escape from your mold as you pour molten material into it. They can be pretty small. For reference, mine ended up being 1.4 mm in diameter.
-Sprues, in contrast, are like little funnels you pour material into. They need to be a bit larger so that you can actually succesfully pour your material into them, meaning their size is a function of the material's viscosity and your own ability to aim while pouring. For reference, I cast out of bismuth-tin alloy and decided to make my funnel's widest opening 5mm across, narrowing down to a 2.5mm diameter pipe below.
Next, design and placement:
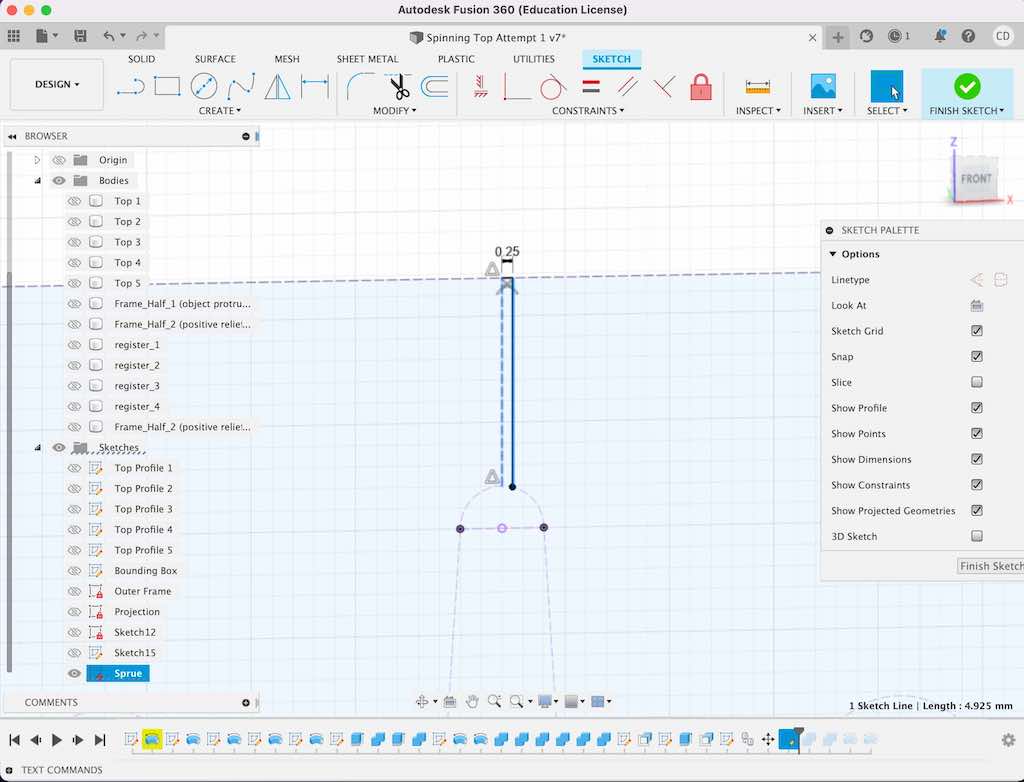
I chose to add my vent sticking straight out of my top's handle. First, I created a new sketch on the top face of my mold (the same face with the registers on it). I projected the top's features onto this. Next, I figured out the center of my top's handle (really, the center of the whole rectangle) and drew a vertical construction line there, from the top of my mold down a bit past the top of the handle.
I then drew a on offset line (not a construction line; a regular one) and parameterized its distance from the center line to be the desired radius for my vent.
Finally, I drew solid lines connecting the various parts of this vent sketch so that I could revolve it, and revolved it (creating a new body) into a cylindrical tunnel. I also joined the vent with the mold, creating a new component consisting of everything up until this point all fused together.
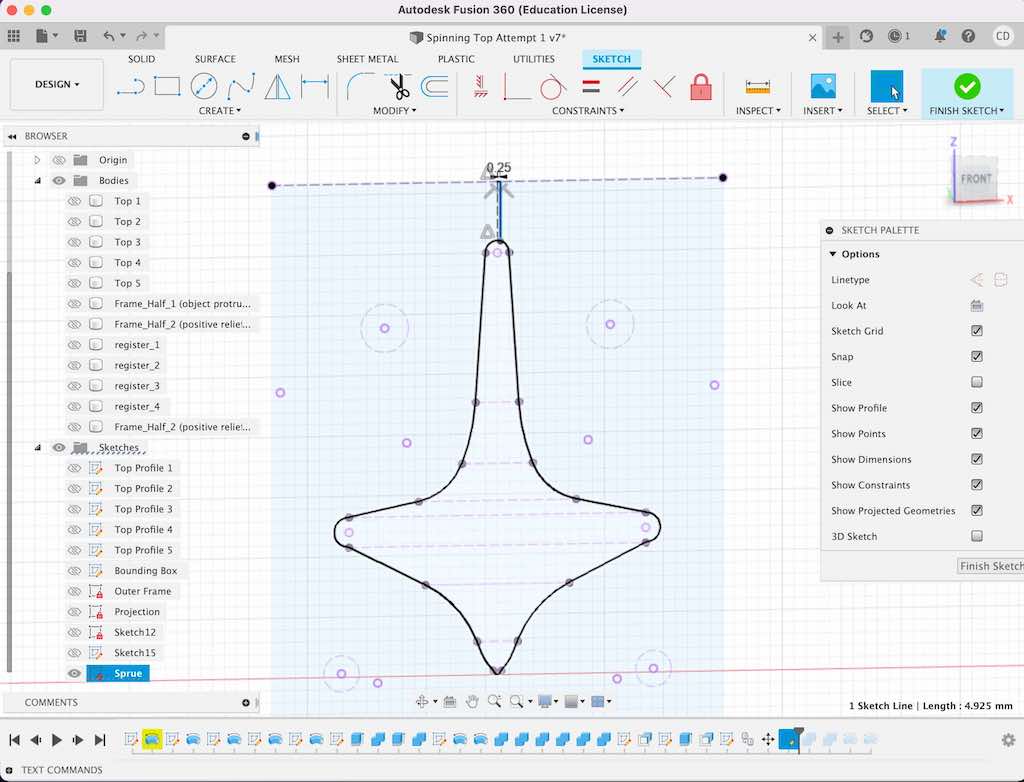
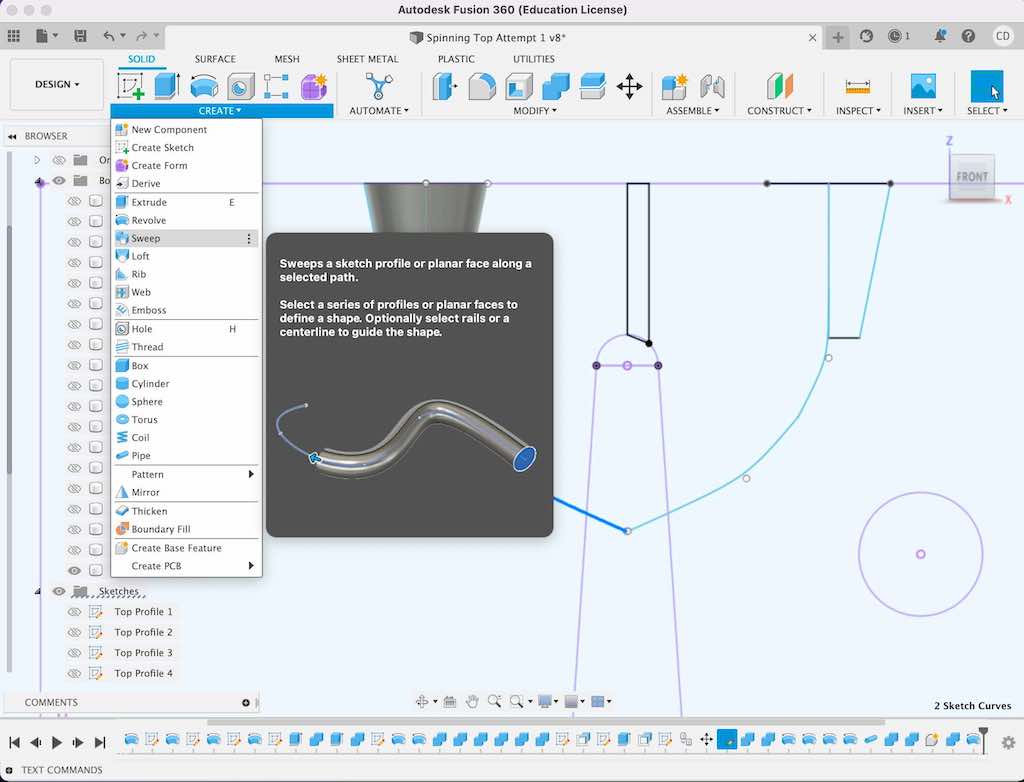
With the vents down, it was time to move on to sprues.
To create my sprues, I started by designing and revolving a little funnel a short distance from my vent.
I wanted to use the "pipe" tool to create a tube connecting the funnel to my top's body. However, I needed to draw a path for the pipe to follow, first. So, I went back to my sketch and used the conic curve tool to draw a gentle curve from about halfway inside my funnel to about halfway inside my top's handle. Then I used this as the path for my pipe.
Note: I did parameterize all of this! Everything from the width of the funnel's wide and narrow openings to the diameter of the tube. That way, if I couldn't get this design to work with my bismuth-tin alloy for some reason, (like if it was too viscous to fit down such a tiny hole), I could easily tweak my design before remilling.

ADDING WALLS:
Fair warning: I did this in more steps than really should really have been required. (To skip my blunder, instead of adding small walls around the half-mold(s) now and then subsequently building the rest of the wax block around these later on, just build the wax block now).
However, since I didn't do this, here are the steps I followed:
I went back into the sketch on the top face of my existing rectangular body (containing my registers and vent / sprue work). I then used the "offset" tool to create a new rectangle slightly smaller than the mold's original outline
I parameterized the offset distance to my desired wall thickness (5mm for now).
Then, I extruded this new rectangular frame slightly higher (~8mm) than my top's flareout protruded.
Note: It's extremely important that your walls extend above your highest feature! Remember that this is a mold from which you will cast another mold. That means that the wall height above your tallest feature here actually determines the thickness of your final mold's bottom wall. You want it thick enough to be nice and sturdy and hold its shape.
Finally, I went to "combine" and joined together all of my components--saving my tools--to create a new component. This was half #1 of my mold.
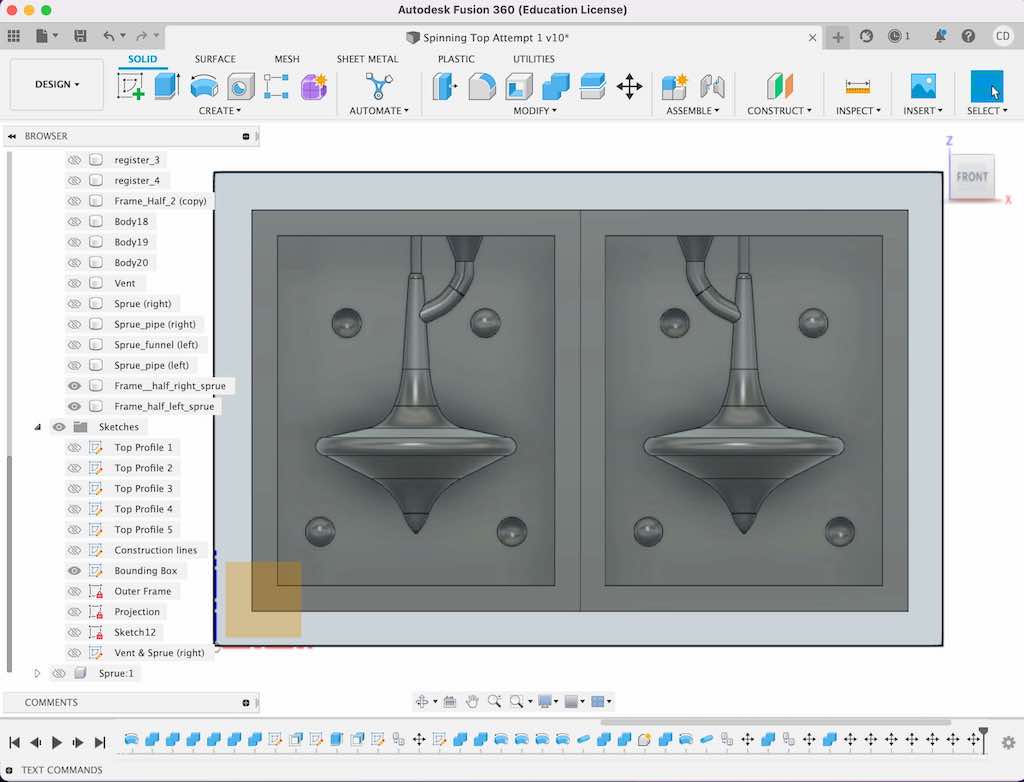
TWO HALVES OF A WHOLE:
Now it was time to create half #2 of my mold, not quite identical to the first. Time to do some creative copying, cutting, and moving!
Note that the sprue made my two mold halves asymmetrical. It stuck out to the right on mold half #1, meaning I now needed a sprue that would stick out to the left on mold half #2. This would allow the sprues to line up when both halves of the mold are closed together like a sandwich.
I already had a three dimensional sprue on the right side of my top, so it was time to create an identical version on the left side. Since it was essential that the sprues on both halves would line up precisely in order to allow material to flow freely, I had to make sure I nailed their positioning.
To make my matching sprue on the other side, I went back into my sketch and reflected the sprue elements across a center line. Then, I repeated the revolve and pipe process to make a new three-dimensional body from this sketch. This sprue was a mirror image of my first one.
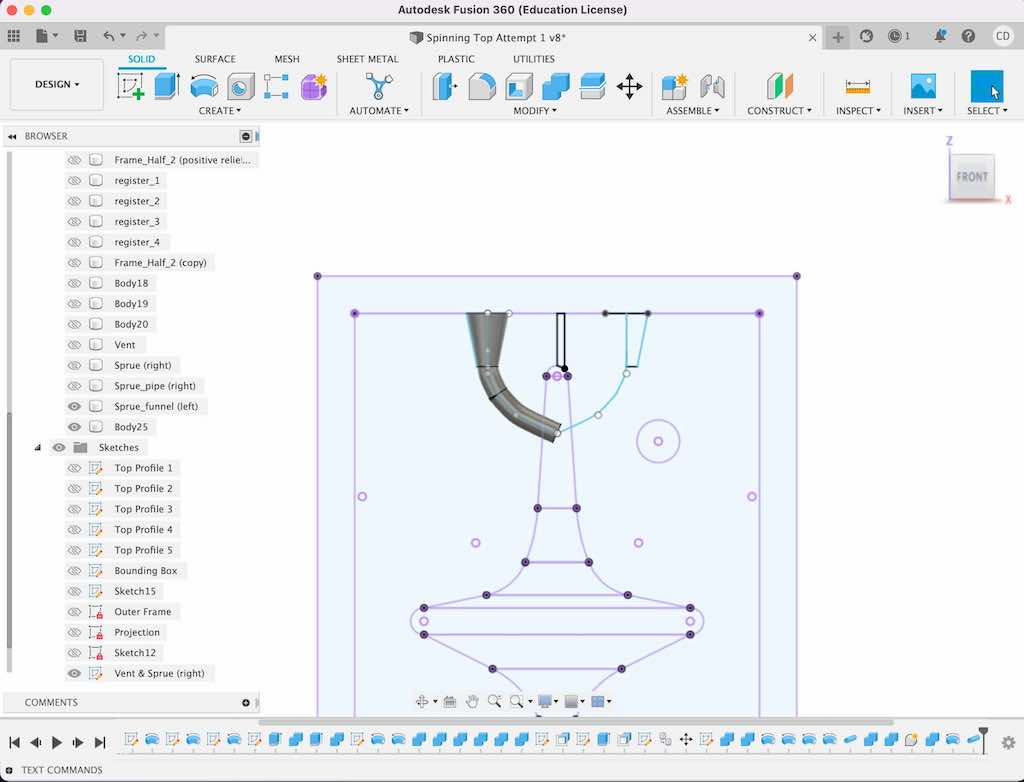
Now that I had a new sprue on the opposite side from my first one, it was time to create a new component.
I navigated to "combine" and joined all of the relevant bodies together once again--this time using the left sprue instead of my original right one--to create a new component. (Remeber to save your tools when doing this!)
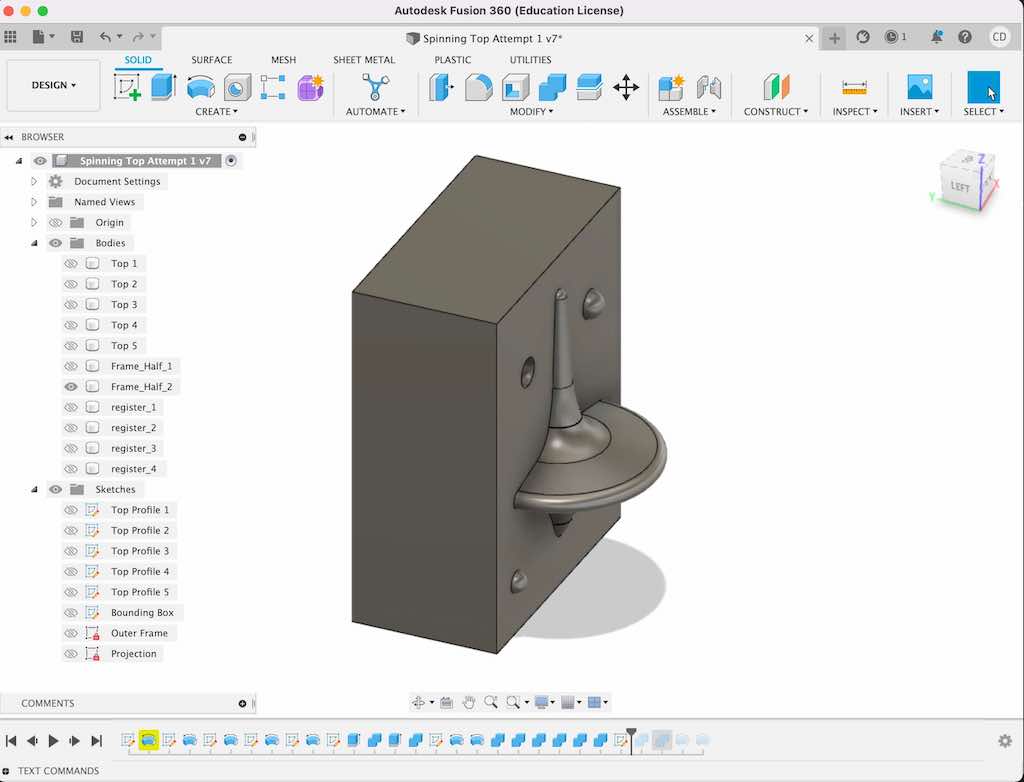
Then, I selected this new component and used the "move/copy" function to move it to the right along the y-axis until it was positoned nicely beside the original mold half.
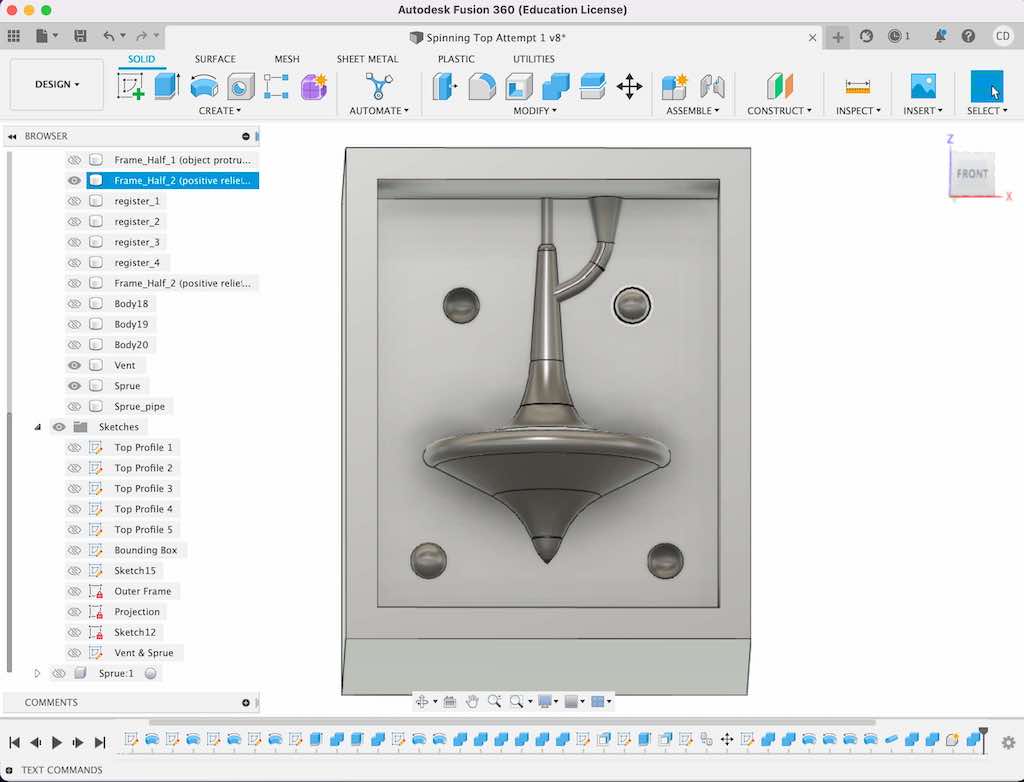
Now, turning off visibility for all bodies except these two new components, I was left with two halves of a whole! On one half of the mold, my sprue extended out to the left; on the other, it was mirrored so it stuck out to the right.
Everything else about the molds was identically placed (not mirrored). I say this again to make absolutely sure that your registers are identical on both halves. One more time for good measure: your registers should not be mirrored for the way I designed them. They should be identical!
I also added a bounding box sketch at this step to illustrate the dimensions of my wax block, to make sure that both halves would fit nicely within it.
MODELING THE WAX BLOCK:
Because I had previously created narrow walls around my mold, I now needed to go back and build the wax block around them.
I did this by first making sure my existing molds were the same height as my wax block: 47mm.
This meant adding together the bounding wall height and extruded distance of the back piece and ensuring they equaled 47mm. Since they didn't (I'd arbitrarily chosen 20mm for my initial extruded depth, and then added walls on top of that), I adjusted my parameter for that extrusion distance to ensure the total final depth would be 47mm.
Tip: To determine the dimensions of something within your drawing, use the "inspect" tool. Then measure between any two faces, points, etc.
Then, I navigated around to the back of my object and created a new sketch on that face of a rectangle measuring 65mm x 11mm, the length and width of my wax block. I extruded this toward my existing molds 47mm, the depth of my wax block.
Finally, I joined together the existing components and my new extrusion.
This essentially replaced my previous walls with the wax block itself.
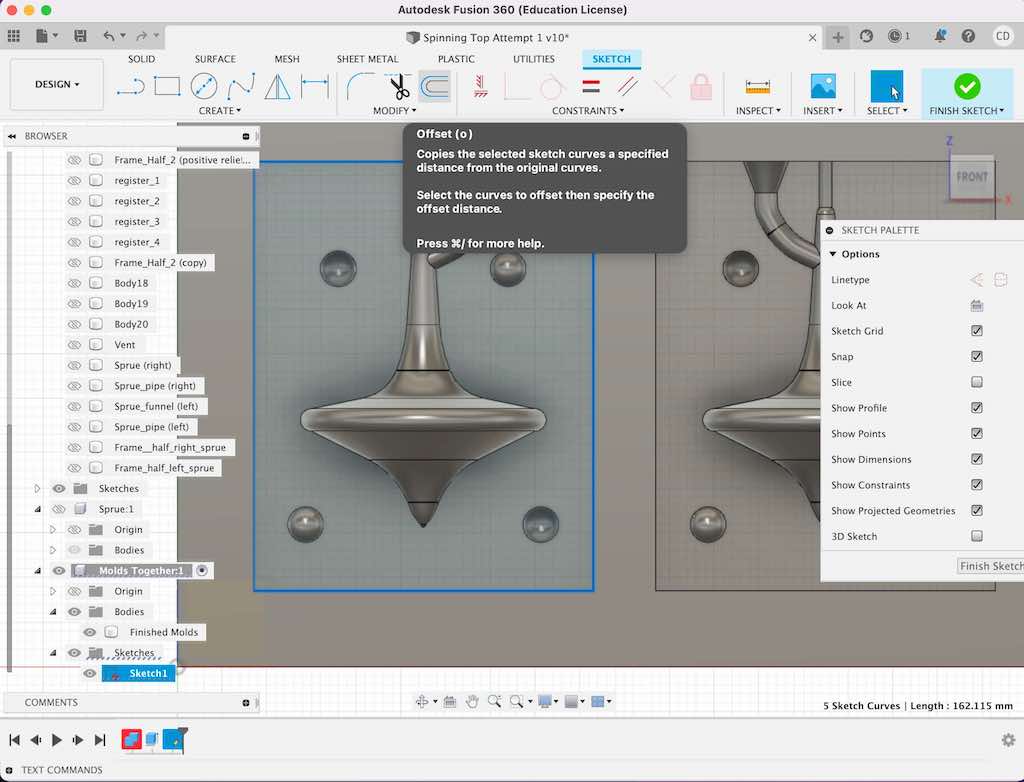
ADDING A STEP REGISTER:
At the last minute, I decided to add a step register in addition to my little hemispheres. This was what Neil suggested, since steps really help lock the mold's halves together all the way around.
I did this by starting a new sketch on the face of my lefthand mold, projecting the mold's features onto this, and offsetting the face's rectangular perimeter by a parameterized distance to create a smaller rectangle inside the original.
Then, I extruded this a parameterized distance that was less than my wall height. (I chose 3mm).
I repeated this process on the other half of the mold. I used the same parameter for the offset distance, but this time I extruded in the opposite direction.
This meant I ended up with a small step up around the perimeter of one mold, and a step down (basically a moat) around the perimeter of the other. These would ultimately lock together!
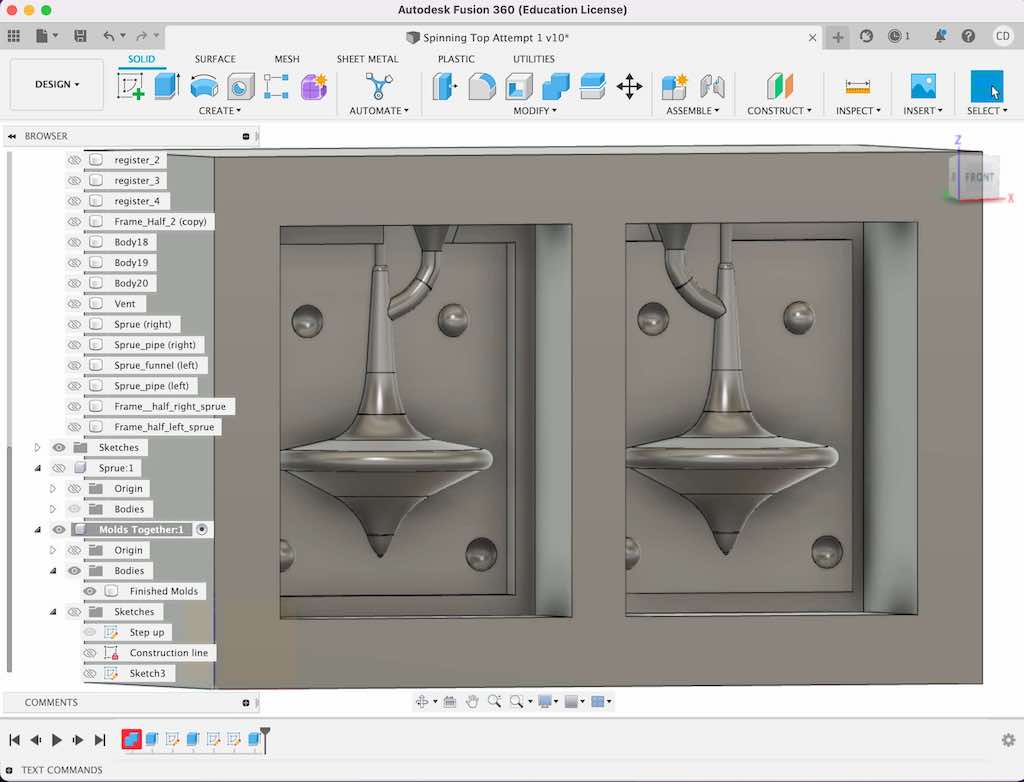
As a last step, I selected the relevant bodies/components, made sure everything was joined, and then saved everything together as a new component one last time.
With the design finally done, now it was time to export as a mesh and mill!
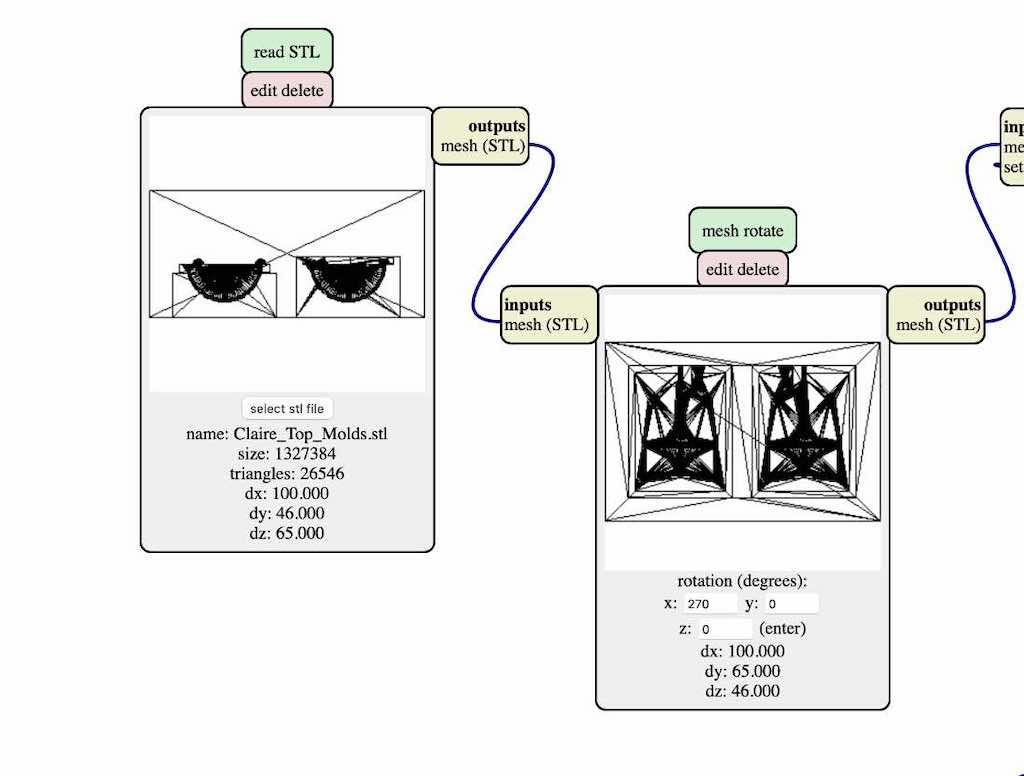
FILE & MACHINE PREP
Step #1 for milling was exporting from Fusion. I clicked on my final, complete component and exported it as a mesh STL. I saved this to a USB and moved to one of the computers connected to the Roland SRM-20.
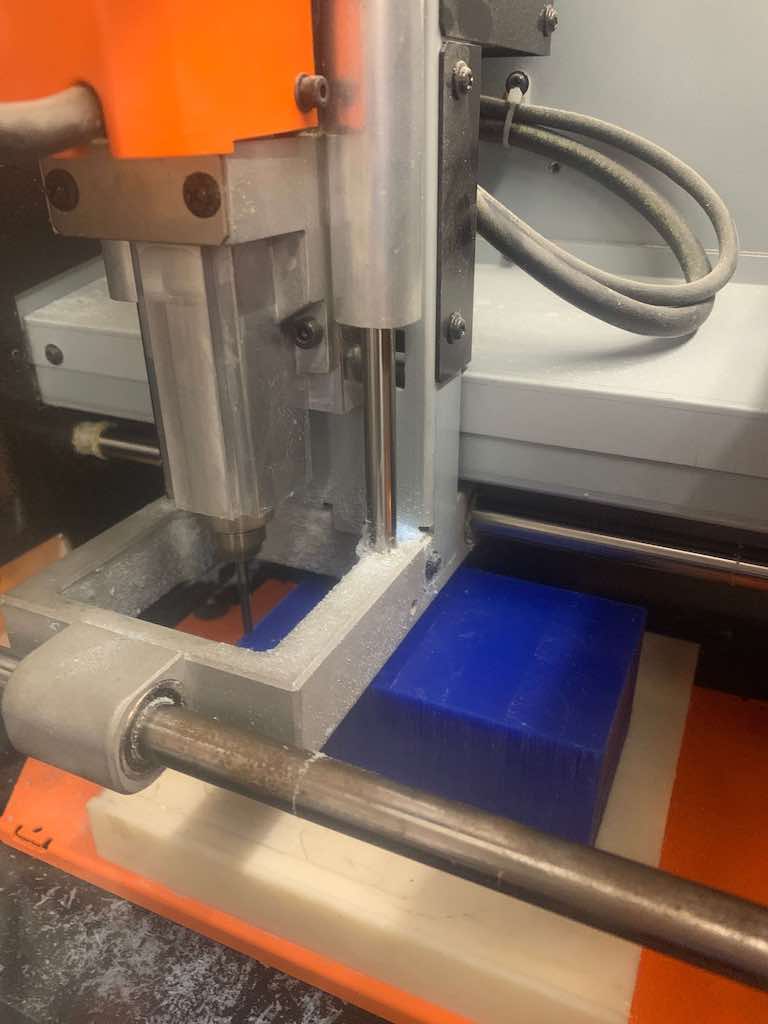
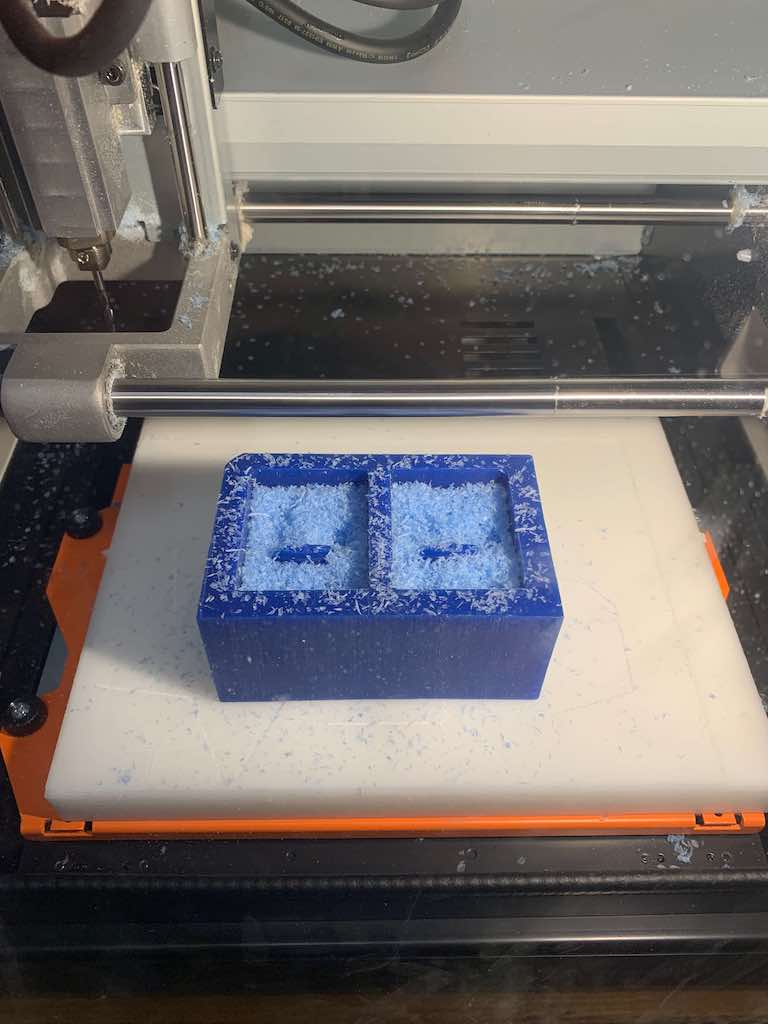
At the milling station, I wiped down the Roland's sacrificial layer and used double-sided tape to adhere my wax block firmly to the bed.
ROUGH PASS IN 2.5D
Then, I followed the steps outlined below to configure my file to mill for the ROUGH PASS in 2.5D using a 1/8" endmill:
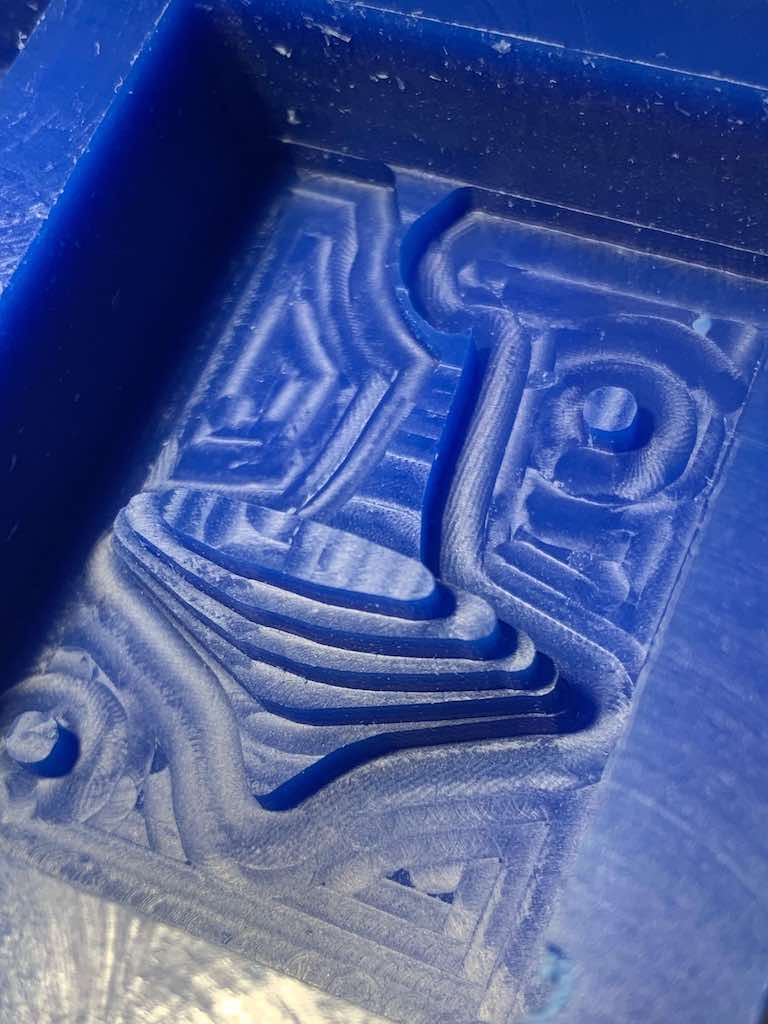
The result is a sort of pixelated / striated effect in a loose silhouette of your desired final product, as you can see below.
The purpose of this pass is to remove the bulk of your extra material with the larger endmill before we go back in and clean up the design with a finer one.
Learn from my mistake: I
initially skipped the 2.5D rough pass step of this process and tried to dive right into the 3D step. The result was that the endmill immediately tried to plunge all the way down (instead of removing material layer by layer, it went straight for the detailed cuts down below). As a result, the endmill got firmly stuck in the wax, the machine ground to a halt, and I had to restart.
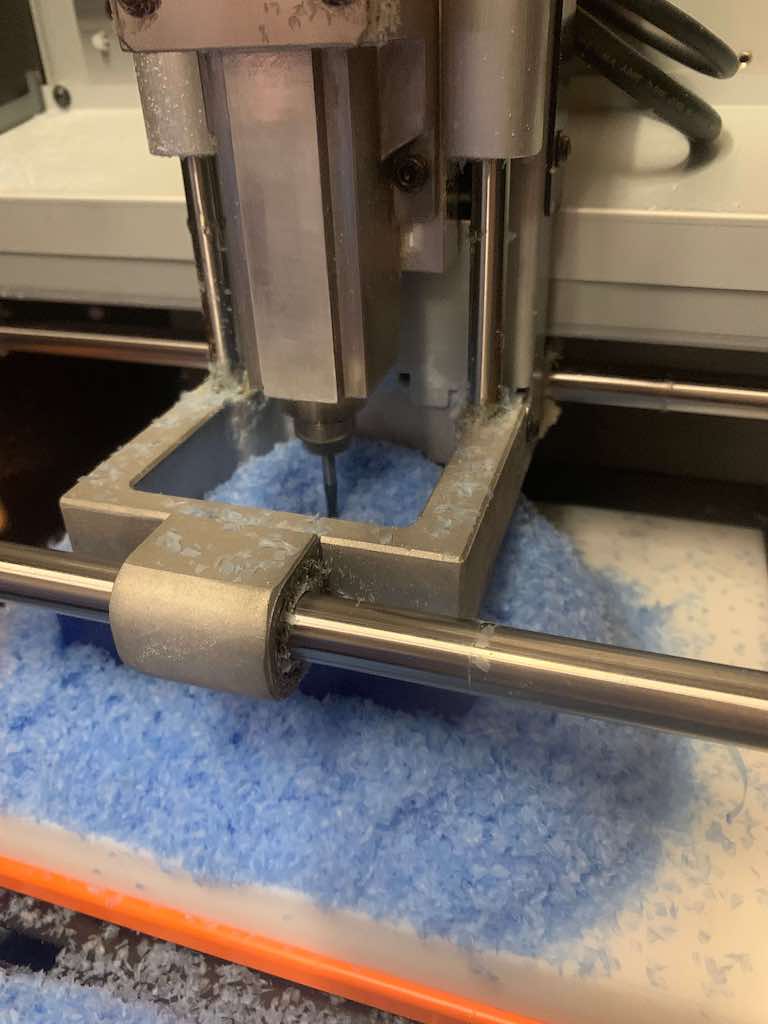
FINISH PASS(ES) in 3D
Once you have a rough cut done, it's time to swap out the 1/8" endmill for something finer that can achieve the level of finished detail we want from a mold.
I chose to do two finish passes: one with a 1/16" endmill and then another with a 1/32" endmill to achieve even more polish. However, if I were going to do this again, I would definitely skip the 1/16" and go straight to 1/32".
This time, we need to configure the file and machine to mill for the FINISH PASS in 3D:
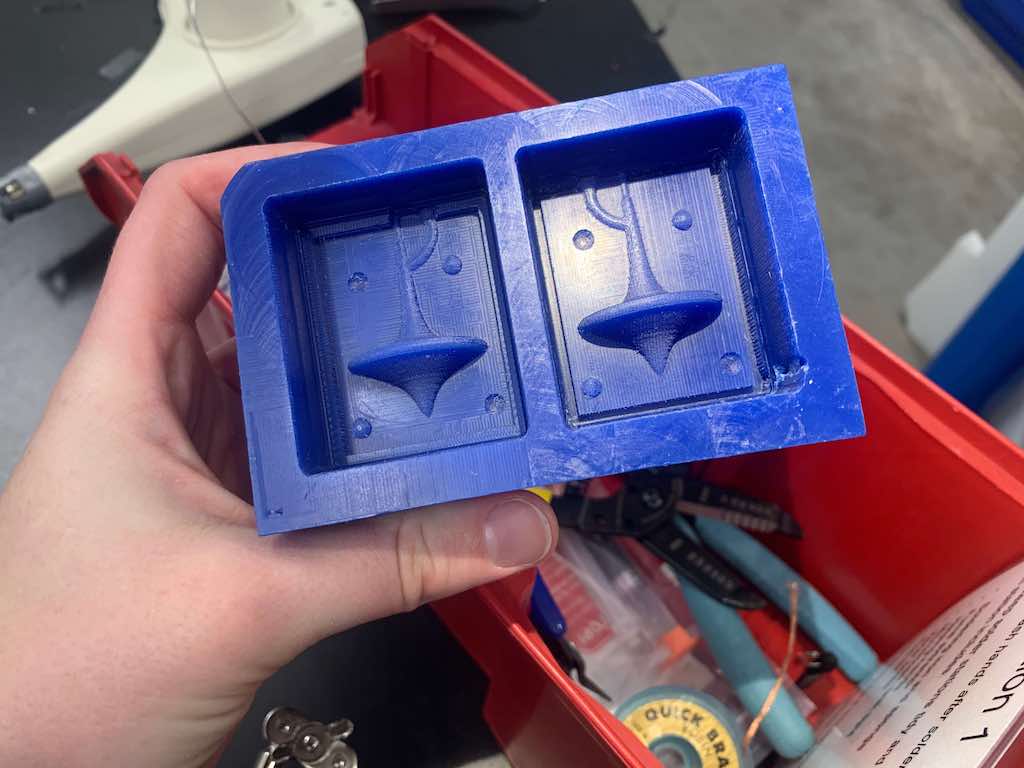
As you can see below, the result is much more detailed this time than from the rough cut!
If it's still not as detailed as you'd like, you can switch to a finer endmill and/or reduce the stepover value slightly.
Note: If you plunge too deep, the machine's collet will rub against the outer walls of your mill job. This isn't a good idea. You might also notice that the wider, upper shaft shaft of your endmill will rub against the outer walls if you have a deep design. I was probably near the upper limit for this, and the shaft of the 1/32" endmill did 100% rub agains the outer walls. Because I taped my wax block down very securely, this wasn't a huge issue -- but I was careful to extend my endmill as far out of the collet as possible (while still able to tighen it into place) to minimize this.
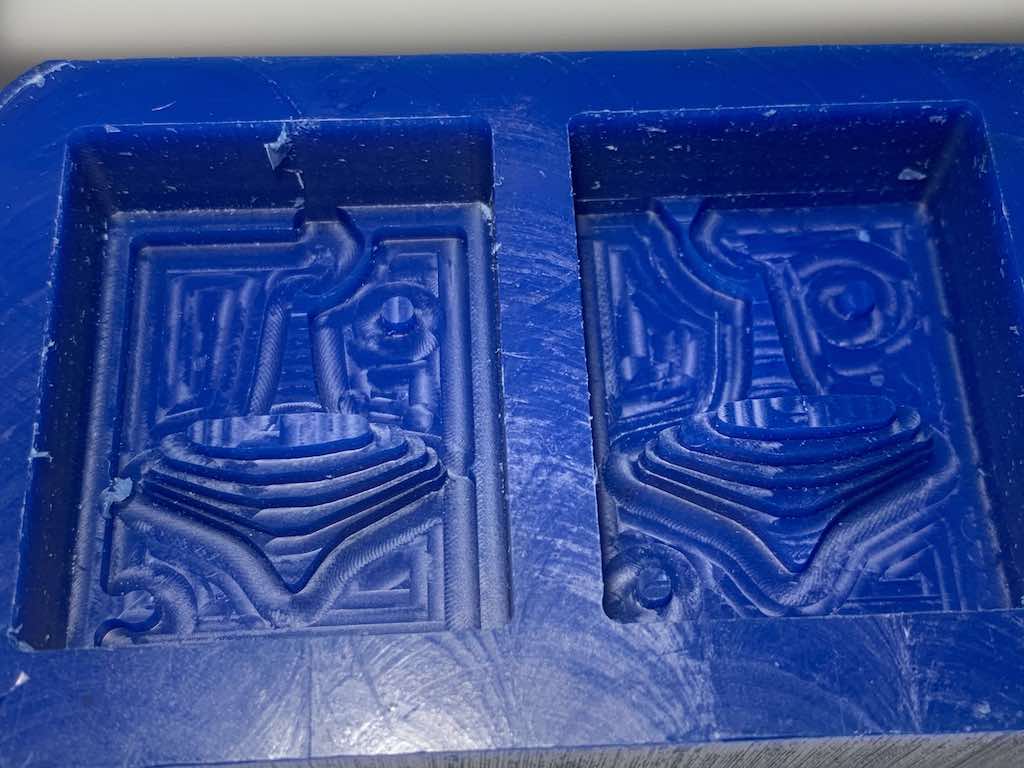
PREPARING YOUR WAX MOLD
First, we need to get all of the little wax shavings off of the wax block we just milled out. Canned air works well for this, and you can (gently!) scrape away extra bits with something soft like a q-tip. As a last step, gently wash the mold out with water and dry thoroughly with a paper towel.
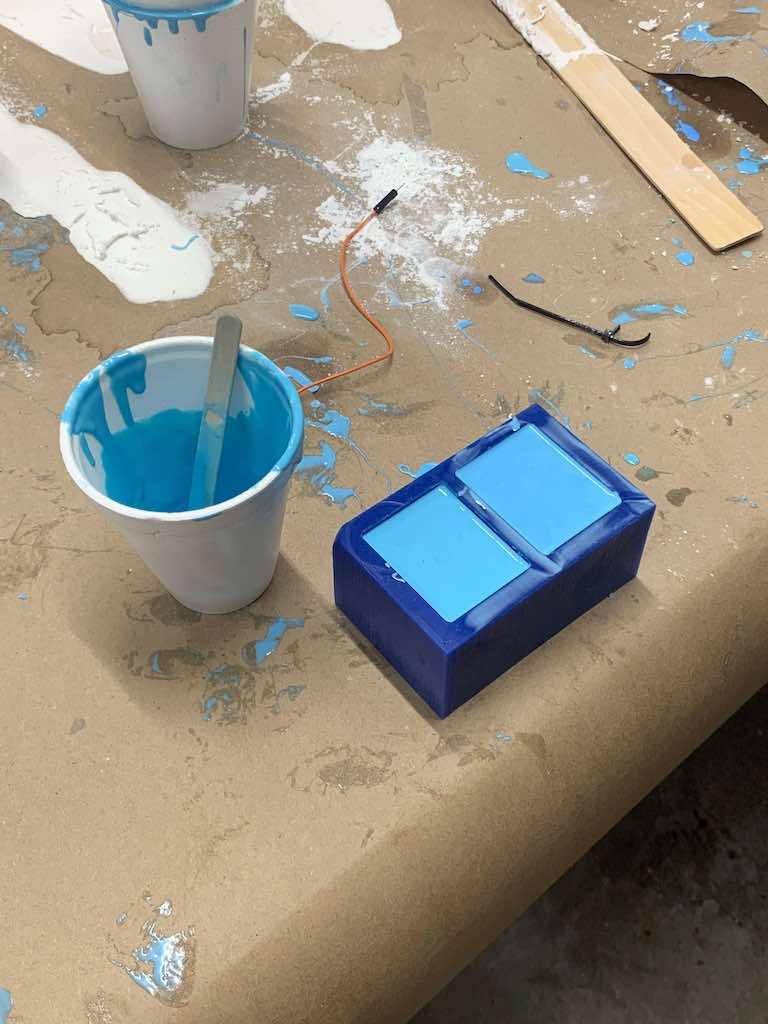
OOMOO PREP & POUR
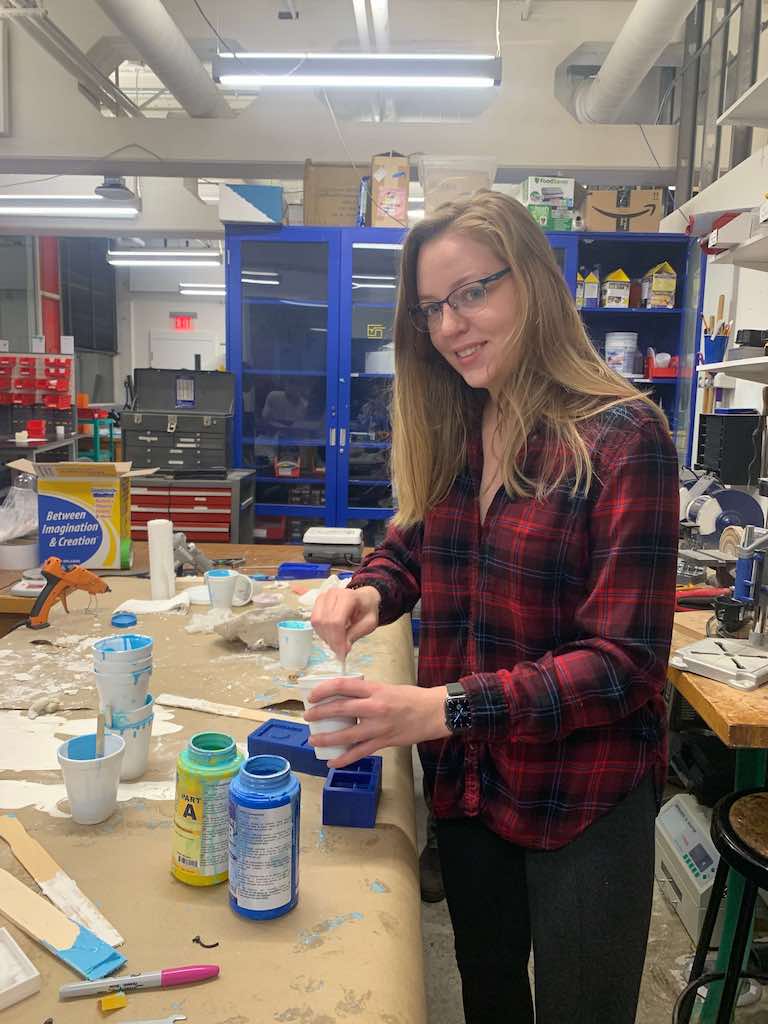
With the mold clean and ready, it's time to mix some goop!
We used something called "Oomoo 25," details for which can be found on Smooth On's website: https://www.smooth-on.com/products/oomoo-25/. This process is pretty straightforward, so feel free to follow the instructions on the box!
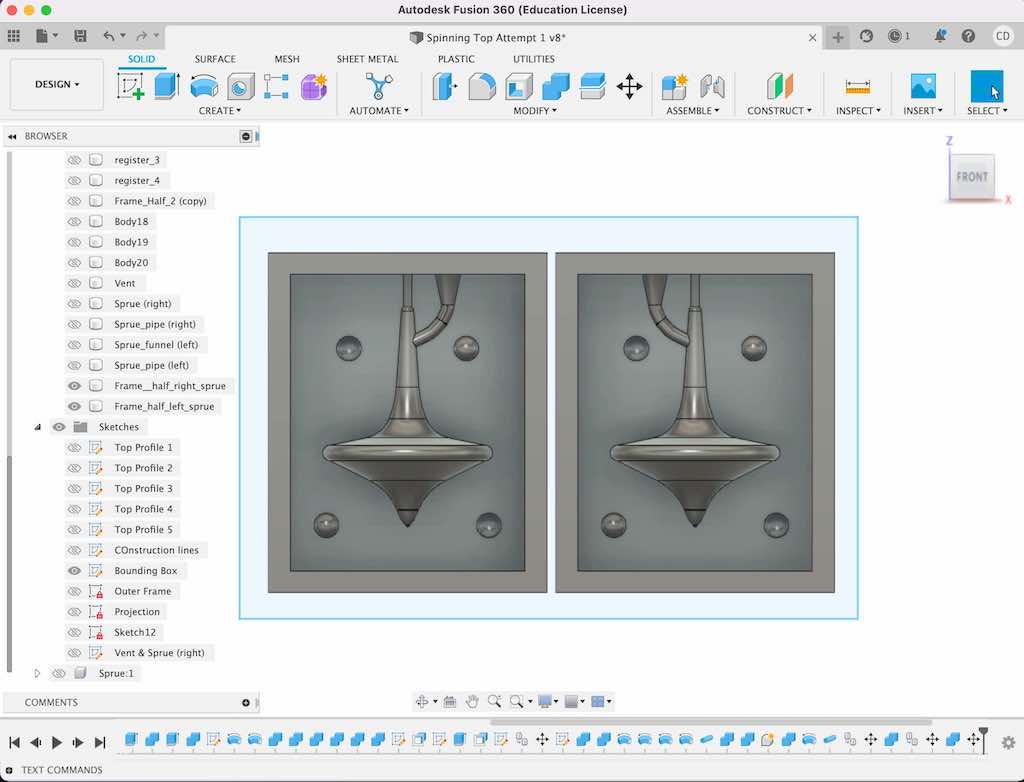
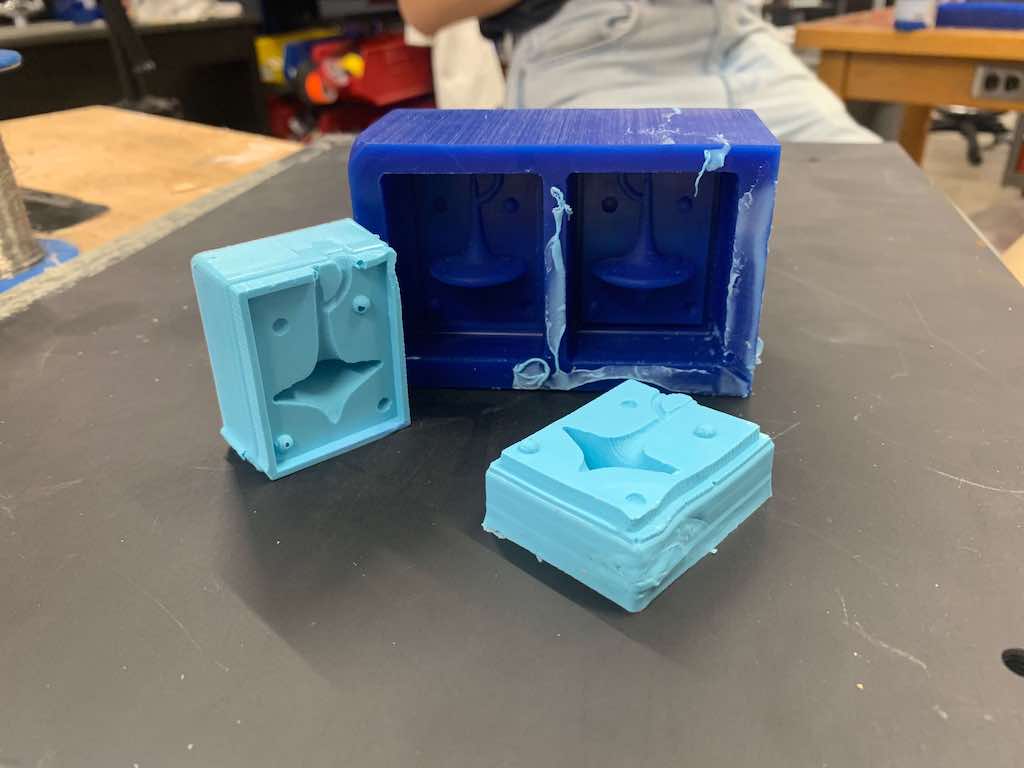
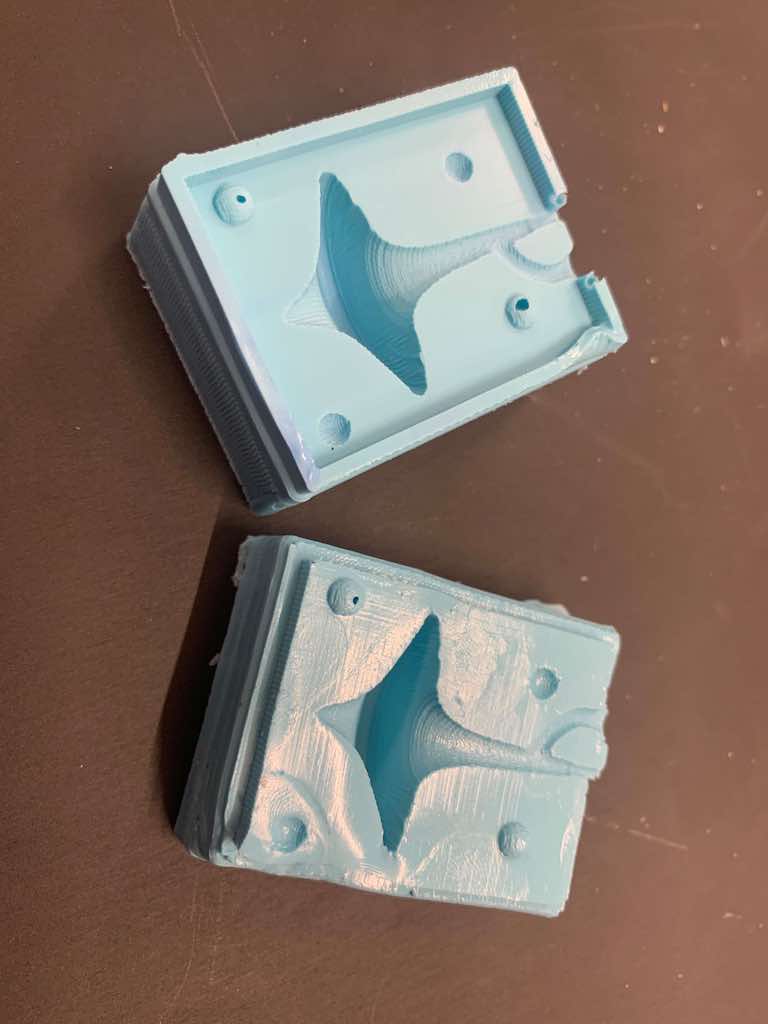
I also realized too late that I hadn't achieved quite full homogeneity in my first mixture. When I removed it from the mold, one small portion looked marbled instead of all one color... and that area was much softer than the others! I ended up needing to repeat the oomoo process all over again for a truly stable cast.
Notice in the photos below that those pesky air bubbles are visible in the registers of my first mold attempt, and the bottom righthand corner of the right half is slightly deformed from removving it too soon from the wax. Rest assured that my second attempt was much cleaner, with no air bubbles.
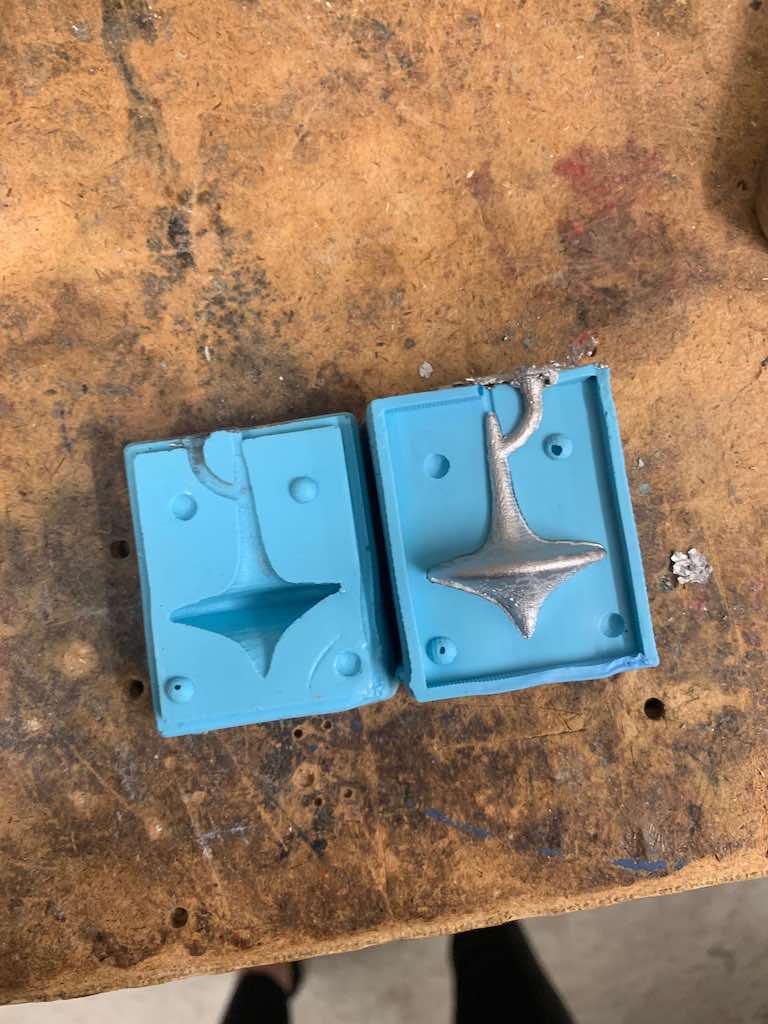
Now that we have cast oomoo into our wax mold to get a new oomoo mold (I know, I know... it gets confusing), it's time to cast one last time into our oomoo mold to create our finished form.
I chose to use a bismuth-tin alloy for this step, since I wanted a nicely weighted metal top. (Note: Neil recommends coating your molds in talc before molding with metal, but I didn't find that this made much of a difference.)
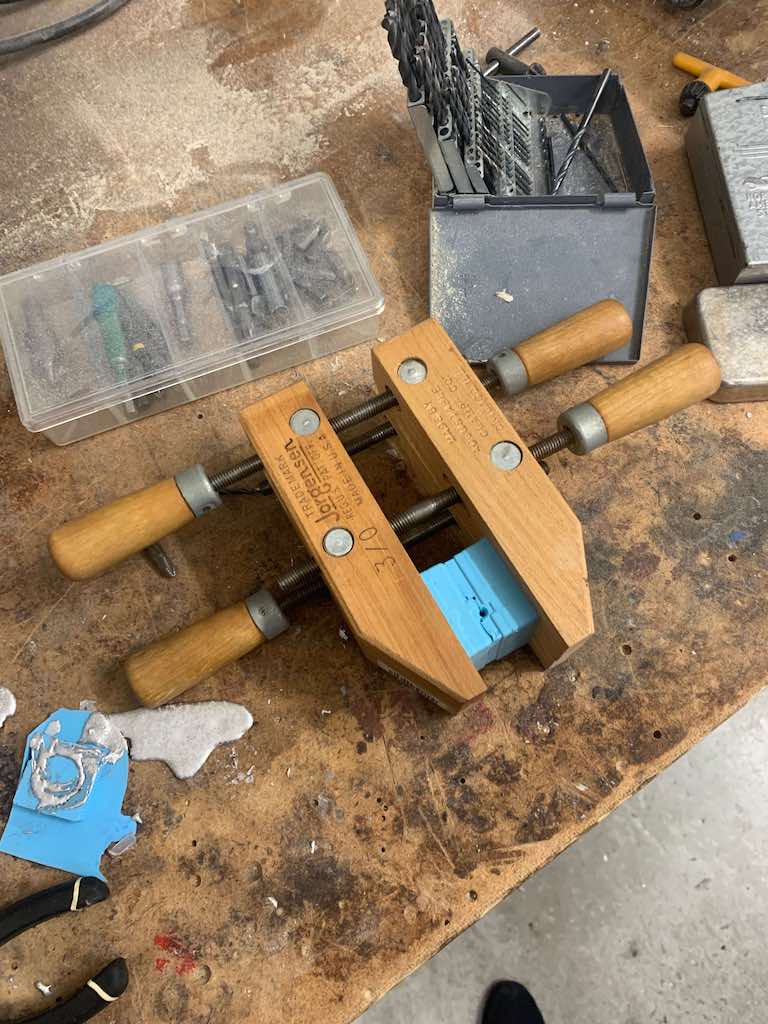
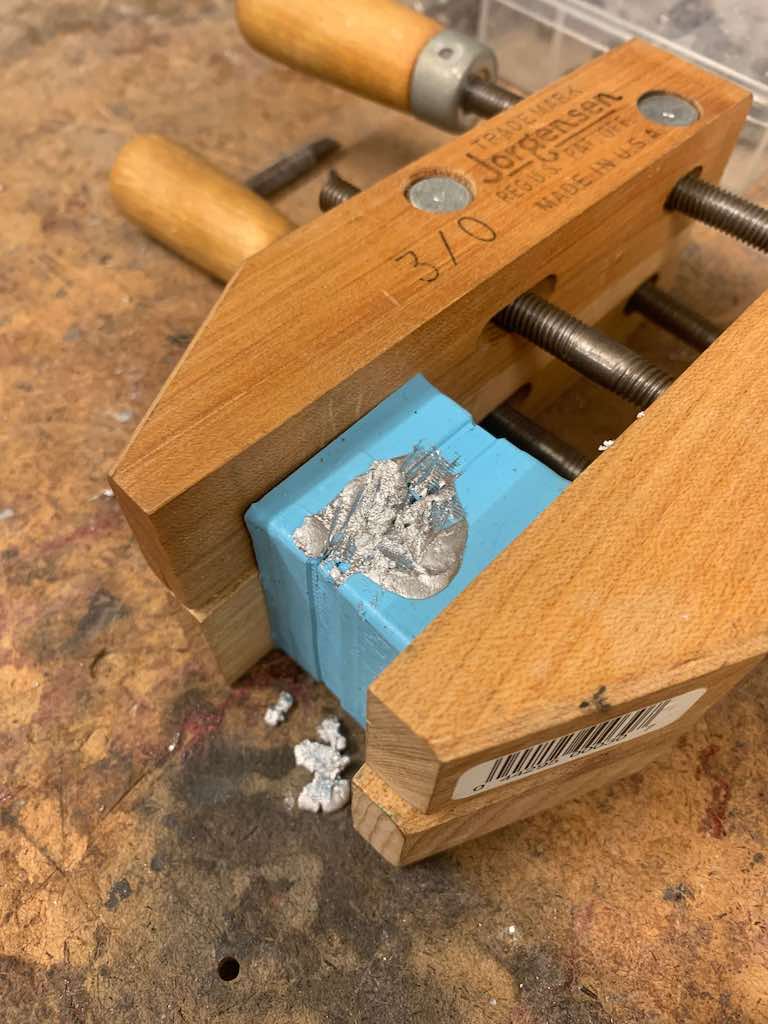
First, I clamped both halves of my mold together using two highly adjustable wooden clamps stacked on top of each other. This allowed me to achieve equal pressure across the mold.
Pro Tip: Do NOT overtighten! If you apply too much pressure, you'll deform you mold just enough to end up with a deformed final product.
Then, I put a heat-safe metal pouring pan full of bismuth-tin scraps from previous students' castings into our lab's toaster oven. It reheats beautifully, so there's no need to start with virgin material here. I set the oven to "convection heat" at the maximum temperature of 450 degrees, and let it bake for 10 minutes to get nice and hot and molten.
At the end of 10 minutes, I used a very thick oven mitt to remove the pan from the oven and immediately poured it--very carefully!--into the sprue opening of my mold. Make sure you avoid your vent! Plugging it up defeats the purpose.
I found it was easiest to direct the flow of the molten alloy if I used a metal stirring rod to help guide it from the lip pouring pan into the appropriate opening, rather than pouring it directly.

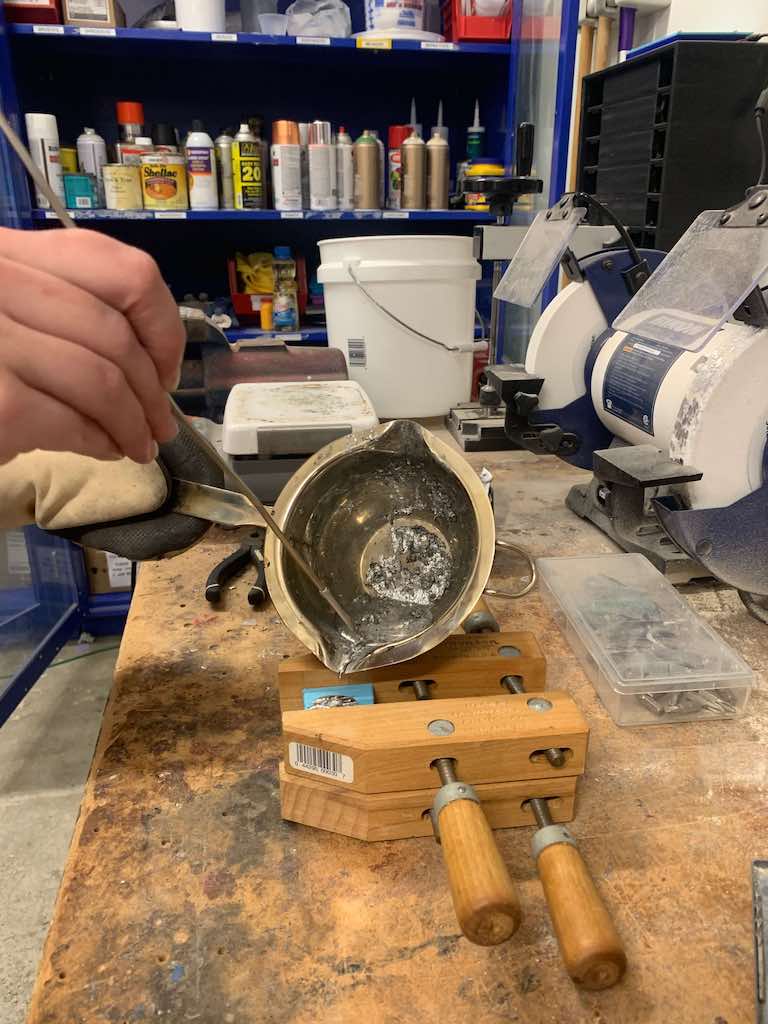
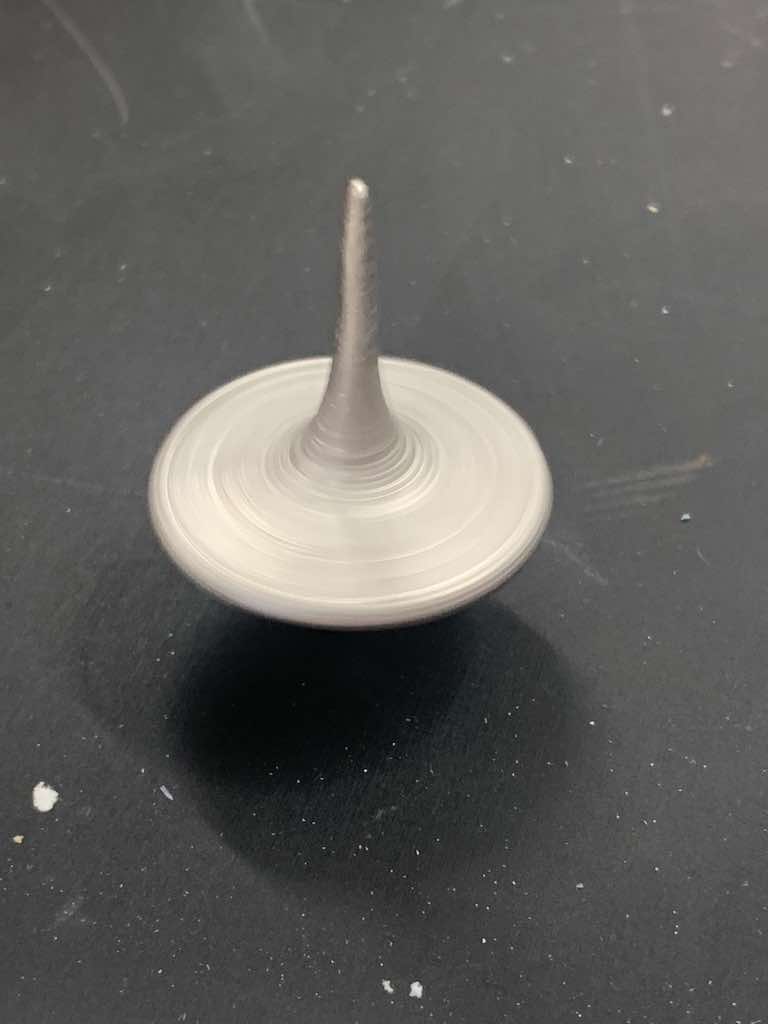
After waiting about 15 minutes for the bismuth-tin alloy to cool and solidify, I unclamped my molds and opened them up to reveal a beautiful, shiny top!
I had virtually no visible seam, since my step register and clams helped me line up both halves of the mold perfectly with even pressure.
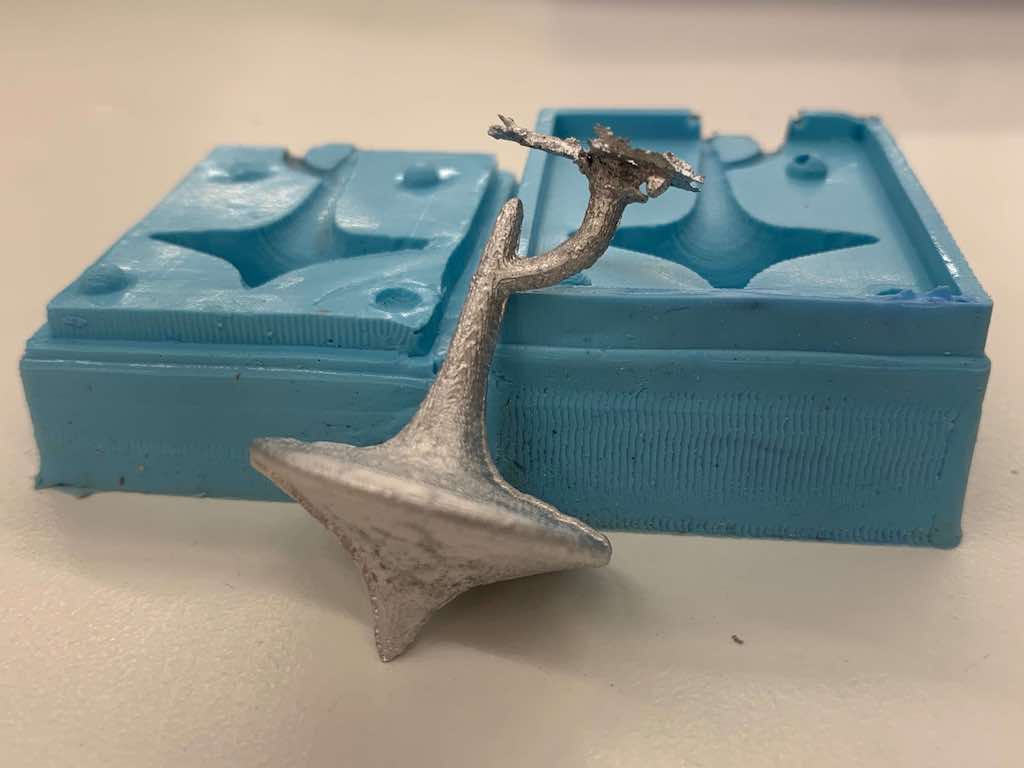
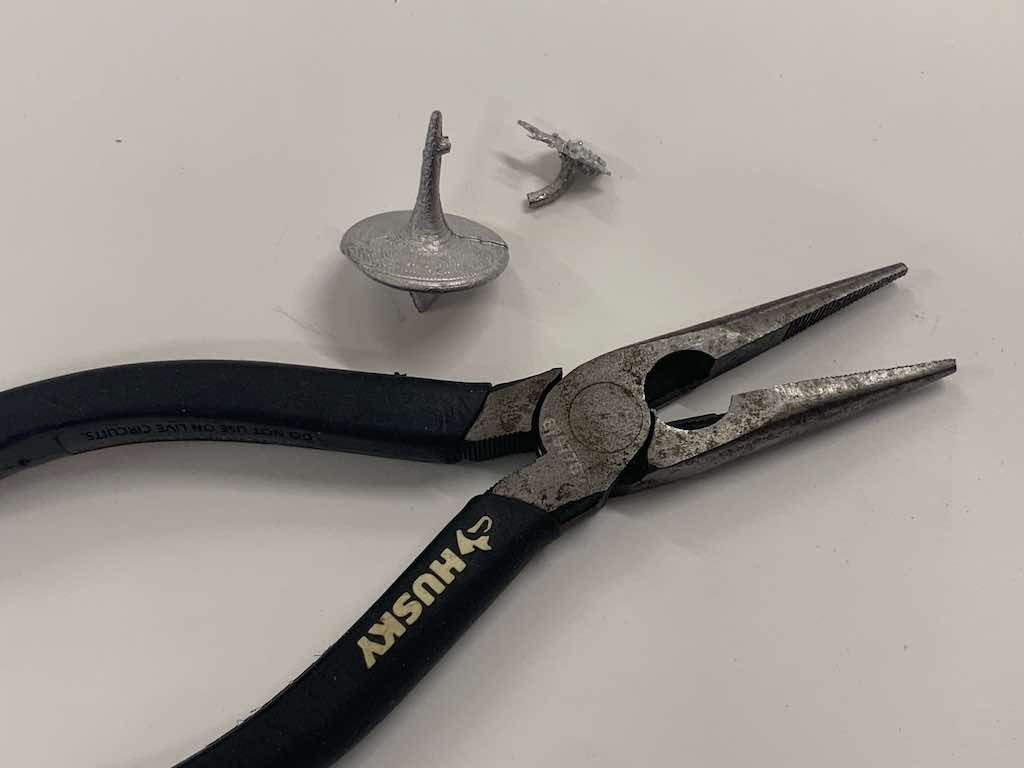
I used needle nose pliers to break off the sprue.
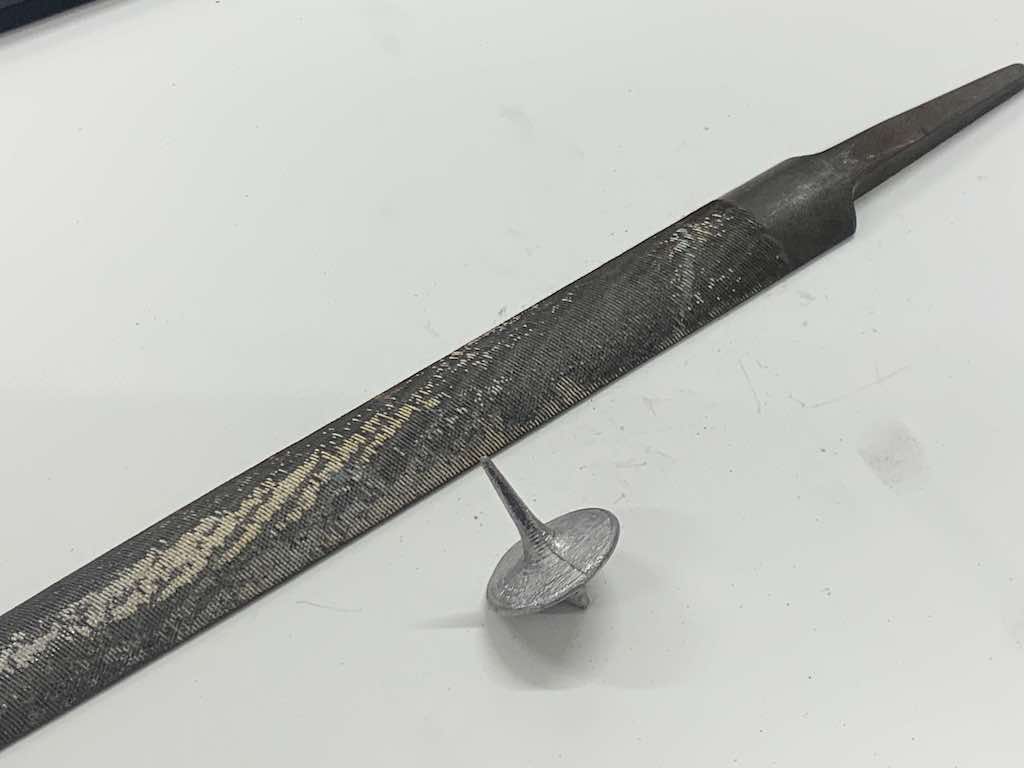
Then, a file to clean up the sharp bit that remained behind.
And the final verdict: it spins beautifully!
This has been my favorite project to date!
I enjoyed the simplicity of the design process for this one, relatively speaking (which means I've come far since week #1!) and the sheer satisfaction of revealing such a sleek final product after so many steps to produce the molds in the first place.
I also appreciate that this is something I can easily make multiple copies of. Now that I have the mold, I can cast into it as much as I want! In fact, TAs Leo and Quentin made their own little tops from my mold, showcasing its dependability.
created with
Website Builder .