SCROLL
finalProject 0000 0001 CAD 0010 cutting 0011 programmer 0100 3Dprinting 0101 elecDesign 0110 makeBig 0111 embedProg 1000 moldCast 1001 inputs 1010 outputs 1011 networks 1100 machine 1101 interface 1110 wildcard 1111 notesNotes
SEARCH THIS PAGE ( COMMAND + F ) FOR KEYWORDS
Documentation
I started off documenting by hand in a notebook and taking photos with my phone. I would then type up the documentation more completely in html. I had to upload photo's, name each one, put it in the correct folder (after compressing) then link to it in my html. This was quite a process, one that was eating up way to much of my time.
Over the last couple weeks I have been experimenting with using Typora, a markdown editor, for note taking (this page is being written in Typora). Typora has proven to be a great tool for writing HTML (you can export your file as html) without having to tag all of my headers, lists, bold and italicised text.
Images have still been taking a long time as between screenshots and photos from my phone they're all stored in different places. This week I had to find all the photos, consolidate them in one folder, name them and link to them correctly in Typora, not for where they were currently, but for where their copies would end up in my class folder. This was an extremely tedious process so today I went in search of a solution.
Image Solution
Create a folder where you will save all of your .md (markdown) files.
Within that folder create a folder where you will store the images you add to Typora documents.
Within that folder create a folder where you will store the images for the particular doc you are writing. Be sure to make the name of this folder the same as the name of the doc you are working on.
- This you have to do every time you start a new doc with images - unless you give Typora permission to create folders which I haven't figured out how to do yet.
Go to preferences > image
- Set the top drop down menu to "Copy image to custom folder"
- Define the relative file path (starting with
./and ending with${filename}) to your general Typora image folder (not the doc specific one)
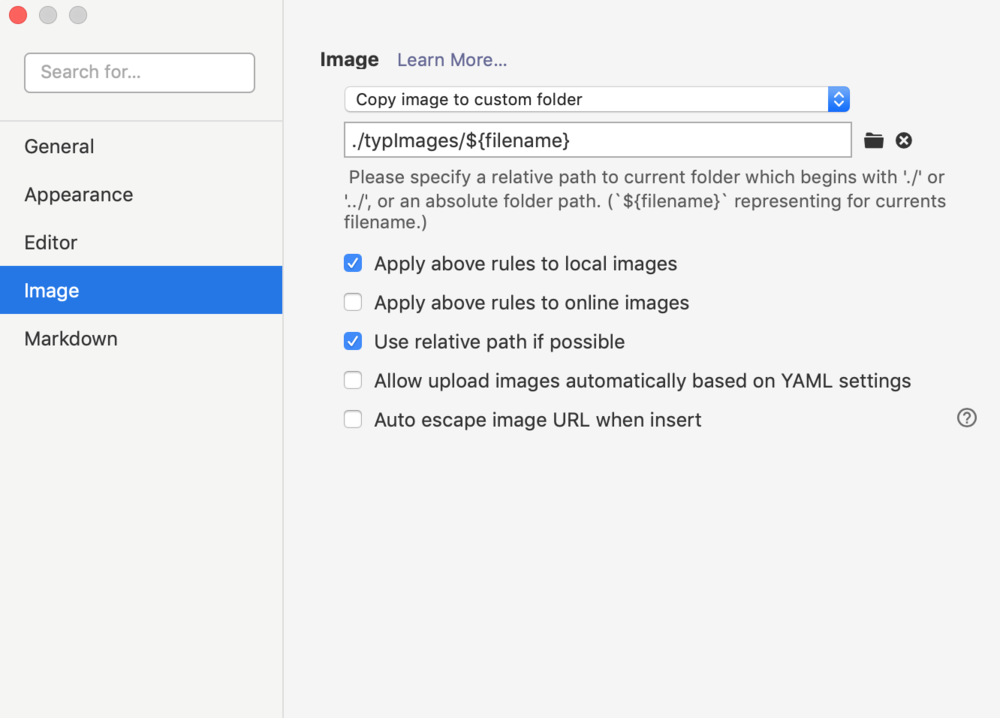
Add an image to your doc and check that a copy of the image was placed into the doc specific image folder within the general Typora image folder. The original image should still be where ever you dragged it into Typora from.
In your directory containing your site pages and assets create the same image file tree as you did for Typora.
Now using ImageMagick or ffmpeg (for videos) convert and copy your media from within the doc specific Typora image folder to the analogous folder in your site directory.
Export your Typora file as html, with or without style (up to you), to your site directory. Keep in mind that you should locate this html so that the file paths in the html img tags are correct.
Style Solution
I have a separate stylesheet for my site that I was linking to for my earlier hand-written HTML pages. I actually prefer the Typora style now, but I would like to keep the side navigation menu on the pages I write in Typora. Here's how to do that:
- I just wrote html straight into the top of the Typora doc and linked my styles file. I also copy and pasted the html for the side nav bar straight into my doc like so:
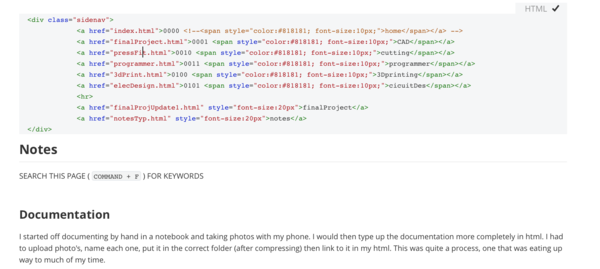
Typora will recognise the HTML and hide it from view. It will even try to render the content.
Once you export the whole doc in HTML to your site directory it will look like the page you're on now.
Laser Cutting
I've been having issues with significant numbers of lines missing when opening DXF files created in Fusion360 in the Thunder Laser software. Not entirely sure on why this happens, but judging by my google searches, it effects a lot of people trying to do similar things.
The work around I found is to import the Fusion DXF into Rhino and then export it using the lowest line count (2007). The Thunder software can then render all of the lines properly. From what I can tell there is no (visible) loss to the geometry.
CAD and 3D printing
Non manifold geometry
A non-manifold geometry is a 3D shape that cannot be unfolded into a 2D surface with all its normals pointing the same direction. This is manifold. Only manifold objects can exist in the real world.
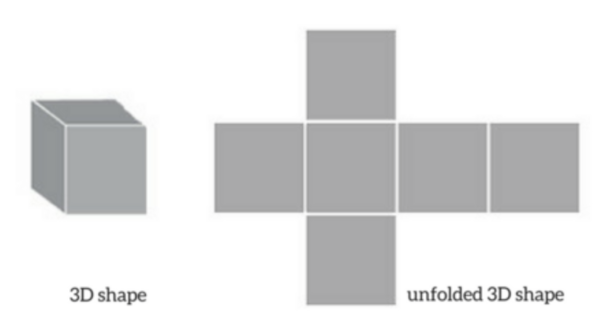
These are common non-manifold errors:
- More than two faces sharing and edge
- Multiple faces sharing a vertex but no edges
- Surfaces with zero volume creating and open shape

ffmpeg
Compression and other manipulations of video and audio files
http://academy.cba.mit.edu/classes/computer_design/video.html
No audio:
xxxxxxxxxxffmpeg -i ledTest.mov -vcodec libx264 -b:v 1000k -vf scale=-1:1080 -an ~/harvardsite/people/donagh/assets/ledTest.mp4- start-end trim
xxxxxxxxxxffmpeg -i demovideodonagh.mp4 -vcodec libx264 -b:v 1000k -vf scale=-1:1080 -an -ss 00:00:03 -t 00:04:34 ~/harvardsite/people/donagh/media/week4/individual/loose.mp4xxxxxxxxxxffmpeg -i demovideodonagh.mp4 -vcodec libx264 -b:v 1000k -vf "scale=trunc(iw/2)*2:trunc(ih/2)*2" -ss 00:00:03 -t 00:04:34 ~/harvardsite/people/donagh/typImages/final/demovid.mp4- no trim
xxxxxxxxxxffmpeg -i centeringTest2.mov -vcodec libx264 -b:v 1000k -vf scale=-1:1080 -an centeringTest2.mp4If getting "width or height not divisible by 2 error" use the below. It divides by two, rounds, and then multiplies by two.
xxxxxxxxxxffmpeg -i 1.mov -vcodec libx264 -b:v 1000k -vf "scale=trunc(iw/2)*2:trunc(ih/2)*2" -an 1.mp4xxxxxxxxxxffmpeg -i testvid.mp4 -vcodec libx264 -b:v 500k -vf "scale=trunc(iw/2)*2:trunc(ih/2)*2" -an ~/Desktop/testvid.mp4Trim Time (-ss start time, -t duration)
xxxxxxxxxxffmpeg -i input_video -vcodec libx264 -b:v 1000k -an -ss 00:00:10 -t 00:00:10 output_video.mp4Simple:
ffmpeg -i video.mp4 -ss 00:00:00 -t 00:00:08 videoTrim.mp4The timestamps need to be in
HH:MM:SS.xxxformat or in seconds (s.msec)
crop size (width:height:xoffset:yoffset):
- This one is weird to measure. I've had the best luck with leaving the height the same and adjusting the width and offset. It almost seems like the width argument controls the height.
- This link is helpful.
xxxxxxxxxxffmpeg -i input_video -vf crop=1500:800:200:100 -vcodec libx264 -b:v 1000k -an output_video.mp4Here are some to try out. The ffplay command allows you to preview the crop before you decide to actually augment the file.
xxxxxxxxxxffmpeg -i scanVid1.mov -vf crop=500:500:000:100 -vcodec libx264 -an ~/harvardsite/people/donagh/Typora/typImages/emb/four.mp4xxxxxxxxxxffmpeg -i scanVid.mov -vf "crop=in_w:in_w:350:100" -vcodec libx264 -an ~/harvardsite/people/donagh/media/week4/individual/scanVidTrim.mp4xxxxxxxxxxffmpeg -i terminal.mov -vf "crop=1150:240" -vcodec libx264 -an ~/harvardsite/people/donagh/typImages/input/terminal.mp4xxxxxxxxxxffmpeg -i ledTest.mov -vf "crop=in_w:in_h/2:700:700" -vcodec libx264 -an ~/Desktop/ledTest.mp4ffplay -i ledTest.mov -vf "crop=in_w/2.8:in_h/1.4:700:800"ffplay -i scanVid.mov -vf "crop=in_w:in_h/4*3:0:0"ffplay -i measure.mov -vf "crop=1150:240"
You can specify input and output locations:
xxxxxxxxxxffmpeg -i /Users/donaghmahon/Movies/test.mov /Users/donaghmahon/Downloads/test.mp4xxxxxxxxxxffmpeg -i measure.mov -vcodec libx264 -b:v 400k -vf "pad=ceil(iw/2)*2:ceil(ih/2)*2" -an ~/harvardsite/people/donagh/typImages/input/measure.mp4xxxxxxxxxx-vf "pad=ceil(iw/2)*2:ceil(ih/2)*2"quantizer (number) specifies quality, lower numbers = higher quality
for mp4:
ffmpeg -i inFile.mp4 -crf 18 outFile.mp4
-i = input
-crf = quality control (lower the number - higher the quality)
To specify bitrate for audio
ffmpeg -i <input name> -b:a <bitrate> <output name>
To specify bitrate for mp4
ffmpeg -i <input name> -b:v <bitrate> <output name>
https://ffmpeg.org/ffmpeg.html
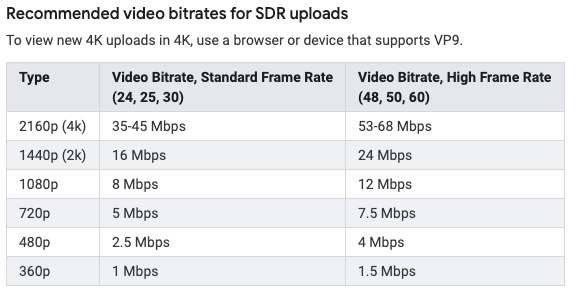
bitrate
the number of bits that are processed in a unit of time
bits per second
8 bits = 1 byte; 1 megabyte = 8 megabits
- video running at 8 megabytes/s has a bit rate of 8 megabits/s (mbps)
- video running at 8 megabytes/s has a bit rate of 8 megabits/s (mbps)
higher bitrate accommodates higher quality
at the same bitrate, video in newer codec will look better than video in older codec
- What the hell is a codec?
variable bitrate (VBR) gives better quality than constant bitrate (CBR)
- CBR holds same bitrate for entire video -- doesn't allocate enough data for complex segments and leaves unused capacity on simple segments
Video file size =

change screenshot save location
Terminal:
defaults write com.apple.screencapture location User/donaghmahon/Desktop/screenshots
Alternatively:
command + shift + 5 > options
^ this is also how to screen record
HTML and CSS
Video
xxxxxxxxxx<video controls loop width="500"><source src="3linkTimelapse.mp4" type="video/mp4"></video><hr>change of theme line (like in my side menu over there <----)Location Linking
- Place
<a id="target">before the element you want to link to (or view source code to see ID of an element on a page you don't control) - Use
<a href="http://url.to.site/index.html#target">Link</a>to link to that location.
- Place
Columns
xxxxxxxxxx<div class="row"><div class="column"></div><div class="column"></div></div>xxxxxxxxxx.row {display: flex;}.column {flex: 50%;}Click image for full view and download
xxxxxxxxxx<a href="media/week5/individual/helloWorldTraces.png" download><img src="media/week5/individual/helloWorldTraces.png" width="500"></a>
Photoshop - Batch Image Compression and Conversion
File > Scripts > Image Processing
ImageMagic - batch image compression and conversion
CAREFUL WITH MOGRIFY - OVERWRITES FILES
- Using
-formatto change file type will not overwrite original files
mogrify -format png *.jpg
- Can use in combination with other commands:
mogrify -quality 50% -resize 500 -format png *.png
- Can use
-path ../new_locationbefore*.pngto send output files to new directory like so:
xxxxxxxxxxmogrify -quality 50% -resize 500 -format jpg -path ~/harvardsite/people/donagh/typImages/final *.jpgxxxxxxxxxxmogrify -quality 40% -resize 500 -format png -path ~/Desktop/Typora/typImages *.png
USE CONVERT TO WORK ON INDIVIDUAL IMAGES
- (Convert inherently writes a new file, unlike mogrifiy. No need for
-formator-path)
convert coolTermOutput.png -quality 50% -resize 500 ~/harvardsite/Harvard_machine_2019/media/coolTermOutput.jpg
ROTATE IMAGES BASED ON EXIF DATA
mogrify -auto-orient *.JPG
git and terminal commands
git status
git add .
git commit -m"comment goes here"
git pull origin master
git push origin master
cd = change directory
pwd = print working directiory
ls - list files in directory
ls -la = list is ling form (-l) and include hidden files (-a)
cd .. = move up one directory in file tree
du -sh -- * | sort -h = list files in directory by size
-h = human readable
open -a "Sublime Text" index.html = open file with particular application
touch newFile.html = create a new file
cp ./Typora/typImages/whyMerge.jpg ~/harvardsite/people/donagh/typImages/ = copy a file to another location
ioreg -p IOUSB -w0 | sed 's/[^o]*o //; s/@.*$//' | grep -v '^Root.*' = list usb devices
open ~/.bash_profile
Add this to bottom of file:

command + s to save and then quit terminal
Reopen terminal and test command
Issues
If when pushing or pulling and you get this:
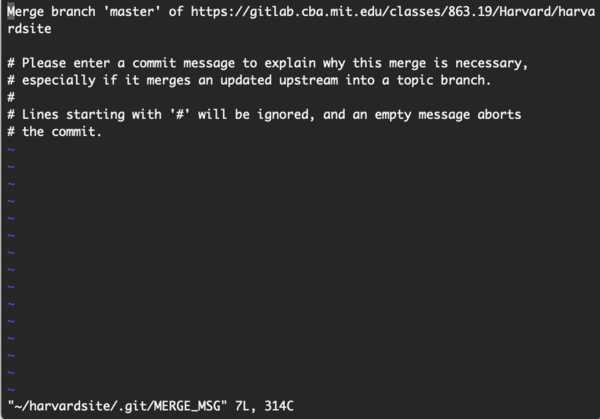
Do this:
- press 'i'
- type a merge message
- press esc
- type :wq
- press enter
If you get this:
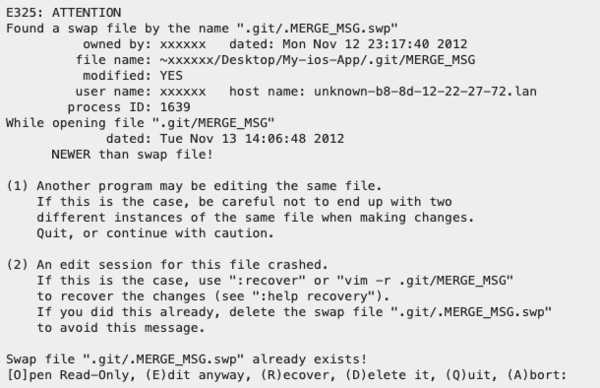
Press 'D' to delete the incomplete git commit or git merge
If you get something like "Your branch and 'origin/master' have diverged, # and have 1 and 1 different commit(s) each, respectively.", do this:
git merge origin/master-or-
git rebase origin/master
Then git pull origin master and retry