SCROLL
finalProject 0000 0001 CAD 0010 cutting 0011 programmer 0100 3Dprinting 0101 elecDesign 0110 makeBig 0111 embedProg 1000 moldCast 1001 inputs 1010 outputs 1011 networks 1100 machine 1101 interface 1110 wildcard 1111 notes
1110
Wildcard Week
DOCKER
For my wildcard week I decided to make my own wildcard topic as the organized options, while extremely interesting, didn't really fit into my final project. Instead I am going to figure out everything about Raspberry Pis, specifically how to deploy my programs to them and interact with its hardware.
Deployment to the RPi
Now that all my programs are written it's time to put them where they need to be. For the python script, that is on the RaspberryPi.
To do this I will use Docker. Docker is a software that allows you to package up your program and its environment into an isolated 'container'. Much like the virtual environment I set up on my Mac to write the OpenCV python script, the container will have everything my program needs to run and will keep all of its dependencies separate from everything that is not in the container. This means that a container can be run almost anywhere, hence your program can be run almost anywhere, regardless of the system or device's configuration.
What's a Docker Image? By Docker image I mean Docker container image. https://www.docker.com/resources/what-container
xxxxxxxxxxA container image is an unchangeable, static file that includes executable code so it can run an isolated process on information technology (IT) infrastructure.
A google search for python opencv docker image returns this image as the second result. It'll do.
Here is a handy guide on how to get docker up and running on a RPi.
The OS I'm going to flash my Pi with is called Hypriot. It is the standard Pi Raspbian OS with Docker enabled. Raspbian and therefore Hypriot is a linux distribution.
Flashing Pi with Hypriot OS:
Resources:
https://blog.hypriot.com/getting-started-with-docker-and-mac-on-the-raspberry-pi/
https://computers.tutsplus.com/articles/how-to-flash-an-sd-card-for-raspberry-pi--mac-53600
- Format 32MB micro SD card
- Download and unzip latest Hypriot from gitHub
xxxxxxxxxxcd Downloadswget https://github.com/hypriot/image-builder-rpi/releases/download/v1.11.5/hypriotos-rpi-v1.11.5.img.zip unzip hypriotos-rpi-v1.11.5.img.zip- Flash microSD
xxxxxxxxxxdiskutil list diskutil unmount /dev/disk3sudo dd if=hypriotos-rpi-v1.11.5.img of=/dev/rdisk3- There will be no output. Could take up to 5 min. Wait for out put. Then unmount.
xxxxxxxxxxdiskutil unmountDisk /dev/disk3Remove microSD from computer
With RPi not connected to power, plug the following into the RPi: mouse, keyboard and HDMI to monitor
Insert MicroSD card into Pi
Plug in to power
Wait - lights should flash
Display should be showing lines of texts and windows opening and closing
- This didn't work first time. I believe I formatted the SDcard incorrectly. I reformatted, refreshed and it worked
Find Mac ip address
xxxxxxxxxxifconfig |grep inet
Number following 'inet' in output
- login with username "pirate", password "hypriot"
Can't find any good way to configure the pi to connect to my phone's hotspot. Going to download Hypriot's flash tool to refresh and edit network settings.
I refreshed, but just figured out I didn't need to. Instead, after flashing and unmounting the microSD, I unplugged it and plugged it back in. I edited a file called 'user_data' :
xxxxxxxxxx#cloud-config# Set your hostname here, the manage_etc_hosts will update the hosts file entries as wellhostname: black-pearlmanage_etc_hosts: true# You could modify this for your own user informationusers:- name: pirategecos: "Hypriot Pirate"sudo: ALL=(ALL) NOPASSWD:ALLshell: /bin/bashgroups: users,docker,videoplain_text_passwd: hypriotlock_passwd: falsessh_pwauth: truechpasswd: { expire: false }package_upgrade: false# # WiFi connect to HotSpot# # - use `wpa_passphrase SSID PASSWORD` to encrypt the pskwrite_files:- content: |allow-hotplug wlan0iface wlan0 inet dhcpwpa-conf /etc/wpa_supplicant/wpa_supplicant.confiface default inet dhcppath: /etc/network/interfaces.d/wlan0- content: |country=dectrl_interface=DIR=/var/run/wpa_supplicant GROUP=netdevupdate_config=1network={ssid="donaghiphone"psk="hotspot"proto=RSNkey_mgmt=WPA-PSKpairwise=CCMPauth_alg=OPEN}path: /etc/wpa_supplicant/wpa_supplicant.conf# These commands will be ran once on first boot onlyruncmd:# Pickup the hostname changes- 'systemctl restart avahi-daemon'# Activate WiFi interface- 'ifup wlan0'
The important change was to the ssid and psk fields.
I rebooted the pi with my phone hotspot on and it connected! I can now wirelessly communicate with my pi.
To ssh into it I did the following:
- Made sure I was on the same wifi network as the pi
- Found my Macs IP address:
xxxxxxxxxxifconfigLooked for the IP address following "inet" under
en0:showing a mask of0xfffffff0. What is a net mask?- Mine was
172.20.10.4
- Mine was
Can also use
xxxxxxxxxxipconfig getifaddr en0
Which will just out put the IP (if connected via wifi)
- I downloaded nmap to scan for IP addresses on the network
xxxxxxxxxxsudo nmap 172.20.10.4/24
Output:
xxxxxxxxxxStarting Nmap 7.70 ( https://nmap.org ) at 2019-12-06 17:27 ESTNmap scan report for 172.20.10.1Host is up (0.0035s latency).Not shown: 997 closed portsPORT STATE SERVICE21/tcp open ftp53/tcp open domain62078/tcp open iphone-syncMAC Address: AA:BE:27:4B:92:64 (Unknown)Nmap scan report for 172.20.10.14Host is up (0.011s latency).Not shown: 999 closed portsPORT STATE SERVICE22/tcp open sshMAC Address: DC:A6:32:38:6F:62 (Unknown)
It found two devices on the network. The first is my laptop and the second must be the pi. I ran ifconfig on the pi to confirm it was the same IP address.
I should be able to ssh to the pi from my Mac terminal now.
xxxxxxxxxxssh pirate@172.20.10.14
"pirate" is the host name of the pi as per the user_data file.
I used the default password "hypriot"
Result:
xxxxxxxxxxLinux black-pearl 4.19.75-v7l+ #1270 SMP Tue Sep 24 18:51:41 BST 2019 armv7lHypriotOS (Debian GNU/Linux 10)The programs included with the Debian GNU/Linux system are free software;the exact distribution terms for each program are described in theindividual files in /usr/share/doc/*/copyright.Debian GNU/Linux comes with ABSOLUTELY NO WARRANTY, to the extentpermitted by applicable law.Last login: Fri Dec 6 19:28:08 2019HypriotOS/armv7: pirate@black-pearl in ~$
I'm in! Woohoo!
Resources for the above steps:
- https://blog.hypriot.com/post/releasing-HypriotOS-1-8/
- https://phoenixnap.com/kb/nmap-command-linux-examples
- https://vitux.com/find-devices-connected-to-your-network-with-nmap/
- https://itsfoss.com/how-to-find-what-devices-are-connected-to-network-in-ubuntu/
- https://github.com/hypriot/flash
- https://blog.hypriot.com/faq/#wifi
- https://github.com/hypriot/image-builder-rpi/blob/master/builder/files/boot/user-data
- https://github.com/hypriot/image-builder-rpi/releases
- https://blog.hypriot.com/getting-started-with-docker-on-your-arm-device/#going-wild-with-docker-what-can-you-actually-do-with-it:397c66ef19f9f061b6711d2e296cb276
- https://blog.hypriot.com/getting-started-with-docker-and-mac-on-the-raspberry-pi/
Getting a Docker Image with OpenCV and Python on the Pi
First I am making a Docker account.
The tutorial explains these commands
git clone https://github.com/docker/doodle.git // clones files to my mac
cd doodle/cheers2019 && docker build -t dmahon10/cheers2019 . // builds a docker image
docker run -it --rm dmahon10/cheers2019 // runs the image in a container
docker login && docker push dmahon10/cheers2019 // pushes to my docker hub account (like gitHub)
Read highlight below
- Clone docker image with openCV and Python3 to my mac
git clone https://github.com/janza/docker-python3-opencv.git
Copy my program files and new docker image and files into same directory
The directory should be good to go for a build. The next commands are:
docker builddocker push
I am going to put them in one
build_and_run.shshell script file like so:
xxxxxxxxxx#!/bin/bashset -euxo pipefaildocker build --tag dmahon10/adversarial_chair:latest .docker push dmahon10/adversarial_chair:latest
To make this file executable by terminal:
xxxxxxxxxxcd scriptschmod 755 build_and_push.sh
And execute it
xxxxxxxxxx./build_and_push.sh
At this point, I realized I had made a mistake
I was building an image with openCV and Python3. What I need to do is build an image with OpenCV, Python3 AND my app.
To do this, I need to write my own Dockerfile. A docker file includes instructions on how to build the image and what commands a user can use to run programs in the image.
Dockerfile Writing
Most docker files reference a parent file. The image I started building above is the image to be reference. This docker file looks like:
xxxxxxxxxxFROM python:3.7MAINTAINER Josip Janzic <josip@jjanzic.com>RUN apt-get update \&& apt-get install -y \build-essential \cmake \git \wget \unzip \yasm \pkg-config \libswscale-dev \libtbb2 \libtbb-dev \libjpeg-dev \libpng-dev \libtiff-dev \libavformat-dev \libpq-dev \&& rm -rf /var/lib/apt/lists/*RUN pip install numpyWORKDIR /ENV OPENCV_VERSION="4.1.1"RUN wget https://github.com/opencv/opencv/archive/${OPENCV_VERSION}.zip \&& unzip ${OPENCV_VERSION}.zip \&& mkdir /opencv-${OPENCV_VERSION}/cmake_binary \&& cd /opencv-${OPENCV_VERSION}/cmake_binary \&& cmake -DBUILD_TIFF=ON \-DBUILD_opencv_java=OFF \-DWITH_CUDA=OFF \-DWITH_OPENGL=ON \-DWITH_OPENCL=ON \-DWITH_IPP=ON \-DWITH_TBB=ON \-DWITH_EIGEN=ON \-DWITH_V4L=ON \-DBUILD_TESTS=OFF \-DBUILD_PERF_TESTS=OFF \-DCMAKE_BUILD_TYPE=RELEASE \-DCMAKE_INSTALL_PREFIX=$(python3.7 -c "import sys; print(sys.prefix)") \-DPYTHON_EXECUTABLE=$(which python3.7) \-DPYTHON_INCLUDE_DIR=$(python3.7 -c "from distutils.sysconfig import get_python_inc; print(get_python_inc())") \-DPYTHON_PACKAGES_PATH=$(python3.7 -c "from distutils.sysconfig import get_python_lib; print(get_python_lib())") \.. \&& make install \&& rm /${OPENCV_VERSION}.zip \&& rm -r /opencv-${OPENCV_VERSION}RUN ln -s \/usr/local/python/cv2/python-3.7/cv2.cpython-37m-x86_64-linux-gnu.so \/usr/local/lib/python3.7/site-packages/cv2.so
I noticed that this looked a lot like the commands I used to build OpenCV on my Mac. That's because it is doing the same thing.
My Dockerfile
Resource for writing docker files: https://stackify.com/docker-build-a-beginners-guide-to-building-docker-images/
xxxxxxxxxxFROM jjanzic/docker-python3-opencvENV ENVIRONMENT rpiCOPY app /usr/local/appWORKDIR /usr/local/appCMD ["python", "videocv2.py"]
I also now realize that I probably need an image made for Raspberry Pi. That is the janza/docker-python3-opencv image referenced above.
Running into this error:
xxxxxxxxxxDonaghs-MacBook-Pro:adversarial_chair donaghmahon$ ./build_and_push.sh + docker build --tag dmahon10/adversarial_chair:latest .Sending build context to Docker daemon 5.977MBStep 1/5 : FROM janza/docker-python3-opencvpull access denied for janza/docker-python3-opencv, repository does not exist or may require 'docker login': denied: requested access to the resource is deniedDonaghs-MacBook-Pro:adversarial_chair donaghmahon$ Even after I login I get the same thing.
Realized I spelled the docker hub repo incorrectly in the Dockerfile. Should be:
xxxxxxxxxxFROM jjanzic/docker-python3-opencvENV ENVIRONMENT rpiCOPY app /usr/local/appWORKDIR /usr/local/appCMD ["python", "videocv2.py"]
Docker build, push, ssh and pull
- Ran
build_and_push.sh - Ssh to pi
- Docker login on pi
- Docker pull on pi
Finished pulling.
In RPi terminal:
raspi-config
Then enable camera and allow reboot
Trying to run.
No dice
Trying to start container but it exits immediately
Trying docker run -it dmahon10/adversarial_chair:latest /bin/bash
Getting:
xxxxxxxxxxstandard_init_linux.go:211: exec user process caused "exec format error"
Some googling around and I find that this image is not compatible with the architecture of my Pi. The image was made for x86_64 but the pi is 64 bit quad core ARM architecture.
Searching for a made-for-pi python and OpenCV docker image
Here:
https://hub.docker.com/r/mohaseeb/raspberrypi3-python-opencv/
Changing my Dockerfile to:
xxxxxxxxxx# This is Pi Specific (64bit ARM)FROM mohaseeb/raspberrypi3-python-opencvENV ENVIRONMENT rpiCOPY app /usr/local/appWORKDIR /usr/local/appCMD ["python", "videocv2.py"]
Now to rebuild and push to my docker hub repo.
Having issues ssh ing so just pulled directly from pi.
Tried to execute the run command but got this error:
xxxxxxxxxxImportError: No module named RPi.GPIO
I didn't even think of adding this package to my image, so I have to go back now and do that. Rebuild, push and pull.
I have to do two things:
- Add commands to Dockerfile to install RPi.GPIO
- When I run the image I have to use the
--priviledgedtag or--device /dev/memto give the container permission to access the GPIO pins.
Good resource here: http://www.knight-of-pi.org/docker-container-with-rpi-gpio-access-for-the-raspberry-pi/
And here: https://raw.githubusercontent.com/JoBergs/RaspiContent/master/docker_GPIO/Dockerfile
https://github.com/JoBergs/RaspiContent/tree/master/docker_GPIO
xxxxxxxxxx# This is Pi Specific (64bit ARM)FROM mohaseeb/raspberrypi3-python-opencvENV ENVIRONMENT rpiCOPY app /usr/local/appWORKDIR /usr/local/app# Install requirementsRUN apt-get update \&& apt-get -y install python3 \python3-pip \python3-dev \python3-rpi.gpioCMD ["python", "videocv2.py"]
New pull_and_run command
xxxxxxxxxxssh -t pirate@172.20.10.14 'docker pull dmahon10/adversarial_chair:latest && docker run -it --device /dev/video0:/dev/video0 --privileged dmahon10/adversarial_chair:latest'
With the edits made I am executing the build_and_push.sh bash shell script.
Pulled it down onto my Pi, but got an error saying RPi.GPIO is not installed. Time to investigate.
Installing RPI.GPIO on Pi
I'm typing this up retroactively because it took me FOREVER to get this installed. I spent a couple hours rewriting my Dockerfile in different ways to have a RUN command that would install RPi.GPIO, but every time I got onto the Pi it would say package does not exist.
I also try pip install and apt-get from the command line on the pi. No dice.
I then started a virtual bash shell in my docker container on the pi to poke around and see what was installed.
xxxxxxxxxxdocker run -it --device /dev/video0:/dev/video0 --device /dev/gpiomem dmahon10/adversarial_chair:latest /bin/bashFrom within this virtual shell, I ran apt-get python3-rpi.gpio and it would say already installed, yet when I tried to run my python script it would say it wasn't there. Furthermore, RPi.GPIO didn't show up with pip freeze or pydoc modules commands.
I then just ran sudo pip install RPi.GPIO and it installed it! Running pip freeze confirmed this.
Tried to run my python program videocv2.py , but got an error saying `
xxxxxxxxxxGPIO.setmode(23, GPIO.OUT)TypeError: function takes exactly 1 argument (2 given)
Which is great because it means it got past the import RPi.GPIO as GPIO line!
The error was thrown because I accidentally used GPIO.setmode() when I meant to use GPIO.setup() to make the pins outputs.
New Dockerfile:
xxxxxxxxxx# This is Pi Specific (64bit ARM)FROM mohaseeb/raspberrypi3-python-opencvENV ENVIRONMENT rpiCOPY app /usr/local/appWORKDIR /usr/local/app# Install requirementsRUN sudo apt-get update \&& sudo pip install RPi.GPIOCMD ["python", "videocv2.py"]
Edits made to python script. Time to run ./scripts/build_and_push.sh
Its running! That is until there's a face in the frame...
I think it must be an issue with accessing the gpio pins.
Having --devices /dev/gpiomem should have done the trick, but I'm not so sure now.
Adding logs to my python script to check it out.
Build, push, pull, run...
Debugging
Logs show that starting off with no face in frame work as expected, but as soon as a face enters it gets stuck in this loop:
xxxxxxxxxx# While face to camera's rightwhile int(round(x + w/2)) < midline - 20:logging.debug('face to right')# Fill incv2.rectangle(frame, (x, y), (x+w, y+h), (255, 0, 0), -1)logging.debug('right rectangle drawn')if ENVIRONMENT != 'dev':logging.debug('in GPIO if ENVIRONMENT statement for ON')# Turn on right turn pinGPIO.output(24, True)if ENVIRONMENT != 'dev':logging.debug('in GPIO if ENVIRONMENT statement for OFF')# Turn off right turn pinGPIO.output(24, False)
It never reaches the bottom if condition:
xxxxxxxxxxif ENVIRONMENT != 'dev':logging.debug('in GPIO if ENVIRONMENT statement for OFF')# Turn off right turn pinGPIO.output(24, False)
Just repeats this:
xxxxxxxxxxDEBUG:root: face to rightDEBUG:root: right rectangle drawnDEBUG:root: in GPIO if ENVIRONMENT statement for ON
Over and over and over even when the camera is covered.
I realize my mistake was using a while loop rather than an if condition
However I did that because I wanted a constant pin HIGH signal from the Pi GPIO pin when the face was off center. If I use an if statement it will be turning on and off rapidly effectively doing PWM for the motor.
I will make it an if condition and retry.
Reran container on Pi. New error - video.open() needs an argument. I should have put 0 in.
I'm actually going to change this block to.
xxxxxxxxxx# Check video capture is openif not video.isOpened():logging.debug('Cannot open camera')exit()
Build, push, pull, run.
IT WORKS!
The logs are showing that everything that supposed to happen is!
Now I need to check if the GPIO pins are actually firing.
I could use an oscilloscope, or just attach a couple LEDs to the pins to see if they flash.
I don't have an oscilloscope with me so LEDs it is.
Checking if GPIO pins firing
I'm using a bread board to connect some LEDs to the RPi's power and the GPIO pins I programmed.
I'm so close! Just need to make the DC motor board and connect it to the Pi!
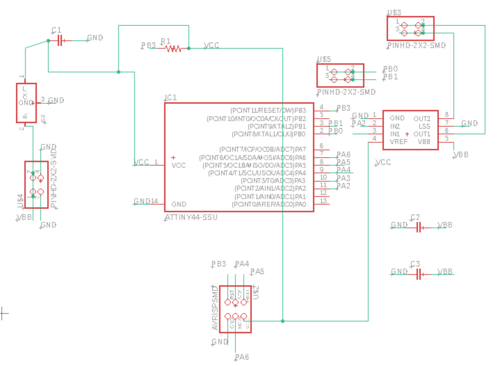
Schematic in Eagle:
Traces:
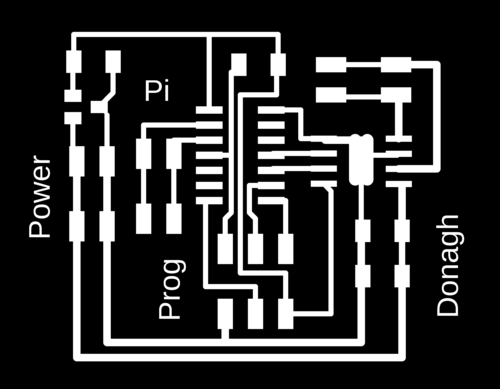
Outline:

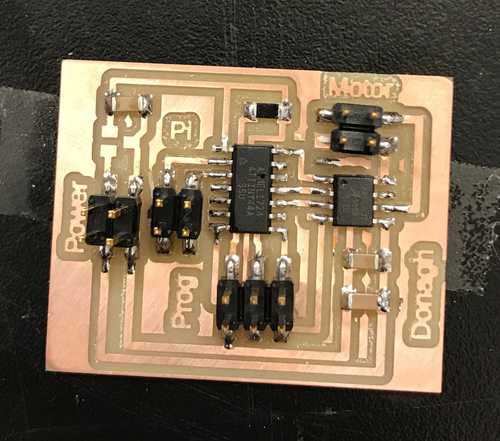
Board has been milled and soldered.

REGULATOR MISSING IN BELOW IMAGE
Programming Microcontroller
I need to get my C program running on the ATTiny micro-controller on the motor board.
To do this I need a programmer:
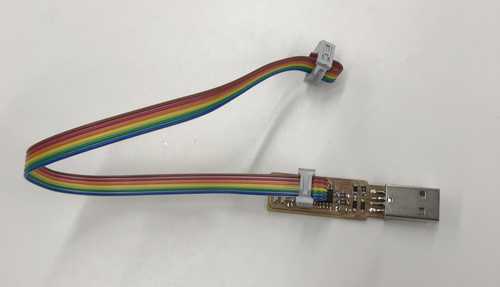
And a make file to get the C program ready for compiling.
To program the ATTiny microcontroller I will use AVRDUDE (AVR Downloader Uploader).
Makefile
Here is a good explanation of make files
xxxxxxxxxxPROJECT=motor_macrosSOURCES=$(PROJECT).cMMCU=attiny44F_CPU = 8000000These are the lines at the top of my makefile. They are the macros.
- Name of the file to compile
- Extension of the file to compile
- Microcontroller to program
- Frequency of the board to program
Complete Makefile
xxxxxxxxxxPROJECT=motor_macrosSOURCES=$(PROJECT).cMMCU=attiny44F_CPU = 8000000CFLAGS=-mmcu=$(MMCU) -Wall -Os -DF_CPU=$(F_CPU)$(PROJECT).hex: $(PROJECT).out avr-objcopy -O ihex $(PROJECT).out $(PROJECT).c.hex;\ avr-size --mcu=$(MMCU) --format=avr $(PROJECT).out $(PROJECT).out: $(SOURCES) avr-gcc $(CFLAGS) -I./ -o $(PROJECT).out $(SOURCES) program-usbtiny: $(PROJECT).hex avrdude -p t44 -P usb -c usbtiny -U flash:w:$(PROJECT).c.hexRan make file. Lots of errors in my C code. Will correct now.
Correct C program
xxxxxxxxxx// Pin to 0// Pin to 1// Check if input pin receiving high signal// Check if output pin not sending high signalint main(void) { // Enable change of prescale register and set prescale to divide by 1 (makes timer run at 8MHz) CLKPR = (1 << CLKPCE); CLKPR = (0 << CLKPS3) | (0 << CLKPS2) | (0 << CLKPS1) | (0 << CLKPS0); // Clear PA2 and PA3 output signals then set as output pins clear(PORTA, A2); set(DDRA, A2); clear(PORTA, A3); set(DDRA, A3); while(1) { // PB0 turns on PA2 // PB1 turns on PA3 // While PB0 is receiving AND PA3 is off while (receiving(PINB, B0) && off(PORTA, A3)) { // PA2 on set(PORTA, A2); } // PA2 off clear(PORTA, A2); // While PB1 is receiving AND PA2 is off while (receiving(PINB, B1) && off(PORTA, A2)) { // PA3 on set(PORTA, A3); } // PA3 off clear(PORTA, A3); }}
Full Test 1.0
Everything is hooked up and ready to roll. The photo just shows a mess of wires, but here's what's connected to what.
- Motor board GND -> Pi GND
- Pi GPIO 23 -> uc PB0 on motor board
- Pi GPIO 24 -> uc PB1 on motor board
- Pi -> Power
- Motor board -> 9V battery
- Pi -> Monitor
- Keyboard -> Pi
- Motor -> motor board
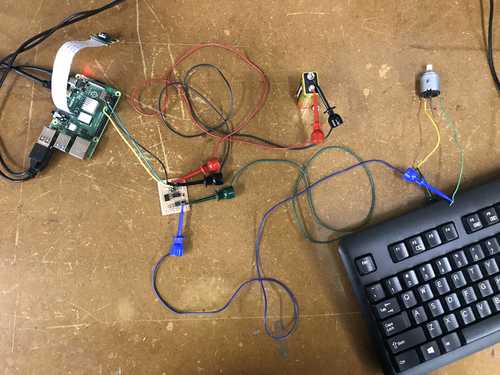
It works!
Kind off...
The motor just ticks when it should be turning. This is because of the on-off flickers as while loop iterates through the if blocks in my python program.
- I need to change the logic structure so that a GPIO output pin is left ON until the face is either in the center or on the other side.
- I also need to handle the case where the motor is turning and then the face leaves the frame. If this happens the motor should turn off.
- Lastly, I'm going to increase the range in which a face is considered centered.
Here is the new program.
xxxxxxxxxximport cv2import osimport RPi.GPIO as GPIOimport logginglogging.basicConfig(level=logging.DEBUG)# Whether or not to open GUIENVIRONMENT = os.getenv('ENVIRONMENT', 'dev')# If running on RPiif ENVIRONMENT != 'dev': # GPIO config GPIO.setwarnings(False) GPIO.setmode(GPIO.BCM) GPIO.setup(23, GPIO.OUT) GPIO.setup(24, GPIO.OUT)# Load the cascadeface_cascade = cv2.CascadeClassifier('./haarcascade_frontalface_default.xml')# Read in from default devicevideo = cv2.VideoCapture(0)# Get frame height and width then calculate midlineframe_width = video.get(cv2.CAP_PROP_FRAME_WIDTH)frame_height = video.get(cv2.CAP_PROP_FRAME_HEIGHT)midline = int(round(frame_width / 2))# Check video capture is openif not video.isOpened(): logging.debug('Cannot open camera') exit()# Loop through each framewhile (True): # Read the next frame success, frame = video.read(0) # Draw vertical centre line cv2.line(frame, (midline, 0), (midline, int(frame_height)), (0,255,0), 5) # Find faces coordinates = face_cascade.detectMultiScale(frame, 1.1, 4) logging.debug('{} faces detected'.format(len(coordinates))) # If we have any faces, get the nearest one (by height) if len(coordinates) > 0: [x, y, w, h] = max(coordinates, key=lambda x: x[2]) # Draw rectangle around nearest face cv2.rectangle(frame, (x, y), (x+w, y+h), (255, 0, 0), 10) # If face NOT in center, fill in rectangle #if int(round(x + w/2)) > midline + 20 or int(round(x + w/2)) < midline - 20: #cv2.rectangle(frame, (x, y), (x+w, y+h), (255, 0, 0), -1) # While face to camera's left if int(round(x + w/2)) > midline + 30: logging.debug('face left') # Fill in cv2.rectangle(frame, (x, y), (x+w, y+h), (255, 0, 0), -1) if ENVIRONMENT != 'dev': # Turn right turn pin off and left turn pin on GPIO.output(24, False) GPIO.output(23, True) logging.debug('turn left') # While face to camera's right elif int(round(x + w/2)) < midline - 30: logging.debug('face right') # Fill in cv2.rectangle(frame, (x, y), (x+w, y+h), (255, 0, 0), -1) if ENVIRONMENT != 'dev': # Turn left turn pin off and right turn pin on GPIO.output(23, False) GPIO.output(24, True) logging.debug('turn right') else: logging.debug('face center') # Turn off both pins GPIO.output(23, False) GPIO.output(24, False) logging.debug('motor off') else: logging.debug('no face') # Turn off both pins GPIO.output(23, False) GPIO.output(24, False) logging.debug('motor off') # Show output only if running locally (will throw error in docker) if ENVIRONMENT == 'dev': cv2.imshow('output', frame) # Show frame for 30 ms, break if 'Ctrl + D' pressed pressed = cv2.waitKey(29) & 255 if pressed == 4: break# Close video capture, clear pins, exitvideo.release()if ENVIRONMENT != 'dev': logging.debug('in GPIO if ENVIRONMENT statement for cleanup') GPIO.cleanup()exit()
Make it presentable!
I want to have a live stream of what the camera is seeing displayed on my monitor so that it is easier to show what the program is actually doing. I will have to give the container the ability to access the Xserver of the RPi. Tips here
To do that I will add the below to my docker run command:
xxxxxxxxxx--net=host --ipc=host --env DISPLAY=$DISPLAY -v /tmp/.X11-unix:/.X11-unixTo the docker run command and remove the environment check before the cv2.imshow() line so that it will always show video output.
Try many different configurations of the above command options with no luck.
Did some more research and found that my RPi's OS, Hypriot, does not have X11 installed, so there is no way to display a GUI output.
https://github.com/hypriot/x11-on-HypriotOS
I'm following the below guide to installing X11 on my pi.
https://medium.com/@icebob/jessie-on-raspberry-pi-2-with-docker-and-chromium-c43b8d80e7e1
Went through all the steps and now I can't login to my Pi! Hoping I won't have to re-flash the pi.
Every time I put in my password, it seems to be loading something, but just returns to the login screen. No incorrect password message so it is definitely logging in, but it seems it doesn't know what to show once logged in or it is automatically logging out.
Luckily I can still ssh into the Pi from my laptop.
I will work to get the display up and running by the time I present but no promises that I'll be able to do that. I can at least run the program on my Mac which does show the video output.