Output Devices
This week, I decided to gear towards my final project. Output-wise, I don’t need anything too complicated - just LEDs which can be controlled for different intensities. Thus, this week my goal is to simply control an LED. Mainly, I want to understand which (and how many) LEDs do I need to light up the sword.
Electronic Design
New week, new board. Who would have thought that after just a couple of months I will be making PCBs from scratch on a weekly basis. Anyway, I took the design from last week and added to it.
I managed to get my hands on some Adafruit NeoPixel Mini Buttons
![]() They cost a bit less than a dollar each, and seemed like a good place to start. I am hoping that using 2-4 of those will give enough luminance, otherwise I would have to find another, stronger LED.
They cost a bit less than a dollar each, and seemed like a good place to start. I am hoping that using 2-4 of those will give enough luminance, otherwise I would have to find another, stronger LED.
Adafruit provides pretty straight forward explanations on using NeoPixels. Basically I connect one wire to 5V (So no need for a stronger power supply), one to ground and one to my microcontroller. It is recommended to add a ~500 Ohm resistor before the data pin, and also a bypass capacitor between the GND and 5V (similar to what I already have for the microcontroller).
![]()
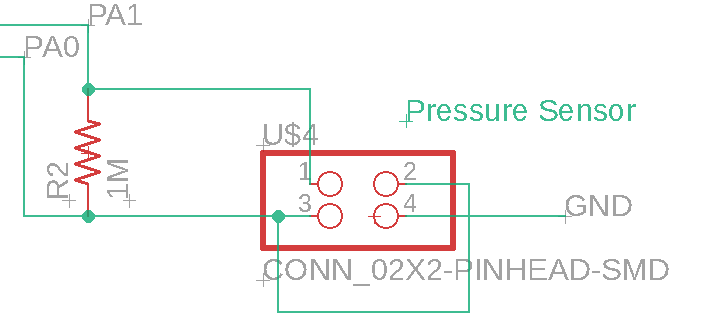
As I am already designing and making a new board, I decided to use this week to try and improve my input device from last week. A a reminder, last week I made an EDA sensor. While it essentially worked, the sensor is very sensitive to pressure changes. I was wondering whether I could make a pressure agnostic EDA sensor, by adding a third electrode that will act as a pressure sensor, using step response. Following Neil’s hello.load example, I added it to my design:
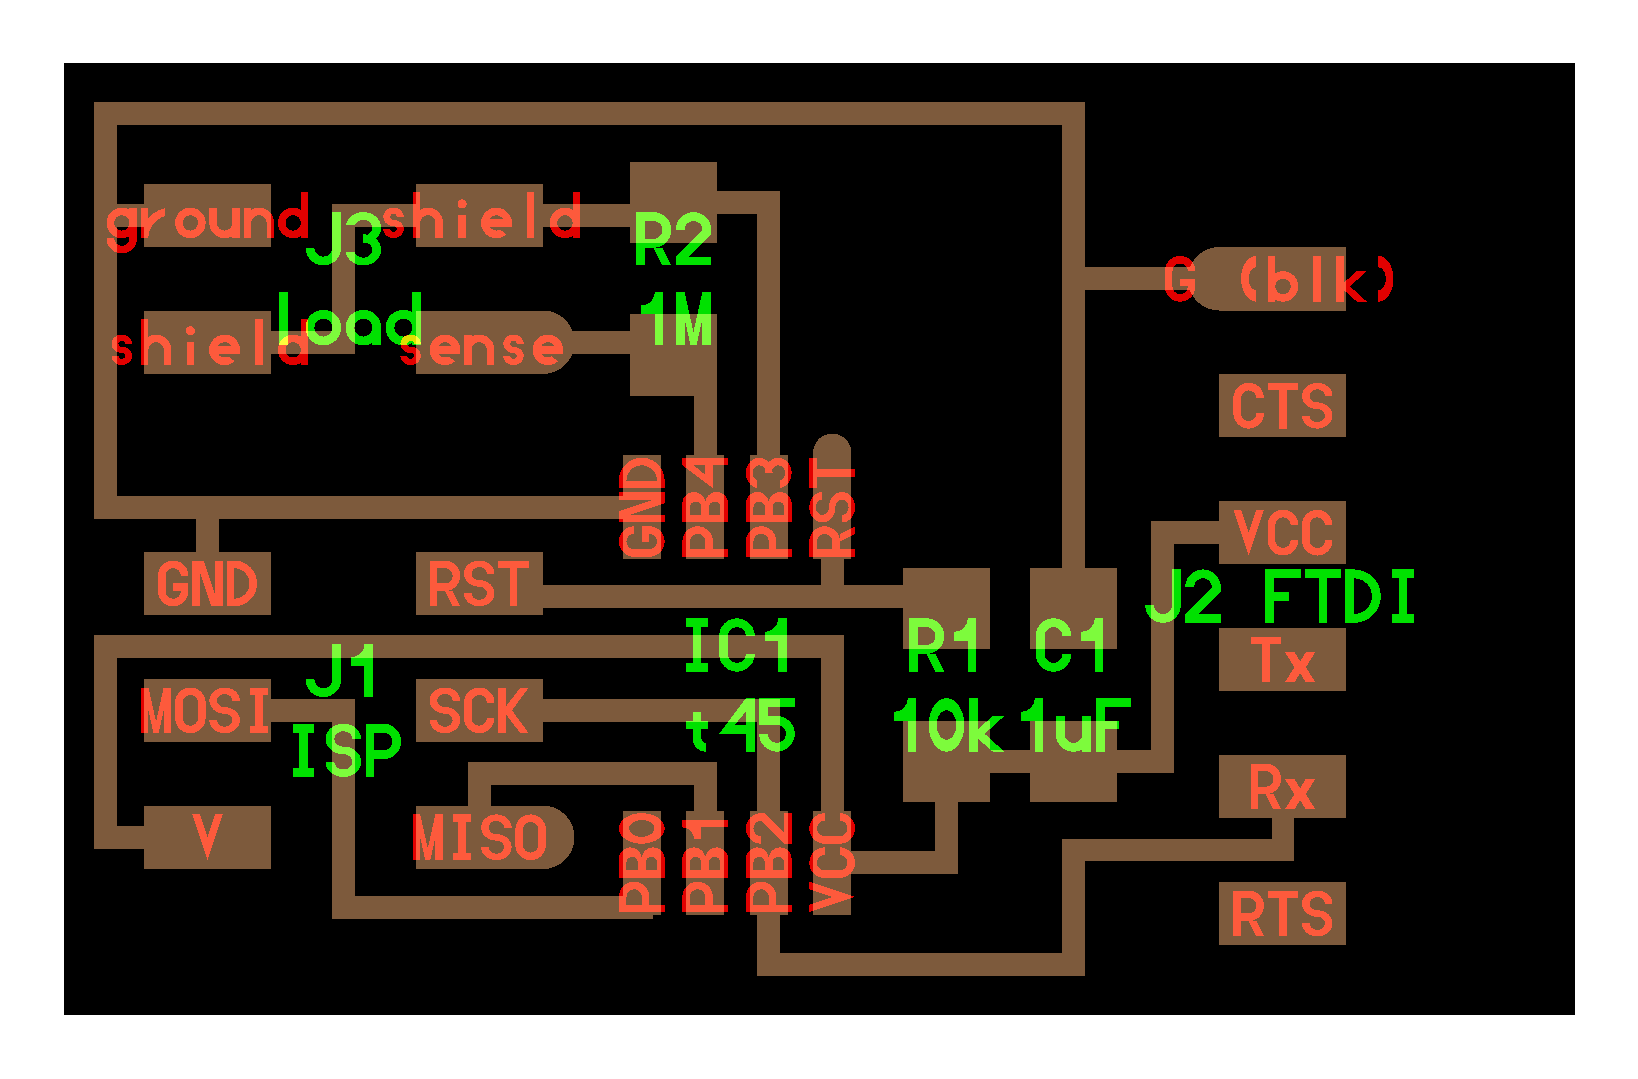
While reading about NeoPixels I noticed most blogs are using 8bits microprocessors, so I decided to upgrade to Attiny84. Not sure if this upgrade was necessary. Overall schema:
 And board:

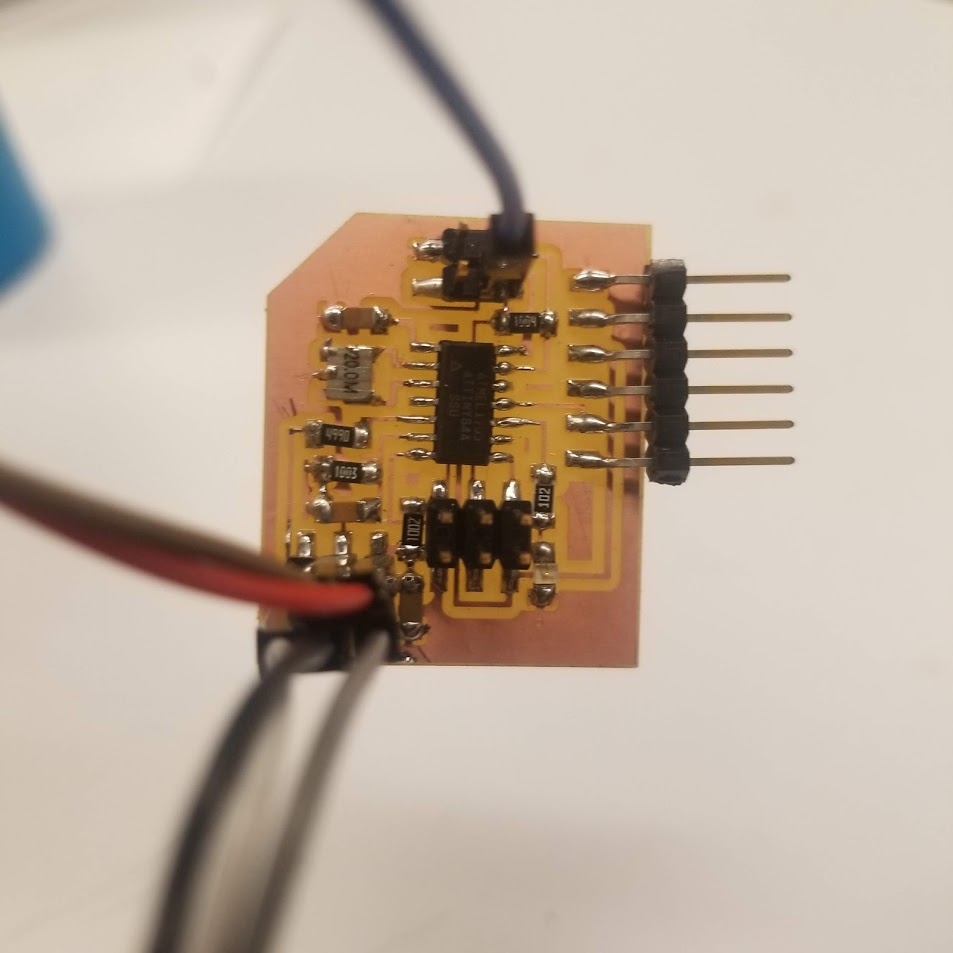
And after soldering:
NeoPixels can be concatenated to a string, as follows:
![]()
Programming
Controlling addressable LEDs is more complicated than a simple LED diode, since you can set an RGB value (3 bytes) for each LED on the chain. Adafruit provides a popular Arduino library to control their addressable LEDs, which are implemented using a circuit WS2812. It’s super easy, but I am feeling quite happy with my lightweight C code, so I found light_ws2812 - Light weight library to control WS2812 based LEDS and LED Strings on 8-Bit AVR and ARM microcontrollers. Perfect.
The main difficulty was the Makefile. Luckily the library gives you a nice Makefile + Examples for AVR. So I ended up putting my code in the Examples directory, and melded some lines from Neil’s Makefile to light_ws2812 one:
# Makefile to build light_ws2812 library examples
# This is not a very good example of a makefile - the dependencies do not work, therefore everything is rebuilt every time.

# Change these parameters for your device

PROJECT = eda_norm
F_CPU = 20000000
DEVICE = attiny84

# Tools:
CC = avr-gcc

LIB       = light_ws2812
EXAMPLES  = eda_norm
DEP       = ws2812_config.h Light_WS2812/light_ws2812.h

CFLAGS = -g2 -I. -ILight_WS2812 -mmcu=$(DEVICE) -DF_CPU=$(F_CPU)
CFLAGS+= -Os -ffunction-sections -fdata-sections -fpack-struct -fno-move-loop-invariants -fno-tree-scev-cprop -fno-inline-small-functions
CFLAGS+= -Wall -Wno-pointer-to-int-cast
#CFLAGS+= -Wa,-ahls=$<.lst

LDFLAGS = -Wl,--relax,--section-start=.text=0,-Map=main.map

all:	$(EXAMPLES)

$(LIB): $(DEP)
	@echo Building Library
	@$(CC) $(CFLAGS) -o Objects/$@.o -c Light_WS2812/$@.c

$(EXAMPLES): $(LIB)
	@echo Building $@
	@$(CC) $(CFLAGS) -o Objects/$@.o Examples/$@.c Light_WS2812/$^.c
	@avr-size Objects/$@.o
	@avr-objcopy -j .text  -j .data -O ihex Objects/$@.o $@.hex
	@avr-objdump -d -S Objects/$@.o >Objects/$@.lss

.PHONY:	clean

clean:
	rm -f *.hex Objects/*.o Objects/*.lss

program-usbtiny: $(PROJECT).hex
	avrdude -p t84 -P usb -c usbtiny -U flash:w:$(PROJECT).hex

program-usbtiny-fuses: $(PROJECT).hex
	avrdude -p t84 -P usb -c usbtiny -U lfuse:w:0x5E:m
Also, notice that you need to change ws2812_config.h to fit the PORT and PIN that are relevant in your design.
First, I ran one of the examples, and it worked!
And wrote some simple code to vary the intensity of blue over time:
int main(void) {
   //
   // main
   //
   static unsigned char intensity = 0;
   int direction = 1;
   //
   // set clock divider to /1
   //
   CLKPR = (1 << CLKPCE);
   CLKPR = (0 << CLKPS3) | (0 << CLKPS2) | (0 << CLKPS1) | (0 << CLKPS0);
   // initialize LEDs
   output(led_direction, led);
   set(led_port, led);
   //
   // main loop
   //
   while (1) {
     color[0].r=0;color[0].g=0;color[0].b=intensity;
     color[1].r=0;color[1].g=0;color[1].b=intensity;
     ws2812_setleds(color,2);
     _delay_ms(10);

     if (intensity == 255) {
       direction = -1;
     } else if (intensity == 0) {
       direction = 1;
     }
     intensity += direction;
  }
}
Which also worked:
So that’s the basic requirement for this week. I spent the rest of my time improving the input module of the project. Also, I’m interested to check if this NeoPixel Mini Button is strong enough to light up the sword. More on the in my final project page
All the files (Eagle + C files) are available here