-

- Computer-Aided Design 01
- Parametric Construction 02
- Electronics Production 03
- 3D Printing 04
- Electronics Design 05
- Computer-Controlled Machining 06
- Embedding Programming 07
- Molding + Casting 08
- Output Devices 09
- Machine Design 10
- Input Devices 11
- Interface + App Programming 12
- Networking + Communications 13
- Composites 14
- Final Project 15
HOW TO MAKE (ALMOST) ANYTHING
Lily Gabaree
3D Printing
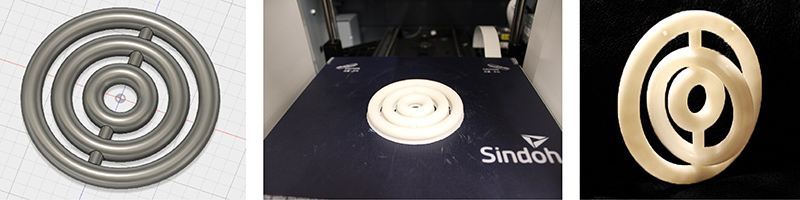
We’ve been tasked with printing something that can’t be made subtractively (i.e., with a CNC, molding, etc.), and preferably something small due to machine time constraints. I decided to start with an ornament that had one degree of freedom; three tori, with one that rotates on an axis between the other two.
I modeled the piece in Fusion 360. My main concern was the point of rotation: this would necessitate some amount of space in between the opening and the axis, and thus the printer would likely be printing “in air.” I didn’t really want to use supports, because I was worried the gaps would be so slight that it might be hard to remove the artifacts, so I decided to risk printing without supports, and trying to make the parts adequately close enough to each other that a layer could “sit” on the previous part and still meld into the added layers. So the axis gap is 6mm, and the axis itself is 5mm.
I added the two bodies into a single component, and exported the componet as an STL file. Rob helped me prepare the file - 3DWox has its own printing interface for the Shiloh printer; I laid the piece flat and selected “easy mode” for normal quality.
The print took 2.5 hours and was quite successful - just popped off the bottom layer and twisted the torus a few times to get it working smoothly.
3D Scanning
I wanted to scan my sunglasses, so I could modify the file and create more interesting pairs. I quickly discovered that it is not easy to capture an object — especially one with a large but sparse outline — with the Sense. It kept highlighting various parts of the glasses, but also other things in the scene (like the bright pink base of the turntable); when I tried covering everything with either black or white materials, the Sense would just pick up those materials, too, at one point managing to scan the whole base of the turntable but not the glasses on top of it.
Out of maybe ten attempts, this was the best scan I got, from hand-holding the Sense quite close to the glasses as they sat on a black surface.

The Sense appears to be much better at picking up faces (it has Object, Head, and Body modes); so I decided to scan my head instead. Chastity and I took turns scanning each other, as it is definitely a two person job; you need to sit really still and rotate in a chair, while also responding to written commands on screen about slowing down at intervals.
Our attempts were more successful than the glasses, but we still were having problems created a full shell; and if there are any holes in the shell, the Sense rather unnervingly portrays the shell as having continuous color through the surface, ending up with inverted eyes etc. Even with a lot of rotations, I ended up with a hole in my head.

Later, I tried again, and Dixon helped me make a pretty complete scan by doing a bunch of rotations and also holding the Sense above my head as a I rotated; this resulted in a much better version...but due to some mixup at the end, I ended up with an extra floating jawline. The good news is that the Sense does have a pretty easy editing UI, so I erased all my spare floating parts, solidified the file, and exported it as an OBJ.The last step was to slice the file - the generated verson has a diagonal cross-section, so the base would sit at kind of an odd angle.
I tried printing the model twice: once, without supports on the 3DWox, and once with supports (touching buildplate only) on the Ultimaker. From left to right: Ultimaker with supports, pre and post processing; 3DWox without supports, pre and post processing.

For the 3DWox Shiloh model (without supports), there was loose layering at some edges, especially the lower edge of my haircut, where the angle was pretty severe. I pulled off the loose layers with tweezers and sanded the rough edges. The detail came out great on the hair; the face is blurred (which I think is the due to a low quality scan, not the printer). The piece is quite smooth - I really like this printer.