Week 7
~ molding and casting ~
This week on HTMAA, Hannah learns how to mold and cast, a really cool process that lets one create production quality objects… not everything has to be PLA! Ultimately, she makes a lightup Buddha figurine.
Vision
My idea for this week was inspired by Jim Peraino (who coincidentally uses the same website theme as I do!). He made a beautiful cast that has a slot for an LED and coin battery.
At the same time, I have a good friend’s birthday coming up, and I wanted to make them something for their Buddhist shrine. So, I decided to combine these two ideas and make a cast of a Buddhist figure holding an orb, where the orb will be the LED. Time permitting, I would like to try and tint the clear mold with a colored powder so that the intricate features may be better seen.
After some research on 3D modeling, I decided it was going to be a very large task to model the buddha surface mesh myself. So, I looked online to find existing models. After much searching, I settled on this design:

Step 1: Creating the CAD
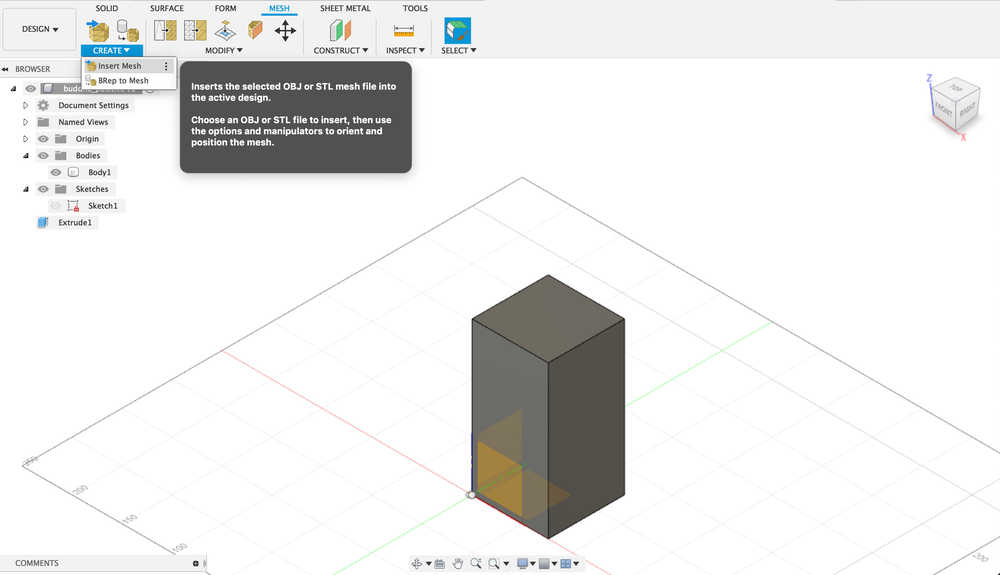
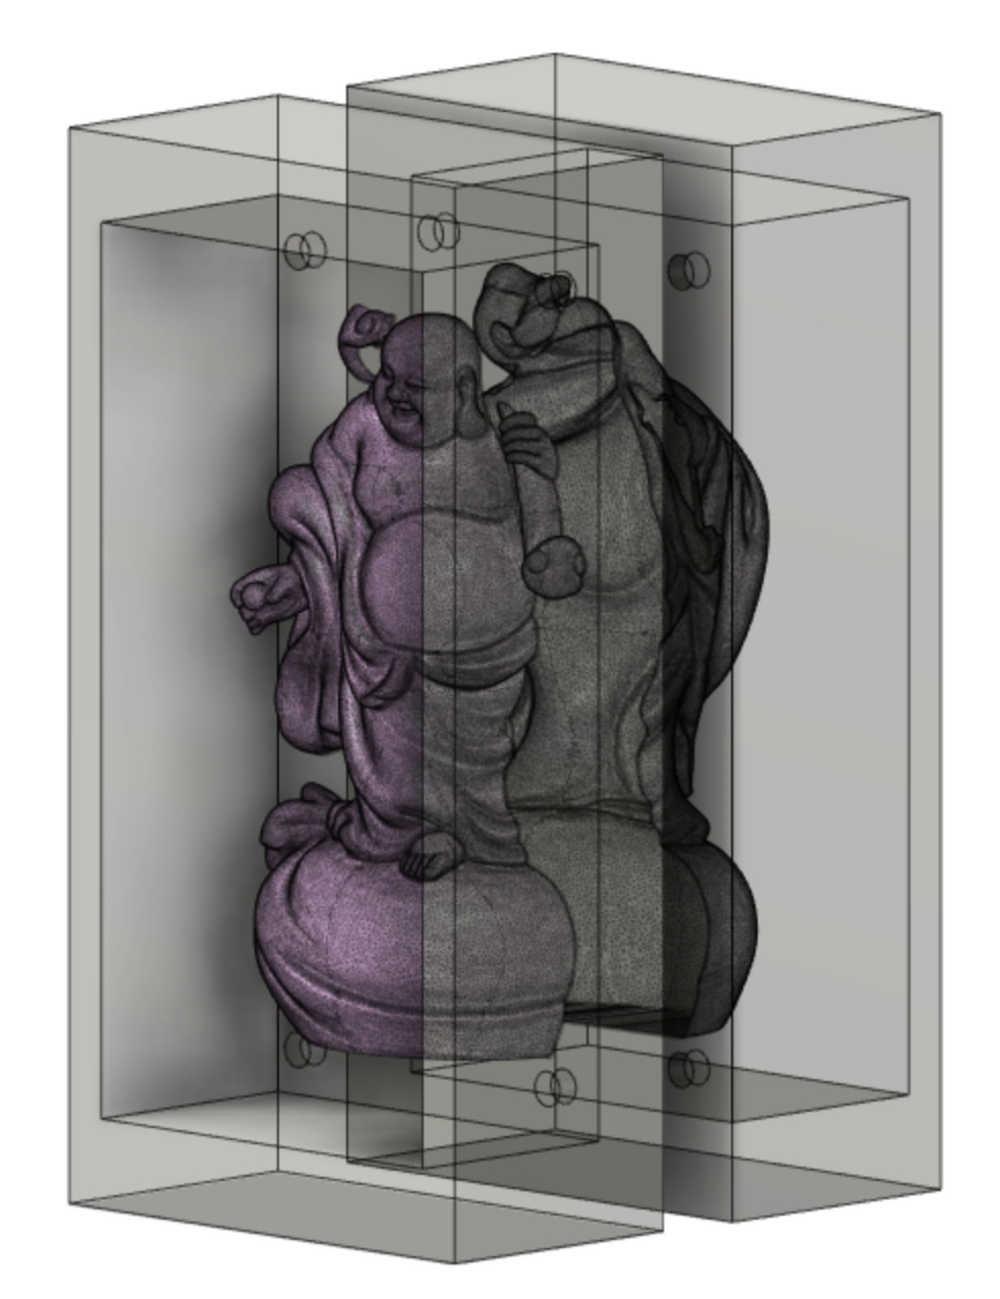
- The first step is to create a CAD of the positive within a model of the 1.5x3x6 inch wax mold. I will use one piece of wax for each half of the figure.
First I created a basic model of the wax as just a solid box in fusion. It turns out that Fusion has a feature to import meshes like so:
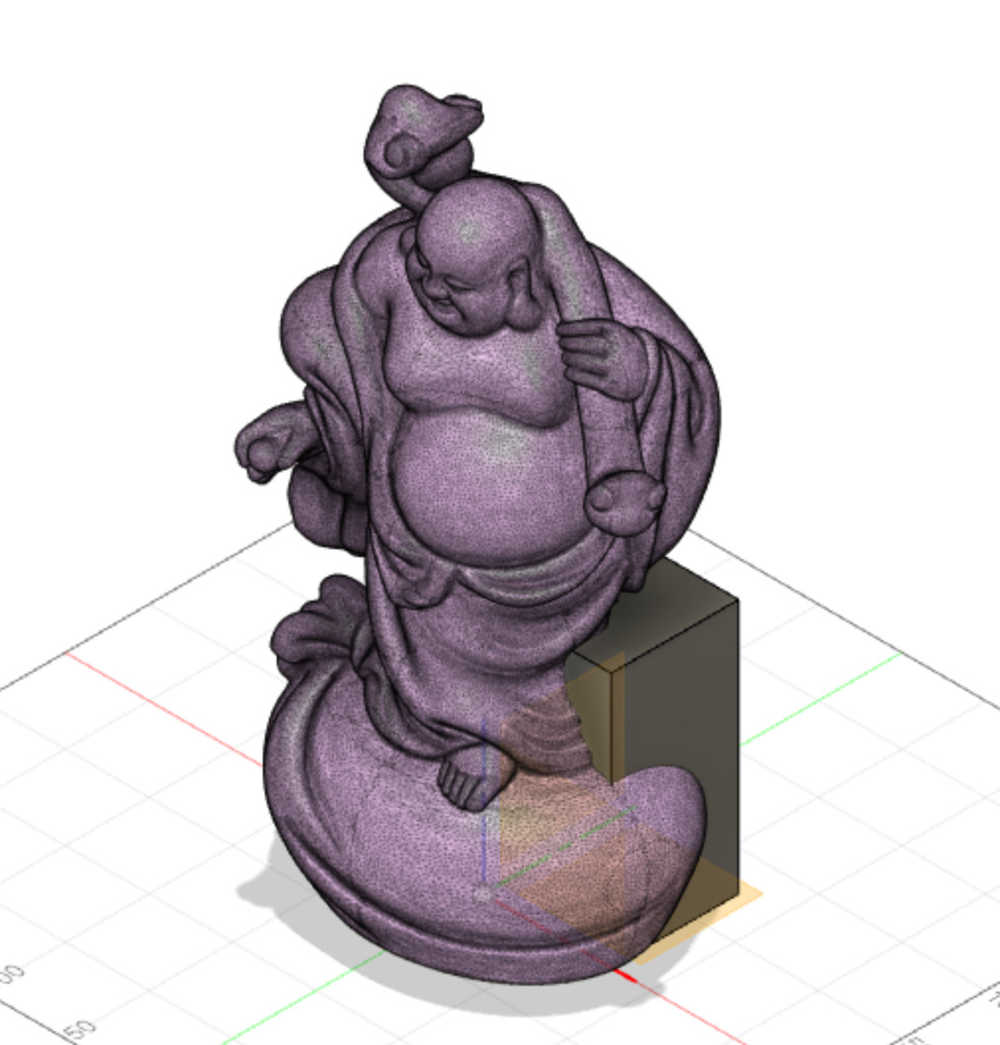
Clearly, I have a lot of scaling to do. Since this will be a two piece mold, I will need 0.5 inches of clearance between the edges of the wax and the figure so that there is room to align the top and bottom molds. Since I will have quite a bit of room on the top and bottom of the figure I will compromise with scaling by using 0.5 inch margins on the top and bottom and 0.25 inch margins on the sides. Scaling for width, the figure can be at most 3 inches - 2*0.25 inches = 2.5 inches.
To figure out the scaling factor, I constructed two lines in both the x and y plane and measured their current distance.

I found the x width to be 218.19 mm = 8.6 inches and the y width to be 164.723 mm = 6.49 inches. Thus the x width will be the limiting factor, and in particular, we need to down-scale by 8.6//2.5 = 3.44. I decided to make it a little smaller just to be safe by making it 3.44//.95 = 3.62 scaling factor. Here is the scaled buddha figure centered within the wax shape.
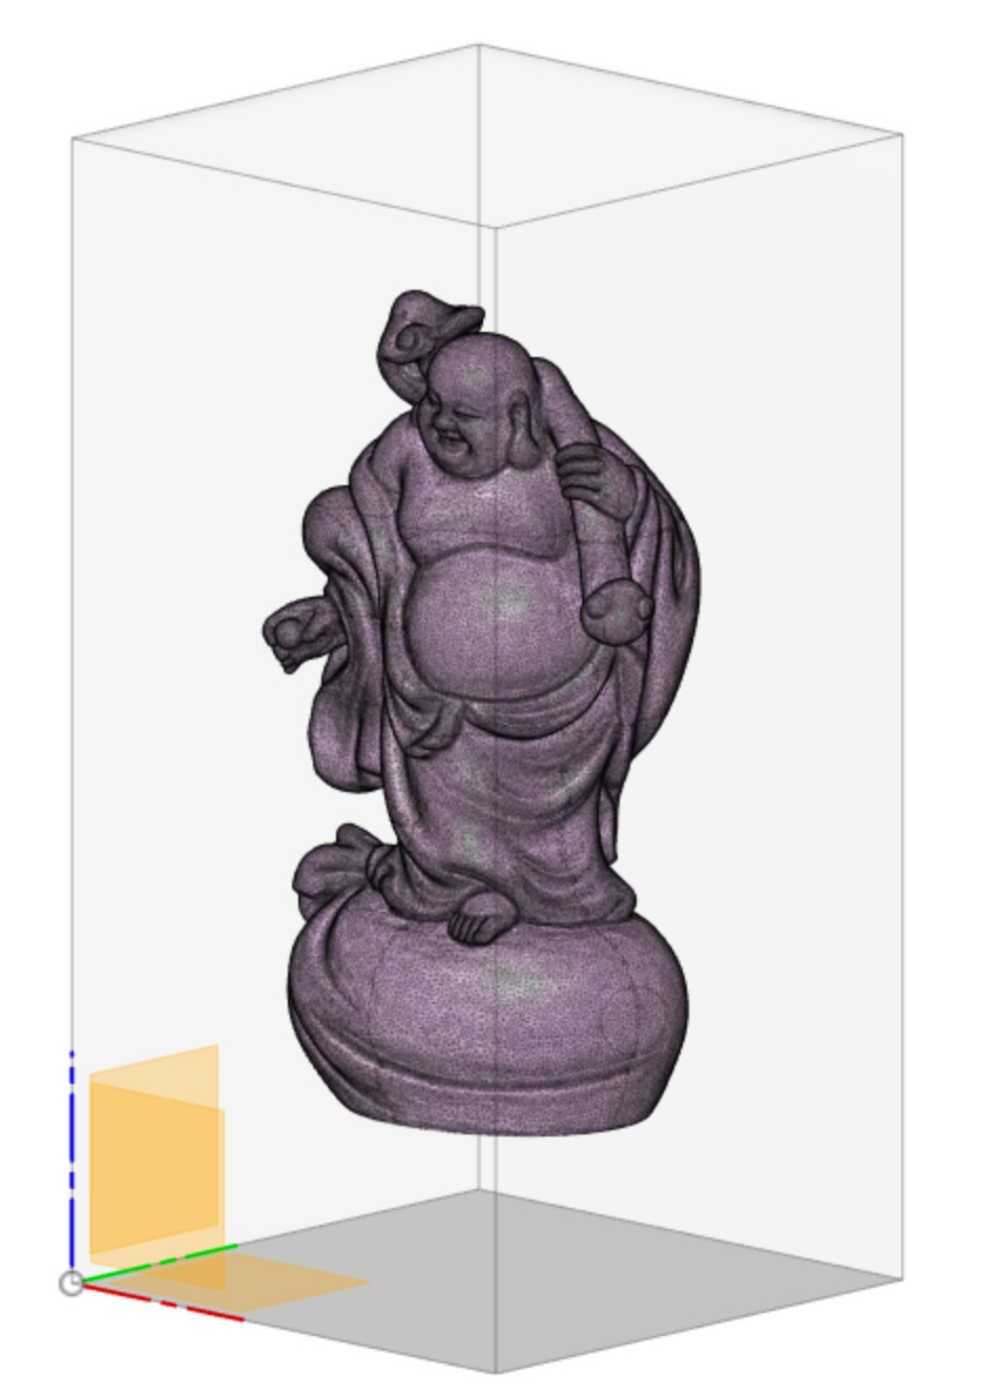
I then applied a plane cut (using a plane constructed as a midplane to the wax body) to both the buddha mesh (using the Mesh menu “Plane Cut” function) and the wax body (using the Solid menu “Split Body”).

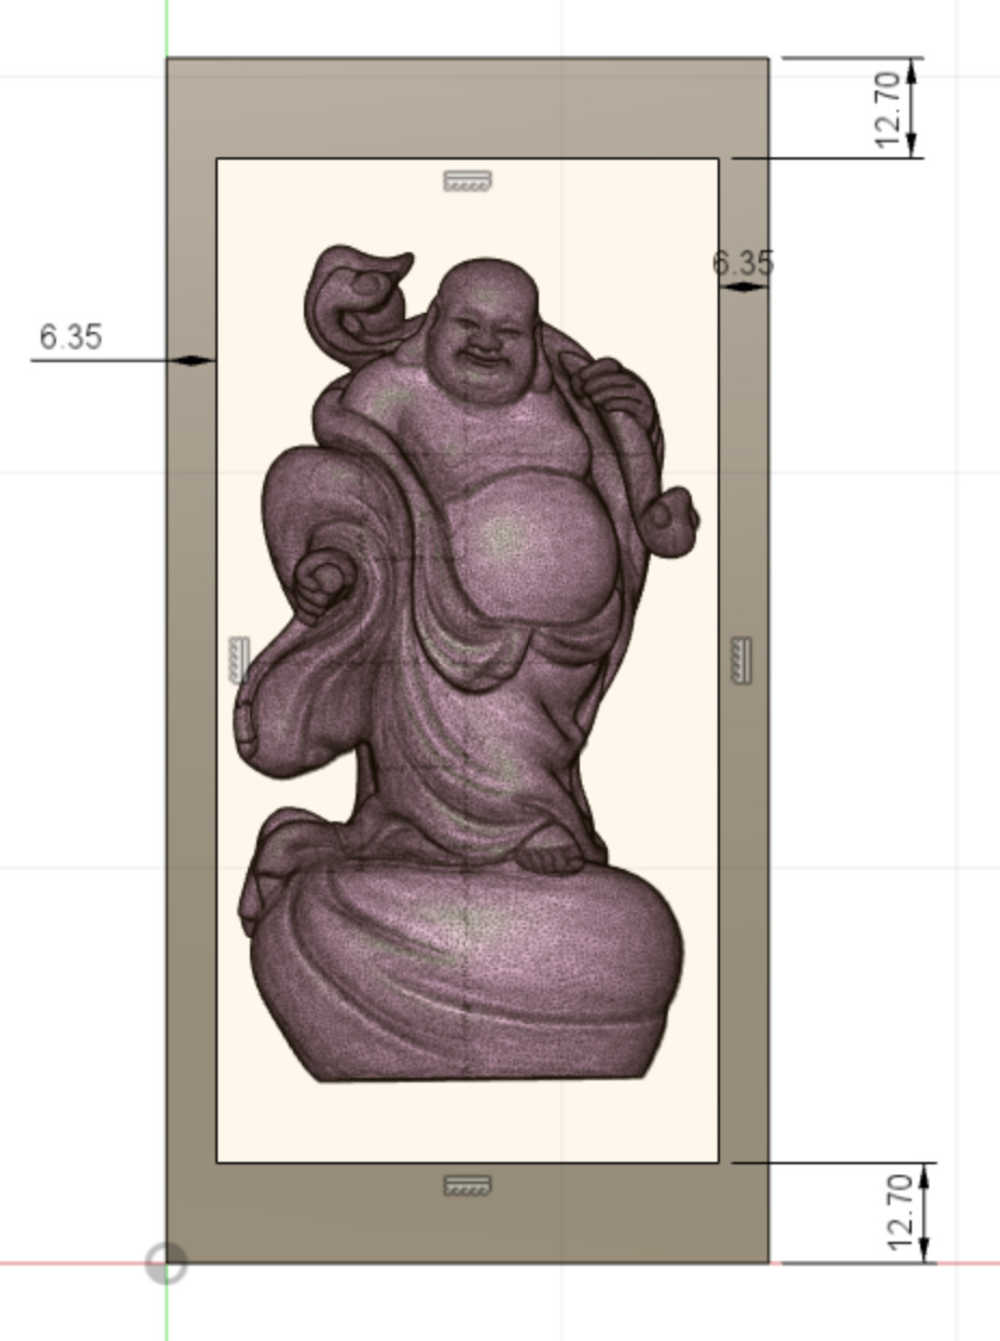
I then made the walls of the wax by extruding from the surface of the wax to the midplane. Using my compromised wax margins for the sketch looks like this:
The positive now looks like this:

The final step is to add slots and pegs so that the two sides of the molds will fit together and give a seamless single object:
Step 2: Toolpaths
As expected, opening the STL and STEP files on Anthony’s computer was not very easy. First of all, the Buddha mesh I had downloaded from the internet contained hundreds of thousands of mesh faces–way too man for the program to be able to open. In my model, I used the Fusion Mesh->Modify->Reduce tool to reduce the number of faces in the mesh.
After much playing around, we found a way to load the file in SolidWorks without it taking forever and possibly crashing: in “Job Setup” in SolidWorks there is an option for importing STL files via “Load Model.” This worked!
The toolpaths consist of both a rough cut and smooth cut for both halves. The purpose of the rough cut is to generate the basic shape. The smooth cut uses much finer overlaps of the tool in every pass so that the resulting shape more closely resembles the original design and the toolpath is less noticeable.
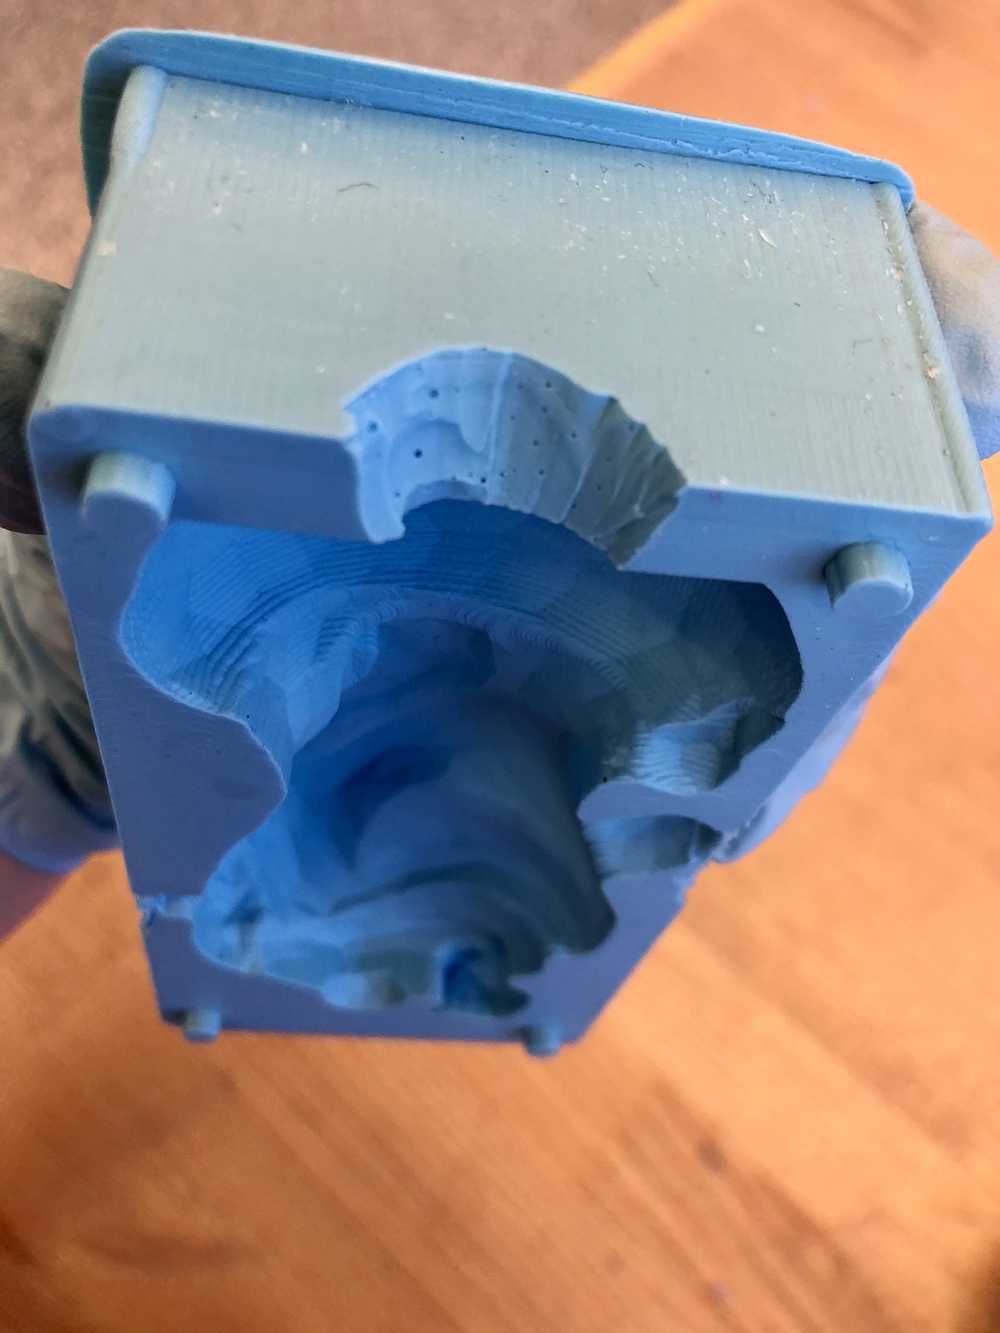
Step 3: Milling the Wax (Positive)
First we tape down the wax to the bed. We need to make sure that it sticks really well so that it doesn’t become dislodged due to the pressure of the tool.

After uploading the file to the CNC Shark Control Panel software, we first zero the bit to the corner of the wax block and then run an air test (by setting the z coordinate to be much higher).
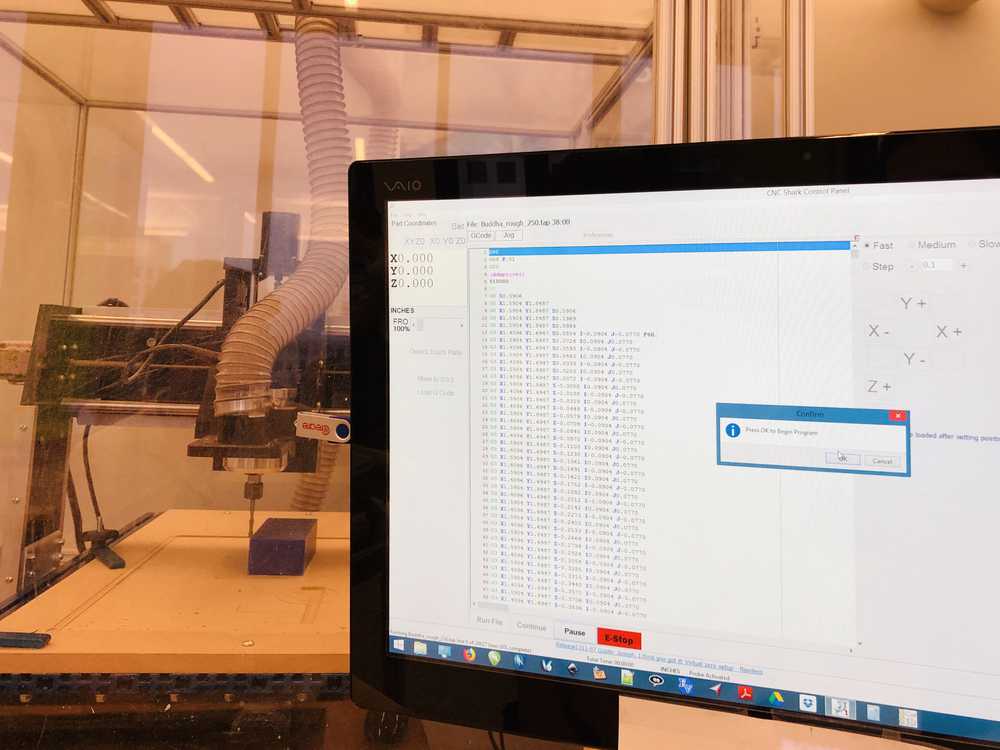
And then it’s time to mill! Since milling can be a finicky process (the bit can get stuck, the material can dislodge, etc.) it requires thee utmost attention during the process. Milling took about an hour for each block.
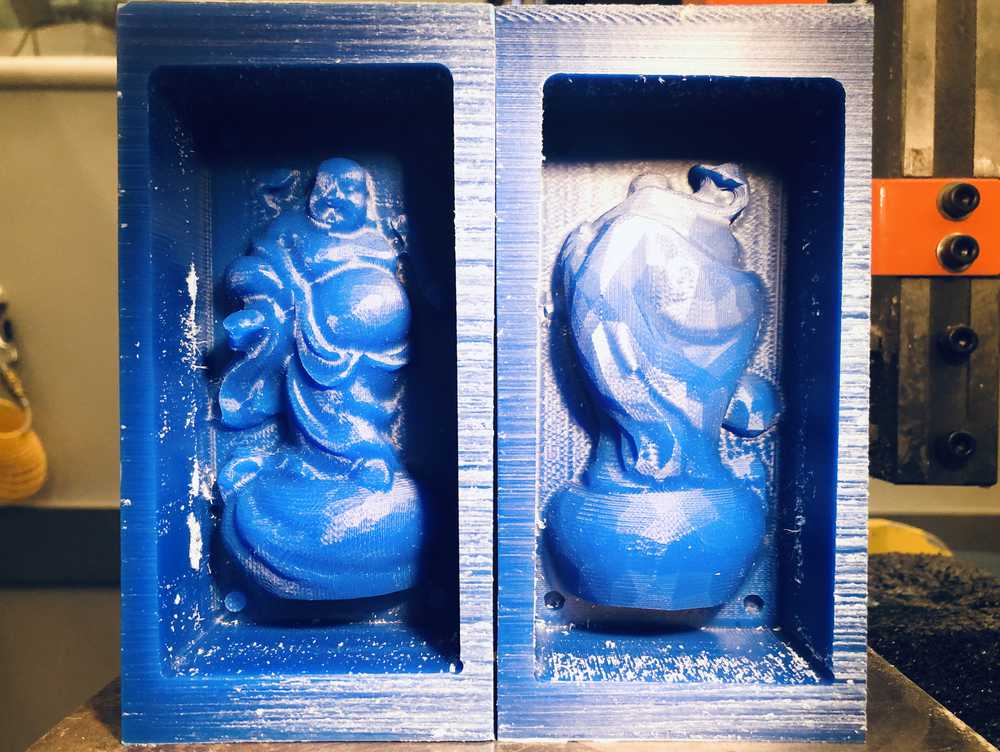
I had to do a bit of editing on the final wax positive. Because I had not left much clearance between the piece itself and the inner walls of the wax (intentionally–I didn’t realize this would be a problem) there were some areas where the bit was not able to mill all the way down. What this means is that the OOMOO mold will have areas near the sides where there is a lack of wall. And finally, this means that when I pour the casting material, it will leak out. To fix this to a small degree, I used the tip of a soldering iron to melt away some of the wax so that there was a continuous boundary around the figurine.
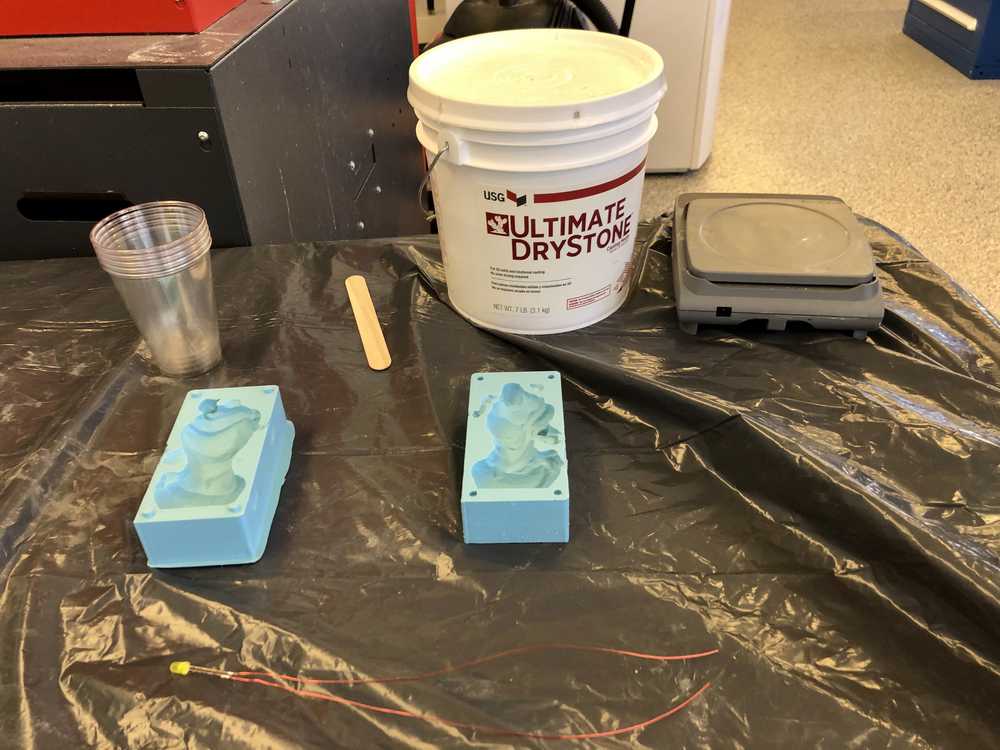
Step 4: OOMOO Mold (Negative)
To make the mold, I used Smooth-On Oomoo 25, a silicone rubber compound that is made by mixing the yellow “A” and blue “B” formulas in a 1-1 by volume ratio. It has a 15 minute mix and pour time and a 75 minute cure time.
The method for doing this is first to figure out how much volume your piece needs. To do this you pour water to fill the wax positive, and then pour that water into a cup, marking the water level with a marker. Then pour half of that water into another cup, and mark both of those new water levels. This leaves you with two cups of equal volume, whose total volume is the volume of Oomoo needed for the mold!
Here is me holding my A and B formulas, ready for mixing.

A note about the Oomoo is that these two parts need to be mixed really well. About twice as much mixing as you think. Otherwise, the mold will end up streaky and may be more likely to have air bubbles, which, if they are at the surface, will then be transferred to the cast. To be safe, I mixed the formula in the bottles, in the cups, and both of them together.
Two hours later, the mold was done:

Step 5: Drystone Cast (Positive)
For the cast, I decided to go with the Ultimate Drystone material, to achieve a more statue-like look (as apposed to the “manufactured” look that plastic would give).
I also prepared my LED by soldering magnet wire to both ends. My plan is to lodge the LED in the buddha’s arm before pouring the cast, so that (hopefully) only the light and not the LED itself is visible. I like the idea of the light as being a “surprise” feature.
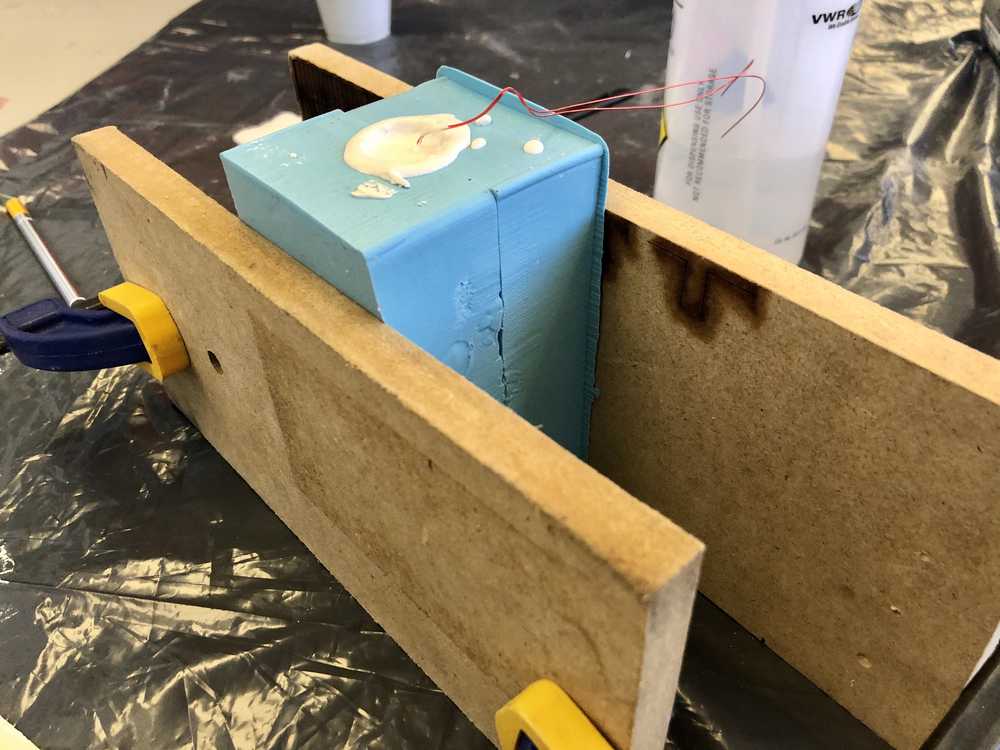
There are two ways to make the cast. One is to cast each half of the mold separately and then glue them together. The other is to cut a pour-hole at the top and clamp the two halves together to achieve a more seamless single cast from the two seperate halves. This is the method I decided to try.
The one problem with my mold was a result of the earlier fact that the mill did not go all the way to the surface causing the mold to have some very delicate/non-existent sides. To make sure that the casting liquid wouldn’t leak out and make a mess, I clamped the two halves together and poured water in. I learned that clamping too hard was actually worse since the increased pressure and increased deformation at the sides worsened the leaking. Eventually I found a clamping pressure so that no water leaked out of the mold. Presto!
The final step before pouring is making a pour hole. For this I cut a small angled semicircle at the bottom of each mold. A rule of thumb is that it is better to pour from a place of less detail than more detail. The bottom of the buddha figurine is just a statue so this was perfect.
And… the cast is poured!
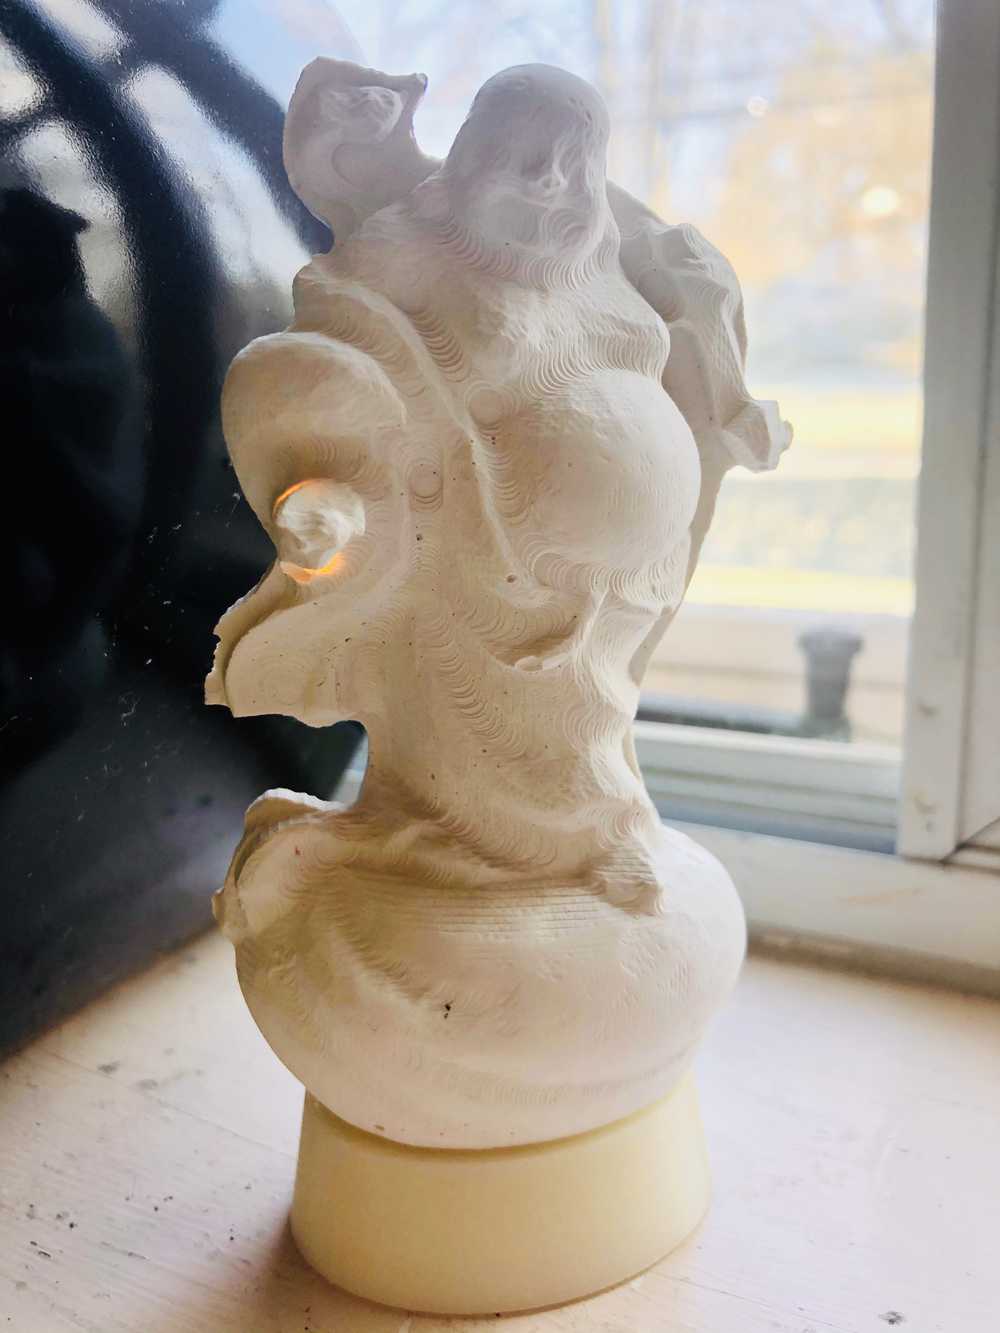
45 minutes later, buddha was ready to come out of his mold:
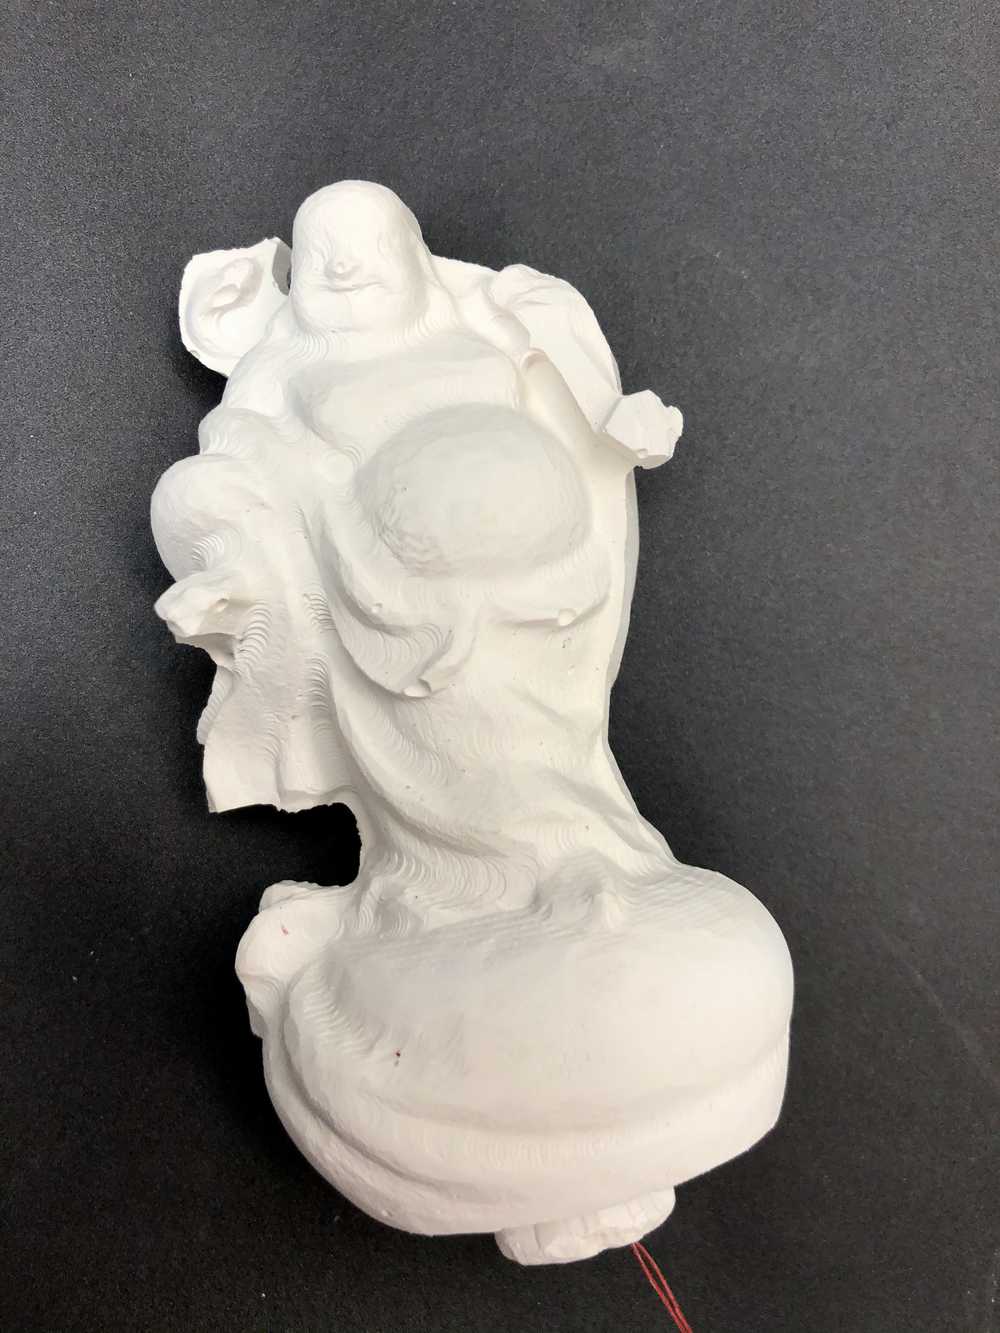
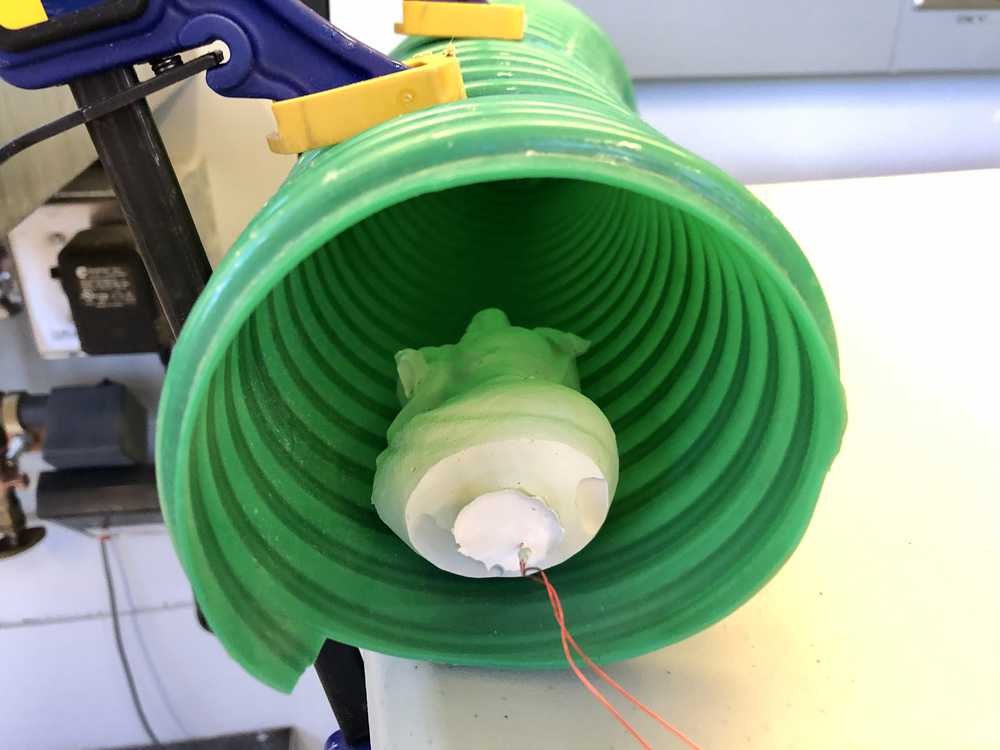
Now to let him fully set. To speed up the process, Anthony recommended placing him in a ventilation tube that blows a continuous gentle stream of air. Increasing the air flow helps him dry faster. I left him in there for about two hours.
Turning on the Lights
The first step was to attach the LED wire to the coin cell battery. Because I didn’t end up casting the battery into the figurine, I decided to make a little stand that would hide thee electronics and the little stub at the bottom from the casting method.
I approximated the base of the buddha as an ellipse, measured the length of the two axis with calipers, created and extruded the shape in Fusion, used the Draft tool to create a subtle slope, and sent it off to the Stratasys uPrint!.

The stand came out of the printer 20 minutes later and these were the results:

I sanded the magnet wire and taped it to the close side of the coin battery. The other side I sanded the very end and decided that if I coiled it all up the spring force itself would help make the connection to the battery. This way, it wouldn’t be permanently on, thus saving battery.

And putting buddha in his stand…
I am ultimately really happy with how this turned out. In the future, I’d like to do more sanding of the figurine. Anthony showed me some small dremmel bits that have a soft sandpaper exterior. This would be perfect for removing the toolpath features in the nookes and cranies. I’d also like to experiment with the other casting materials such as the silicons, metals, and production quality plastics.