FINAL PROJECT
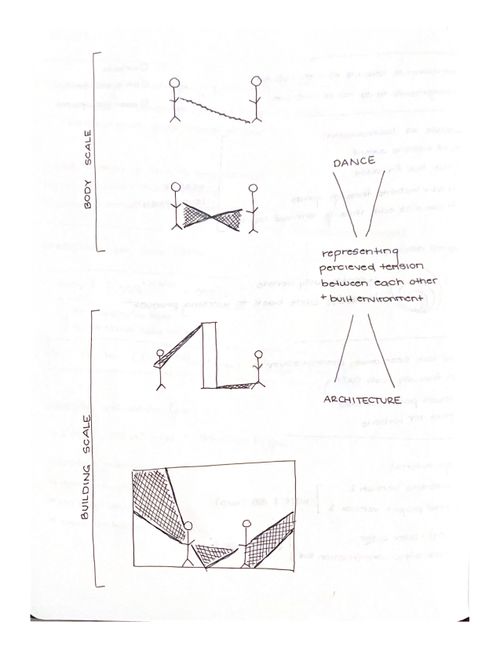
A brief sketch showing the overall goal of my final project.
Most of my work centers at the intersection of architecture and dance. Both practices focus on movement and space but on very different scales.
The goal of my work is to merge these to practices across scales in order to understand how our built environment and fellow people affect the tensions we feel in a space and therefore how we move through it.
09.14 PREVIOUS WORK
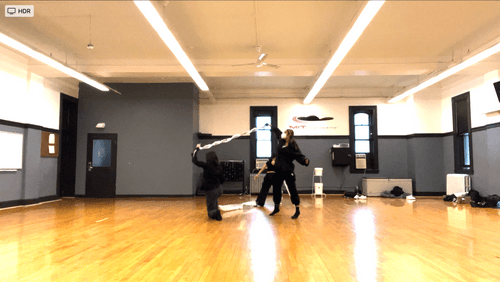
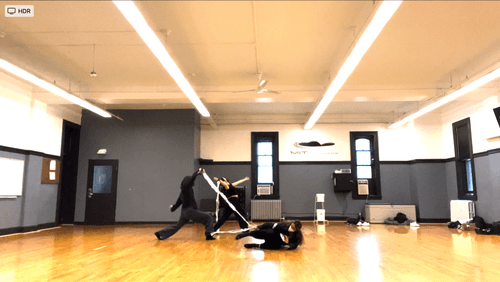
My final project for How to Make is a continuation of a thesis project I did last year utilizing the study and practice of dance to inform the design and fabrication of public spaces. My initial experiments for this project utilized a wearable elastic device that connected dancers to one another while they were moving. The elastics made the dancers aware of the tensions we experience between each other and our built environment as we move through a space.
In my first iteration and experimentation, the elastics solely acted as a constraint to the dancers, and the dancers would have to verbalize their variation in tension/comfort. I then took these verbalized data points and charted them on a map to show the dancers perceived tensions in relation to each other as they danced.
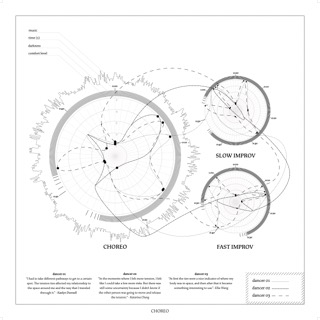
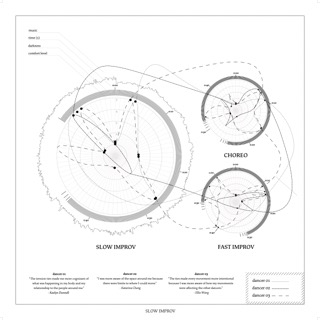
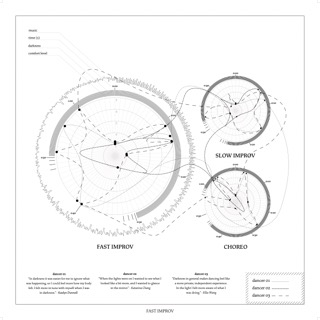
For my final project I want to recreate these tension ties with the ability to measure the tension within them. I also just started a UROP in the Immersion Lab in MIT.nano working on measuring dancers bodies as they perform. Over IAP I am hoping to combine these two project and be able to analyze the objective tension between the dancers (through this final project), and the perceived tension experienced by each dancers body (through the Immersion Lab sensors). I then hope to design a program that can synthesize the data from both sources in real time and generate a map, like the ones I previously made, of the dancers movement and tension in real time.
10.02 FIRST PROTOTYPE
I made my first prototype in the third week of class, which focused on 3D printing and scanning. Check-out a more in depth explanation of this fabrication process on my documentation page for week 3. To summarize, I tried 3d printing rings to embed inside the tension tie that I could eventually attach sensors to that would measure the distance between rings and gage when the ties was taught versus slack. However, this prototype didn't work for a few reasons. The 3d rings were too big and heavy and weighed down the fabric, and the fabric I used was not strong enough and so did not have the same constraining properties as my initial ties. Although, unsuccessful this prototype helped me to further define my goals for this project and discover more productive ways to go about making it.
10.05 REVISED FABRICATION METHODS
I came out of the 3d printing week with two new fabrication methods in mind:
Method #1: Conducting threads sewn into the elastic tension ties that can measure the tension forces within the ties and then send the data back to be programmed.
Method #2: Programmable knits. I reached out to the self assembly lab to learn more about this process.
10.20 PROGRAMMABLE FABRIC PRECEDENTS
I met with Jack Forman from the Tangible Media Group to discuss some of the ways to go about programming fabrics. He gave me a list of precedents that I'm planning on sifting through to develop my own strategy for my final project.
Tangible Media Group:
https://tangible.media.mit.edu/project/sensorknits-architecting-textile-sensors-with-mach
https://dl.acm.org/doi/fullHtml/10.1145/3313831.3376841
Piezoresistive Fabrics:
https://news.mit.edu/2022/structural-color-changing-photography-0801
https://www.kobakant.at/DIY/
https://www.instructables.com/Lasercut-Stretchy-Conductive-Fabric-Traces/
12.06 PLAN, SCHEDULE, INVENTORY
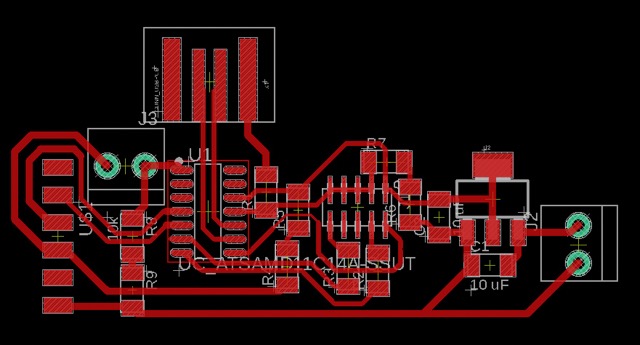
After meeting with Jack, and reading through his list of precedents I decided to use this polysensing method developed by another HTMAA TA, Cedric Honnet. After deciding on my method I met with my TA Reina to figure out how to connect my manipulated fabric to a pcb board which would then relay the information to my computer via bluetooth. Below is my plan, schedule, and materials inventory for the my final project:
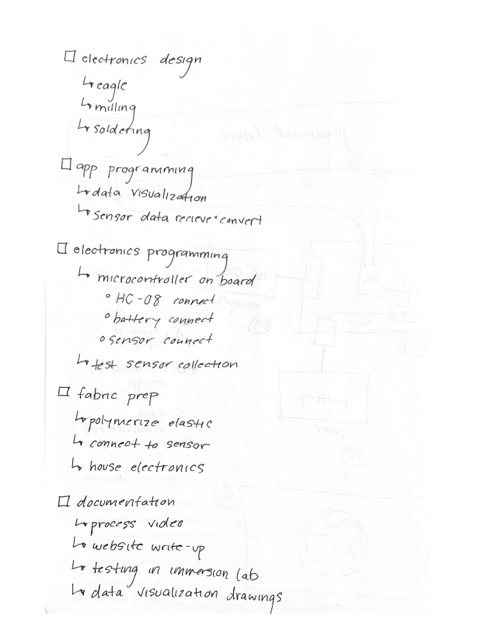
I. Project Plan:
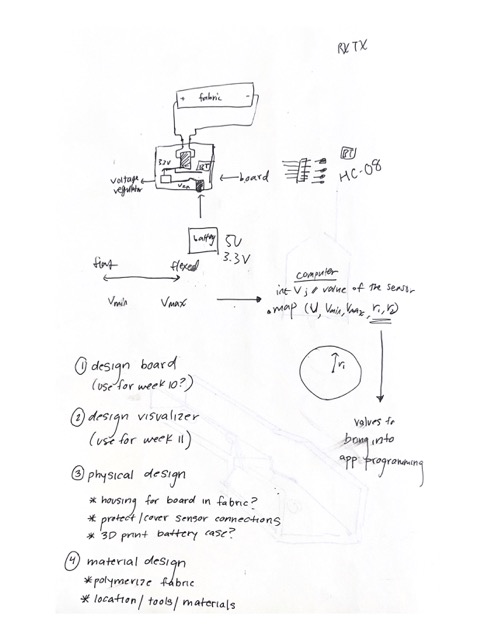
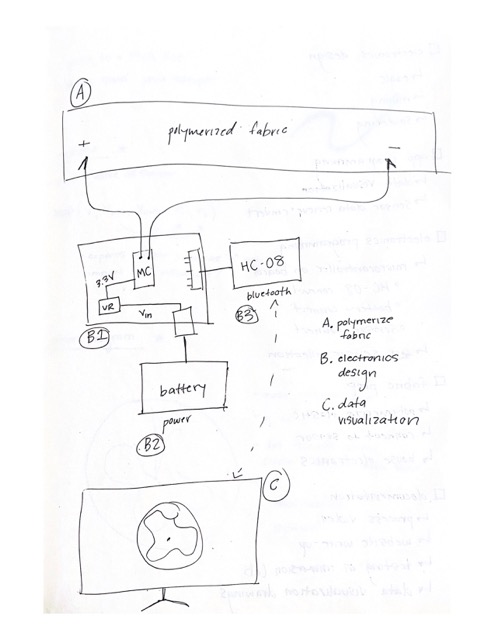
A. Fabric Prep: First I'm going to polymerize my fabric using equal parts Iron Chloride and Pyrrole, following the procedure described here. This will essentially turn my fabric into a sensor which can then be used similarly to the piezo sensors I used in week 8. To connect the sensor to my board I'll use wires attached to clips, connecting one end of the polymerized fabric to my microcontroller ground, and the other end to my +3V3 charge.
B. Electronics Design: Next will be the electronics design. My board will need the basic components such as a USB connection and 5x2 pinhead for boot-loading. It will also need a voltage regulator that connects to a battery pack for power, and a connection to the Arduino HC-08 bluetooth module for communication with my computer. The microcontroller will need a terminal block connection in order to connect my fabric.
C. Data Visualization: Lastly, will be the app / interface programming. I will need to program in Arduino in order to receive and process the sensor data. I will then need to program the visualization of the received data. Reina suggested I use processing which is helpful for creating graphing visualizations.
D. Misc/Other: Other miscellaneous tasks include designing a housing unit for my electronics to embed within the elastic as well as documenting my fabrication and testing process. I will also be doing a pilot study in the Immersion Lab the Monday before our final in order to see how my project works in lab.
II. Project Schedule:
I listed out my master to do list in order to organize my thoughts and then delegate each task to a day or so. My rough timeline is as such:
1. Electronics Design: 12/11 - 12/14
2. Electronics Fabrication: 12/14
3. App Programming: 12/14 - 12/16
4. Electronics Programming: 12/15-12/16
5. Fabric Prep: 12/16
6. Tension Tie Fabrication: 12/17
7. Integration and Debugging: 12/17 - 12/18
8. Testing in Immersion Lab: 12/19
9. Documentation: 12/18 - 12/19
III. Project Inventory:
1. Elastic Bands: https://www.amazon.com/dp/B074M61SJF?psc=1&ref=ppx_yo2ov_dt_b_product_details
2. Battery Case: https://www.amazon.com/Battery-FatShark-Attitude-Headsets-Included/dp/B094GFXDGS
3. Alligator Clips: https://www.amazon.com/Alligator-Clips-Heavy-Silicone-Jumper/dp/B07L29V4Z2
4. HC-08 Bluetooth Module: https://www.smart-prototyping.com/HC-08-4-0-BLE-Serial-Bluetooth-Module-CC2540
5. Snaps: https://www.amazon.com/dp/B09FPV4FNV?psc=1&ref=ppx_yo2ov_dt_b_product_details
6. Iron Chloride: https://www.glentham.com/en/products/product/GK2873
7. Pyrrole: https://www.glentham.com/en/products/product/GK9750
8. Electronics Components: SAMD11C14 microcontroller, SOT223 voltage regulator, terminal blocks, capacitors, resistors, 2x5 pinhead connection, 1x6 wire connection. (More detail on electronics design below)
12.11 - 12.15 ELECTRONICS DESIGN
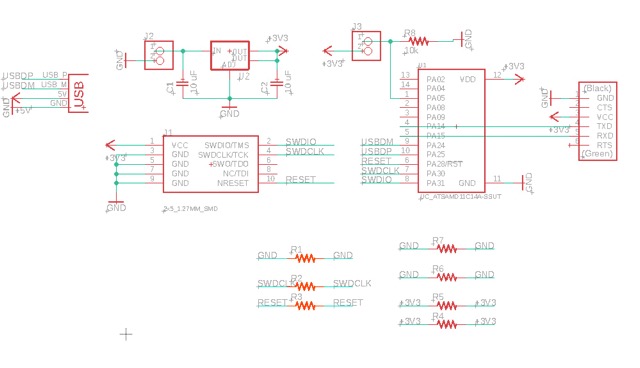


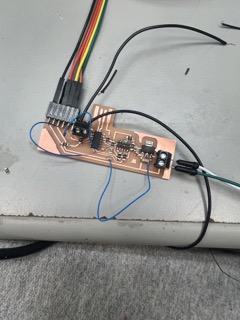
1. Ok so when I started my electronics design, I followed the initial plan I detailed above but still had a few questions, such as do I still need a USB and pinhead on my board if its communicating wirelessly? The answer is YES USB and pinhead are necessary to program your PCB. How will I connect my board to the battery? I used a terminal block! How will I connect my board to the HC-08 bluetooth module? A 6 x1 pinhead rainbow connector, this is not the technical term for it but hopefully from the photos you will see what I am talking about.Lastly, how will my sensor connect to the board? Also, a terminal block!
2. After figuring out all my questions I finalized my board design and began fabrication. Unfortunately, the first two board I made where not soldered well enough and could not be boot loaded. My third board was eventually successful but there were a few trials and tribulations to get there.
12.16 REDUCING THE SCOPE OF MY PROJECT
1. So, at this point in the week I had spent almost three days straight on my electronics fabrication and debugging and was feeling VERY discouraged. HTMAA is not an easy class on your mental or physical health, andI was feeling the effects of burn out. I do want to emphasize that if you are feeling overwhelmed and discouraged that you are more capable than you think and can also ease some of your worries and fears by letting go of your initial ideas; basically, kill your babies.
2. After some advice from Neil, I reduced the scope of my project and decided to aim for a simplified version of my idea that was functioning rather than the full-fledged version that wouldn’t work. This meant that instead of polymerizing my fabric with Pyrrole and Iron Chloride I instead used a stretch sensor attached to my elastic. I also reduced my ambitions for the data visualization (you can read more about this specifically in my week 11 page).
12.17 FINALLY, A WORKING BOARD
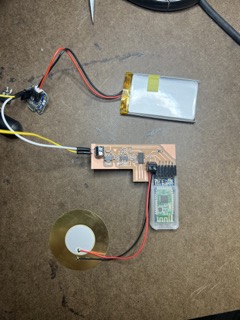
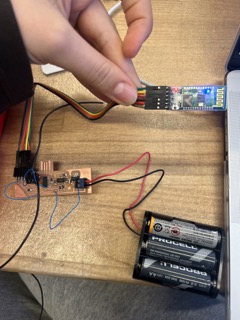
1. Okay by the 17th I had FINALLY gotten a working board by programming my final project board with the code that I had used in week 8 and connecting my sensor terminal block to a piezo sensor, and my board to my computer through USB rather than Bluetooth (I had a lot of trouble trying to implement and then connect to the HC-08 / HC-05 module).
2. Then I connected my terminal block to a stretch sensor rather than the piezo sensor and that also worked!!
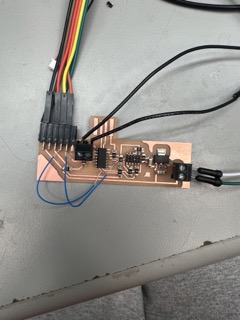
3. The next problem to tackle was the HC-08 module.I realized that the LEDs weren’t turning on which meant the module was not connected to my board. After further investigation I realized that the pins are not mapped the same on the HC-08 as they are on the pinhead. Anthony helped me use some wires to re-route the HC-08 charges to match the pinhead ones. This worked and the LEDs turned on!
4. The next issue though was realizing that I connected my HC-08 module to the wrong pins on my SAMD11C microcontroller. I connected them to two random analog pins, when really, they should have been connected to the two serial pins (30 and 31). To fix this I removed the copper traces connecting the HC-08 TX and RX to my microcontroller. Then I used small blue wires to connect those traces to the 30 and 31 pins on my microcontroller.
12.18 3D PRINTED HOUSING
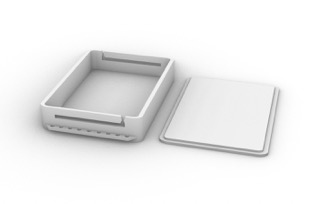
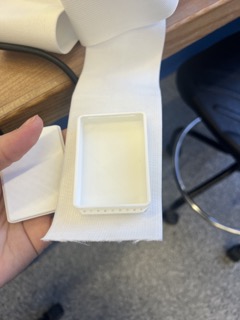
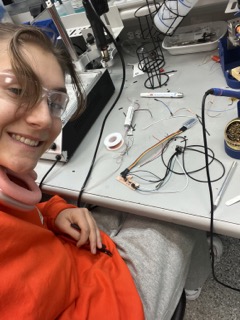
1. While I was in the EECS shop getting helpI also used some of my time to design a nice housing unit for all my electronics. I wanted to make sure nothing was exposed to ensure the dancers safety, so I designed a small box to be 3D printed that had slits for the wires to come out of and some holes to be able to sew the box directly onto my fabric.
2. The 3D printed housing took a few iterations, the first one was way too small because I was stupidly too lazy to get a ruler and instead used my elastic to guestimate the measurements but amazon descriptions told me the elastic was 2 inches wide when it was actually 3…However, on the third try I got a box that fit all my electronics and fit snuggly within the width of the elastic.
12.18 STILL WORKING ON MY BOARD
1. At this point I was still trying to get the HC-08 to work. Now that it was correctly connected to the serial pins on my microcontroller I was able to connect to Anthony’s (EECS TA) phone and send messages from my board to Anthony’s phone, woohoo! This was very exciting because as I mentioned in my week 10 assignment I wasn’t able to get theESP32 to work so I was very happy to finally have completed assignment 10. The one problem we soon found is that HC-08 does not connect easily with mac so instead I switched to the HC-05 module.
2. I switched to the HC-05 module but when I plugged it in it wouldn’t turn on. With Anthony’s help I soon found out theHC-05 needs 3.6V to run and my board and battery only supplied it with 3.3V.The solution was to change my battery to three AA batteries which would supply a total of 4.5V. I need 3.3V to run the microcontroller and 3.6V to run theHC-05, so I used another blue wire to connect the HC-05 VCC trace to my battery terminal block trace before it went through the voltage regulator and was reduced to 3.3V. Thankfully this WORKED! I was able to connect to HC-05 on mac :)
3. However, the connection is still super finicky and even if the HC-05 is securely connected to my computer the serial data won’t read, so for my final presentation I used the USB connection to demonstrate.
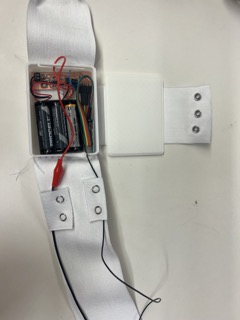
12.19 ELASTIC FABRICATION
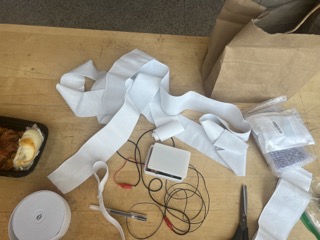
1. For my final fabrication I placed all my electronics in the 3D printed housing, sewed wrist straps on either side, and then sewed a strap to go around the 3D printed housing and added snaps to connect the strap on the bottom of the elastic. Then I used more snaps to create more little straps to keep my stretch sensor and wires in place.
12.19 DATA VISUALIZATION
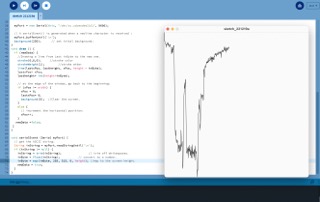
1. I have some more in-depth stuff about this on my week 11 assignment page but a quick summary of the things I learned follows.
2. The first big thing was the difference between Serial and Serial1. Serial is the language used to send sensor data to my computer through Bluetooth, Serial1 is the language used by the HC-05 module. When changing between a USB connection and Bluetooth connection make sure to change all of your “serials” to “serial1” and change your port name from your USB one to the HC-05 one.
3. I edited the visualization code by playing around with some of the color and stroke values. I also figure out the threshold of values for my stretch sensor by stretching it and watching the visuals and then used this to determine the upper and lower bounds of my graph (275-550). LastlyI added a save function to be able to continuously save images of the graph to my computer.
12.20 FINAL PRESENTATION + FUTURE PLANS
video link:
https://youtu.be/uTbg4F79OIk
1. For future improvements I want to make the electronics smaller so that they don’t weigh the tension tie down as much. I also want to find a Bluetooth module that works better and more consistently with mac. In addition, experimenting with more complex plotting and eventually working up to the radial plotting I originally wanted. Lastly, I want to try to create my own fabric sensor using the Iron Chloride + Pyrrole polymerization.
2. Other more far off future ideas I had were creating a full suit that is polymerized so the whole suit is a sensor that can map a dancer’s movement. I also want to integrate the Immersion lab data from my urop with the tension tie data from my elastics.