Idea
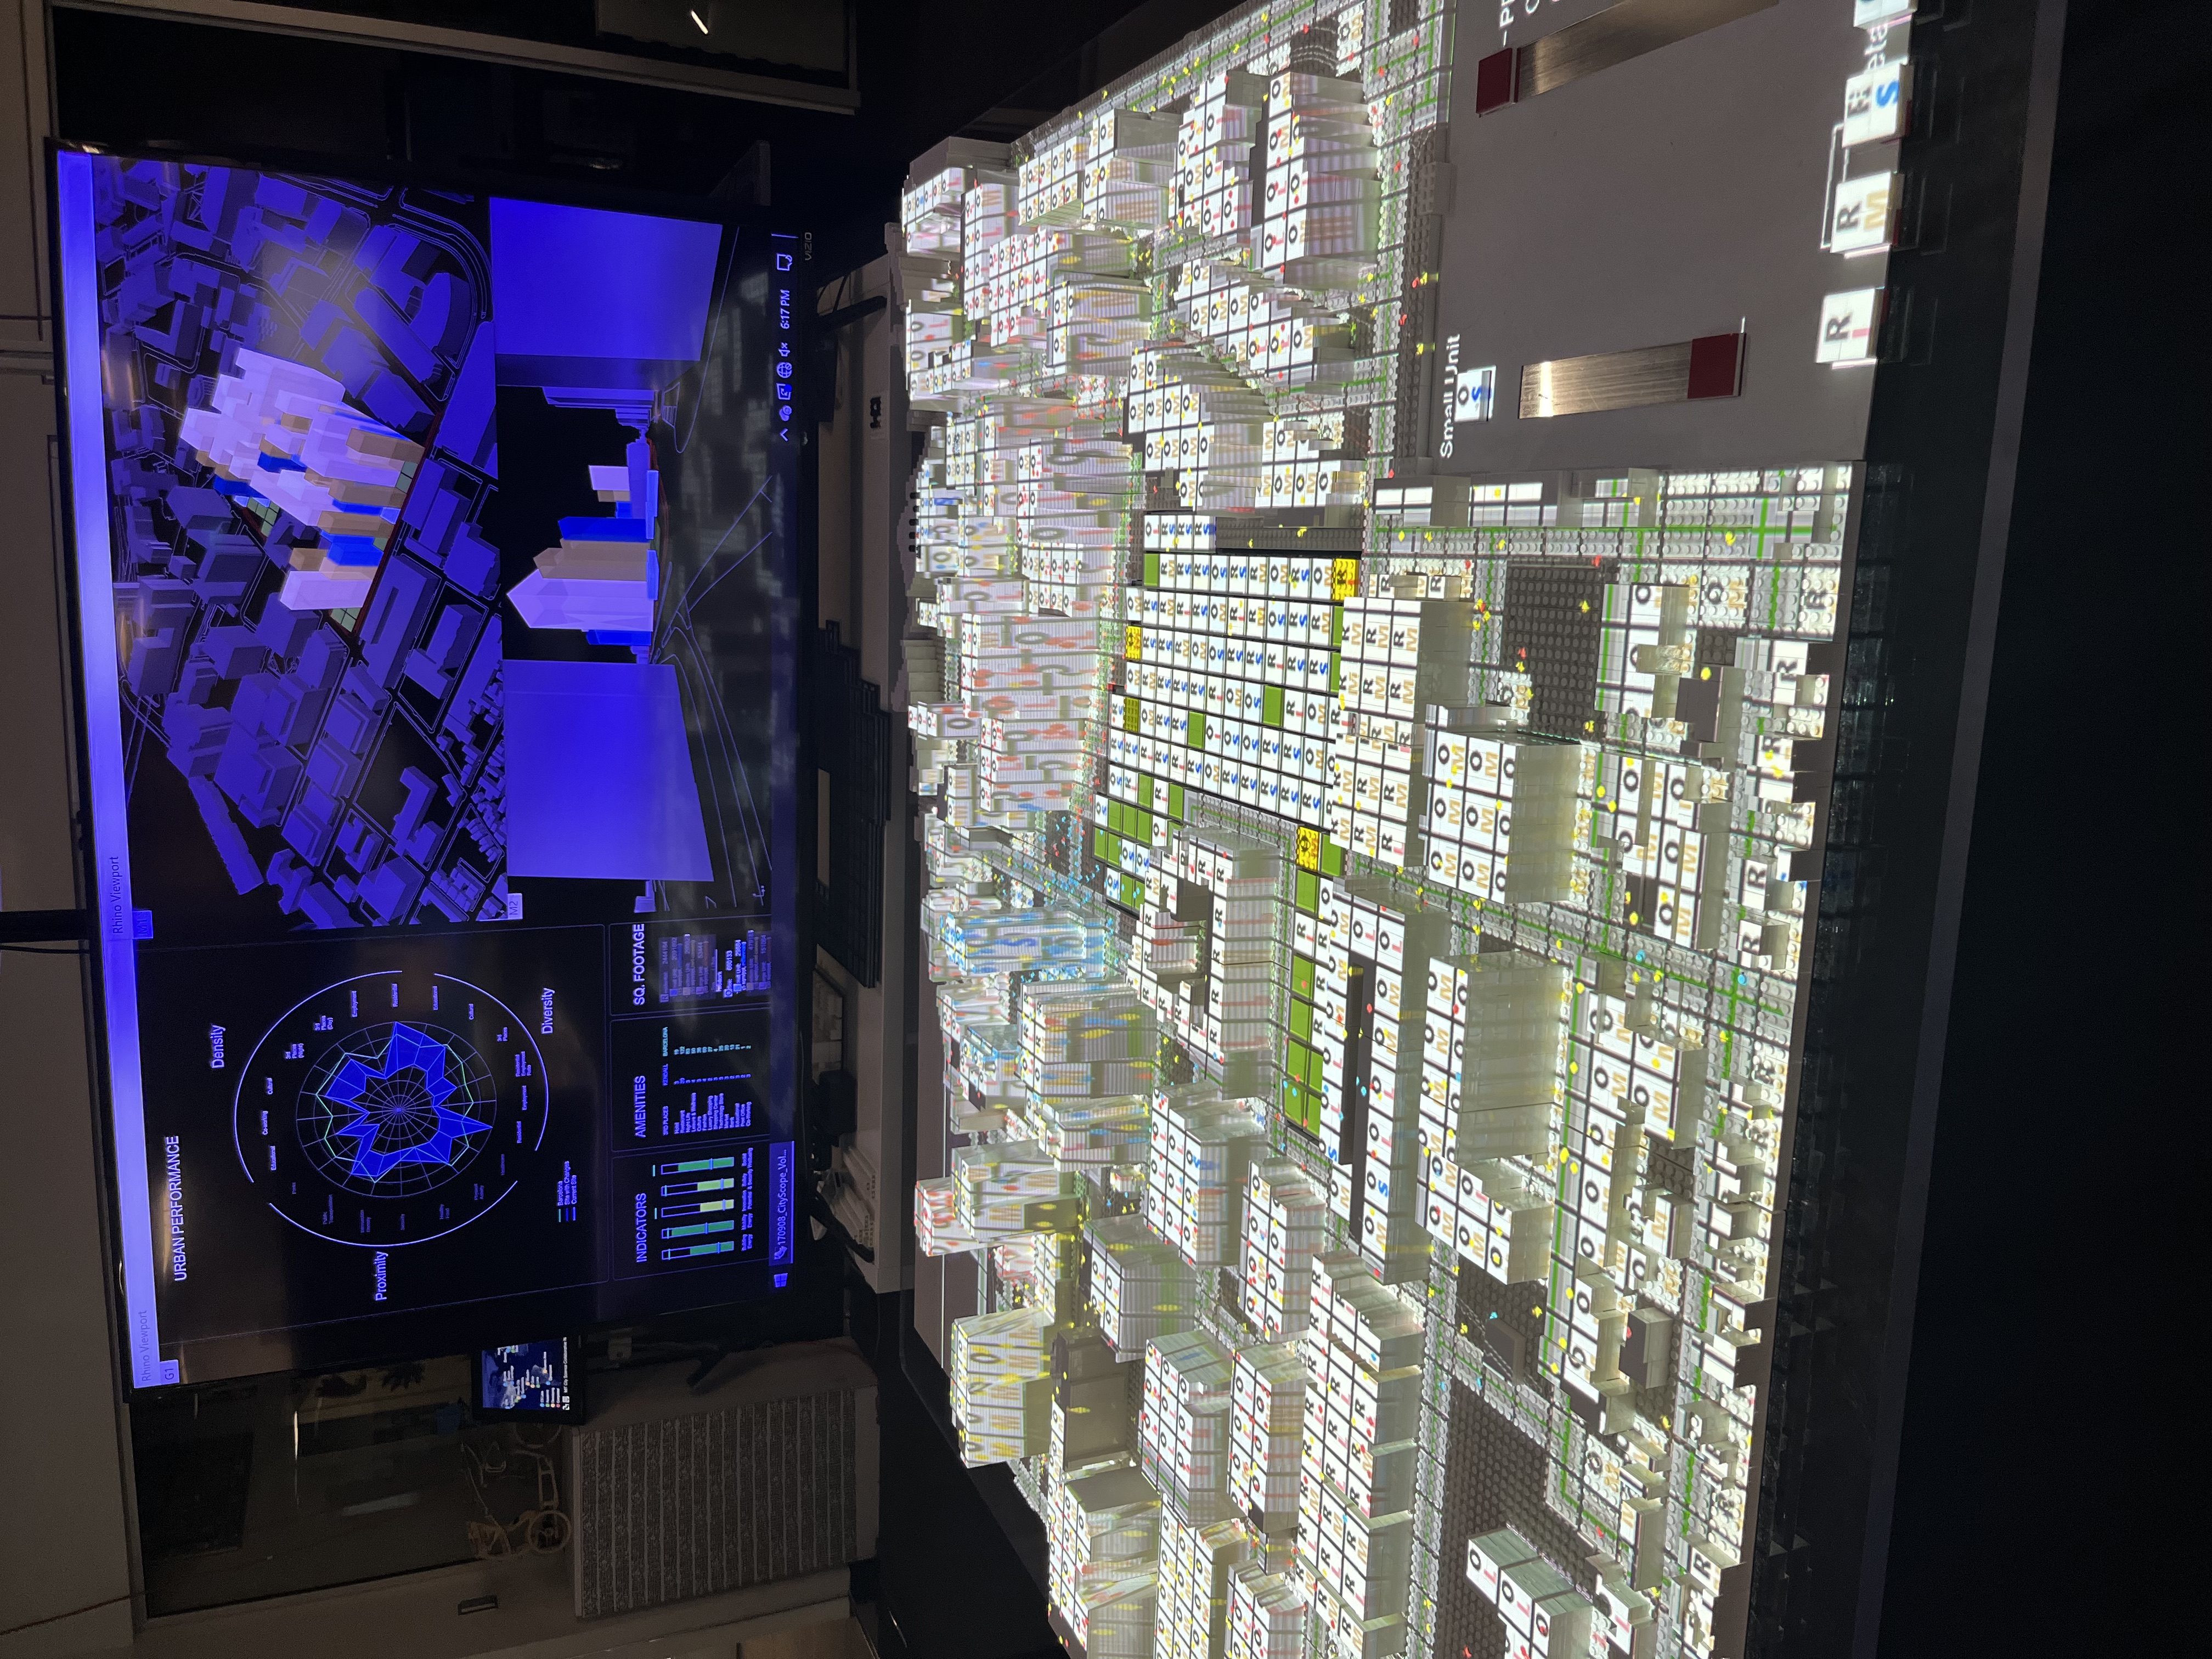
The inspiration for my final project stemmed from the original CityScope by the City Science group. However, the original CityScope table had some limitations—it was bulky and light-sensitive due to its reliance on a camera to detect color codes placed under the building blocks. To address these issues, my goal was to create a stackable version of CityScope that integrated the circuitry within the cubes, making it more portable and flexible.
I had previously attempted a similar project in Spring 2023, where different building heights were represented by different resistor values. However, I wanted to take it a step further and allow for adjustable heights rather than predefined ones.
What does it do?
CitySynth is a versatile urban planning and visualization tool that combines physical cubes with embedded circuits, a sensing platform, and a web interface. Users can create custom cityscapes by stacking and arranging these cubes on the sensing platform. The system recognizes the cube configuration and updates a 3D city model on a website in real time, allowing users to visualize changes in land use and building heights.
System Diagram
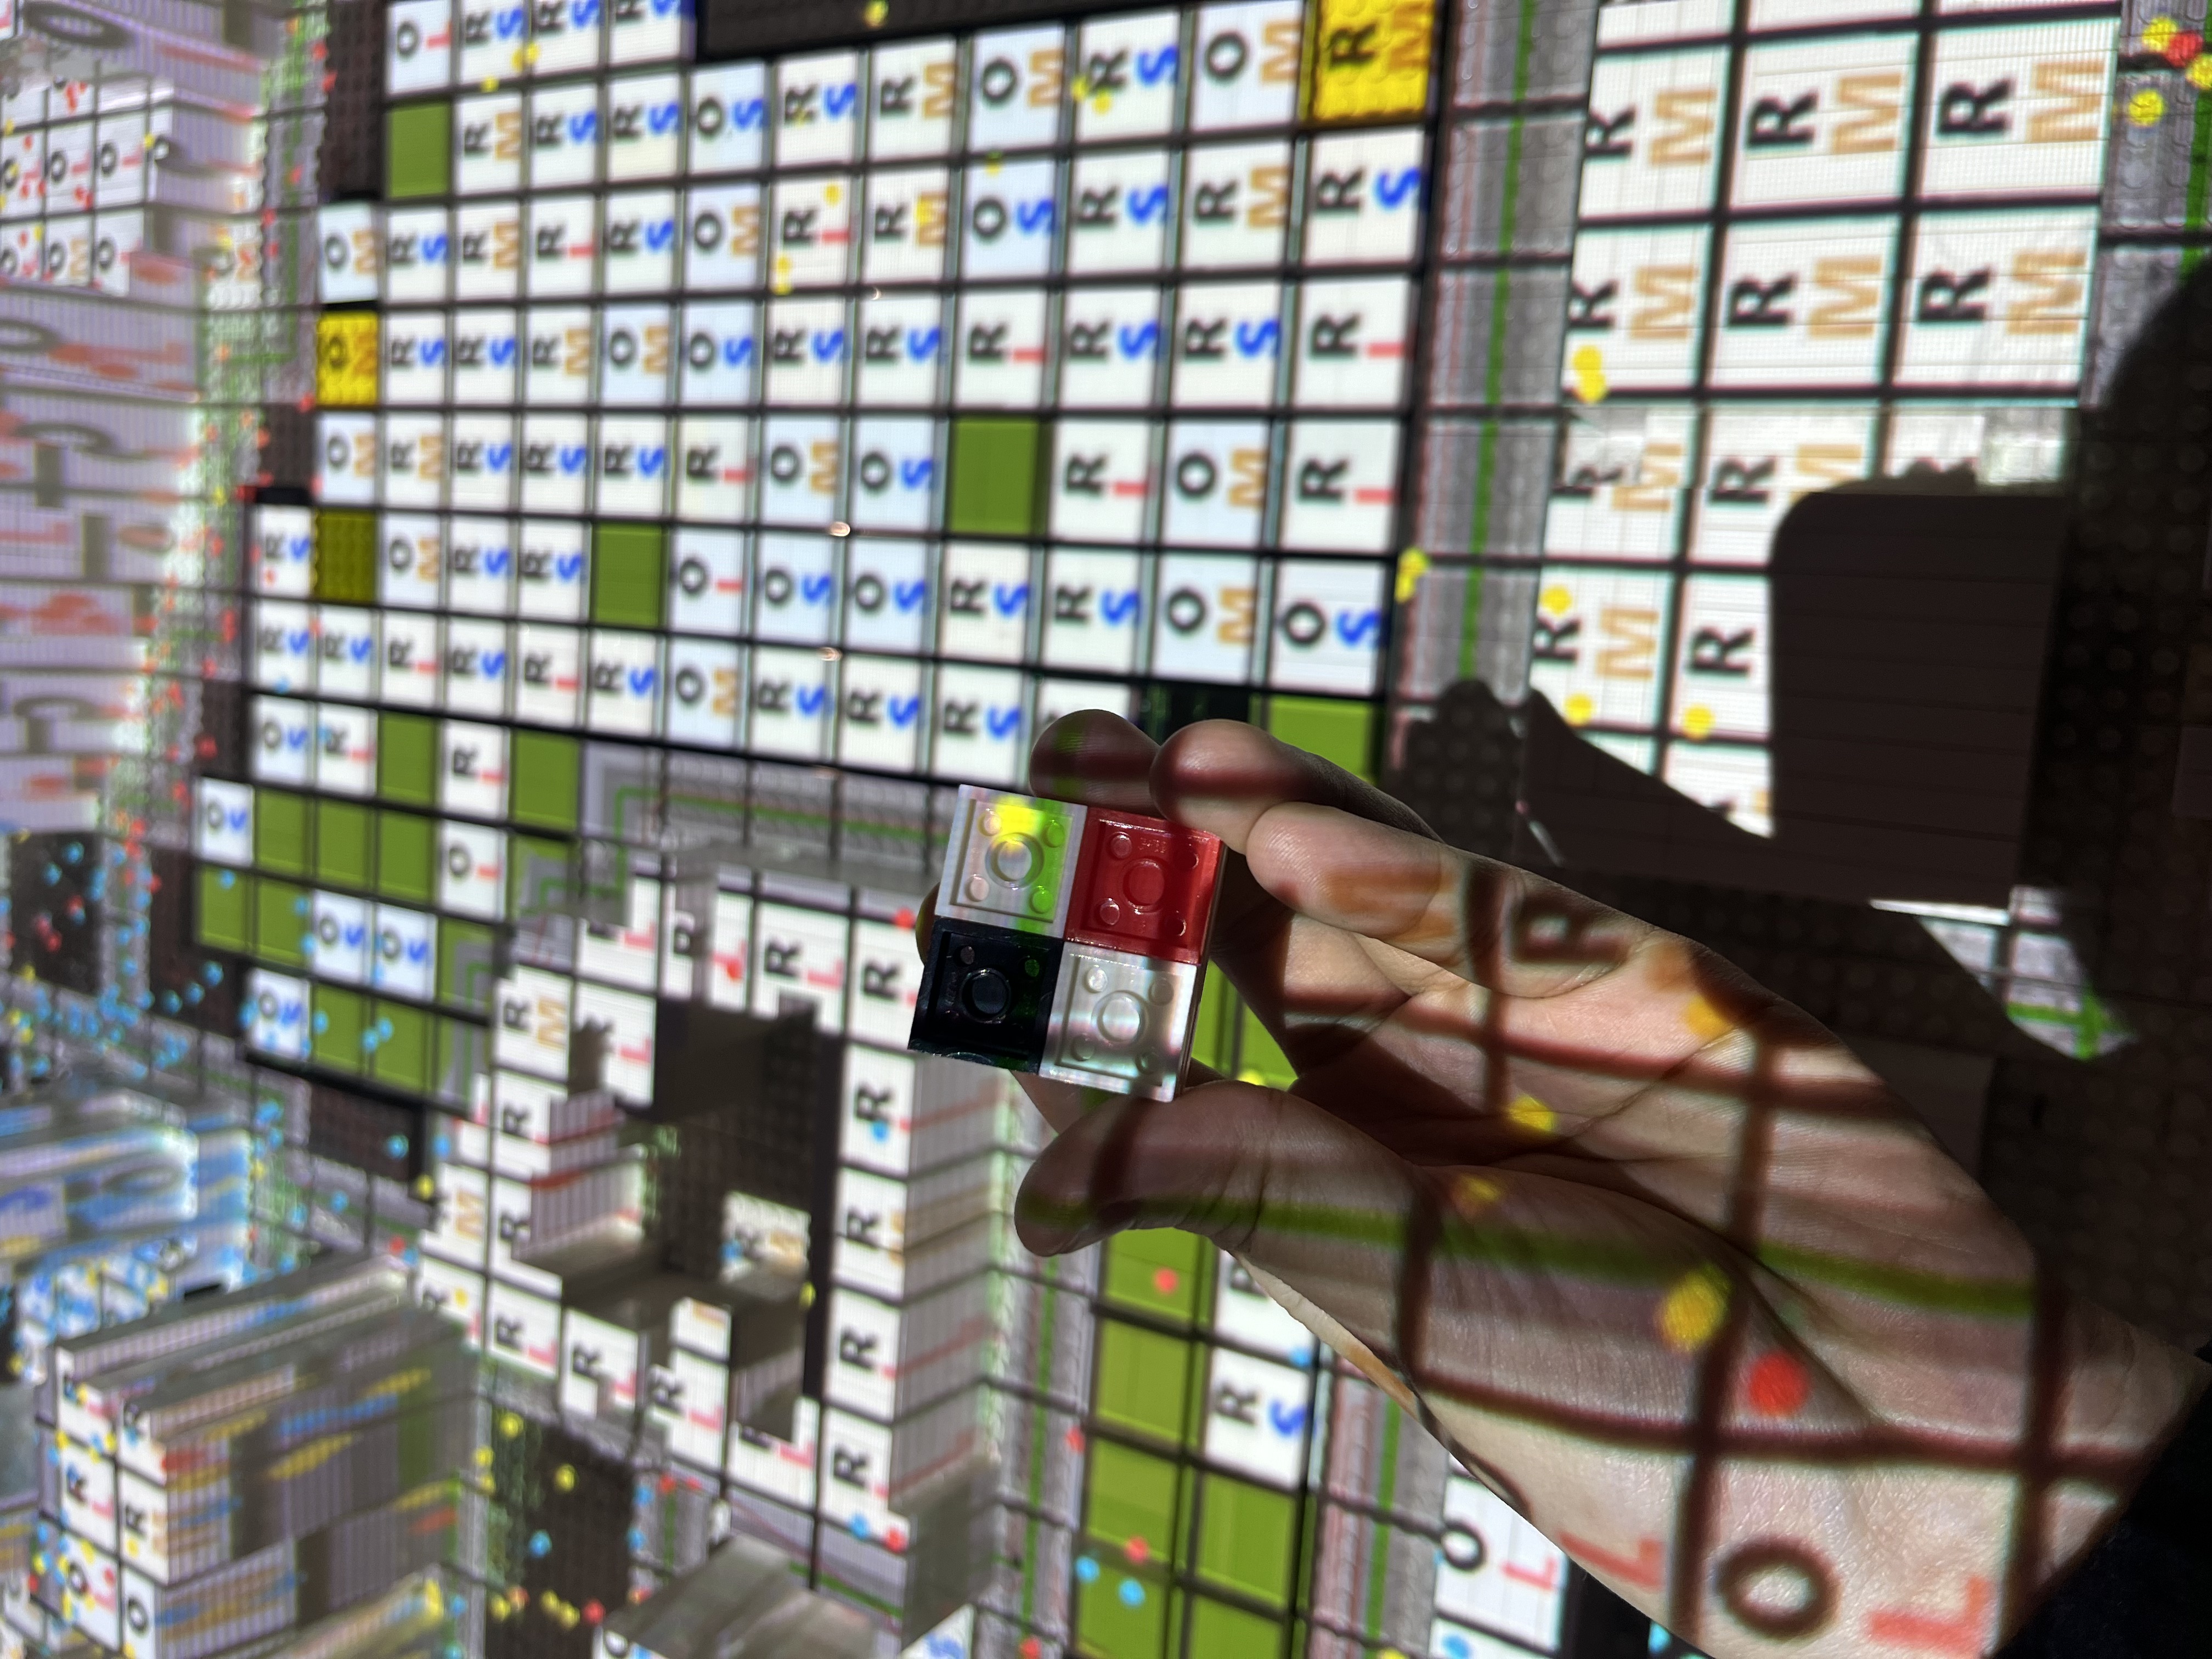
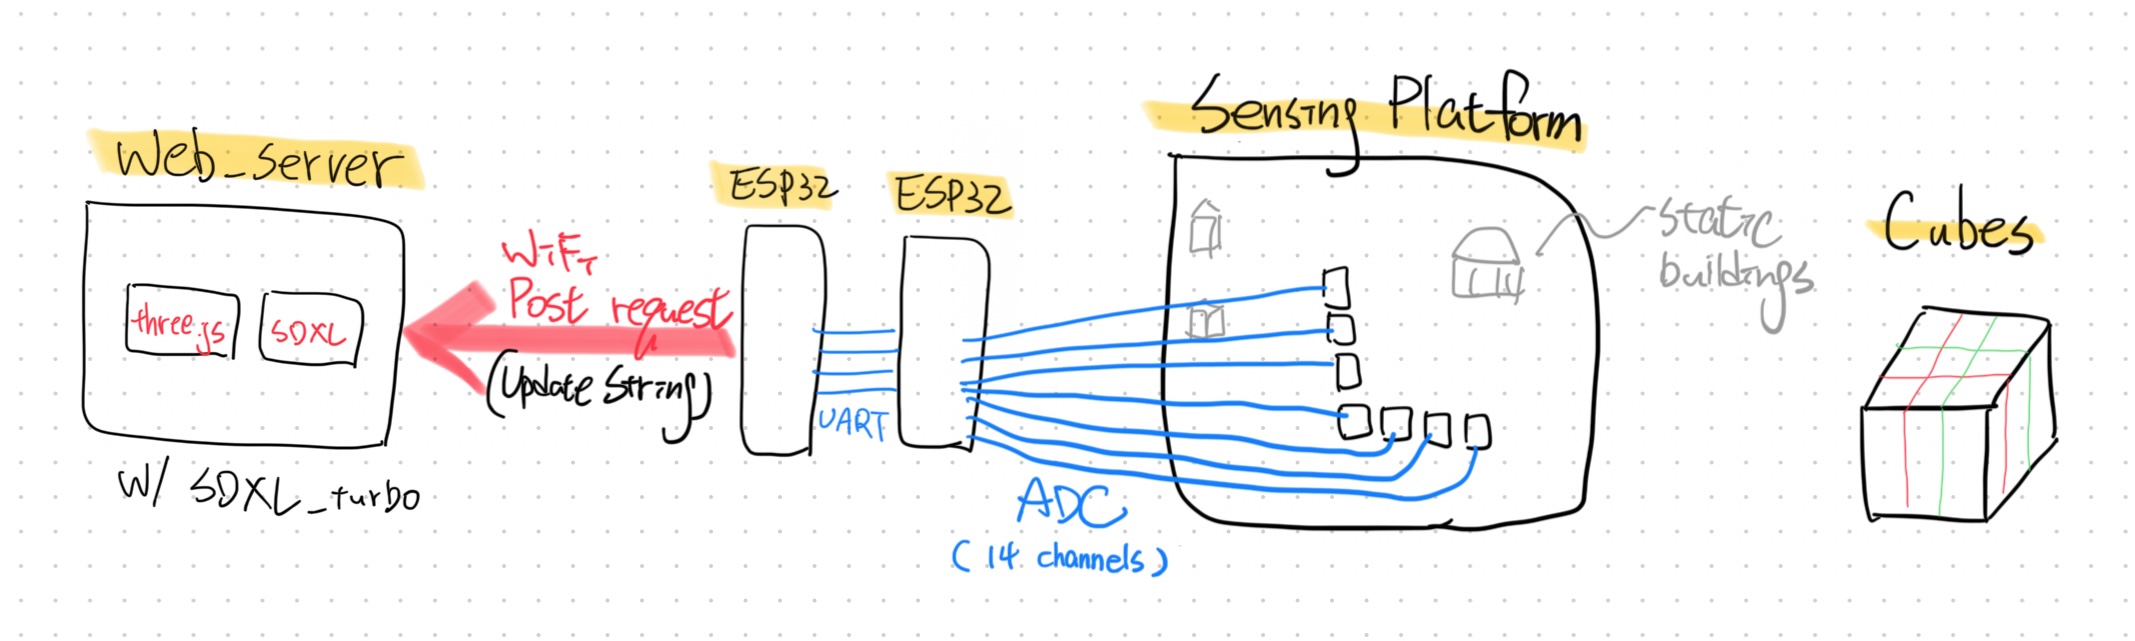
My final project consists of three main components. The first part involves circuit-embedded cubes capable of changing between two types of land uses. These cubes are stackable, with more cubes representing taller buildings. The second part is a sensing platform with seven slots, each equipped with contact circuits for the cubes. The third and final part is a website that updates a 3D model based on the placement and quantity of cubes on the sensing platform. It also provides real-time rendering of the model and visualizes the outcome on the webpage.
Timeline
| Timeline | Project Part | Component | Tools/Materials |
|---|---|---|---|
| Dec 9- Dec 12 | Stackable Cubes | cubes | Formlab 3D printer/ Clear Reisin, magnets |
| Dec 13- Dec 14 | 3D circuits | Copper tapes, smd resistors, mini coiled LED | |
| Dec 14- Dec 16 | Sensing Platform | platform | 3mm acrlic boards, copper tape |
| Dec 13- Dec 15 | static buildings | Prusa 3D printer / PLA filiment | |
| Dec 14- Dec 15 | PCB | PCB milling machine/ ESP32, copper plate, smd resistors, 20p female headers | |
| Dec 12- Dec 13 | Web Server | Websocket communication | |
| Dec 14 | Three.js object update | ||
| Dec 15- Dec 16 | Stable Diffusion XL turbo rendering | ||
| Dec 16 | Prep for presentation | Demo video | |
| Dec 17- Dec 18 | A Slide |
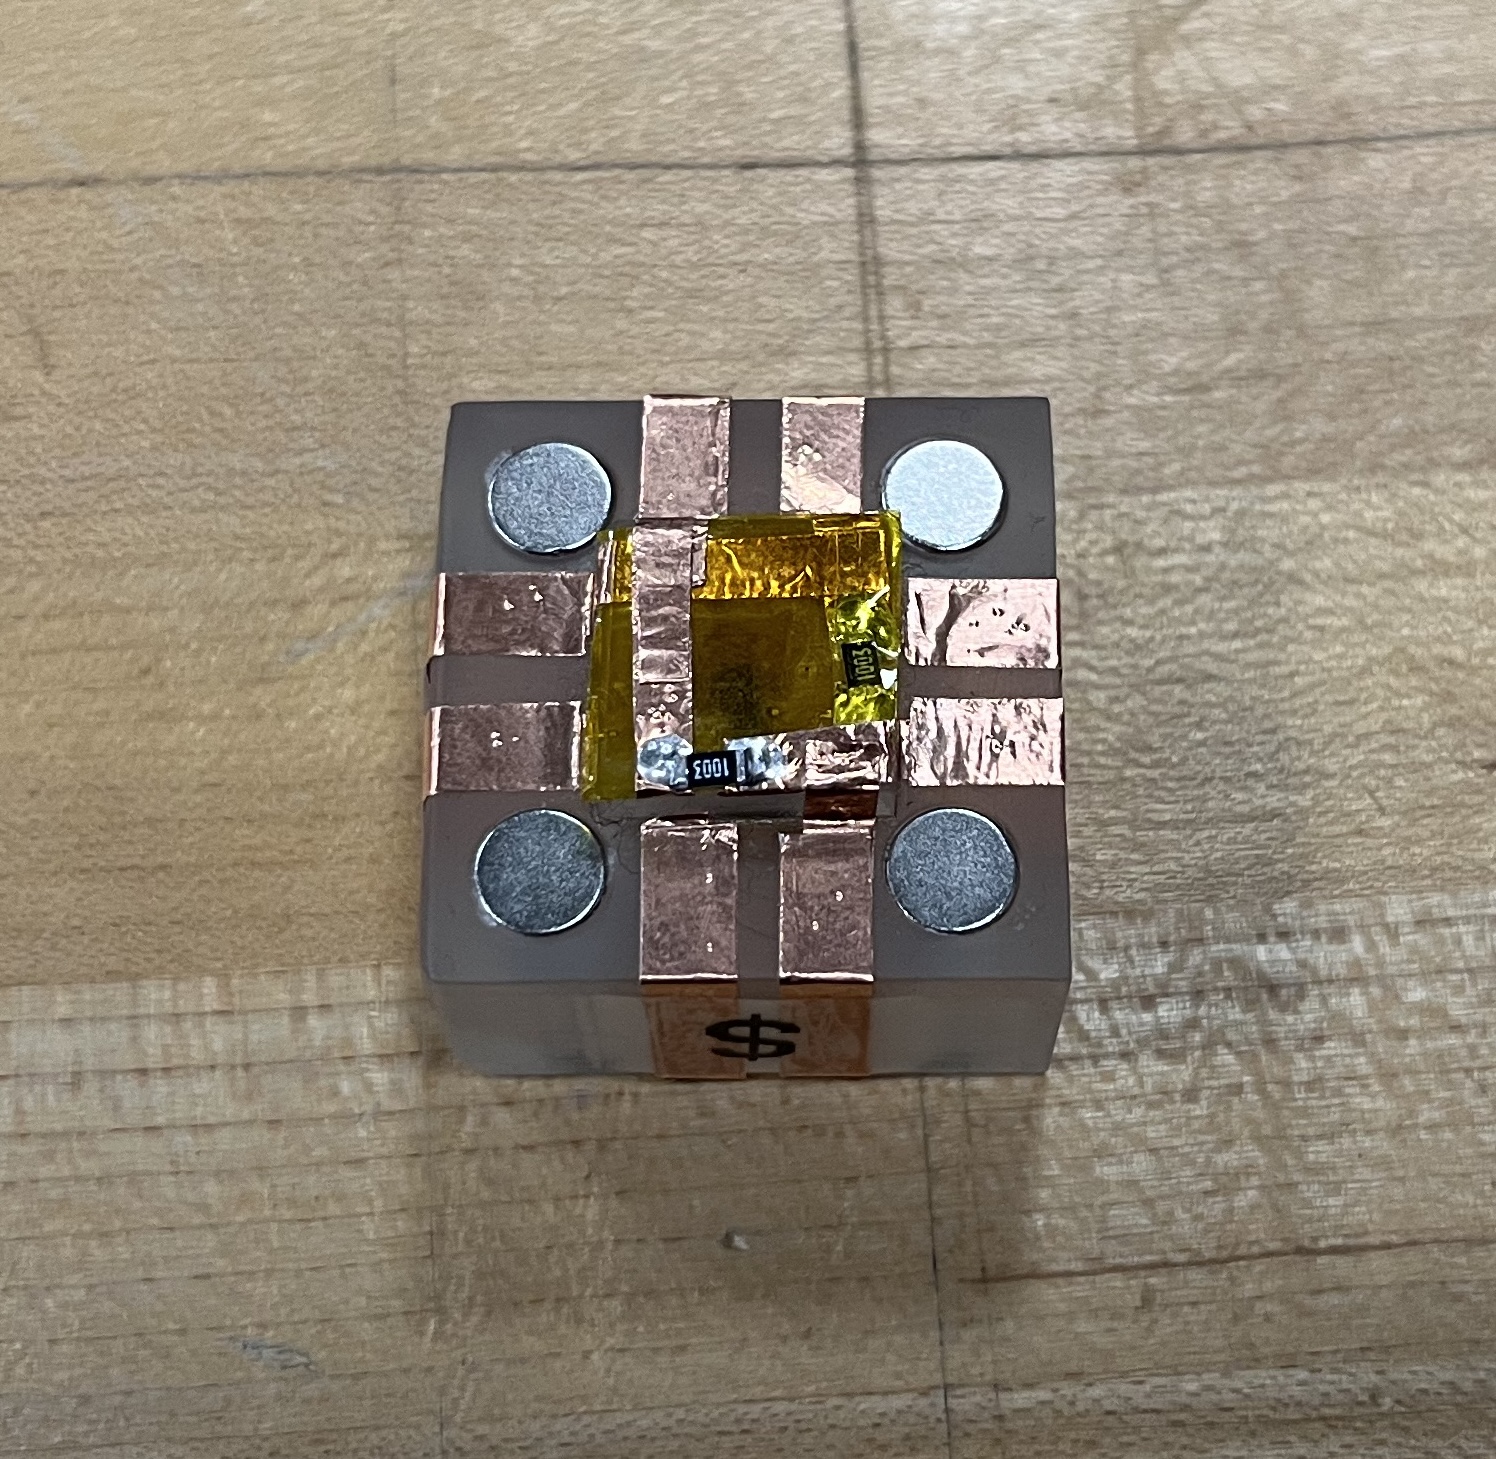
Cube Desgin (5 Pins vs 2 Pins)
Initially, I designed cubes that could change land use by flipping to another side. I also created a more complex version of the cube by adding mini-neopixels to indicate land-use type with color changes. However, the design with mini-neopixels proved challenging to fabricate, as it involved five traces on each side of the cube. Given the small dimensions of the cube (40x40x20mm), it was difficult to execute within the project timeline and added complexity to the circuit design of the sensing platform. Ultimately, I opted for the simpler two-type stackable cube design with a 7-slot sensing platform.

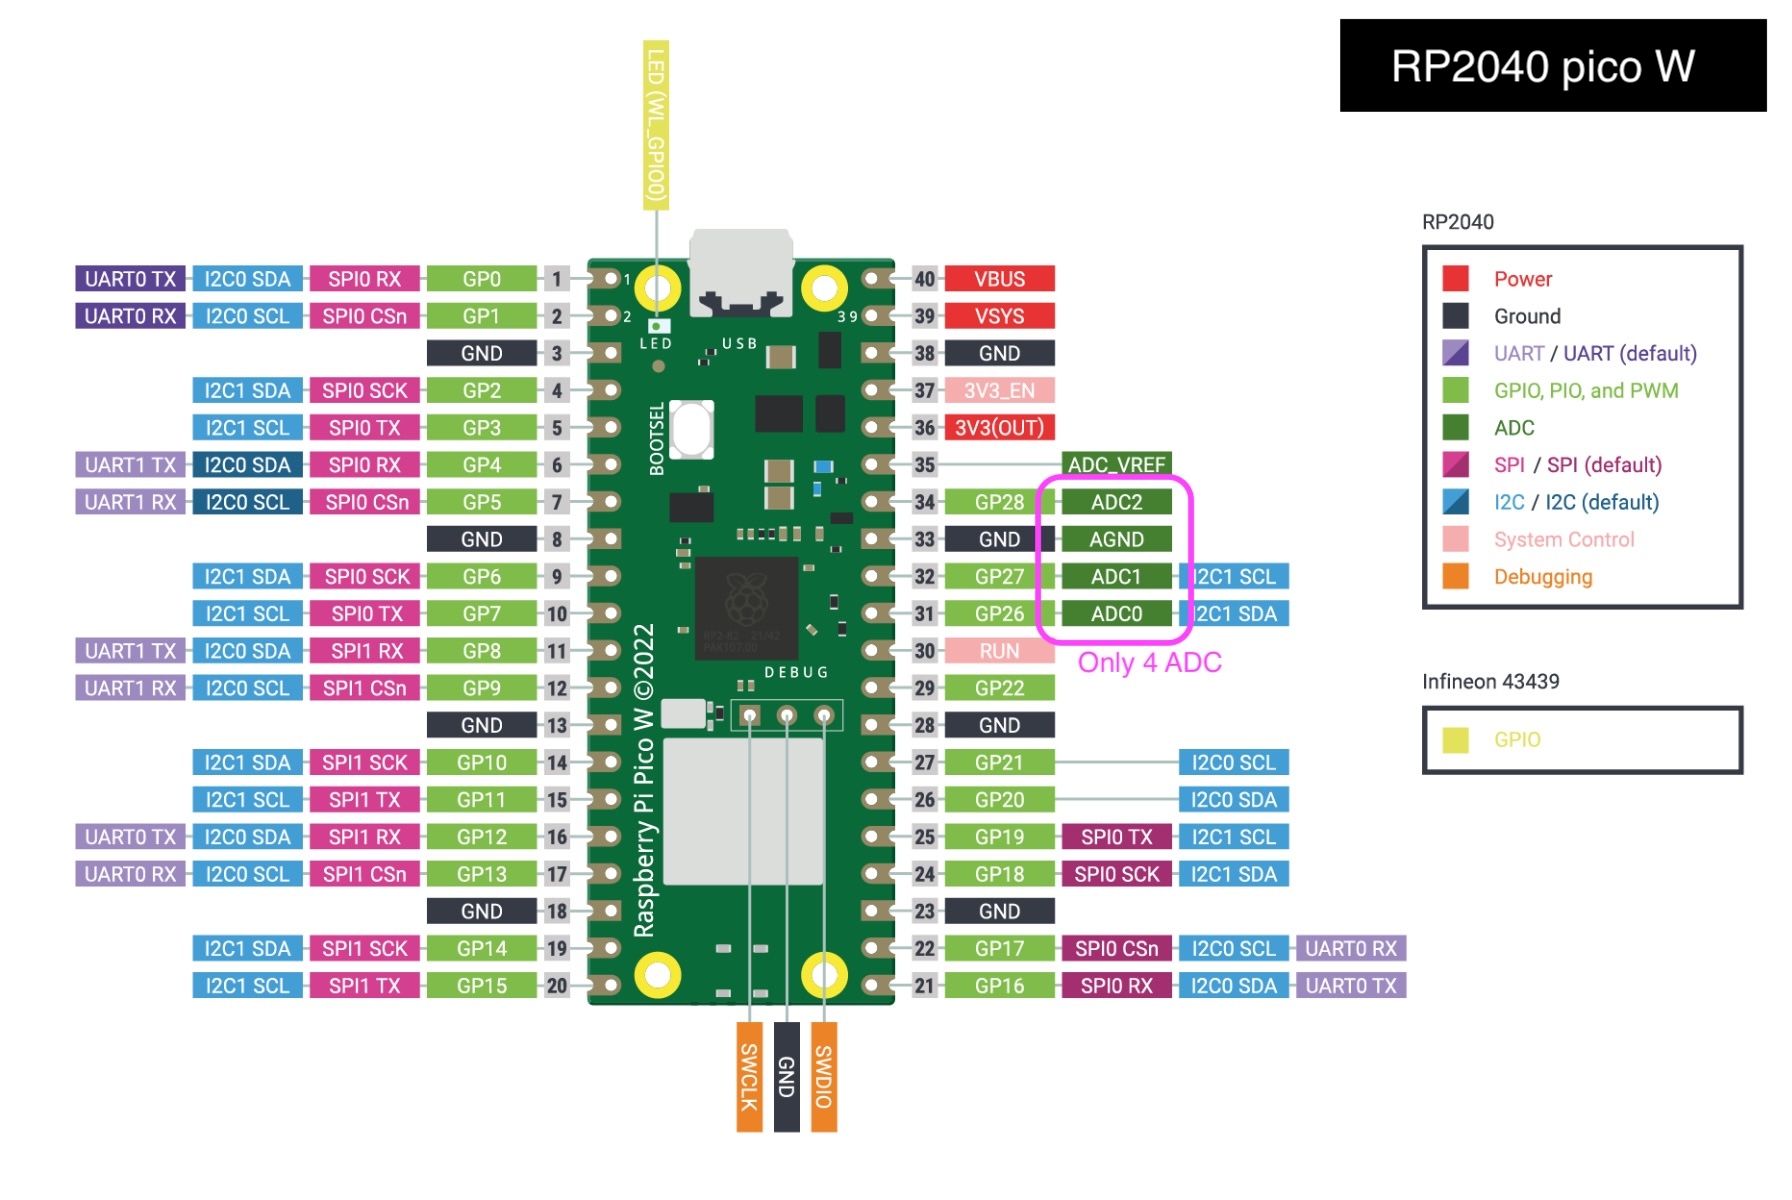
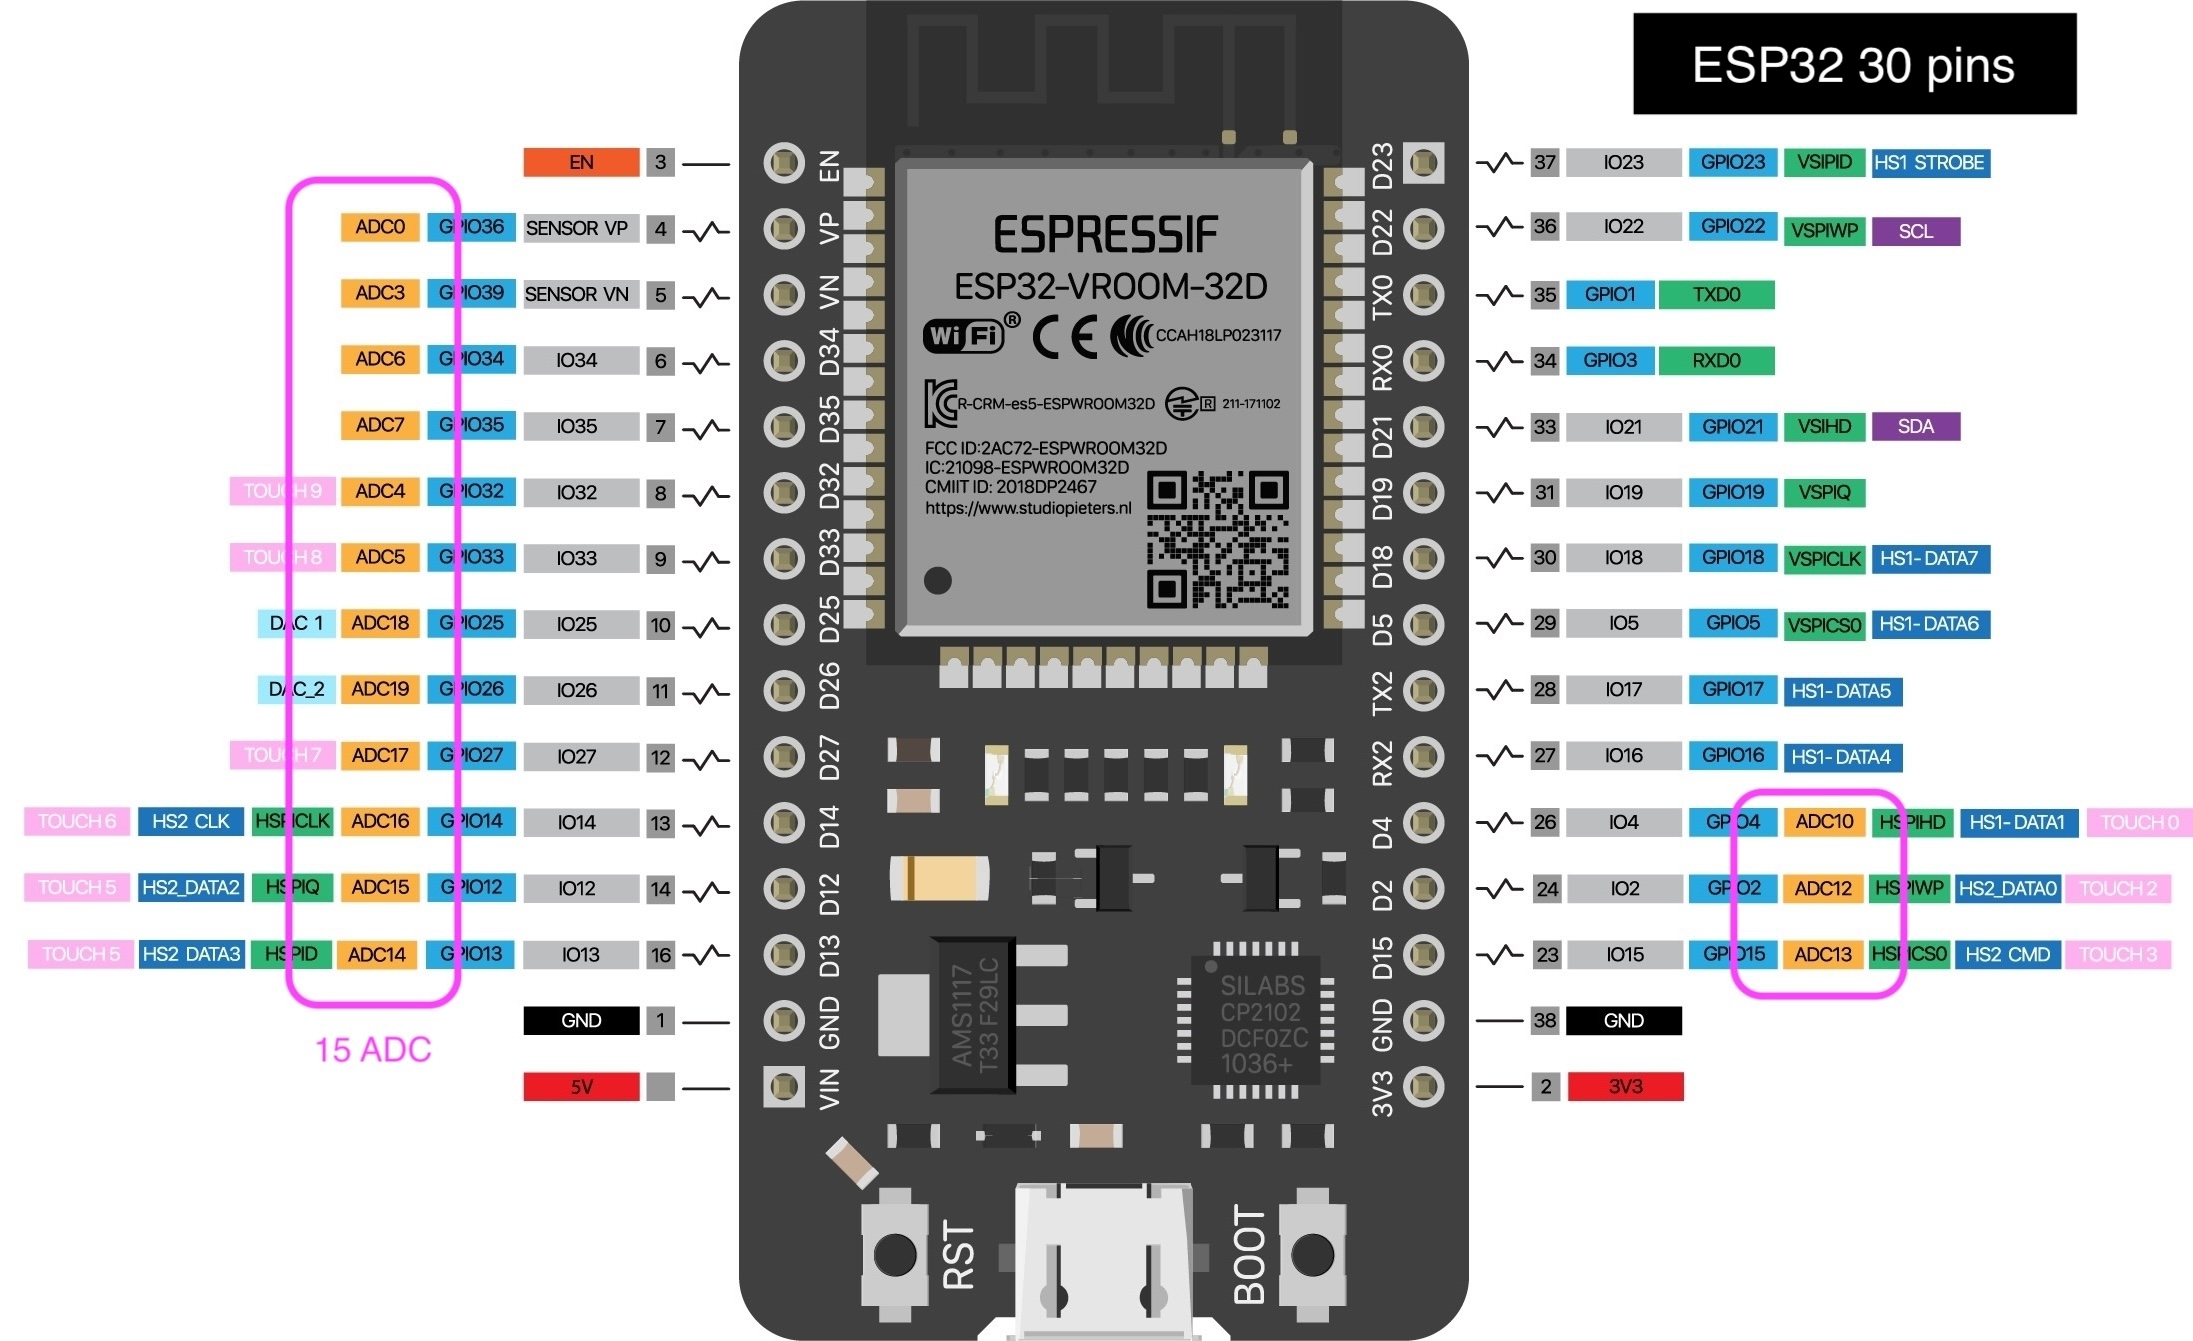
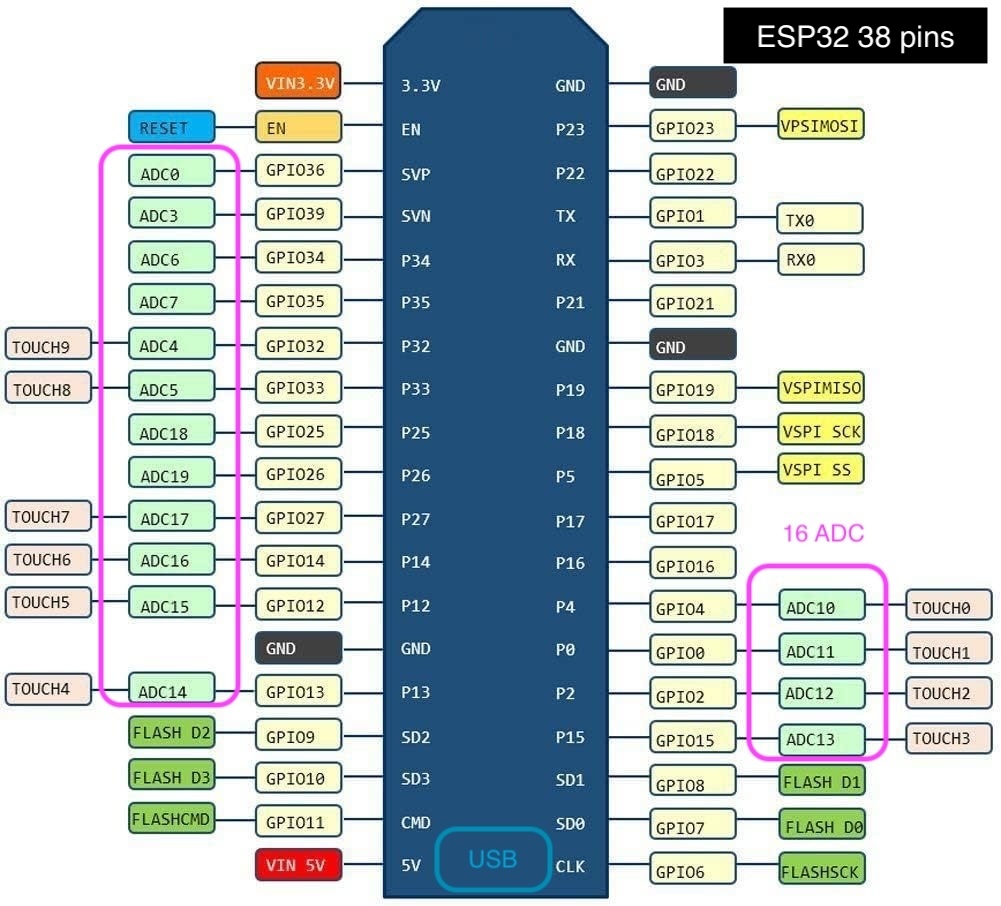
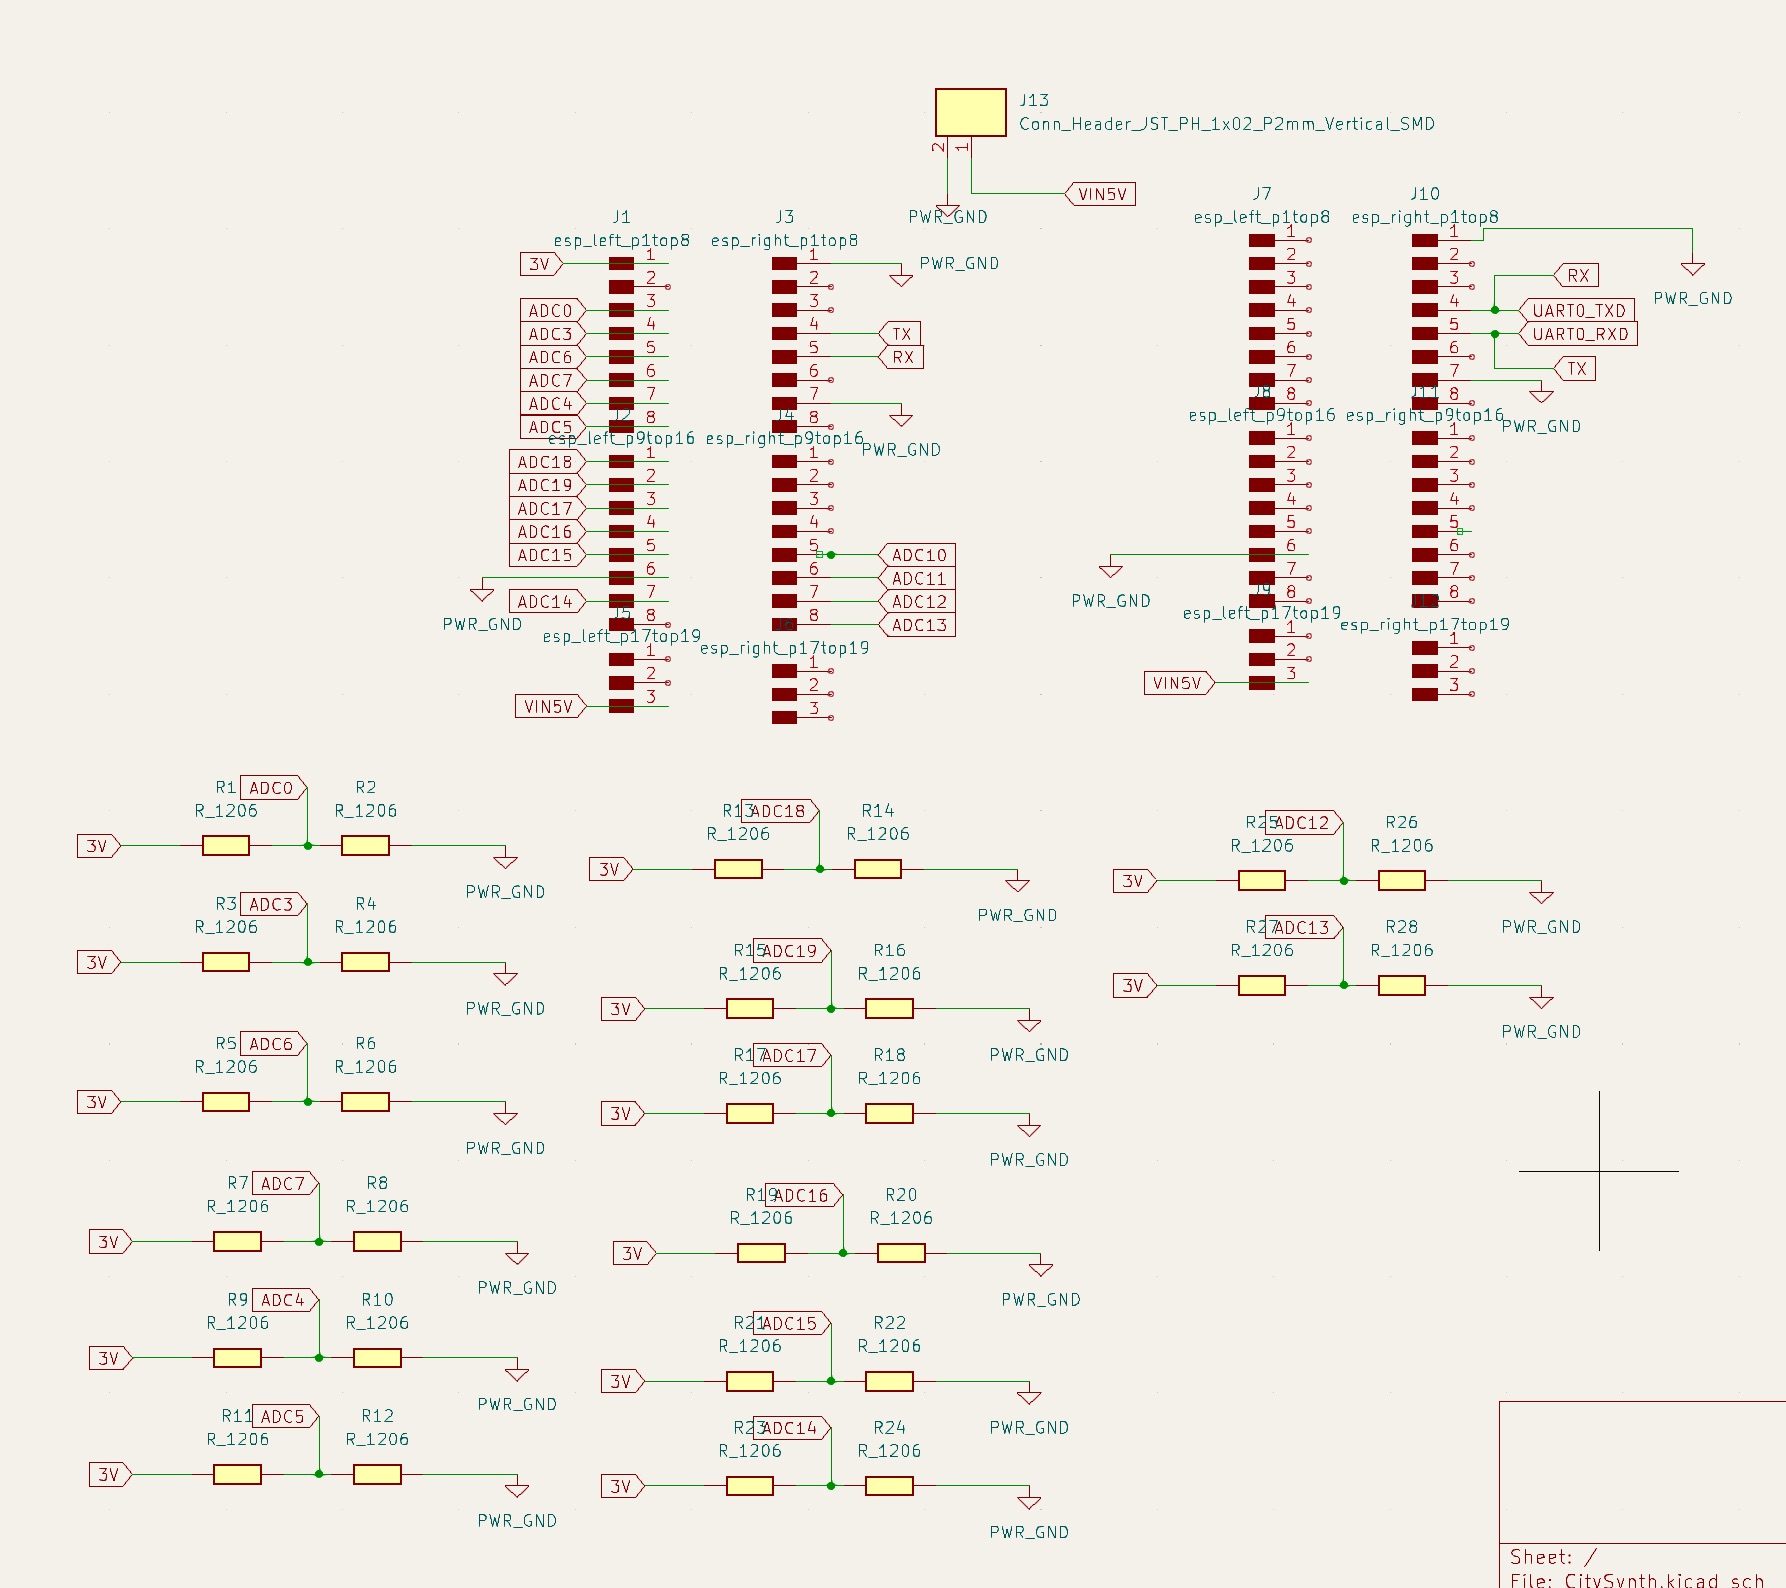
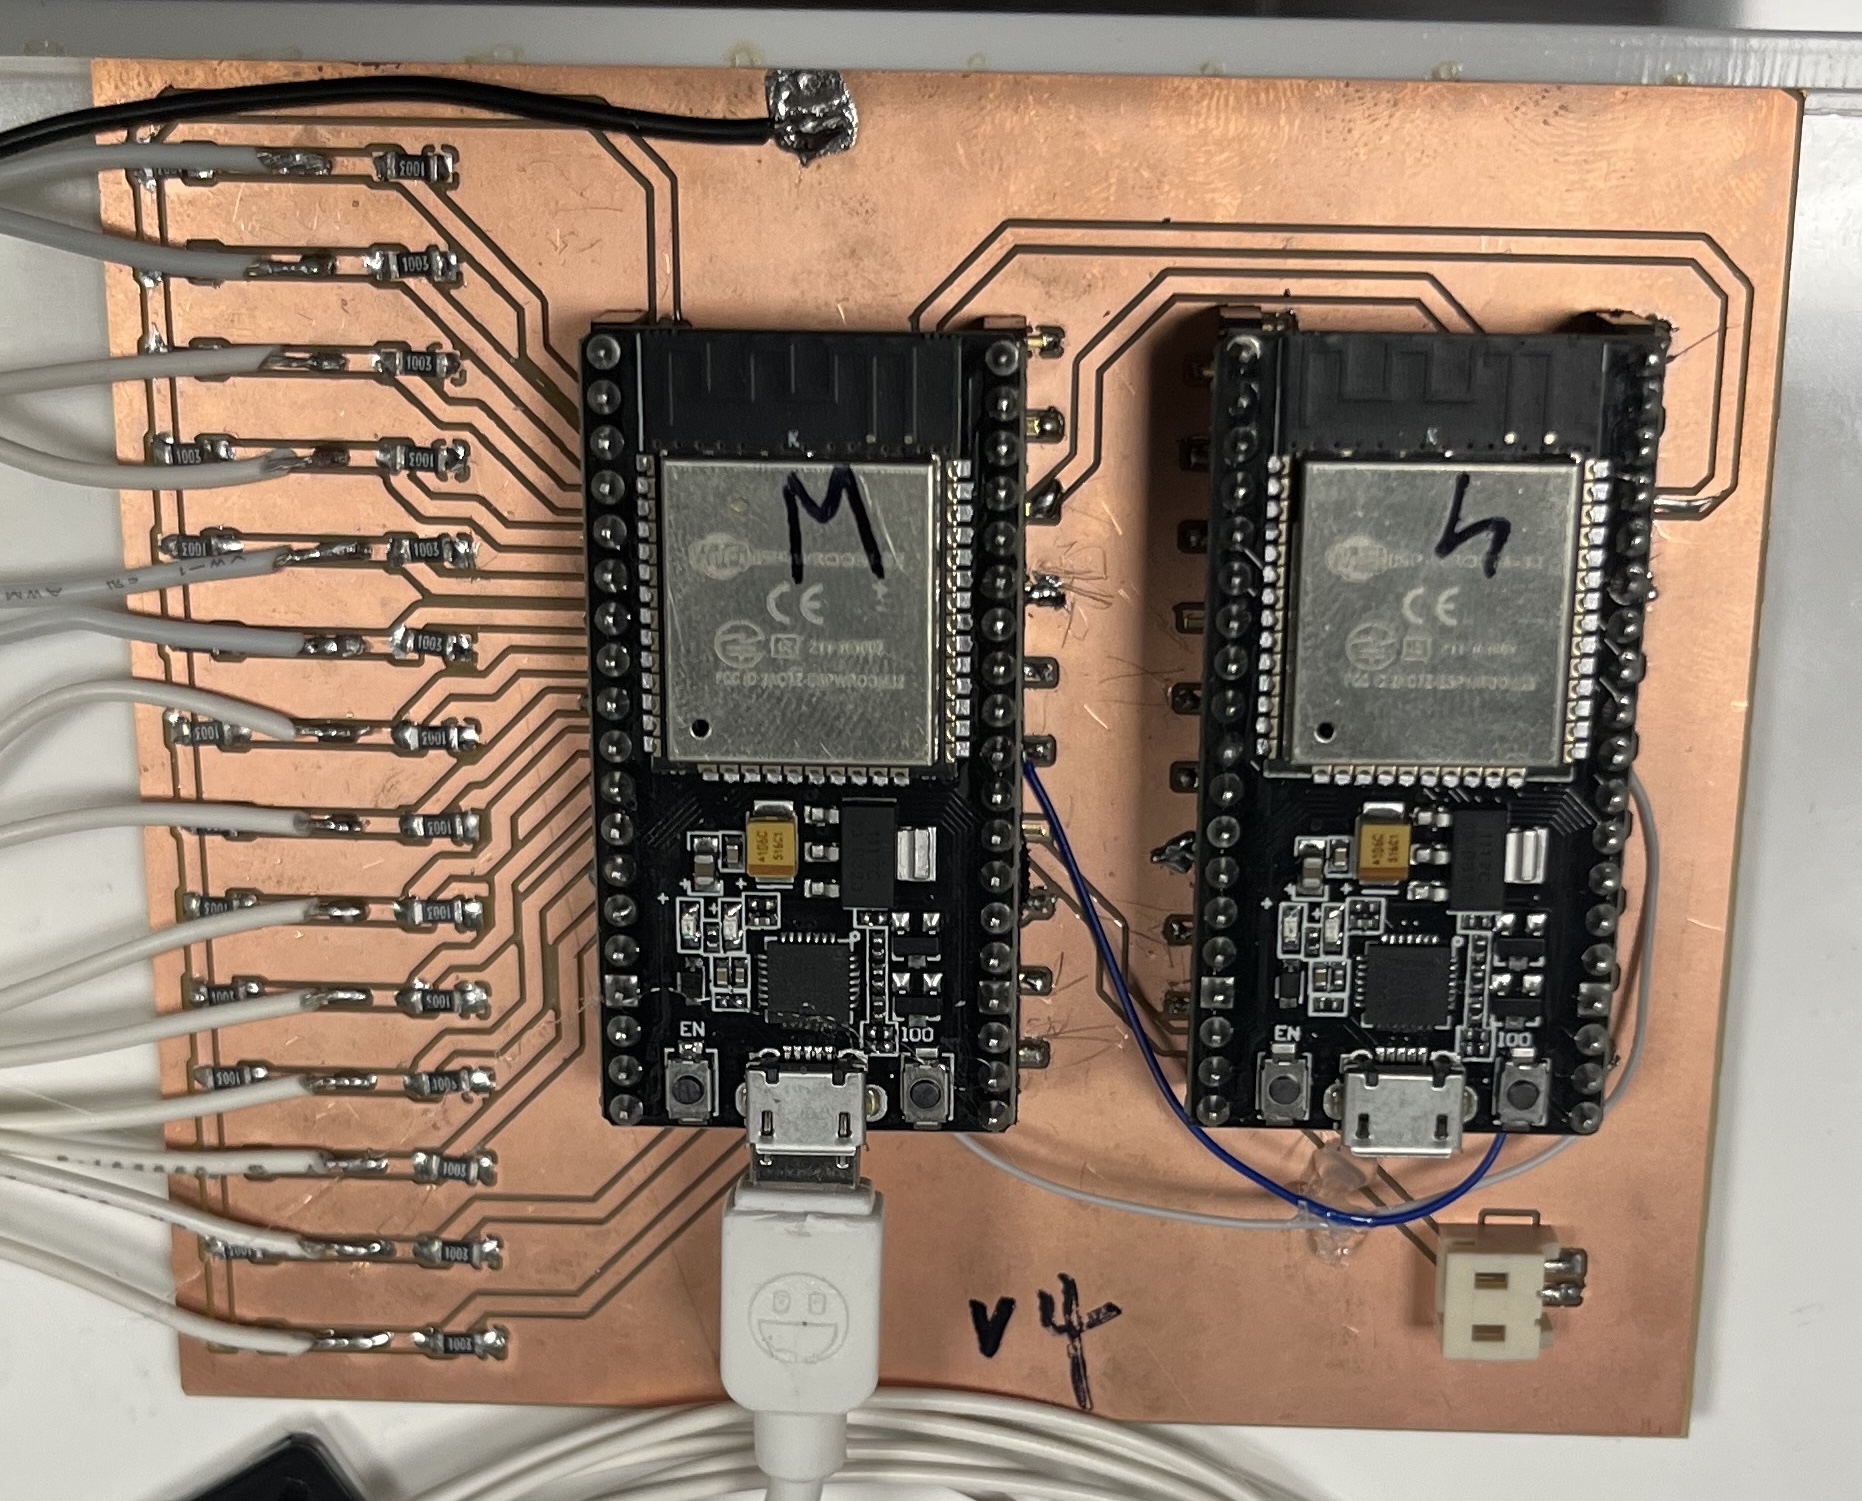
Microcontroller Choices (RP2040 pico -> ESP32 30 pins -> 2* ESP32 38 pins)
My initial choice was the RP2040 Pico, as it offered the necessary WiFi communication and 14 pins for reading inputs. However, I soon realized that it had only 4 ADC pins. Subsequently, I borrowed an ESP32 WROOM 30-pins development board, which featured 15 ADC pins. Unfortunately, the WiFi functionality conflicted with the ADC2 channels. Thus, I made the decision to utilize two ESP32 boards (38-pins) and employ UART to transmit analog results to the second board, which could then use WiFi to send POST requests to the web server.
Platform Circuit Design
- Sensing Platform Design
- Software: Onshape and Rhino
- Machine: Cricut Maker, Laser Cutter, and Prusa 3D printer MKS3+
I obtained the 3D model of Cambridge City from the Cambridge gov website and further refined and scaled it down to fit within the sensing platform. Notably, some buildings in the 3D model contained non-printable surfaces, requiring additional time for cleaning and rebuilding solid models. And then I removed the Volpe Site for adding 7 slots on the platform for further fabrcation. I used Prusa 3D printer to print those static buildings and Laser cutter at the MARS lab for cutting the platform. The online CAD file of the platform and static buildings link is here.
-
Wiring on the Platform:
For wiring on the platform, I have tried three methods:
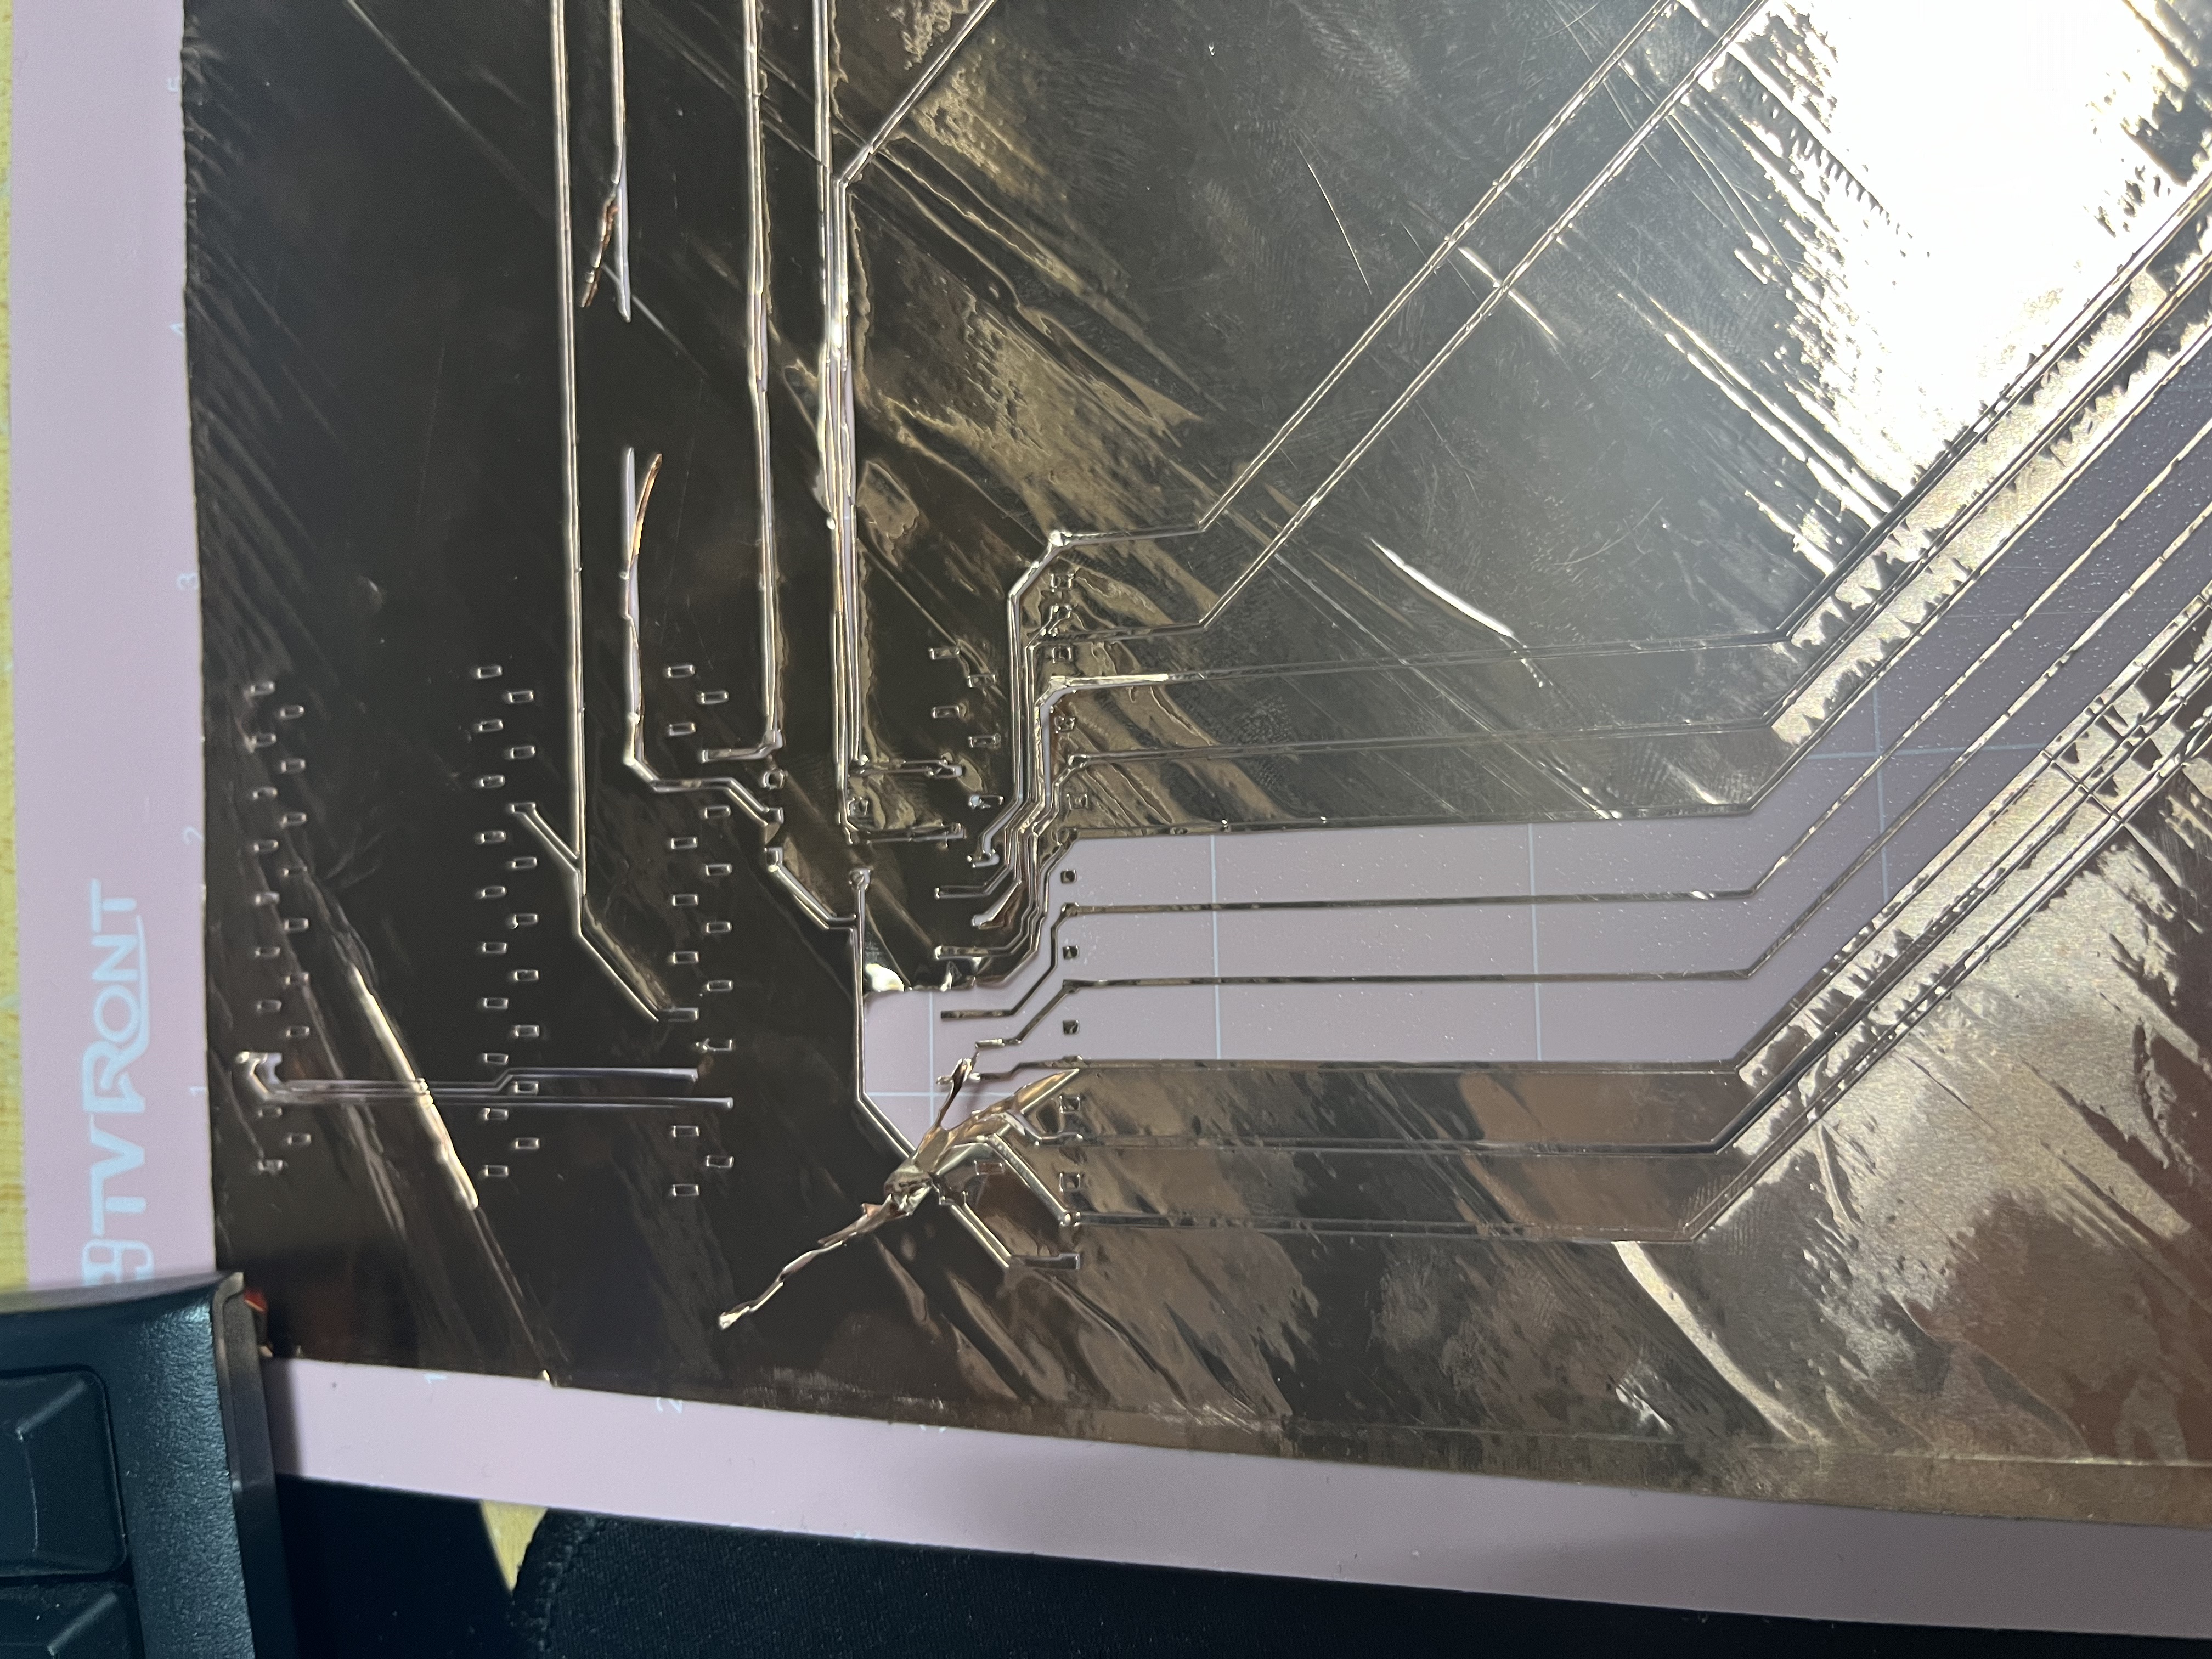
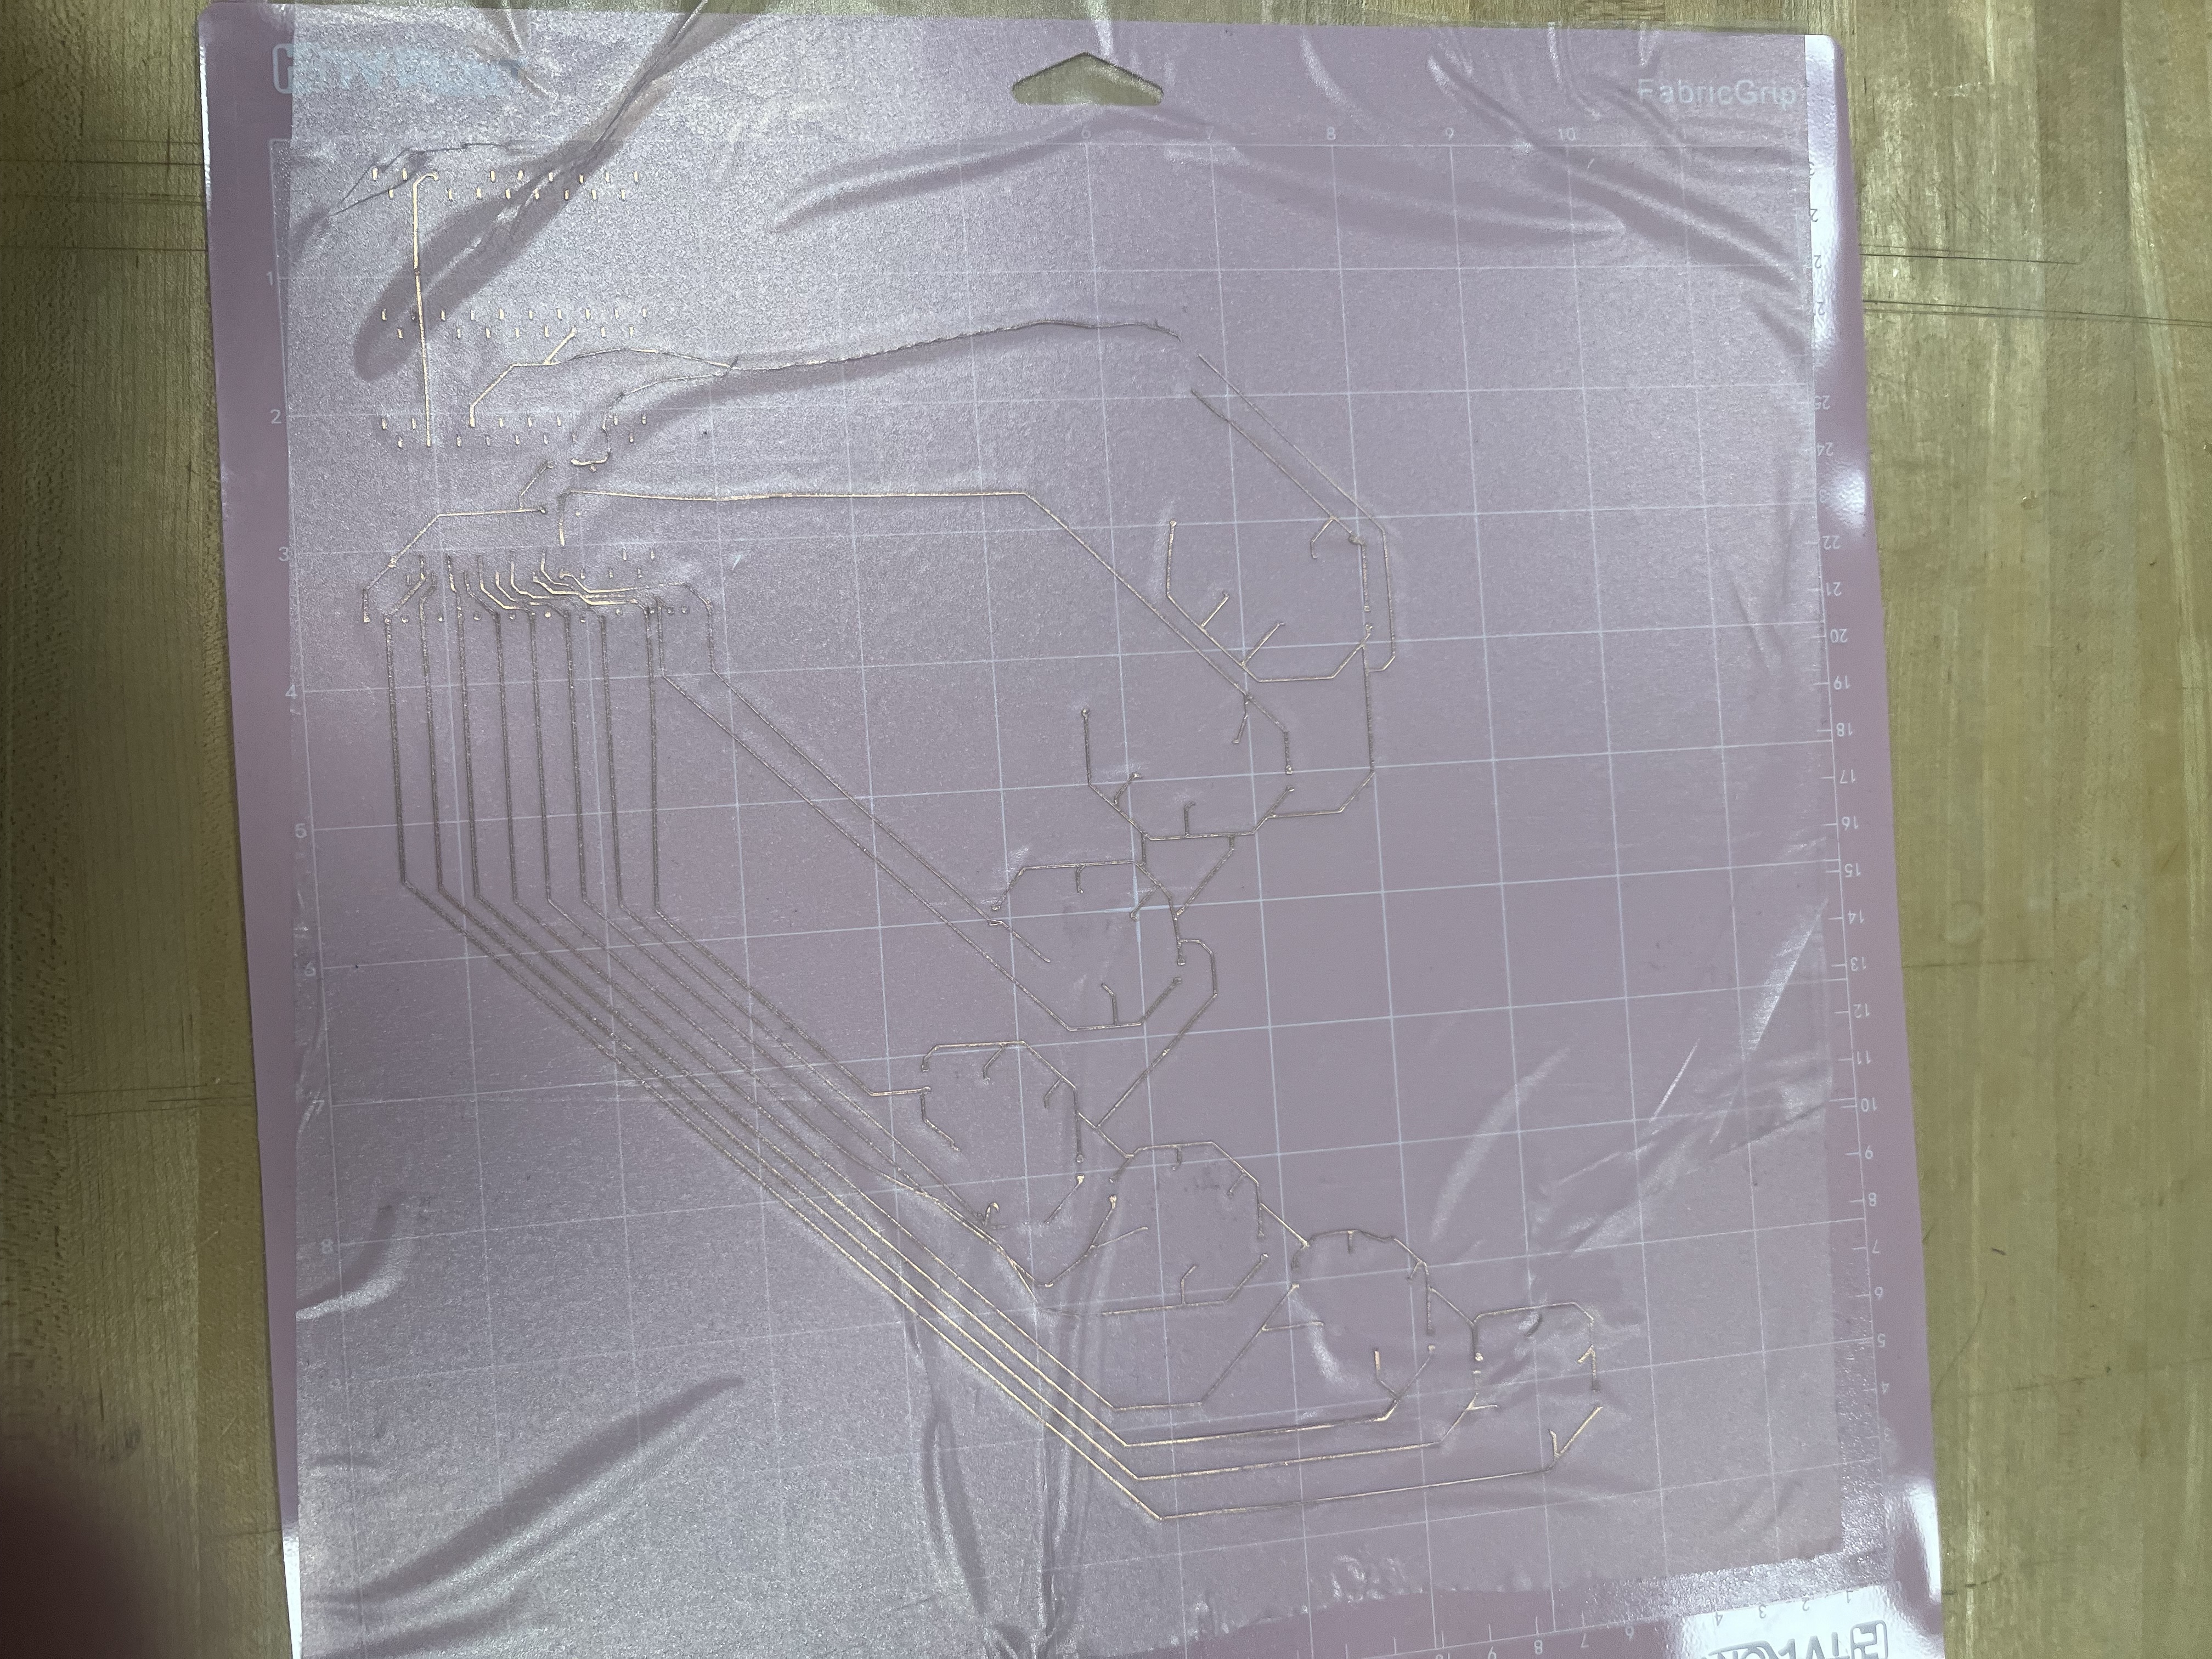
- Copper Tape with Circuit Made by Vinyl Cutter(CriCut Maker):
This approach proved overly detailed and challenging to weed fine traces, especially at a larger scale (35x35mm), without damaging any traces.


- Mannually tape copper tapes: The existing copper tape width was too wide for making 14 traces connected to the ESP32.
-
Stranded Wires: Using copper tapes of the contact surfaces and solder 24 AWG stranded wired to the back side and connect to the PCB board.

- Copper Tape with Circuit Made by Vinyl Cutter(CriCut Maker):
This approach proved overly detailed and challenging to weed fine traces, especially at a larger scale (35x35mm), without damaging any traces.
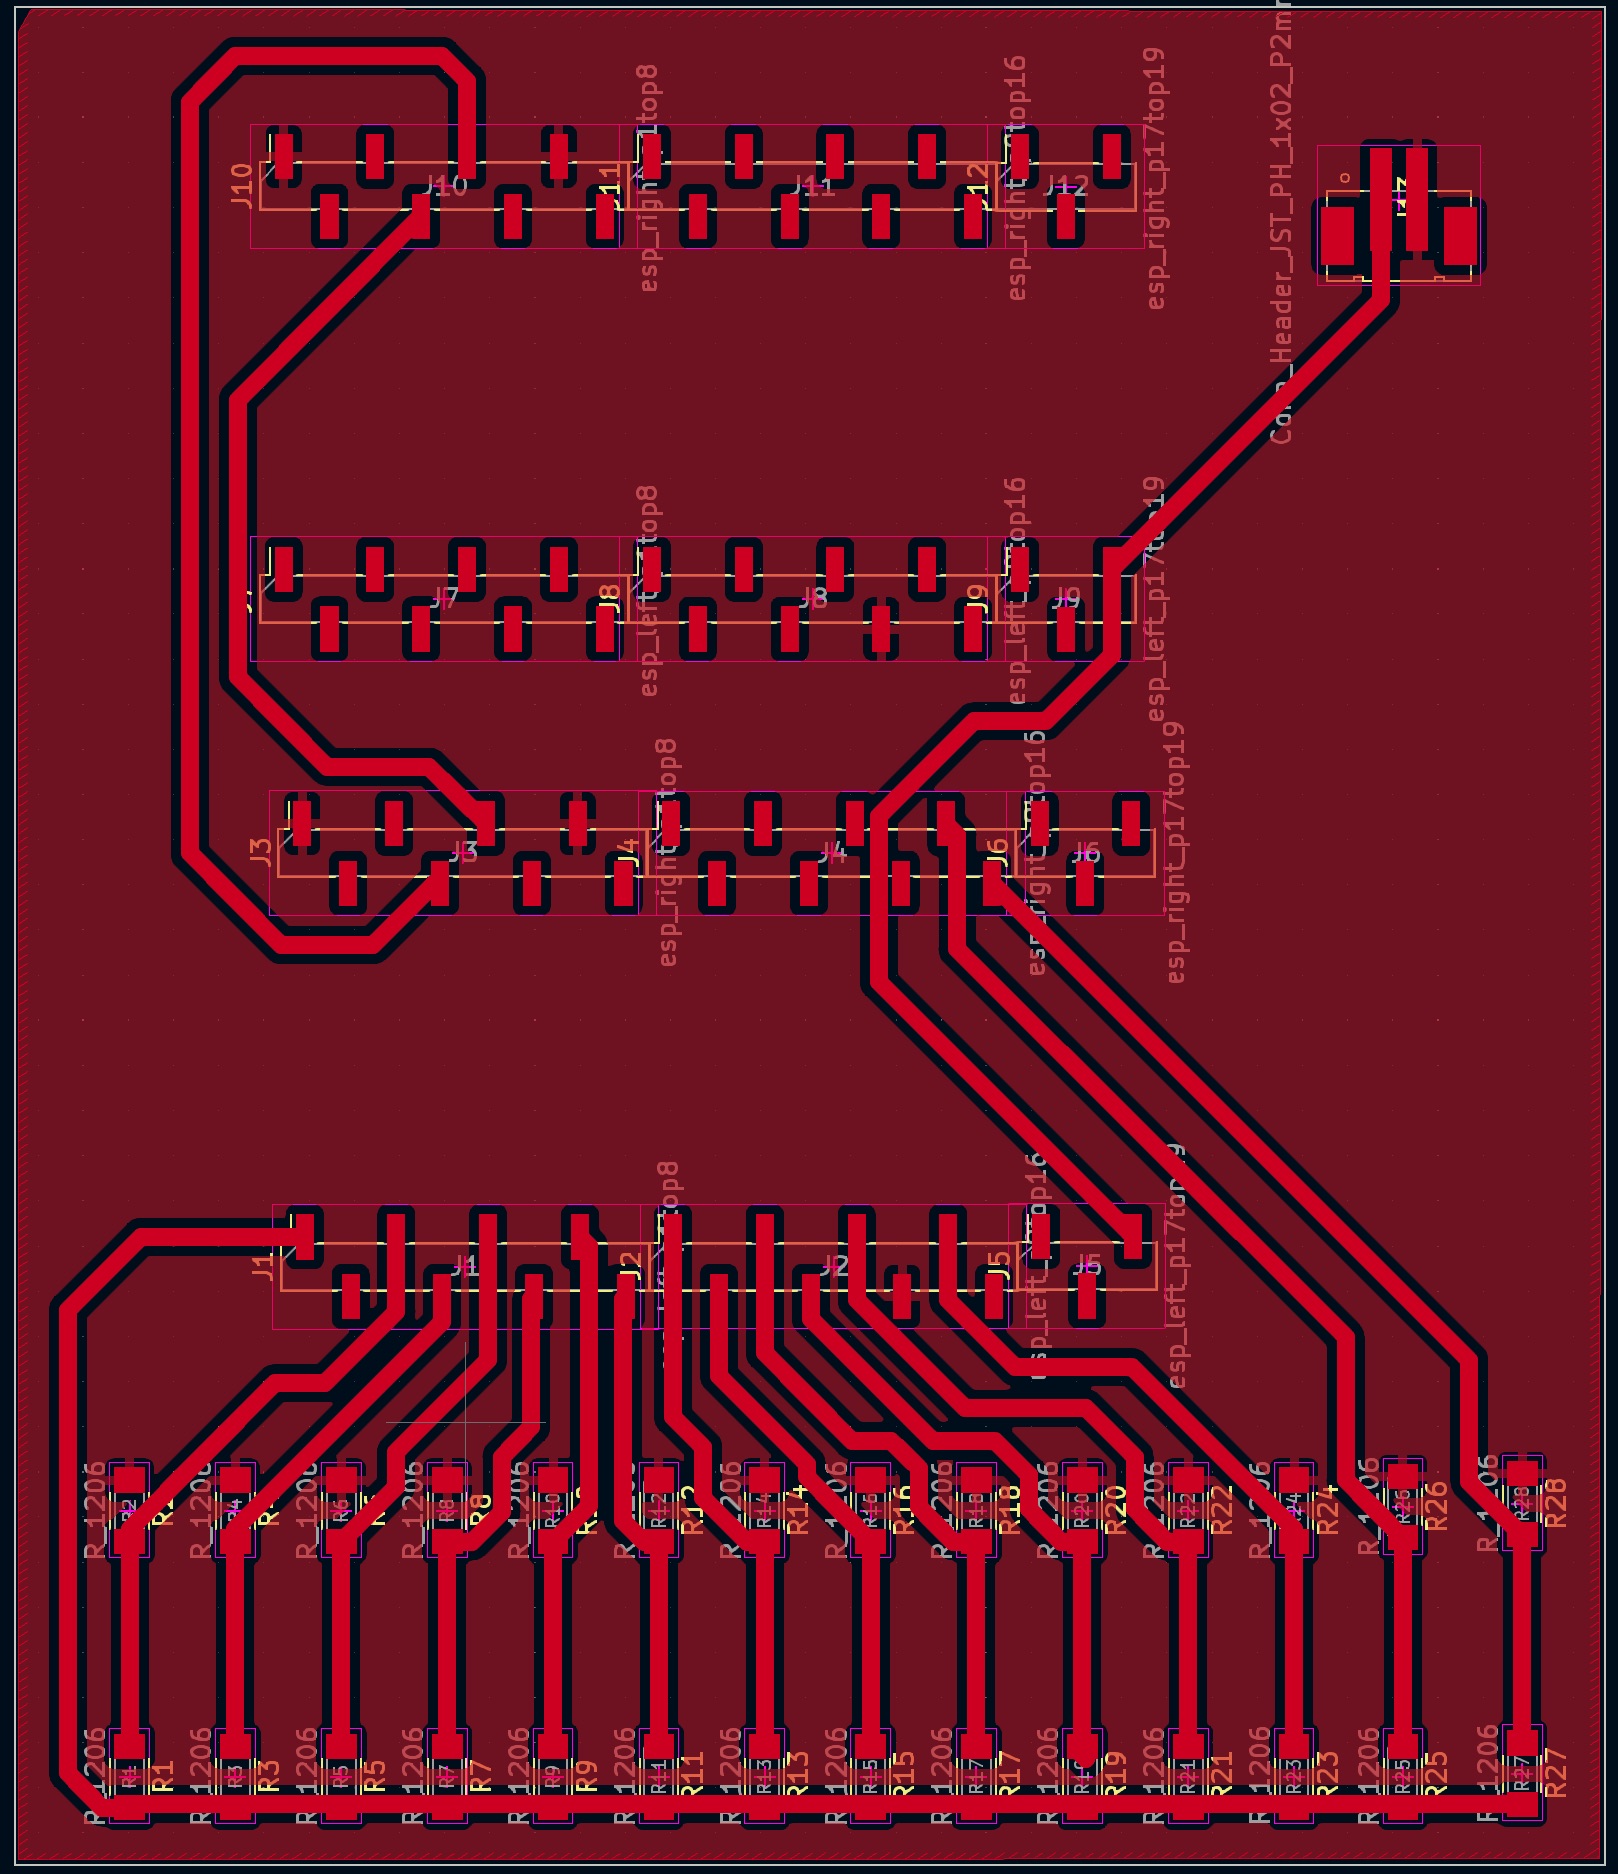
- PCB Design
- Software: Kicad
- Machine: CNC Milling Machining
- The Circuit Made for Cricut Maker
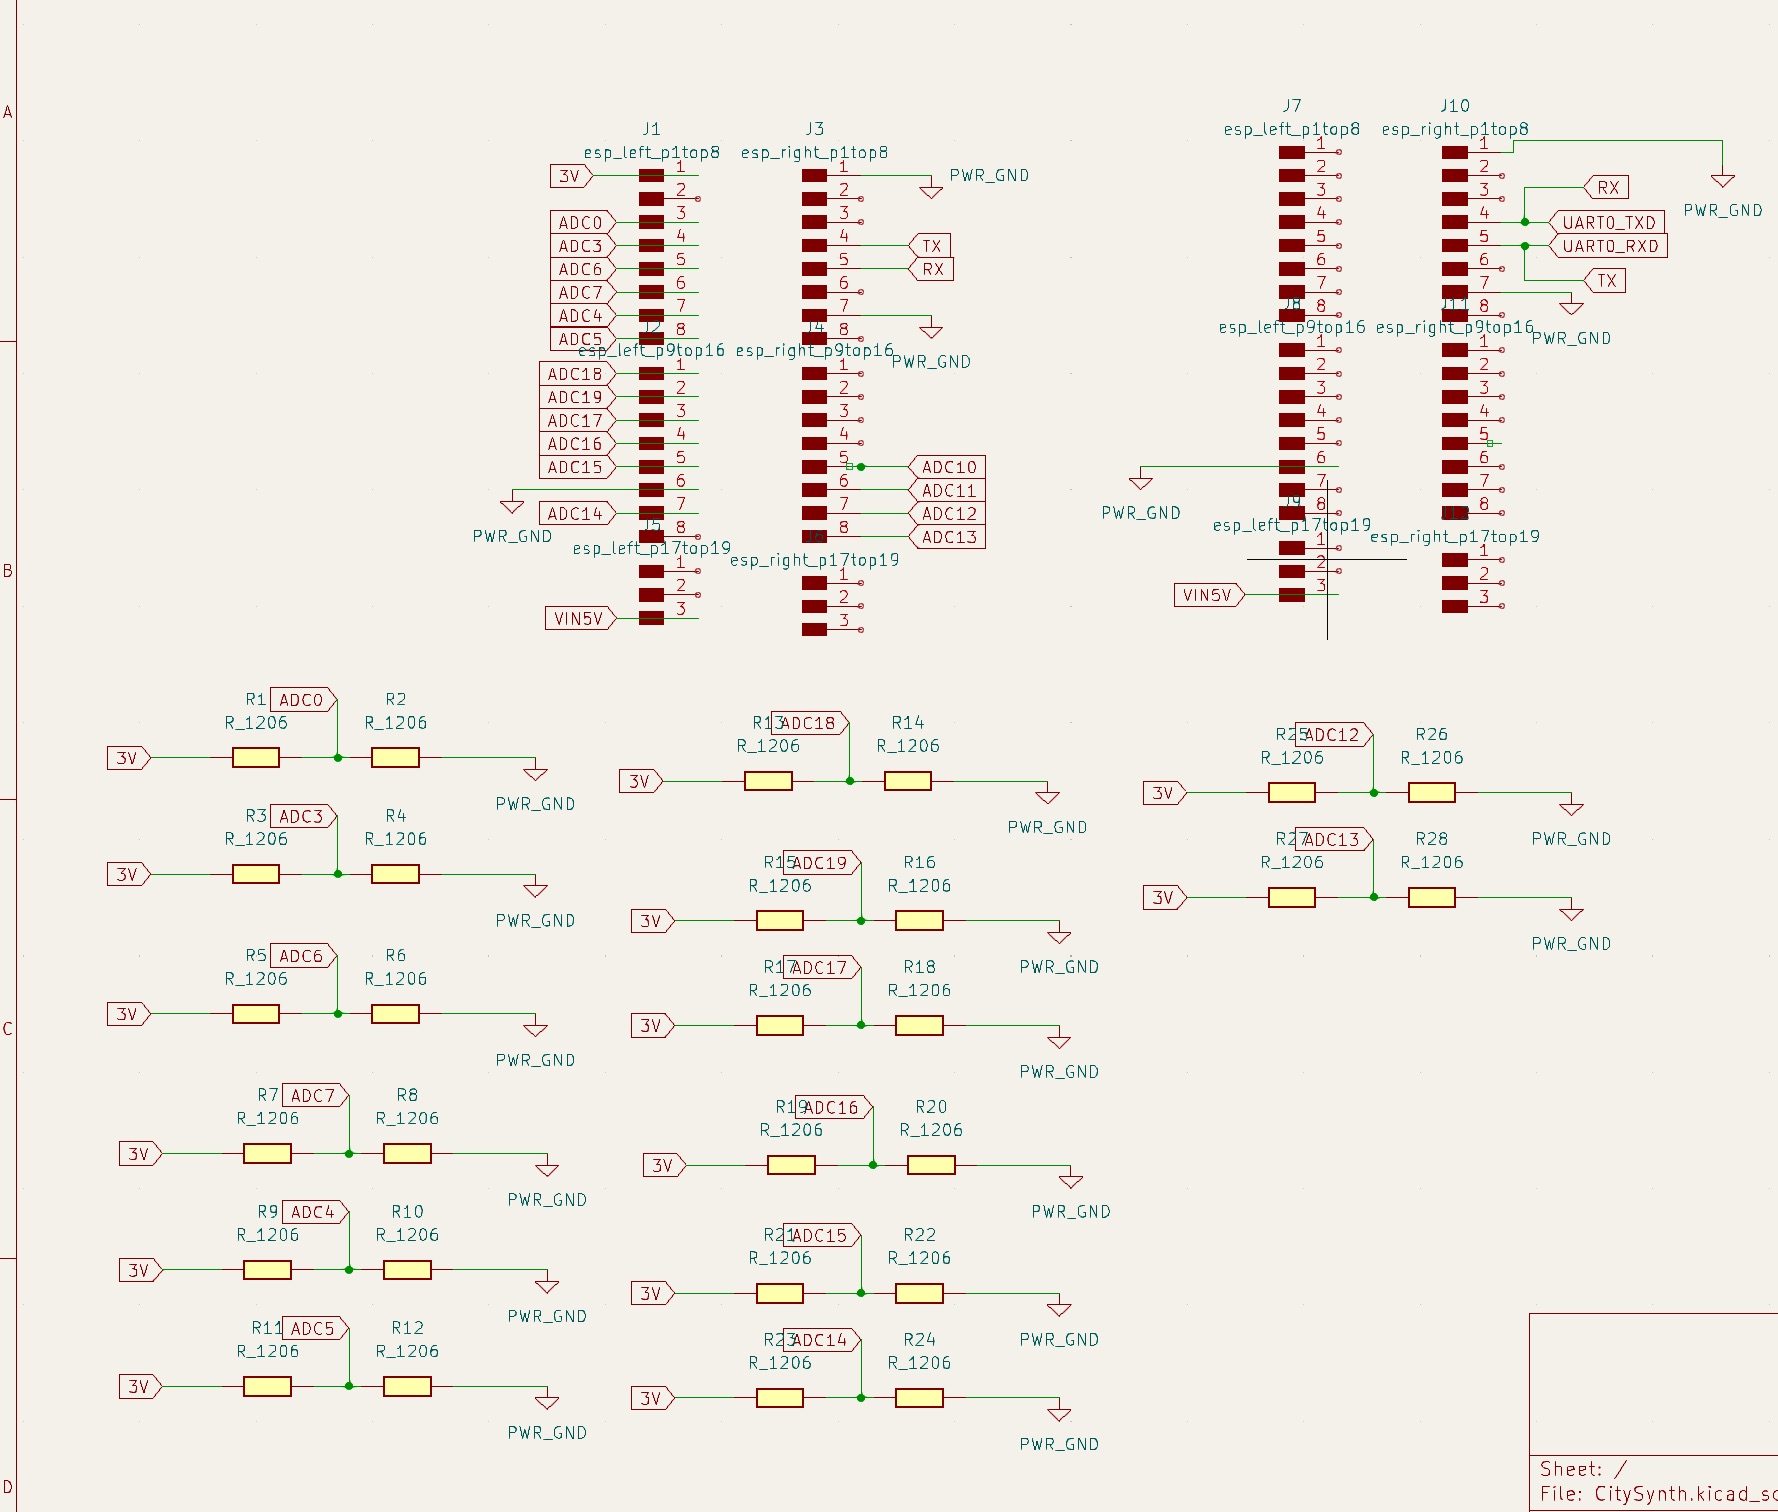

- Main Board (2 ESP32 and 14 voltage dividers)
Code for ESP32 (Slave, send data via WiFi to Webserver)
#include <HardwareSerial.h>
#include <WiFi.h>
#include <HTTPClient.h>

HardwareSerial SerialPort(2); // use UART2
const char* ssid = "wifi-name";
const char* password = "wifi-psw";
String httpRequestData = "";

char number  = ' ';
String sendMsg="";

void initWiFi() {
  WiFi.mode(WIFI_STA);
  WiFi.begin(ssid, password);
  Serial.print("Connecting to WiFi ..");
  while (WiFi.status() != WL_CONNECTED) {
    Serial.print('.');
    delay(1000);
  }
  Serial.println(WiFi.localIP());
}

void sendHttp(String msg){
  HTTPClient http;

  // Specify request destination
  http.begin("http://192.168.41.62:5003/update");

  // Specify content-type header
  //http.addHeader("Content-Type", "application/x-www-form-urlencoded");
  http.addHeader("Content-Type", "text/plain");
  // int httpResponseCode = http.POST("Hello, World!");

  // Send HTTP POST request
  int httpResponseCode = http.POST(msg);

  // If response is received
  if (httpResponseCode > 0) {
    Serial.print("HTTP Response code: ");
    Serial.println(httpResponseCode);
    String payload = http.getString();
    Serial.println(payload);
  }
  else {
    Serial.print("Error code: ");
    Serial.println(httpResponseCode);
  }
  // Free resources
  http.end();
}

void setup()
{
  Serial.begin(115200);
  initWiFi();
  Serial.print("RRSI: ");
  Serial.println(WiFi.RSSI());

  SerialPort.begin(15200, SERIAL_8N1, 16, 17);

}
void loop()
{
  if (SerialPort.available())
  {
    int number = SerialPort.read();
    Serial.print("get:");
    Serial.println((char)number);

    if (number == 42){    // The begining of the new data, "*" =42
      sendMsg="";
      sendMsg.concat((char)number);
    }
    else if(number ==10){   // End of the data, "\n" = 10
      sendMsg.concat((char)number);
      Serial.print("Send:");
      Serial.print(sendMsg);
      sendHttp(sendMsg);    //Send a post request to webserver
    }
    else{
      sendMsg.concat((char)number);
    }

  }
}
Code for ESP32 (Master, Read 14 channels of ADC and send data via UART)
#include <HardwareSerial.h>
 // Analog input pin
const int analogPin_1A = 36;
const int analogPin_1B = 39;
const int analogPin_2A = 34;
const int analogPin_2B = 35;
const int analogPin_3A = 32;
const int analogPin_3B = 33;
const int analogPin_4A = 25;
const int analogPin_4B = 26;
const int analogPin_5A = 27;
const int analogPin_5B = 14;
const int analogPin_6A = 12;
const int analogPin_6B = 13;
const int analogPin_7A = 2;
const int analogPin_7B = 15;

int sensorValue_1A = 0;
int sensorValue_1B = 0;
int sensorValue_2A = 0;
int sensorValue_2B = 0;
int sensorValue_3A = 0;
int sensorValue_3B = 0;
int sensorValue_4A = 0;
int sensorValue_4B = 0;
int sensorValue_5A = 0;
int sensorValue_5B = 0;
int sensorValue_6A = 0;
int sensorValue_6B = 0;
int sensorValue_7A = 0;
int sensorValue_7B = 0;

int threshold_0 = 2048; // 4096/2=2048
int threshold_1 = 1365; // 4096/3=1365
int threshold_2 = 1024; // 4096/4=1024
int threshold_3 = 819; // 4096/5=819
// int threshold_4 = 650; // 4096/6=682
// int threshold_5 = 585; // 4096/7=585

float margin = 0.15; // 15%

HardwareSerial SerialPort(2); // use UART2


void setup()
{
  SerialPort.begin(15200, SERIAL_8N1, 16, 17);
  Serial.begin(115200);
}
void loop()
{
  readRuitine();

  SerialPort.print("*");  // start of the array

  type_Cal(sensorValue_1A,1);
  SerialPort.print(",");
  type_Cal(sensorValue_1B,2);
  SerialPort.print(";");
  type_Cal(sensorValue_2A,1);
  SerialPort.print(",");
  type_Cal(sensorValue_2B,2);
  SerialPort.print(";");
  type_Cal(sensorValue_3A,1);
  SerialPort.print(",");
  type_Cal(sensorValue_3B,2);
  SerialPort.print(";");
  type_Cal(sensorValue_4A,1);
  SerialPort.print(",");
  type_Cal(sensorValue_4B,2);
  SerialPort.print(";");
  type_Cal(sensorValue_5A,1);
  SerialPort.print(",");
  type_Cal(sensorValue_5B,2);
  SerialPort.print(";");
  type_Cal(sensorValue_6A,1);
  SerialPort.print(",");
  type_Cal(sensorValue_6B,2);
  SerialPort.print(";");
  type_Cal(sensorValue_7A,1);
  SerialPort.print(",");
  type_Cal(sensorValue_7B,2);

  SerialPort.print("\n"); // end of the array

  debug();

  delay(500);
}

void debug(){
  // print the results to the Serial Monitor:
  Serial.print("1A = ");
  Serial.print(sensorValue_1A);
  Serial.print("\t 1B = ");
  Serial.println(sensorValue_1B);
  Serial.print("2A = ");
  Serial.print(sensorValue_2A);
  Serial.print("\t 2B = ");
  Serial.println(sensorValue_2B);
  Serial.print("3A = ");
  Serial.print(sensorValue_3A);
  Serial.print("\t 3B = ");
  Serial.println(sensorValue_3B);
  Serial.print("7A = ");
  Serial.print(sensorValue_7A);
  Serial.print("\t 7B = ");
  Serial.println(sensorValue_7B);
}

void readRuitine()
{
  sensorValue_1A = analogRead(analogPin_1A);
  sensorValue_1B = analogRead(analogPin_1B);
  sensorValue_2A = analogRead(analogPin_2A);
  sensorValue_2B = analogRead(analogPin_2B);
  sensorValue_3A = analogRead(analogPin_3A);
  sensorValue_3B = analogRead(analogPin_3B);
  sensorValue_4A = analogRead(analogPin_4A);
  sensorValue_4B = analogRead(analogPin_4B);
  sensorValue_5A = analogRead(analogPin_5A);
  sensorValue_5B = analogRead(analogPin_5B);
  sensorValue_6A = analogRead(analogPin_6A);
  sensorValue_6B = analogRead(analogPin_6B);
  sensorValue_7A = analogRead(analogPin_7A);
  sensorValue_7B = analogRead(analogPin_7B);
  delay(10);
}

void type_Cal(int value, int type)
{
  if(value>=(threshold_0*(1-margin)) && value <=(threshold_0*(1+margin))){
    SerialPort.print(0);
  }
  else if(value>=(threshold_1*(1-margin)) && value <=(threshold_1*(1+margin))){
    SerialPort.print(type);
  }
  else if(value>=(threshold_2*(1-margin)) && value <=(threshold_2*(1+margin))){
    SerialPort.print(type);
    SerialPort.print(",");
    SerialPort.print(type);
  }
  else if(value>=(threshold_3*(1-margin)) && value <=(threshold_3*(1+margin))){
    SerialPort.print(type);
    SerialPort.print(",");
    SerialPort.print(type);
    SerialPort.print(",");
    SerialPort.print(type);
  }
  else if(value < (threshold_3*(1-margin))){
    SerialPort.print(type);
    SerialPort.print(",");
    SerialPort.print(type);
    SerialPort.print(",");
    SerialPort.print(type);
  }
  else{
    SerialPort.print(3); // something wrong if it falls into this category, try to increase the margin
  }
}
Website Developement
-
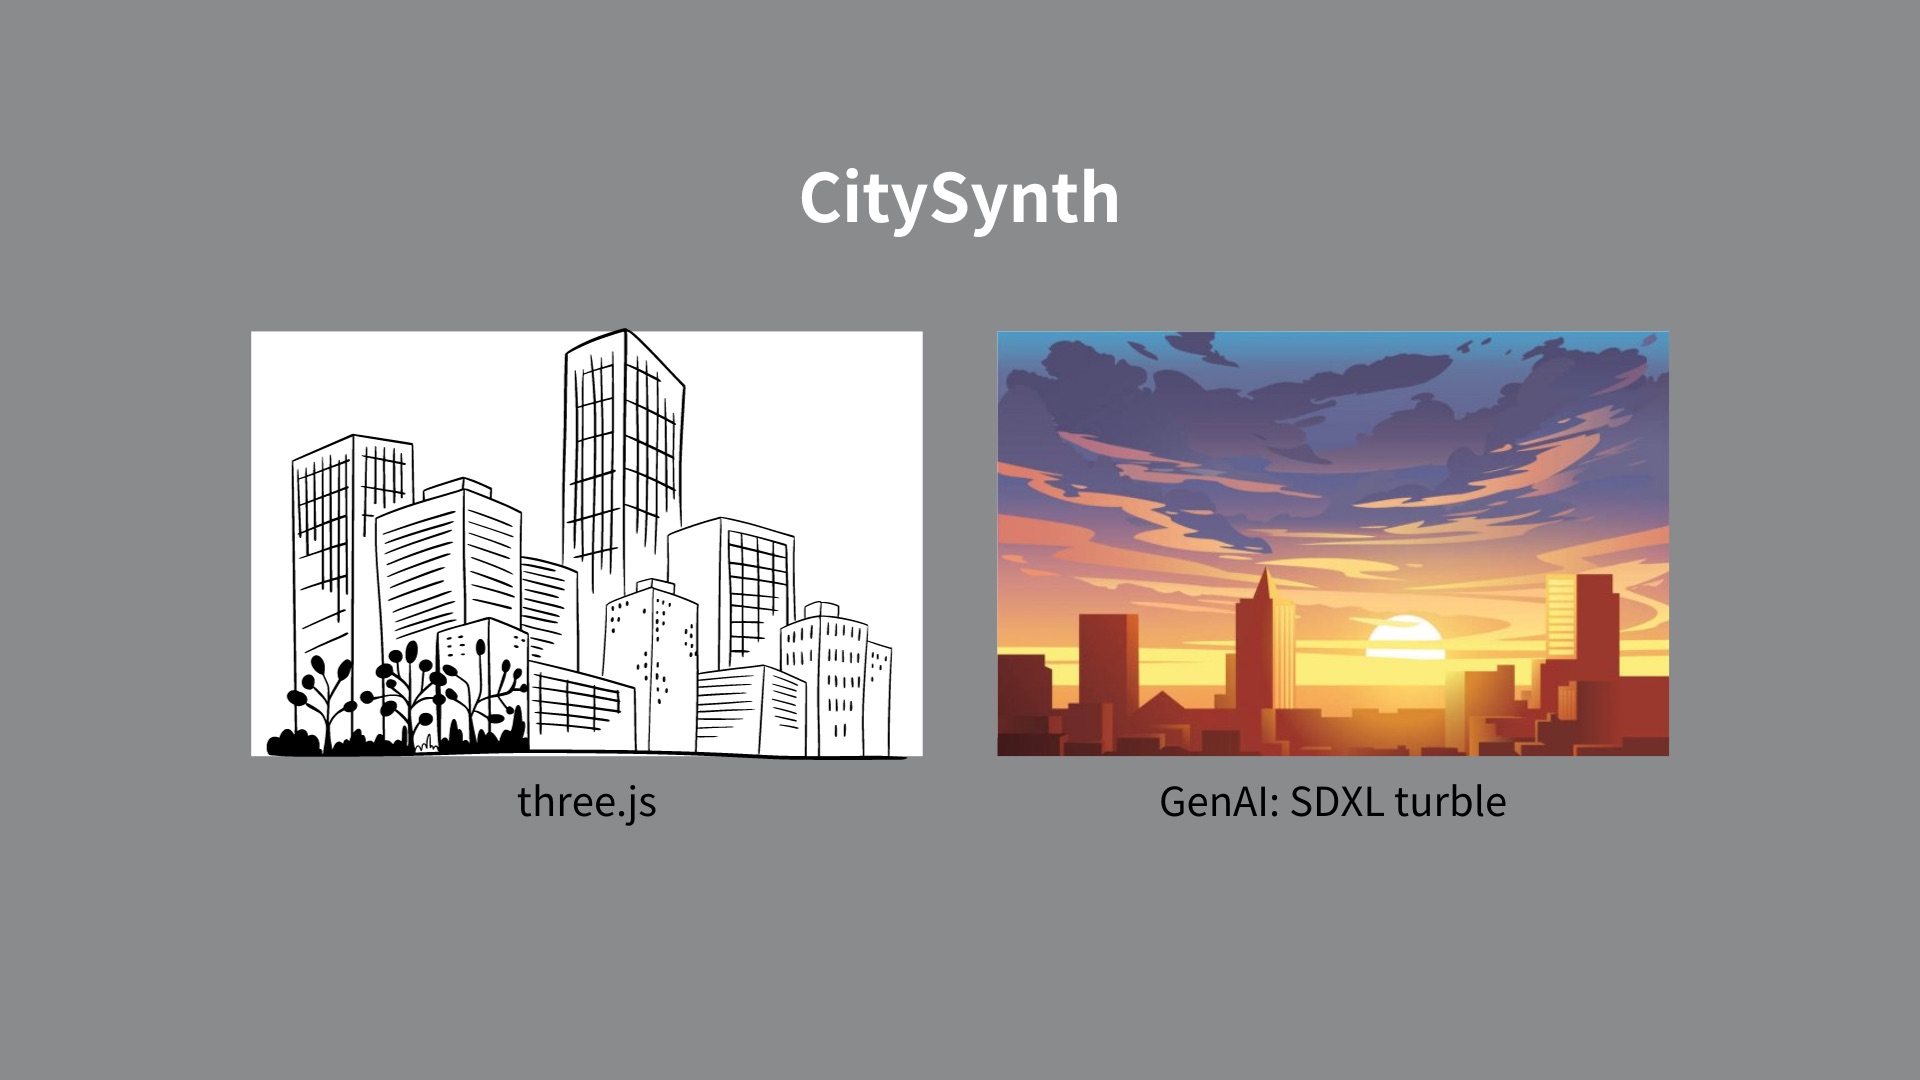
Web design Inspired by Ariel Noyman’s project, “Real-time Geo-referenced Urban Prototyping & Visualization,” I planned to develop a website that updates its 3D model in response to configurations of circuit-embedded stackable cubes on the sensing platform. This project will utilize Stable Diffusion SDXL Turbo for the rapid rendering of model screenshots.
-
Communication Communication between the ESP32 on the sensing platform and the Python web server occurs through HTTP POST requests. Upon receiving the data regarding the placement of cubes, the web server updates a Three.js model via socket.io. Any changes made to the 3D model or camera view prompt the web server to capture a screenshot of the model, which is then relayed through socket.io. The Python server renders the screenshot using Stable Diffusion XL Turbo, and once the rendering is complete, it is sent back to the website through socket.io.
- 1st Spiral: Web Server updates 3D models (Three.js)
- 2nd Spiral: ESP32 sends post request to Web-server through WiFi
- 3rd Spiral: Experimental Circuit and updates on the webpage
- 4th Spiral: Stable Diffusion XL turbo rendering on the browser
Code for Webserver w/ SDXL turble
from flask import Flask, render_template, request, jsonify
from flask_socketio import SocketIO, emit
from diffusers import ControlNetModel, StableDiffusionXLControlNetPipeline, AutoencoderKL
from diffusers.utils import load_image
import torch
import base64
from io import BytesIO
from PIL import Image
import cv2
import numpy as np

image_width = 600
image_height = 400
building_array =[]
rendering = False

#sdxl-turbo
device = "mps"
app = Flask(__name__)
socketio = SocketIO(app)
controlnet = ControlNetModel.from_pretrained(
    "diffusers/controlnet-canny-sdxl-1.0-small",
    torch_dtype=torch.float16
).to(device)
pipe = StableDiffusionXLControlNetPipeline.from_pretrained(
    "stabilityai/sdxl-turbo",
    controlnet=controlnet,
    variant="fp16",
    torch_dtype=torch.float16,
).to(device)
prompt = "a beautifl aerial view of Kendall Square, Cambridge, MA. OffiWinter, trees, sunset, 8k, trend on artstation"

def get_control_image(image):
    image = np.array(image)
    image = cv2.Canny(image, 100, 200)
    image = image[:, :, None]
    image = np.concatenate([image, image, image], axis=2)
    image = Image.fromarray(image)
    return image

def base64_to_image(base64_string):
    image_data = base64.b64decode(base64_string)
    image = Image.open(BytesIO(image_data))
    return image

def parse_response(text):
    try:
        text = text.replace("*","").replace("\\n","").replace("0,","")
        array = text.split(";")
        array = [x.split(",") for x in array]
        array = [[int(element) for element in sublist] for sublist in array]
    except Exception as e:
        pass
    return array

@app.route('/')
def playground():
    return render_template('kendall.html')

@app.route('/update',methods=['POST','GET'])
def update():
    global building_array
    if request.method == 'POST':
        data = request.data.decode('utf-8')
        temp_array = parse_response(data)
        if temp_array != building_array:
            building_array = temp_array
            print(building_array)
            socketio.emit('building_array', building_array)
    return jsonify(building_array)

@socketio.on('imgUrl')
def render(imgUrl):
    global rendering
    if not rendering:
        rendering = True
        img = base64_to_image(imgUrl.split(",")[1])
        init_image = load_image(img).resize((image_width, image_height))
        control_image = get_control_image(init_image)
        image = pipe(prompt, image=control_image, num_inference_steps=2,controlnet_conditioning_scale=0.5, guidance_scale=1).images[0]
        image_url = "static/rendered.png"
        image.save(image_url)
        socketio.emit('rendered_image', image_url)
        rendering = False
    return

if __name__ == '__main__':
    socketio.run(app,debug=True,port=5003,host='0.0.0.0')
What Did I Design?
I designed the following components for CitySynth:
- Stackable circuit-embedded cubes with two types of land use.
- A sensing platform with seven slots for cube placement.
- The circuitry for cube recognition and data transmission(UART beteen two ESP32 and WiFi communication to the Web-server).
- A website for real-time rendering(Stable Diffusion XL turbo) and visualization.
Material List
- ESP32-WROOM 38P
- Small Inductive Wireless LEDs
- 5V inductive coil
- LiPo battery
- Charger for LiPoly Batt
- Clear and White Acrylic Sheet
- Copper Tape
- 24 AWG Stranded Silicone Wire kit
- Silk PLA filament
- Formlabs Clear Resin Cartridge v4
- 100K ohm 1206 SMD Resistor
The total cost of materials for this project is approximately $144 without tax.
What Questions Were Answered?
CitySynth answers questions related to urban planning and visualization. It provides insights into how changes in land use and building heights impact cityscapes in real time. It also addresses questions related to the feasibility of creating a flexible and portable urban planning tool.
What Worked? What Didn’t?
What Worked:
- The sensing platform demonstrated effectiveness in sensing and transmitting data to the web server.
- Real-time 3D model rendering on the website provided a dynamic visualization.
What Didn’t:
- The initial design with mini-neopixels on cubes was challenging to fabricate and was simplified in subsequent iterations.
- The uneven contact surfaces on the cubes resulted in unstable readings on the sensing platform. I plan to explore alternative 3D printers for the cubes or,considering feedback from Neil, investigate the possibility of switching from DC to AC for cube readings.
How Was It Evaluated?
CitySynth was evaluated by testing the recognition and stacking capabilities of the cubes, as well as the real-time rendering and visualization on the website.
What Are the Implications?
CitySynth has the potential to revolutionize urban planning by providing a flexible, portable, and interactive tool for visualizing and experimenting with cityscapes. Its implications extend to urban designers, architects, educators, and city planners who can use it to explore different scenarios and engage in collaborative decision-making for sustainable urban development. Additionally, it showcases the power of combining physical and digital elements to address real-world challenges.
Acknowledgment
This project has been developed using the Stable Diffusion model from Stability AI.
Special Thanks
I would like to extend my heartfelt gratitude to the teaching assistants - Alfonso, Wedyan, Quentin, Miana, Anthony, Jake, Dave, and Lingdong - for their invaluable assistance and guidance throughout the HTMAA course. Additionally, a big shoutout to my friends Alan, Kai, Lucy, Chance, and Keunwook for their unwavering support and encouragement during this journey.