| HOW TO MAKE (ALMOST) ANYTHING MAS.863.12 |
|
PROJECTS | ABOUT | CONTACT | ||||||||
 |
||||||||||||
|
|
|||||||||||
| 3D ISP SCANNING AND PRINTING - week4 | ||||||||||||
| This week the assignment was to 3D scan and print. Here you can find the perfect tutorial on how to use Minolta and Geo Magic for the scanning. I used Minolta for my 3D scanning. The first step is to calibrate Minolta. Just as the tutorial, I clicked on "Show Live Image Window" and enabled the streaming video. Having the plastic folder on the turn table, I made sure I could see the whole spectrum of colors on my streaming screen. | ||||||||||||
 |
||||||||||||
 |
||||||||||||
| 3D scanning | ||||||||||||
| For the actual scanning, I went through the same process. I went back to the show live image window and updated color image then clicked on the update range and color image. Now the tricky part was focusing part. At first I only saw the silhouette of my object and the background was showing the range of color. I unchecked auto-focus and changed the distance until my object was showing the whole color spectrum. I clicked "scan" when I was ready. | ||||||||||||
 |
||||||||||||
 |
||||||||||||
|
|
|||||||||||
| Cleaning and Modifying The Scan | ||||||||||||
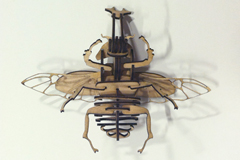
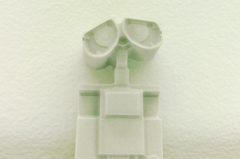
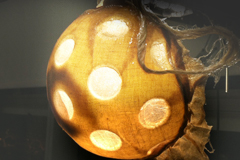
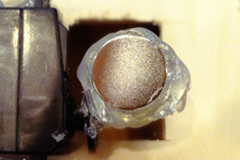
| I found noise captured from the turntable surface. I cleaned them up by drag/select and deleting them. I repeated until it was all cleaned up. Then I went to "Point" navigation bar on the top and selected Reduce Noise. Afterwards, in the same navigation bar and merged my scanned object. On the left hand side, I selected the merged file from my list of scanned parts and navigated to the "Polygon" bar and pressed Clean. The next step was filling in the holes. In Polygon there was a function called Fill Holes. Once I was ready I exported my file as STL binary fie.stl. Key trick to reduce the size is to go to Polygon and click Decimate and reducing it to 50%. Now using the trial version of Rhino OSX I opened up the STL file and edited the design a bit. After editing my model, I exported it again into an STL binary file. My file was sent to 3dprint[at]cba.mit.edu for the final printing. (At the lab, we would usually confirm with Tom and John before we send our files.) The following image is the result. | ||||||||||||
 |
||||||||||||
FINAL PROJECT PROPOSAL.
My ideas for the final project- week1 |
PRESS-FIT CONSTRUCTION KIT.
Learn how to make something using vinyl cutter and laser cutter - week2 |
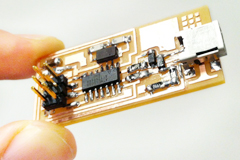
FAB ISP (IN-SYSTEM PROGRAMMER) Learn how to make a custom PCB - week3 |
||||||||||
3D SCANNING AND PRINTING. Learn how to make 3D printed model - week4 |
ELECTRONICS DESIGN. Learn how to redraw the echo hello-world board - week5 |
MOLDING AND CASTING. Learn how to design a 3D mold, machine it, and cast parts from it - week6 |
||||||||||
EMBEDDED PROGRAMMING. Learn how to program a custom board to do something - week7 |
MAKE SOMETHING BIG. Learn how to make SOMETHING BIG through computer-controlled machining- week8 |
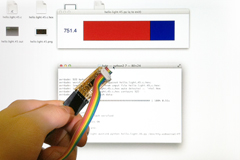
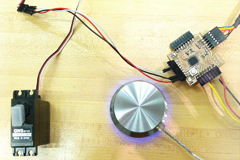
INPUT DEVICES. Learn how to add sensor to a microcontroller board and read it - week9 |
||||||||||
COMPOSITES. Learn how to assemble a 3D mold, and lay up a fiber composite part in it - week10 |

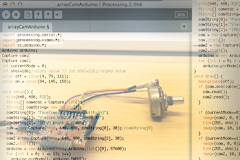
OUTPUT DEVICES. Learn how to add an output device to a microcontroller board and program it to do something - week11 |
INTERFACE AND APPLICATION PROGRAMMING. Learn how to write an application that interfaces with an input &/or output device - week12 |
||||||||||
NETWORKING AND COMMUNICATIONS. Learn how to build a wired &/or wireless network with at least two nodes - week13 |
MECHANICAL/MACHINE DESIGN. Learn how to design or modify a machine and automate the machine - week14 |
FINAL PROJECT. My final project for How To Make (almost) Anything - week15, 16 |
||||||||||

MAS.863 Learn about the How To Make (almost) Anything course at MIT |
||||||||||||
| Copyright © 2012 by AUSTIN S. LEE | ||||||||||||