Or an opportunity to connect all the dots
This week, we had to program the board we designed two weeks ago so that it would do 'something'
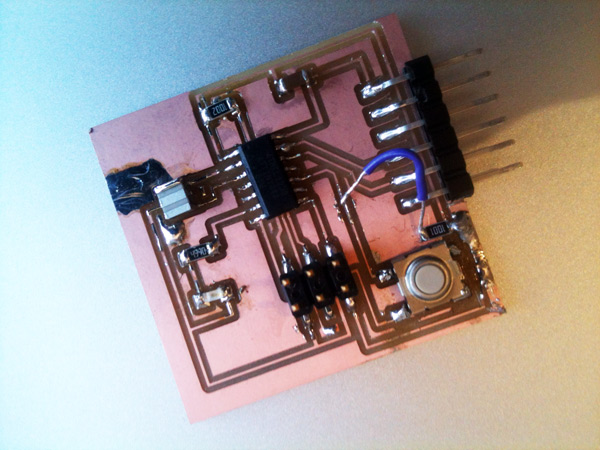
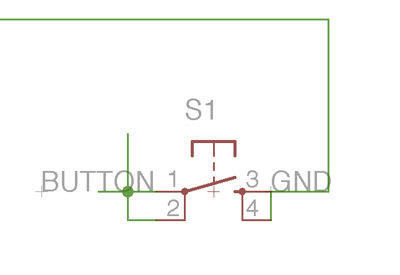
Since we had a switch and a LED on the board, the first thing we could do was to turn the light on when pressing the button. Well, actually the first thing to do is to check that the board is working: starting first with connecting the board to the ISP programmer and the computer, and testing a basic program on the Arduino interface, such as 'Blink'.
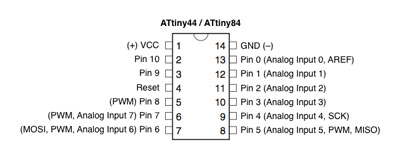
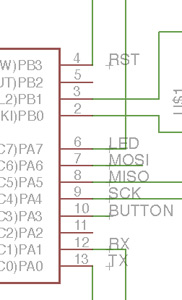
In order to do that, there are some settings to check with the Arduino interface. With the help of David Mellis' tutorial, we make it work. First we need to install the ATtiny44 components in the Arduino sketchbook folder, then select the programmer we're using in the list (Tools > Programmer) - in this case the AVRISP MKII-, then we have the burn the bootloader. From there, any program that will be uploaded to the board will have to be uploaded with the programmer (File > upload using programmer). Also the pins numbers are different according to the design of the board, so they need to be changed in the pre-written script.
Once we do that, and upload the program 'Blink' from the examples, we realise that the LED is not blinking. With the help of Charles, our TA this week, we review what could be wrong. First, we noticed there were problems with the soldering of some parts: I had to add solder on some resistors and the LED, and take some off the resonator. Really discovered the magicness of flux liquid this week. The board is blinking, hurrah!
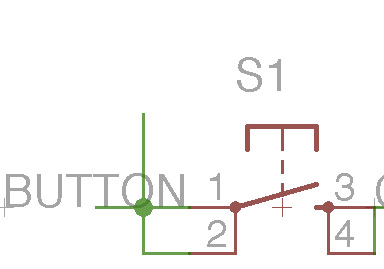
But an error keeps showing up, that could create a short circuit. There's an inherent problem with the circuit design itself, in that a 1k resistor should modulate the switch - the resistor is optional, but in this case it's much simpler if I had one already on the board. So, I desolder the switch, cut some connections and add a 1k resistor in a not-so elegant way, but it's working! (Thanks Charles for providing demo+help).
From there, I was able to test various things on the Arduino interface and write up my own scripts. I wanted to try the button state detection to play with it and the LED. It uncovered another issue, which is that the example provided is using the Arduino library "Serial" that is undefined with the current programmer. So the TA helped me checked where the Receive and Transmit pins were in order to define the serial parameters - we used for that the ATtiny44 pin configuration again and found online the configurations for the FTDI pinout.

Finally, other things I did this week was to browse through the data sheet of the ATtiny44, check out some other interfaces like Eclipse and basically trying to make sense of a lot of information of what is what in the process of interfacing a board with software instructions. Many tutorials are available on websites such as Hack A Day but I'm not sure I succeeded yet in making sense of it all.

Week 10
Week 11
Week 12

Week 13

Week 14

Week 15
Week 16